
Container chili growing is more than just a trend; it’s a vibrant, accessible way to bring the fiery flavors of fresh chilies right to your doorstep! Imagine plucking a ripe, red chili straight from your patio to spice up your next meal – that’s the magic we’re unlocking today. For centuries, chilies have held a special place in cultures around the world, from adding zest to ancient Mesoamerican cuisine to becoming a staple in fiery Asian dishes.
But you don’t need acres of land to cultivate these flavorful gems. In fact, I’m going to show you how easy and rewarding container chili growing can be, even if you’re a complete beginner. Whether you’re short on space, dealing with poor soil, or simply want the convenience of having your chilies close at hand, growing them in containers is the perfect solution.
This DIY guide is packed with simple tricks and hacks that will help you nurture healthy, productive chili plants in pots. We’ll cover everything from choosing the right container and soil to providing the perfect amount of sunlight and water. Get ready to unleash your inner gardener and embark on a flavorful adventure – your taste buds will thank you!
Growing Chili Peppers in Containers: A Spicy DIY Guide
Hey there, fellow chili enthusiasts! Ever dreamt of having a fiery little chili garden right on your balcony or patio? Well, you’ve come to the right place! Growing chili peppers in containers is surprisingly easy and rewarding. I’m going to walk you through everything you need to know, from choosing the right peppers to harvesting your spicy bounty. Let’s get started!
Choosing Your Chili Pepper Varieties
First things first, let’s talk peppers! The world of chili peppers is vast and exciting, ranging from mild and fruity to scorching hot. When choosing varieties for container growing, consider these factors:
* Size: Compact varieties are ideal for containers. Look for peppers labeled as “bush” or “dwarf.”
* Heat Level: Think about your spice tolerance! Do you want a gentle warmth or a fiery inferno? Scoville Heat Units (SHU) measure a pepper’s heat.
* Growing Conditions: Some peppers thrive in hotter climates, while others prefer cooler temperatures. Check the seed packet or plant label for specific requirements.
Here are a few popular chili pepper varieties that do well in containers:
* Jalapeño: A classic medium-heat pepper, perfect for salsas and pickling.
* Serrano: A bit hotter than jalapeño, great for adding a kick to Mexican dishes.
* Cayenne: A versatile hot pepper, often dried and ground into powder.
* Thai Chili: Small but mighty, these peppers pack a punch and are essential for Southeast Asian cuisine.
* Habanero: For the brave souls! These peppers are seriously hot and fruity.
* Bell Peppers: Okay, not technically chili peppers, but they grow well in containers and add a sweet touch to your garden.
Gathering Your Supplies
Before we get our hands dirty, let’s gather everything we need. Here’s a checklist:
* Containers: Choose pots that are at least 12 inches in diameter and depth. Larger is generally better, as it gives the roots more room to grow. Make sure the containers have drainage holes!
* Potting Mix: Use a high-quality potting mix specifically formulated for containers. Avoid using garden soil, as it can compact and drain poorly.
* Chili Pepper Seeds or Seedlings: You can start from seed or buy established seedlings from a nursery.
* Fertilizer: A balanced fertilizer (e.g., 10-10-10) or a fertilizer specifically formulated for tomatoes and peppers will work well.
* Watering Can or Hose: For watering your plants.
* Trowel or Small Shovel: For planting.
* Gloves (Optional): To protect your hands.
* Plant Markers: To label your pepper varieties.
* Stakes or Cages (Optional): To support taller pepper plants.
Planting Your Chili Peppers
Now for the fun part – planting! Whether you’re starting from seed or using seedlings, follow these steps:
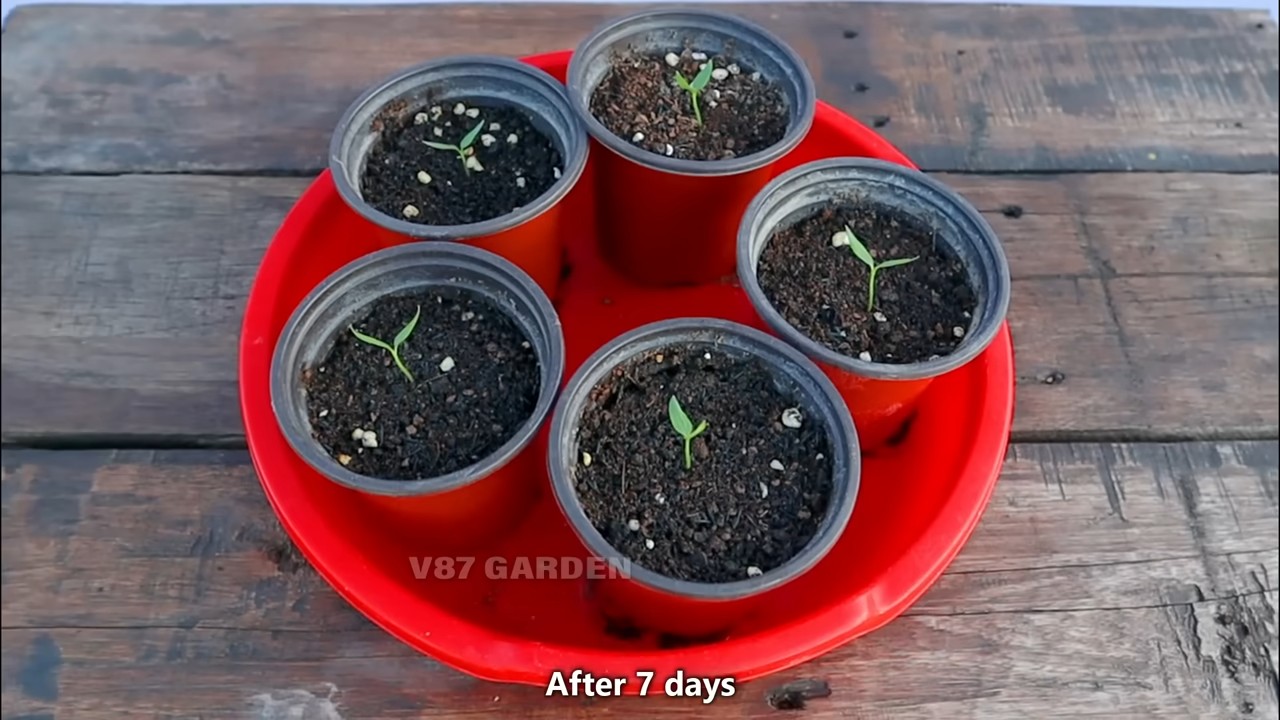
Starting from Seed (Optional)
If you’re starting from seed, you’ll need to start them indoors about 6-8 weeks before the last expected frost.
1. Prepare Seed Starting Trays: Fill seed starting trays or small pots with seed starting mix.
2. Sow Seeds: Sow the seeds about ¼ inch deep and gently water them.
3. Provide Warmth and Light: Keep the trays in a warm location (around 70-80°F) and provide plenty of light. A heat mat and grow light can be helpful.
4. Keep Soil Moist: Keep the soil consistently moist, but not soggy.
5. Transplant Seedlings: Once the seedlings have a few sets of true leaves, transplant them into larger pots.
Planting Seedlings
If you’re using seedlings, you can skip the seed starting process and plant them directly into your containers.
1. Prepare the Container: Fill the container with potting mix, leaving a few inches of space at the top.
2. Remove Seedling from Pot: Gently remove the seedling from its nursery pot. Loosen the roots slightly if they are tightly bound.
3. Plant the Seedling: Dig a hole in the potting mix large enough to accommodate the seedling’s root ball. Place the seedling in the hole and backfill with potting mix. The top of the root ball should be level with the soil surface.
4. Water Thoroughly: Water the seedling thoroughly after planting.
5. Add Support (Optional): If you’re growing a taller variety, insert a stake or cage to provide support.
Caring for Your Chili Peppers
Once your chili peppers are planted, it’s time to provide them with the care they need to thrive.
Watering
* Water Regularly: Chili peppers need consistent moisture, especially during hot weather. Water deeply when the top inch of soil feels dry to the touch.
* Avoid Overwatering: Overwatering can lead to root rot. Make sure the container has good drainage.
* Water in the Morning: Water in the morning to allow the foliage to dry before nightfall, which can help prevent fungal diseases.
Fertilizing
* Fertilize Regularly: Chili peppers are heavy feeders and benefit from regular fertilization.
* Use a Balanced Fertilizer: Use a balanced fertilizer (e.g., 10-10-10) or a fertilizer specifically formulated for tomatoes and peppers.
* Follow Package Instructions: Follow the package instructions for application rates.
* Fertilize Every 2-3 Weeks: Fertilize every 2-3 weeks during the growing season.
Sunlight
* Provide Plenty of Sunlight: Chili peppers need at least 6-8 hours of sunlight per day.
* Choose a Sunny Location: Place your containers in a sunny location, such as a balcony, patio, or deck.
* Rotate Containers: Rotate the containers occasionally to ensure even sunlight exposure.
Pruning (Optional)
* Pinch Back Early Growth: Pinching back the early growth can encourage bushier plants and more peppers.
* Remove Suckers: Remove any suckers (small shoots that grow from the base of the plant) to improve air circulation and focus the plant’s energy on pepper production.
Pest and Disease Control
* Inspect Plants Regularly: Inspect your plants regularly for pests and diseases.
* Common Pests: Common pests include aphids, spider mites, and whiteflies.
* Control Pests: Control pests with insecticidal soap, neem oil, or other organic pest control methods.
* Prevent Diseases: Prevent diseases by providing good air circulation, avoiding overwatering, and removing any diseased foliage.
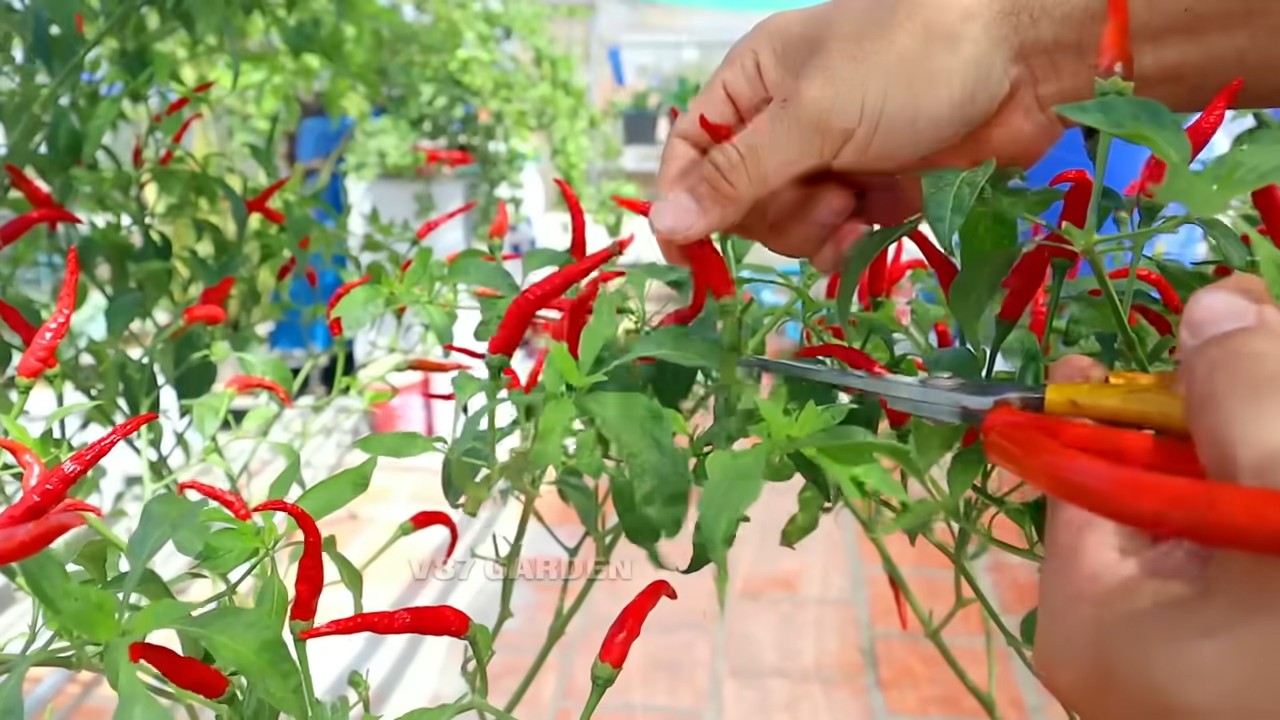
Harvesting Your Chili Peppers
The moment you’ve been waiting for – harvesting your spicy rewards!
* Harvest When Ripe: Harvest chili peppers when they have reached their mature color and size. The color will vary depending on the variety.
* Use Pruning Shears or Scissors: Use pruning shears or scissors to cut the peppers from the plant.
* Handle with Care: Handle hot peppers with care, as the oils can irritate your skin. Wear gloves if necessary.
* Harvest Regularly: Harvest regularly to encourage the plant to produce more peppers.
Troubleshooting Common Problems
Even with the best care, you might encounter some problems along the way. Here are a few common issues and how to address them:
* Yellowing Leaves: Can be caused by overwatering, underwatering, nutrient deficiencies, or pests. Adjust your watering schedule, fertilize regularly, and inspect for pests.
* Blossom End Rot: A calcium deficiency that causes the bottom of the peppers to rot. Ensure consistent watering and add calcium to the soil.
* Lack of Peppers: Can be caused by insufficient sunlight, poor pollination, or nutrient deficiencies. Provide more sunlight, hand-pollinate the flowers, and fertilize regularly.
* Pest Infestations: Treat pest infestations with insecticidal soap, neem oil, or other organic pest control methods.
Enjoying Your Chili Peppers
Now that you’ve harvested your chili peppers, it’s time to enjoy them! Here are a few ideas:
* Use Fresh: Add fresh chili peppers to salsas, sauces, stir-fries, and other dishes.
* Dry: Dry chili peppers for later use. You can dry them in a dehydrator, oven, or by hanging them in a well-ventilated area.
* Pickle: Pickle chili peppers for a tangy and spicy treat.
* Make Chili Oil: Infuse oil with chili peppers for a flavorful condiment.
* Share with Friends: Share your spicy bounty with friends and family!
Growing chili
Conclusion
So, there you have it! Growing chili peppers in containers is not only achievable, but it’s also incredibly rewarding. This DIY container chili growing method offers a fantastic way to enjoy fresh, spicy peppers even if you’re short on space, time, or experience. Forget the expensive store-bought peppers that lack that homegrown zest. With a little effort and these simple steps, you can cultivate your own vibrant chili garden right on your balcony, patio, or even a sunny windowsill.
This isn’t just about saving money; it’s about connecting with your food, understanding the growing process, and experiencing the unparalleled satisfaction of harvesting something you nurtured from seed (or seedling!) to spicy perfection. Imagine the bragging rights when you tell your friends that the fiery kick in your homemade salsa comes from peppers you grew yourself!
But the best part? This DIY project is endlessly customizable. Want to try different varieties? Go for it! From the mild poblano to the scorching habanero, the possibilities are endless. Experiment with different soil mixes, fertilizer schedules, and container sizes to find what works best for your specific environment and preferences. Consider adding companion plants like basil or marigolds to your chili containers to deter pests and attract beneficial insects. You could even create a tiered container garden for a visually stunning and space-efficient chili display.
Don’t be afraid to get creative and personalize your container chili growing experience. Try different watering techniques, like bottom watering, to encourage strong root growth. Explore organic pest control methods, such as neem oil or insecticidal soap, to keep your plants healthy and thriving. And most importantly, don’t give up if you encounter challenges along the way. Gardening is a learning process, and every mistake is an opportunity to improve your skills and knowledge.
We wholeheartedly encourage you to give this DIY container chili growing method a try. It’s a fun, engaging, and ultimately delicious way to bring a little spice into your life. And once you’ve harvested your first batch of homegrown chilies, be sure to share your experience with us! We’d love to hear about your successes, your challenges, and any unique variations you’ve discovered. Share your photos, recipes, and tips in the comments below. Let’s build a community of chili-growing enthusiasts and inspire others to embark on this rewarding journey. So, grab your containers, soil, and chili seeds, and get ready to experience the joy of growing your own spicy peppers! You won’t regret it.
Frequently Asked Questions (FAQ)
What are the best chili pepper varieties to grow in containers?
The beauty of container gardening is that you can grow almost any chili pepper variety! However, some varieties tend to thrive better in containers than others. Compact or bush-type chili plants are generally a good choice, as they don’t require as much space as larger, sprawling varieties. Popular options include:
* **Jalapeño:** A classic choice for its versatility and moderate heat.
* **Serrano:** Offers a bit more heat than jalapeño and is great for salsas and sauces.
* **Poblano:** Milder in flavor and perfect for stuffing or roasting.
* **Thai Chili:** Small but mighty, these peppers pack a serious punch.
* **Habanero:** For those who like it hot, habaneros deliver intense heat and fruity flavor.
* **Cayenne:** A popular choice for making chili powder and hot sauce.
* **Bell Peppers:** While not technically chilies, they are often grown alongside them and add a sweet element to dishes.
Ultimately, the best variety for you will depend on your personal preferences and the amount of space you have available. Research different varieties and choose those that appeal to your taste and growing conditions.
What size container is best for growing chili peppers?
The ideal container size depends on the specific chili pepper variety you’re growing. As a general rule, a container that is at least 12 inches in diameter and 12 inches deep is a good starting point. Larger varieties, such as bell peppers or some habaneros, may benefit from even larger containers, such as 5-gallon buckets or larger.
Ensure the container has adequate drainage holes to prevent waterlogging, which can lead to root rot. You can also use fabric pots, which allow for better air circulation and drainage.
What type of soil should I use for container chili growing?
Chili peppers need well-draining soil that is rich in organic matter. A good potting mix specifically formulated for vegetables is an excellent choice. Avoid using garden soil, as it can be too heavy and compact in containers, hindering drainage and root growth.
You can also create your own potting mix by combining equal parts of:
* Peat moss or coco coir (for moisture retention)
* Perlite or vermiculite (for drainage and aeration)
* Compost (for nutrients)
Adding a slow-release fertilizer to the potting mix at planting time can provide a steady supply of nutrients to your chili plants.
How often should I water my container chili plants?
Watering frequency depends on several factors, including the weather, the size of the container, and the type of soil you’re using. As a general rule, water your chili plants when the top inch of soil feels dry to the touch.
Avoid overwatering, as this can lead to root rot. Water deeply, ensuring that the water drains out of the drainage holes. During hot, dry weather, you may need to water your plants more frequently.
How much sunlight do chili peppers need?
Chili peppers need at least 6-8 hours of direct sunlight per day to thrive. Choose a sunny location for your container chili garden, such as a south-facing balcony or patio. If you don’t have enough sunlight, you can supplement with grow lights.
Do I need to fertilize my container chili plants?
Yes, chili peppers are heavy feeders and benefit from regular fertilization. Use a balanced fertilizer specifically formulated for vegetables, following the instructions on the label. You can also use organic fertilizers, such as compost tea or fish emulsion.
Fertilize your chili plants every 2-3 weeks during the growing season. Avoid over-fertilizing, as this can lead to excessive foliage growth and fewer peppers.
How do I protect my chili plants from pests and diseases?
Regularly inspect your chili plants for signs of pests or diseases. Common pests include aphids, spider mites, and whiteflies. You can control these pests with insecticidal soap, neem oil, or by handpicking them off the plants.
To prevent diseases, ensure good air circulation around your plants and avoid overwatering. If you notice any signs of disease, such as leaf spots or wilting, remove the affected leaves or plants immediately.
When can I harvest my chili peppers?
The time it takes for chili peppers to mature depends on the variety. Generally, chili peppers are ready to harvest when they have reached their mature color and size. The color will vary depending on the variety, but common colors include green, red, yellow, and orange.
You can harvest chili peppers by snipping them off the plant with scissors or pruning shears. Be careful not to damage the plant when harvesting.
Can I overwinter my container chili plants?
Yes, you can overwinter your container chili plants in a frost-free location. Before the first frost, prune back the plants and move them indoors to a sunny windowsill or under grow lights. Water sparingly during the winter months, allowing the soil to dry out slightly between waterings.
In the spring, gradually acclimate the plants to outdoor conditions before moving them back outside permanently.
Leave a Comment