
Bottle Gourd Gardening Guide: Your Path to a Bountiful Harvest!
Have you ever dreamed of strolling through your own backyard, plucking fresh, homegrown bottle gourds right off the vine? Imagine the satisfaction of creating delicious, healthy meals with produce you nurtured from seed to table! This isn’t just a pipe dream; it’s entirely achievable with the right knowledge and a little bit of elbow grease. And that’s exactly what this Bottle Gourd Gardening Guide is here to provide.
Bottle gourds, also known as calabash, boast a rich history, dating back thousands of years. Evidence suggests they were among the first cultivated plants, predating even pottery in some cultures! They weren’t just a food source; they were also used for crafting utensils, containers, and even musical instruments. This versatile vegetable has sustained and enriched communities across the globe for generations.
But why should *you* embark on this gardening adventure? In today’s world, where we’re increasingly conscious of where our food comes from, growing your own bottle gourds offers a fantastic way to ensure freshness, reduce your carbon footprint, and save money. Plus, let’s be honest, there’s something incredibly rewarding about watching a tiny seed transform into a thriving plant that provides you with delicious, nutritious food. This Bottle Gourd Gardening Guide will provide you with all the information you need to get started, from selecting the right seeds to harvesting your very own crop. So, let’s get our hands dirty and cultivate some gardening magic together!
Flaschenkürbis Anbau: Dein umfassender DIY-Leitfaden für eine reiche Ernte
Hallo Gartenfreunde! Ich freue mich riesig, euch heute in die faszinierende Welt des Flaschenkürbis-Anbaus einzuführen. Diese vielseitige Pflanze ist nicht nur ein Hingucker in jedem Garten, sondern liefert auch das Material für wunderschöne, selbstgemachte Dekorationen und Gebrauchsgegenstände. Keine Angst, es ist einfacher als du denkst! Lass uns gemeinsam loslegen und deinen Garten in ein Flaschenkürbis-Paradies verwandeln.
Was du für den Flaschenkürbis-Anbau brauchst:
Bevor wir loslegen, hier eine Liste der Dinge, die du bereithalten solltest:
* Flaschenkürbis-Samen: Wähle die Sorte, die dir am besten gefällt. Es gibt viele verschiedene Formen und Größen!
* Anzuchttöpfe oder -schalen: Für die Voranzucht im Haus.
* Anzuchterde: Speziell für die Keimung von Samen.
* Gartenerde: Nährstoffreich und gut durchlässig.
* Kompost oder organischer Dünger: Für eine optimale Nährstoffversorgung.
* Gießkanne oder Schlauch: Zum Bewässern der Pflanzen.
* Rankhilfe: Ein stabiles Gerüst, Zaun oder eine Pergola, an dem die Kürbisse hochklettern können.
* Gartenschere: Zum Beschneiden der Pflanzen.
* Handschuhe: Zum Schutz deiner Hände.
* Geduld: Flaschenkürbisse brauchen Zeit zum Wachsen!
Die Vorbereitung: Der Grundstein für eine erfolgreiche Ernte
Die Vorbereitung ist das A und O für einen erfolgreichen Flaschenkürbis-Anbau. Hier zeige ich dir, wie du alles richtig machst:
1. Die richtige Sorte wählen:
Es gibt unzählige Flaschenkürbis-Sorten, von kleinen, runden Formen bis hin zu langen, schlanken Varianten. Überlege dir, was du mit den Kürbissen später machen möchtest. Möchtest du sie als Deko verwenden, oder planst du, daraus Gebrauchsgegenstände herzustellen? Informiere dich über die Eigenschaften der verschiedenen Sorten und wähle die, die am besten zu deinen Bedürfnissen passen. Ich persönlich mag die “Lagenaria siceraria” sehr gerne, da sie sehr vielseitig ist.
2. Der perfekte Standort:
Flaschenkürbisse lieben die Sonne! Wähle einen Standort in deinem Garten, der mindestens 6-8 Stunden Sonnenlicht pro Tag bekommt. Der Boden sollte locker, gut durchlässig und nährstoffreich sein. Vermeide Staunässe, da dies zu Wurzelfäule führen kann.
3. Den Boden vorbereiten:
Lockere den Boden gründlich auf und entferne Unkraut. Arbeite reichlich Kompost oder organischen Dünger ein, um den Boden mit Nährstoffen anzureichern. Flaschenkürbisse sind Starkzehrer und benötigen eine gute Nährstoffversorgung. Ein pH-Wert zwischen 6,0 und 7,0 ist ideal.
Die Anzucht: Den Grundstein legen
Die Anzucht ist ein wichtiger Schritt, um den Flaschenkürbissen einen Vorsprung zu verschaffen. So geht’s:
1. Aussaat: Fülle Anzuchttöpfe oder -schalen mit Anzuchterde. Lege pro Topf 1-2 Samen etwa 2-3 cm tief in die Erde. Bedecke die Samen leicht mit Erde und gieße sie vorsichtig an.
2. Keimung: Stelle die Töpfe an einen warmen, hellen Ort. Eine Temperatur von 20-25°C ist ideal für die Keimung. Halte die Erde feucht, aber nicht nass. Die Keimung dauert in der Regel 7-14 Tage.
3. Pflege der Jungpflanzen: Sobald die Keimlinge aufgegangen sind, stelle sie an einen helleren Ort, z.B. auf eine Fensterbank. Gieße sie regelmäßig und dünne sie gegebenenfalls aus, sodass nur die stärkste Pflanze pro Topf übrig bleibt.
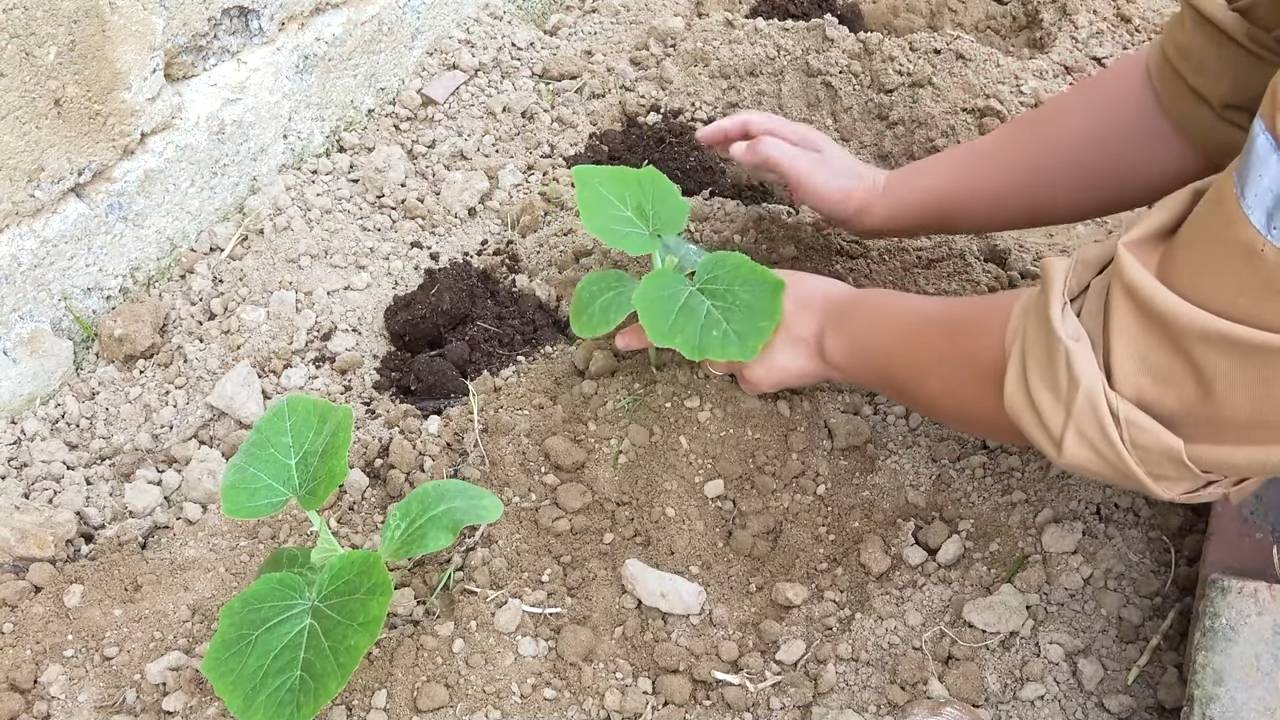
Das Auspflanzen: Raus in die Freiheit!
Sobald die Jungpflanzen kräftig genug sind und keine Frostgefahr mehr besteht (in der Regel Mitte Mai), können sie ins Freie gepflanzt werden.
1. Abhärten: Bevor du die Jungpflanzen ins Freie pflanzt, solltest du sie einige Tage lang abhärten. Stelle sie tagsüber für einige Stunden ins Freie und hole sie abends wieder herein. So gewöhnen sie sich langsam an die veränderten Bedingungen.
2. Pflanzabstand: Pflanze die Jungpflanzen im Abstand von etwa 1-1,5 Metern. Flaschenkürbisse brauchen viel Platz zum Wachsen.
3. Pflanzloch: Grabe ein ausreichend großes Pflanzloch und setze die Jungpflanzen vorsichtig hinein. Achte darauf, dass der Wurzelballen nicht beschädigt wird.
4. Angießen: Gieße die Pflanzen nach dem Einpflanzen gründlich an.
Die Pflege: Damit deine Kürbisse prächtig gedeihen
Die richtige Pflege ist entscheidend für eine reiche Ernte. Hier sind meine Tipps:
1. Bewässerung: Flaschenkürbisse benötigen regelmäßig Wasser, besonders während der Blüte- und Fruchtbildungsphase. Gieße sie am besten morgens, damit die Blätter bis zum Abend abtrocknen können. Vermeide es, die Blätter direkt zu gießen, da dies Pilzkrankheiten fördern kann.
2. Düngung: Dünge die Pflanzen regelmäßig mit Kompost oder organischem Dünger. Eine zusätzliche Düngung mit einem kaliumbetonten Dünger während der Fruchtbildung kann die Ernte verbessern.
3. Rankhilfe: Flaschenkürbisse sind Kletterpflanzen und benötigen eine Rankhilfe. Ein stabiles Gerüst, ein Zaun oder eine Pergola sind ideal. Leite die Triebe der Pflanzen an der Rankhilfe entlang und befestige sie gegebenenfalls mit Bindedraht.
4. Beschneiden: Das Beschneiden der Pflanzen kann die Fruchtbildung fördern. Entferne überflüssige Seitentriebe und Blätter, um die Luftzirkulation zu verbessern und die Energie der Pflanze auf die Fruchtbildung zu konzentrieren.
5. Schutz vor Schädlingen und Krankheiten: Kontrolliere die Pflanzen regelmäßig auf Schädlinge und Krankheiten. Bei Bedarf kannst du biologische Schädlingsbekämpfungsmittel einsetzen. Achte auf eine gute Belüftung, um Pilzkrankheiten vorzubeugen.
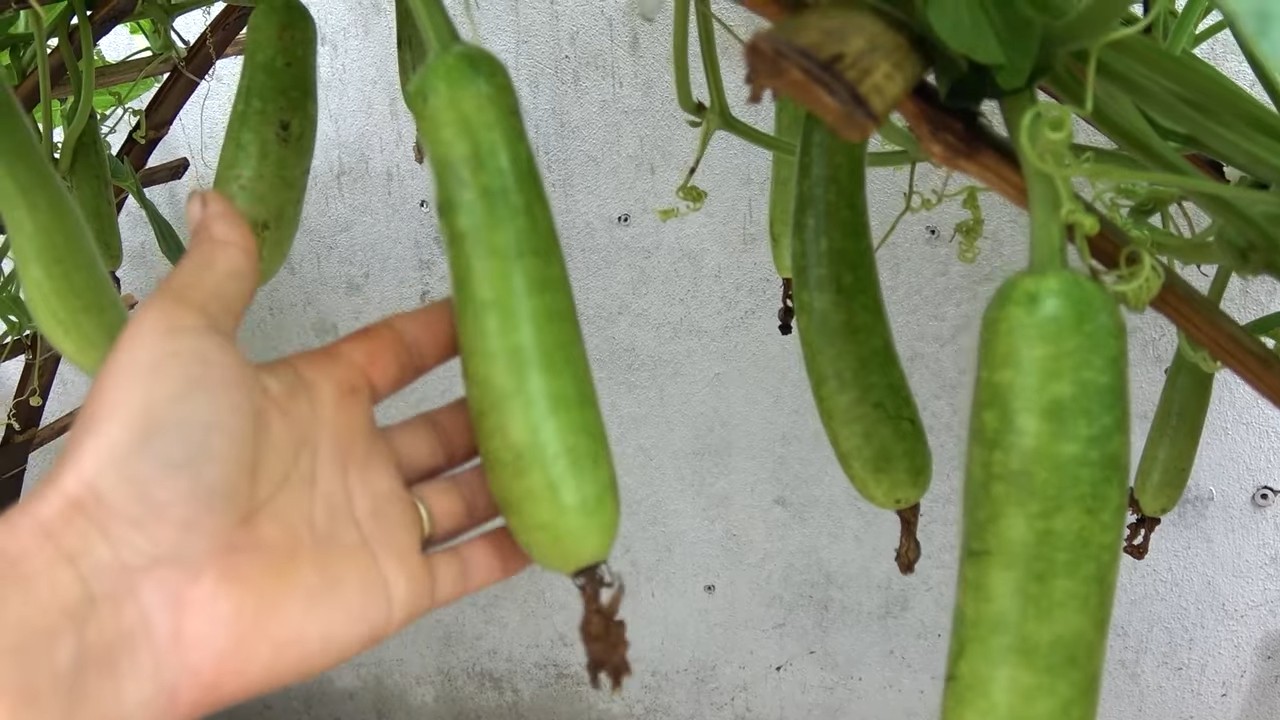
Die Ernte: Der Lohn deiner Mühe
Die Erntezeit für Flaschenkürbisse ist in der Regel im Herbst, wenn die Früchte vollständig ausgereift sind.
1. Reife erkennen: Die Reife der Flaschenkürbisse erkennst du daran, dass die Schale hart und fest ist und sich nicht mehr leicht eindrücken lässt. Die Stiele sollten braun und trocken sein.
2. Ernten: Schneide die Kürbisse mit einer Gartenschere vom Stiel ab. Lasse dabei einen etwa 5-10 cm langen Stielansatz stehen, um die Haltbarkeit zu verlängern.
3. Trocknen: Die geernteten Kürbisse müssen vor der Weiterverarbeitung getrocknet werden. Lege sie an einen trockenen, gut belüfteten Ort, z.B. auf einen Dachboden oder in eine Garage. Die Trocknungszeit beträgt in der Regel mehrere Wochen bis Monate, je nach Größe und Dicke der Kürbisse. Während des Trocknungsprozesses schrumpfen die Kürbisse und die Schale wird noch härter.
Kreative Ideen für deine Flaschenkürbisse:
Nach dem Trocknen sind deiner Kreativität keine Grenzen gesetzt! Hier sind einige Ideen, was du aus deinen Flaschenkürbissen machen kannst:
* Dekorative Vasen und Schalen: Bemalen, bekleben oder schnitzen.
* Vogelhäuser: Ein echter Hingucker im Garten.
* Laternen: Für eine stimmungsvolle Beleuchtung.
* Musikinstrumente: Zum Beispiel eine Kalebasse.
* Gebrauchsgegenstände: Wie Löffel, Schöpfkellen oder Behälter.
Zusätzliche Tipps für den erfolgreichen Anbau:
* Fruchtfolge beachten: Baue Flaschenkürbisse nicht jedes Jahr
Conclusion
So, there you have it! Mastering the art of bottle gourd gardening doesn’t require a green thumb blessed by the gardening gods. It’s about understanding the plant’s needs, providing the right environment, and employing a few clever DIY tricks to boost its growth and productivity. This guide has armed you with the knowledge to cultivate your own thriving bottle gourd patch, even if you’re a beginner.
Why is this DIY approach a must-try? Because it empowers you to take control of your garden’s success. Instead of relying solely on commercial fertilizers or pre-packaged solutions, you’re actively participating in the plant’s well-being. You’re creating a personalized environment that caters specifically to the bottle gourd’s unique requirements. This hands-on approach not only yields better results but also fosters a deeper connection with nature and a greater appreciation for the fruits (or in this case, vegetables) of your labor.
Beyond the basics, there’s always room for experimentation and personalization. Consider these variations to further enhance your bottle gourd gardening experience:
* Vertical Gardening: If space is limited, train your bottle gourd vines to climb a trellis or fence. This not only saves space but also improves air circulation around the plants, reducing the risk of fungal diseases.
* Companion Planting: Plant basil, marigolds, or nasturtiums near your bottle gourds to deter pests and attract beneficial insects.
* Seed Saving: Once your bottle gourds mature, save the seeds for future planting. This allows you to cultivate varieties that are specifically adapted to your local climate and soil conditions.
* Gourd Art: After harvesting, dry your bottle gourds and transform them into beautiful works of art. Painting, carving, and pyrography are just a few of the techniques you can use to create unique and personalized decorations.
Ultimately, the success of your bottle gourd garden hinges on your willingness to experiment, learn, and adapt. Don’t be afraid to try new things, observe your plants closely, and adjust your approach as needed. Remember, gardening is a journey, not a destination. Embrace the challenges, celebrate the successes, and most importantly, have fun!
We wholeheartedly encourage you to embark on this bottle gourd gardening adventure. Share your experiences, successes, and even your failures with us. Post photos of your thriving vines, your bountiful harvests, and your creative gourd art projects. Let’s build a community of passionate bottle gourd gardeners who are eager to learn from each other and inspire others to grow their own food. Your insights and experiences can help others overcome challenges and achieve their gardening goals. So, get your hands dirty, plant those seeds, and let the bottle gourd magic begin!
Frequently Asked Questions (FAQ)
What is the best time to plant bottle gourd seeds?
The ideal time to plant bottle gourd seeds is during the late spring or early summer, after the last frost has passed and the soil has warmed up to at least 65°F (18°C). Bottle gourds are warm-season crops that require plenty of sunshine and warm temperatures to thrive. Planting too early can result in poor germination and stunted growth. If you live in an area with a short growing season, you can start the seeds indoors 4-6 weeks before the last frost and transplant them outdoors once the weather is favorable.
How much sunlight do bottle gourds need?
Bottle gourds require at least 6-8 hours of direct sunlight per day to grow and produce fruit. Choose a planting location that receives ample sunlight throughout the day. If your garden is partially shaded, try to position the bottle gourds so that they receive the most sunlight possible. Insufficient sunlight can lead to weak growth, reduced flowering, and smaller fruit.
What type of soil is best for bottle gourds?
Bottle gourds prefer well-drained, fertile soil that is rich in organic matter. The ideal soil pH is between 6.0 and 7.0. Before planting, amend the soil with compost, aged manure, or other organic materials to improve its fertility and drainage. Avoid planting in heavy clay soil, as it can become waterlogged and inhibit root growth. If you have clay soil, consider adding sand or perlite to improve its drainage.
How often should I water bottle gourds?
Bottle gourds need consistent watering, especially during hot, dry weather. Water deeply and regularly, ensuring that the soil remains moist but not waterlogged. Avoid overhead watering, as it can promote fungal diseases. Instead, water at the base of the plants, using a soaker hose or drip irrigation system. The frequency of watering will depend on the weather conditions and the type of soil. As a general rule, water when the top inch of soil feels dry to the touch.
How do I fertilize bottle gourds?
Bottle gourds are heavy feeders and require regular fertilization to support their rapid growth and fruit production. Apply a balanced fertilizer (e.g., 10-10-10) at planting time and then side-dress with a nitrogen-rich fertilizer every 4-6 weeks during the growing season. You can also use organic fertilizers, such as compost tea or fish emulsion. Avoid over-fertilizing, as it can lead to excessive vegetative growth and reduced fruit production.
How do I control pests and diseases in bottle gourds?
Bottle gourds are susceptible to various pests and diseases, including squash bugs, squash vine borers, aphids, powdery mildew, and downy mildew. To prevent pest and disease problems, practice good garden hygiene, such as removing weeds and debris, providing adequate air circulation, and avoiding overhead watering. Inspect your plants regularly for signs of pests or diseases and take action promptly. You can use organic pest control methods, such as insecticidal soap or neem oil, to control pests. For fungal diseases, use a fungicide specifically labeled for use on cucurbits.
How long does it take for bottle gourds to mature?
The time it takes for bottle gourds to mature depends on the variety and the growing conditions. Generally, it takes 90-120 days from planting to harvest. The gourds are ready to harvest when they are mature and the skin is hard and dry. You can test the maturity by tapping the gourd; a mature gourd will sound hollow.
Can I eat bottle gourds?
Yes, young bottle gourds can be eaten as a vegetable. They have a mild, slightly sweet flavor and can be used in soups, stews, curries, and stir-fries. However, mature bottle gourds are not typically eaten, as they become tough and bitter. Mature gourds are primarily used for crafting and decoration.
How do I dry bottle gourds for crafting?
To dry bottle gourds for crafting, harvest them when they are fully mature and the skin is hard and dry. Wash the gourds with soap and water and then dry them thoroughly. Hang the gourds in a well-ventilated, dry place for several months, until they are completely dry. The drying process can take anywhere from 3 to 6 months, depending on the size and thickness of the gourd. Once the gourds are dry, you can clean them, sand them, and decorate them as desired.
What are some creative ways to use bottle gourds?
Bottle gourds can be used to create a wide variety of crafts and decorations, including birdhouses, bowls, dippers, musical instruments, lamps, and decorative ornaments. You can paint, carve, burn, or embellish the gourds with various materials, such as beads, shells, or fabric. The possibilities are endless! Let your creativity guide you and transform your bottle gourds into unique and personalized works of art.

Leave a Comment