
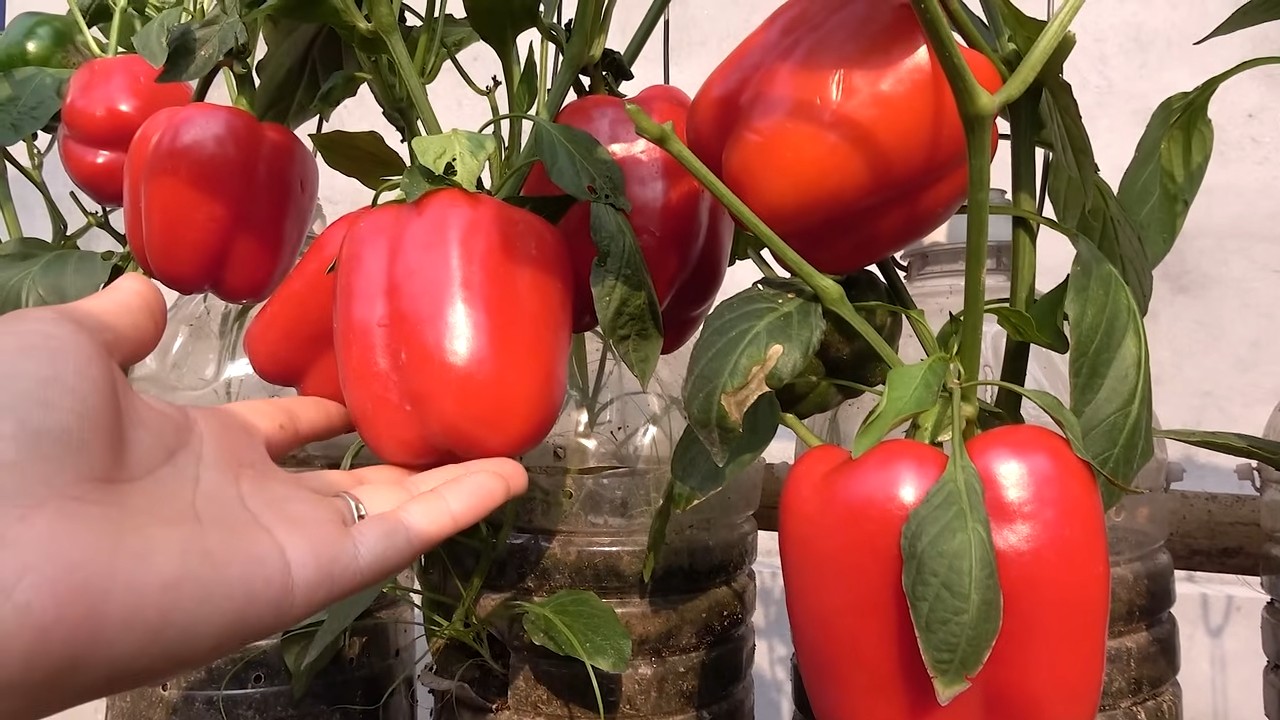
Bottle garden bell peppers: sounds intriguing, right? I’m so excited to share this incredibly simple and rewarding DIY project with you! Forget sprawling gardens and back-breaking labor; we’re bringing the vibrant flavors of fresh bell peppers right to your windowsill, balcony, or patio using recycled bottles.
The concept of container gardening, a close relative to our bottle garden adventure, has roots stretching back centuries. From the hanging gardens of Babylon to the meticulously crafted bonsai of Japan, humans have always sought ways to cultivate plants in limited spaces. But this modern twist, using readily available plastic bottles, makes gardening accessible to everyone, regardless of space or budget.
Why should you try this? Well, let’s be honest, store-bought bell peppers can sometimes be a bit bland and expensive. Growing your own bottle garden bell peppers guarantees fresh, flavorful produce, free from harmful chemicals. Plus, it’s an incredibly satisfying experience to nurture a plant from seed to harvest. Imagine the joy of adding your own homegrown bell peppers to your favorite dishes! This DIY project is not only eco-friendly, repurposing plastic waste, but also empowers you to take control of your food source and enjoy the delicious rewards of your labor. So, let’s dive in and discover how easy it is to create your own thriving bottle garden!
DIY Flaschengarten für Paprika: Dein Mini-Gewächshaus für Zuhause
Hey Gärtnerfreunde! Habt ihr Lust, eure eigenen Paprika anzubauen, auch wenn ihr keinen Garten habt? Dann ist ein Flaschengarten genau das Richtige für euch! Ich zeige euch, wie ihr aus einer einfachen Plastikflasche ein kleines Paradies für eure Paprikapflanzen zaubern könnt. Es ist super einfach, macht Spaß und ihr könnt eure eigenen, frischen Paprika ernten. Los geht’s!
Was du brauchst:
* Eine große Plastikflasche (mindestens 1,5 Liter, idealerweise 5 Liter)
* Ein scharfes Messer oder eine Schere
* Anzuchterde oder Blumenerde
* Paprikasamen oder kleine Paprikapflanzen
* Wasser
* Optional: Sprühflasche, kleine Steine oder Kies, Aktivkohle
Schritt-für-Schritt Anleitung:
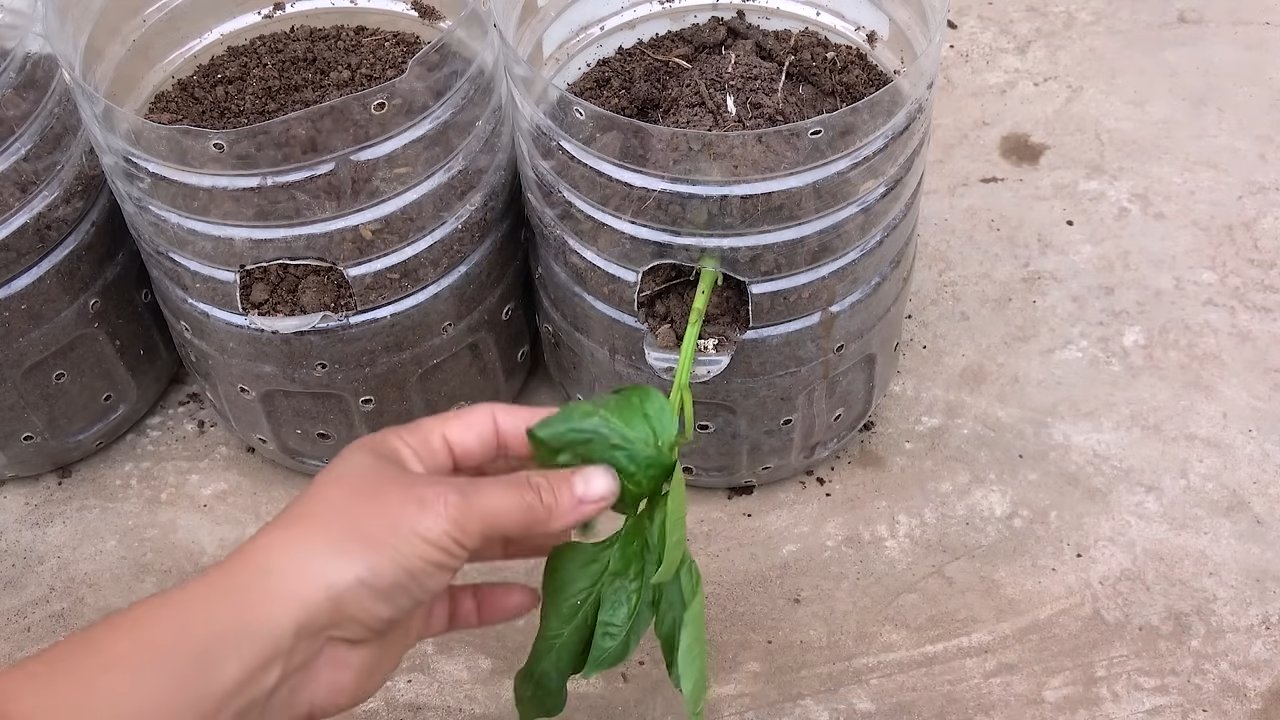
1. Flasche vorbereiten: Zuerst müsst ihr die Plastikflasche gründlich reinigen. Entfernt alle Etiketten und spült sie mit warmem Wasser und Spülmittel aus. Achtet darauf, dass keine Spülmittelreste zurückbleiben. Lasst die Flasche gut trocknen.
2. Flasche zuschneiden: Jetzt kommt der spannende Teil! Mit dem Messer oder der Schere schneidet ihr die Flasche in zwei Teile. Wo ihr schneidet, hängt davon ab, wie groß eure Paprikapflanzen sind oder werden sollen. Ich empfehle, die Flasche etwa ein Drittel vom Flaschenhals entfernt zu schneiden. So habt ihr genug Platz für die Wurzeln und die Pflanze kann gut wachsen. Achtung: Seid vorsichtig beim Schneiden, damit ihr euch nicht verletzt!
3. Drainage vorbereiten (optional): Für eine gute Drainage könnt ihr eine Schicht kleine Steine oder Kies auf den Boden des unteren Flaschenteils legen. Das verhindert Staunässe, die Paprikapflanzen gar nicht mögen. Eine dünne Schicht Aktivkohle über den Steinen hilft zusätzlich, das Wasser sauber zu halten und unangenehme Gerüche zu vermeiden. Das ist aber kein Muss, wenn ihr darauf achtet, nicht zu viel zu gießen.
4. Erde einfüllen: Füllt nun das untere Flaschenteil mit Anzuchterde oder Blumenerde. Achtet darauf, dass die Erde locker und luftig ist. Drückt sie nicht zu fest an, damit die Wurzeln gut wachsen können. Lasst oben etwa 2-3 cm Platz bis zum Rand.
5. Paprikasamen säen oder Pflanze einsetzen:
* Samen: Wenn ihr Paprikasamen verwendet, macht kleine Mulden in die Erde (etwa 1 cm tief) und legt jeweils 2-3 Samen hinein. Bedeckt die Samen leicht mit Erde und gießt sie vorsichtig an.
* Pflanze: Wenn ihr eine kleine Paprikapflanze habt, grabt ein Loch in die Erde, das groß genug für den Wurzelballen ist. Setzt die Pflanze vorsichtig ein und füllt das Loch mit Erde auf. Drückt die Erde leicht an und gießt die Pflanze gut an.
6. Oberteil aufsetzen: Setzt das obere Flaschenteil umgekehrt auf das untere Teil. So entsteht ein kleines Gewächshaus. Der Flaschenhals sollte nach unten zeigen.
7. Gießen und pflegen: Gießt eure Paprikapflanze regelmäßig, aber nicht zu viel. Die Erde sollte immer leicht feucht sein, aber nicht nass. Am besten gießt ihr mit einer Sprühflasche, um die Erde gleichmäßig zu befeuchten. Achtet darauf, dass das Wasser gut abfließen kann, falls ihr keine Drainage eingebaut habt.
8. Standort wählen: Stellt euren Flaschengarten an einen hellen und warmen Ort, aber nicht in die pralle Sonne. Ein Fensterbrett ist ideal. Paprika brauchen viel Licht, um gut zu wachsen.
9. Belüften: Um Schimmelbildung zu vermeiden, solltet ihr den Flaschengarten regelmäßig lüften. Nehmt dazu einfach das obere Flaschenteil für ein paar Stunden ab. Besonders wichtig ist das, wenn ihr merkt, dass sich viel Kondenswasser im Inneren bildet.
Pflege-Tipps für deinen Paprika-Flaschengarten:
* Düngen: Nach etwa 4-6 Wochen könnt ihr eure Paprikapflanzen mit einem Flüssigdünger düngen. Achtet darauf, dass der Dünger für Gemüse geeignet ist.
* Schädlinge: Kontrolliert eure Pflanzen regelmäßig auf Schädlinge wie Blattläuse oder Spinnmilben. Bei Befall könnt ihr natürliche Schädlingsbekämpfungsmittel verwenden.
* Stützen: Wenn eure Paprikapflanzen größer werden, brauchen sie möglicherweise eine Stütze. Ihr könnt einfach einen kleinen Stock in die Erde stecken und die Pflanze daran festbinden.
* Ernten: Sobald eure Paprika reif sind, könnt ihr sie ernten. Schneidet die Paprika mit einem scharfen Messer oder einer Schere ab.
Häufige Probleme und Lösungen:
* Schimmelbildung: Wenn sich Schimmel im Flaschengarten bildet, ist es meistens zu feucht. Lüftet den Flaschengarten öfter und gießt weniger. Ihr könnt auch die befallene Erde entfernen und durch frische Erde ersetzen.
* Gelbe Blätter: Gelbe Blätter können ein Zeichen für Nährstoffmangel sein. Düngt eure Pflanzen mit einem Flüssigdünger.
* Wachstumsprobleme: Wenn eure Pflanzen nicht gut wachsen, kann das an zu wenig Licht oder zu wenig Nährstoffen liegen. Stellt den Flaschengarten an einen helleren Ort und düngt die Pflanzen regelmäßig.
* Trauermücken: Kleine schwarze Fliegen, die um die Erde schwirren, sind oft Trauermücken. Sie sind lästig, aber nicht schädlich für die Pflanzen. Ihr könnt sie mit Gelbtafeln oder Nematoden bekämpfen.
Spezielle Tipps für verschiedene Paprikasorten
Nicht alle Paprikasorten sind gleich! Einige wachsen besser im Flaschengarten als andere. Hier ein paar Tipps für verschiedene Sorten:
* Mini-Paprika: Diese Sorten sind ideal für den Flaschengarten, da sie klein bleiben und nicht so viel Platz brauchen. Sie sind auch sehr dekorativ.
* Spitzpaprika: Diese Sorten sind etwas größer, aber auch gut für den Flaschengarten geeignet. Achtet darauf, dass ihr eine ausreichend große Flasche verwendet.
* Gemüsepaprika: Diese Sorten werden sehr groß und sind daher weniger geeignet für den Flaschengarten. Wenn ihr sie trotzdem anbauen wollt, solltet ihr sie frühzeitig in einen größeren Topf umpflanzen.
* Chili-Paprika: Viele Chili-Sorten sind relativ klein und eignen sich gut für den Flaschengarten. Achtet darauf, dass ihr die Chilis nicht zu nah an andere Pflanzen stellt, da sie sehr scharf sein können.
Den Flaschengarten dekorieren
Euer Flaschengarten muss nicht nur nützlich sein, er kann auch schön aussehen! Hier ein paar Ideen, wie ihr ihn dekorieren könnt:
* Kleine Figuren: Stellt kleine Figuren oder Dekorationselemente in den Flaschengarten. Das macht ihn zu einem echten Hingucker.
* Moos: Legt etwas Moos auf die Erde. Das sieht nicht nur schön aus, sondern hilft auch, die Feuchtigkeit zu halten.
* Steine: Verwendet verschiedene Steine, um den Flaschengarten zu gestalten.
* Holzstücke: Kleine Holzstücke oder Äste können dem Flaschengarten eine natürliche Note verleihen.
* Farbiges Glas: Verwendet farbiges Glas oder Glassteine, um Akzente zu setzen.
Warum ein Flaschengarten für Paprika?
Ein Flaschengarten für Paprika hat viele Vorteile:
* Platzsparend: Ihr braucht keinen Garten, um eure eigenen Paprika anzubauen. Ein Flaschengarten passt auf jedes Fensterbrett.
* Einfach zu pflegen: Ein Flaschengarten ist relativ pflegeleicht. Ihr müsst nur regelmäßig gießen und lüften.
* Dekorativ: Ein Flaschengarten ist ein echter Hingucker und verschönert jedes Zuhause.
* Nachhaltig: Ihr könnt eure eigenen Paprika anbauen und spart euch den Kauf im Supermarkt.
* Lehrreich: Ein Flaschengarten ist eine tolle Möglichkeit, Kindern die Natur näherzubringen.
Ich hoffe, diese Anleitung hat euch gehol
Conclusion
So, there you have it! Transforming ordinary plastic bottles into miniature greenhouses for your bell peppers is not just a clever upcycling project; it’s a game-changer for gardeners of all levels. We’ve explored how this simple DIY trick can extend your growing season, protect your precious plants from unpredictable weather, and even deter pests without resorting to harsh chemicals. The beauty of this method lies in its accessibility and affordability. You’re likely already throwing away the very materials you need to create these protective cloches.
But why is this a must-try? Beyond the cost savings and environmental benefits, the bottle garden bell peppers method offers a level of control over your plants’ environment that’s hard to achieve otherwise. You can easily regulate temperature and humidity, creating the ideal conditions for robust growth and abundant harvests. Imagine enjoying fresh, homegrown bell peppers weeks, even months, before your neighbors!
This isn’t just about growing bell peppers; it’s about empowering yourself to become a more resourceful and successful gardener.
Now, let’s talk variations. While we’ve focused on bell peppers, this technique can be adapted for other small plants, such as herbs, strawberries, or even young tomato seedlings. Experiment with different bottle sizes to accommodate varying plant heights. For larger plants, consider cutting the bottle in half and using the top portion as a mini-greenhouse, securing it to the ground with stakes. You can also add ventilation holes to the bottles to prevent overheating on particularly sunny days. For added protection against frost, consider wrapping the bottles with bubble wrap or burlap on cold nights.
Another variation involves using colored bottles. While clear bottles are ideal for maximizing sunlight exposure, colored bottles can offer specific benefits. For example, green bottles can filter out certain wavelengths of light, potentially promoting leaf growth, while red bottles may encourage flowering and fruiting. Experiment to see what works best for your particular climate and bell pepper variety.
Don’t be afraid to get creative! You can even decorate your bottle gardens with paint or markers to add a touch of personality to your garden. This is a fun project to do with kids, teaching them about sustainability and the wonders of gardening.
We truly believe that this DIY bottle garden bell peppers trick is a valuable addition to any gardener’s toolkit. It’s simple, effective, and environmentally friendly. So, what are you waiting for? Gather your empty plastic bottles, grab your bell pepper seedlings, and get started today!
We’re confident that you’ll be amazed by the results. But don’t just take our word for it. Try it out for yourself and see the difference it makes. And most importantly, we want to hear about your experience! Share your photos, tips, and stories with us in the comments below. Let’s build a community of resourceful gardeners who are passionate about growing their own food in a sustainable way. We can’t wait to see what you create!
Frequently Asked Questions (FAQ)
1. What type of plastic bottles are best for creating bottle gardens for bell peppers?
The best type of plastic bottles to use are clear, food-grade plastic bottles, such as those used for water, soda, or juice. Clear bottles allow maximum sunlight to reach the plants, which is essential for photosynthesis. Avoid using bottles that have contained harsh chemicals or cleaning products, as these could contaminate the soil and harm your bell peppers. Also, ensure the bottles are thoroughly cleaned before use to remove any residue. The size of the bottle will depend on the size of your bell pepper plant, but generally, 2-liter bottles or larger are ideal.
2. How do I prepare the plastic bottles for use as mini-greenhouses?
Preparing the bottles is a simple process. First, thoroughly wash the bottles with soap and water to remove any residue. Next, remove the labels. You can either cut off the bottom of the bottle completely to create a cloche that sits over the plant, or you can cut around the bottle, leaving a small hinge, so you can open and close the bottle for ventilation and watering. If you choose to cut the bottom off completely, you can secure the bottle to the ground by pushing it into the soil or using stakes. If you opt for the hinged method, make sure the hinge is strong enough to withstand repeated opening and closing.
3. How do I water my bell pepper plants when they are enclosed in bottle gardens?
Watering can be done in a few ways. If you’ve cut the bottom off completely, you can simply lift the bottle and water the plant directly. If you’ve created a hinged bottle, you can open the bottle and water the plant. Another option is to drill small holes in the top of the bottle to allow rainwater to enter. Be careful not to overwater, as this can lead to root rot. Check the soil moisture regularly and water only when the top inch of soil feels dry to the touch.
4. How do I provide ventilation for my bell pepper plants inside the bottle gardens?
Ventilation is crucial to prevent overheating and excessive humidity, which can lead to fungal diseases. If you’ve cut the bottom off completely, you can simply lift the bottle slightly to allow air to circulate. If you’ve created a hinged bottle, you can open the bottle during the day and close it at night. You can also drill small holes in the sides of the bottle to provide constant ventilation. The number and size of the holes will depend on your climate and the weather conditions. Start with a few small holes and increase the size or number as needed.
5. Can I use this method for other plants besides bell peppers?
Yes, this method can be adapted for other small plants, such as herbs, strawberries, tomatoes, and other vegetables. The key is to choose a bottle size that is appropriate for the size of the plant. For larger plants, you may need to use larger bottles or cut the bottles in half and use the top portion as a mini-greenhouse. You may also need to adjust the ventilation and watering schedule depending on the specific needs of the plant.
6. How do I protect my bottle garden bell peppers from frost?
While the bottle garden provides some protection from frost, it may not be enough in extremely cold temperatures. To provide additional protection, you can wrap the bottles with bubble wrap or burlap on cold nights. You can also bring the plants indoors if temperatures are expected to drop below freezing. Another option is to place a layer of mulch around the base of the plants to insulate the roots.
7. How long can I keep my bell pepper plants in the bottle gardens?
The length of time you can keep your bell pepper plants in the bottle gardens will depend on the size of the plant and the weather conditions. Generally, you can keep them in the bottles until they outgrow them or until the weather warms up enough to remove the bottles completely. Once the plants are large enough, you can transplant them into larger pots or directly into the garden.
8. Will the plastic bottles affect the taste or quality of my bell peppers?
No, the plastic bottles should not affect the taste or quality of your bell peppers, as long as you are using food-grade plastic and have cleaned the bottles thoroughly. The bottles simply provide a protective environment for the plants to grow.
9. What if the bottle garden bell peppers get too hot inside the bottle?
Overheating can be a problem, especially on sunny days. To prevent overheating, make sure to provide adequate ventilation. You can also move the plants to a shadier location during the hottest part of the day. If you notice that the leaves are wilting or the soil is dry, it’s a sign that the plants are getting too hot.
10. How do I dispose of the plastic bottles after I’m finished using them?
The best way to dispose of the plastic bottles is to recycle them. If recycling is not an option, you can reuse them for other gardening projects or other purposes around the house. You can also cut them up and use them as mulch or compost.

Leave a Comment