
Harvesting peanuts without garden beds might sound like an impossible feat, but trust me, it’s absolutely achievable! Have you ever dreamt of enjoying freshly dug, homegrown peanuts, still warm from the earth, but thought you needed acres of farmland to make it happen? Well, dream no more! This DIY guide is your ticket to peanut-growing success, even if you’re limited to a balcony, patio, or small yard.
The humble peanut, despite its name, isn’t actually a nut! It’s a legume with a fascinating history, originating in South America and spreading across the globe. For centuries, peanuts have been a staple food source and a symbol of resourcefulness. Now, you can tap into that rich history and cultivate your own little peanut patch, regardless of your space constraints.
Why learn this DIY trick? Because everyone deserves the joy of growing their own food! Plus, store-bought peanuts simply can’t compare to the flavor of freshly harvested ones. Harvesting peanuts without garden beds opens up a world of possibilities for urban gardeners and anyone looking to connect with nature, even in a small way. I’m going to show you how to bypass the need for traditional in-ground planting and use containers to create the perfect environment for your peanut plants to thrive. Get ready to roll up your sleeves and discover the secrets to a bountiful peanut harvest, no sprawling garden required!
Harvesting Peanuts Like a Pro (Even Without Garden Beds!)
Okay, so you’ve bravely ventured into the world of peanut growing, and maybe, just maybe, you didn’t have the perfect garden bed setup. No worries! I’m here to tell you that harvesting peanuts without traditional garden beds is totally doable. We’ll get those delicious legumes out of the ground and ready for roasting (or snacking raw, if you’re into that!).
Understanding Peanut Growth: A Quick Refresher
Before we dive into the harvesting process, let’s quickly recap how peanuts grow. Unlike most nuts that grow on trees, peanuts are unique because they develop underground. After the peanut plant flowers, the flower’s “peg” (a stalk-like structure) elongates and pushes into the soil. This peg is where the peanut pod forms. So, when we’re harvesting, we’re essentially digging up the entire plant to retrieve the peanuts attached to the roots.
When to Harvest: The Crucial Timing
Timing is everything when it comes to harvesting peanuts. If you harvest too early, the peanuts won’t be fully mature and will be small and underdeveloped. If you wait too long, the pods can rot in the ground, or the plants can be damaged by frost.
Here’s how to tell when your peanuts are ready for harvest:
* Check the Calendar: Most peanut varieties take around 120-150 days from planting to harvest. Check your seed packet or plant tag for the specific variety you’re growing and mark the approximate harvest date on your calendar.
* Observe the Plant: The leaves of the peanut plant will start to yellow and brown as the plant matures. This is a good sign that harvest time is approaching.
* The “Shell Test”: This is the most reliable way to determine if your peanuts are ready. Dig up a test plant and examine the peanut pods.
* The shells should be well-formed and have prominent veins.
* The inside of the shell should be dark in color.
* The peanuts themselves should fill the shell completely and have a reddish-brown skin.
* If the peanuts are still small, white, or have a papery skin, they’re not ready yet.
Tools You’ll Need: Gathering Your Arsenal
Having the right tools will make the harvesting process much easier and more efficient. Here’s what I recommend:
* Garden Fork or Shovel: This is essential for loosening the soil around the peanut plants and lifting them out of the ground. A garden fork is generally preferred because it’s less likely to cut the peanut pods.
* Gloves: Protect your hands from dirt and potential irritants.
* Trowel or Hand Fork: Useful for digging around individual plants and loosening stubborn pods.
* Bucket or Tub: To collect the harvested peanut plants.
* Hose with a Spray Nozzle: For washing the soil off the peanuts.
* Drying Rack or Screen: For curing the peanuts after harvesting. You can use a wire mesh screen, a slatted shelf, or even an old window screen.
* Sharp Knife or Pruning Shears: To remove any remaining roots or stems after washing.
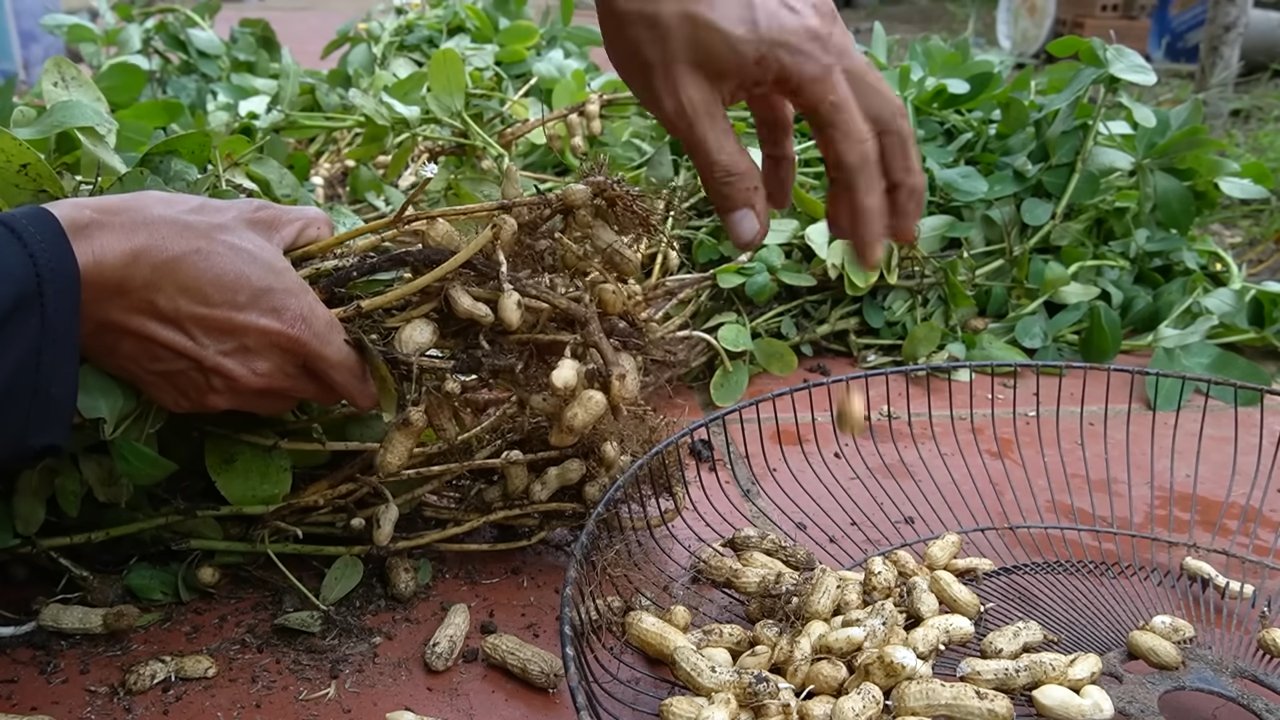
Harvesting Peanuts: The Step-by-Step Guide
Alright, let’s get down to the nitty-gritty of harvesting those peanuts!
1. Prepare the Area: Before you start digging, clear any weeds or debris around the peanut plants. This will make it easier to access the plants and prevent you from accidentally damaging the peanut pods.
2. Loosen the Soil: Using your garden fork or shovel, carefully loosen the soil around the base of the peanut plant. Insert the fork or shovel a few inches away from the plant and gently lift upwards. Work your way around the plant, loosening the soil on all sides.
3. Lift the Plant: Once the soil is loosened, gently grasp the base of the plant and lift it out of the ground. Be careful not to pull too hard, as this can cause the peanut pods to break off. If the plant is particularly large or the soil is compacted, you may need to use your trowel or hand fork to loosen the soil around the roots.
4. Shake Off Excess Soil: Once you’ve lifted the plant, gently shake off as much soil as possible. This will make it easier to wash the peanuts later.
5. Inspect the Roots: Take a moment to inspect the roots and peanut pods. Look for any signs of disease or damage. Discard any plants with severely damaged or diseased pods.
6. Repeat: Repeat steps 2-5 for all of your peanut plants.
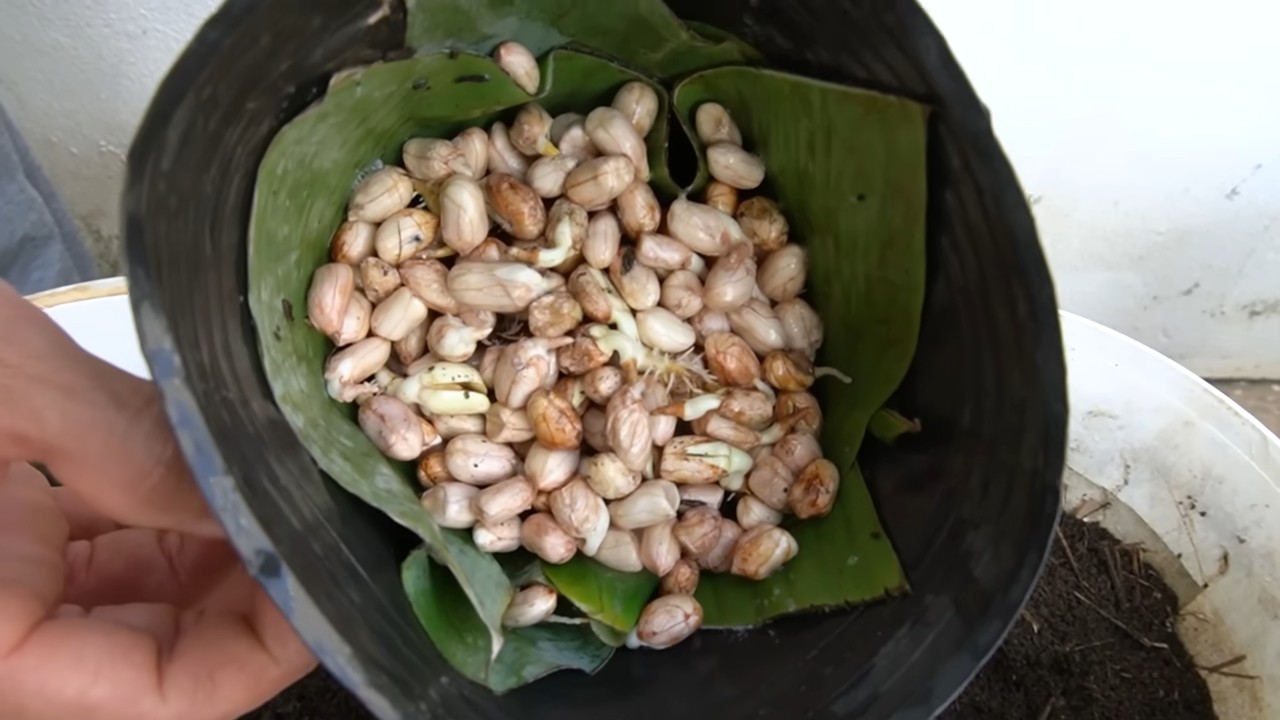
7. Washing the Peanuts: This is a crucial step to remove dirt and prevent mold growth during the curing process.
* Place the harvested peanut plants in a bucket or tub.
* Use a hose with a spray nozzle to gently wash the soil off the peanuts.
* Be careful not to use too much pressure, as this can damage the pods.
* Turn the plants over and wash them thoroughly on all sides.
* Continue washing until the water runs clear.
8. Removing Excess Roots and Stems (Optional): After washing, you can use a sharp knife or pruning shears to remove any remaining roots or stems. This is not essential, but it can help to improve air circulation during the curing process.
9. Curing the Peanuts: Curing is the process of drying the peanuts to reduce their moisture content and prevent spoilage. This is a critical step for long-term storage.
* Spread the peanut plants in a single layer on a drying rack or screen.
* Make sure the peanuts are well-ventilated and not touching each other.
* Place the drying rack in a warm, dry, and well-ventilated area. A garage, shed, or covered porch is ideal.
* Avoid direct sunlight, as this can cause the peanuts to dry too quickly and crack.
* Turn the peanuts over every day or two to ensure even drying.
* The curing process typically takes 2-4 weeks, depending on the humidity and temperature.
* The peanuts are properly cured when the shells are brittle and the kernels rattle inside.
10. Storing the Peanuts: Once the peanuts are fully cured, you can store them in a cool, dry, and dark place.
* Store the peanuts in burlap sacks, mesh bags, or well-ventilated containers.
* Avoid storing the peanuts in airtight containers, as this can trap moisture and lead to mold growth.
* Properly stored peanuts can last for several months.
Dealing with Peanuts Grown in Containers or Raised Beds
If you grew your peanuts in containers or raised beds, the harvesting process is even easier!
* Containers: Simply tip the container over and gently remove the plant. The soil will be loose, and the peanuts should come out easily.
* Raised Beds: The soil in raised beds is typically well-draining and loose, making it easy to lift the plants. Follow the same steps as for harvesting peanuts grown in the ground, but you may not need to loosen the soil as much.
Troubleshooting: Common Peanut Harvesting Problems
Even with the best planning, you might encounter some challenges during the peanut harvesting process. Here are a few common problems and how to address them:
* Peanuts Breaking Off: If the peanuts are breaking off the plant when you try to lift it, the soil may be too dry or compacted. Try watering the area a day or two before harvesting to soften the soil. You can also use a trowel or hand fork to carefully loosen the soil around the roots.
* Rotting Peanuts: If you find rotting peanuts, it could be due to overwatering, poor drainage, or fungal diseases. Make sure your peanut plants are planted in well-draining soil and avoid overwatering. You can also apply a fungicide to prevent fungal diseases. Discard any rotting peanuts to prevent the spread of disease.
* Small or Underdeveloped Peanuts: If your peanuts are small or underdeveloped, it could be due to harvesting too early, poor soil fertility, or insufficient sunlight. Make sure you wait until the peanuts are fully mature before harvesting. Amend the soil with compost or fertilizer to improve soil fertility. Ensure your peanut plants are getting at least 6-8 hours of sunlight per day.
Enjoying Your Harvest: From Garden to Table
Congratulations! You’ve successfully harvested your peanuts. Now it’s time to enjoy the fruits (or rather, nuts) of your labor.
* Roasting Peanuts: Roasting peanuts is a popular way to enhance their flavor. Preheat your oven to 350°F (175°C). Spread the peanuts in a single layer on a baking sheet. Roast for 20-25 minutes, or until the peanuts are golden brown and fragrant. Let the peanuts cool completely before shelling and eating.
* Boiling Peanuts: Boiling peanuts is a Southern tradition. Place
Conclusion
So, you’ve reached the end of our guide on harvesting peanuts without traditional garden beds! By now, you should be armed with the knowledge and confidence to successfully unearth your own homegrown bounty, even if you’re working with limited space or unconventional gardening setups. We’ve explored the ins and outs of container gardening, raised beds, and even alternative methods like growing peanuts in large grow bags or repurposed containers.
But why is this DIY trick a must-try? Simply put, it democratizes peanut cultivation. No longer is the joy of harvesting fresh, earthy peanuts confined to those with sprawling gardens. This method opens the door to urban gardeners, apartment dwellers, and anyone with a sunny balcony or patio. Imagine the satisfaction of snacking on peanuts you nurtured from seed to harvest, knowing exactly where they came from and how they were grown. It’s a connection to your food that’s both rewarding and empowering.
Beyond the sheer satisfaction, growing your own peanuts offers several practical advantages. You control the quality of the soil, ensuring it’s free from harmful chemicals and pesticides. You can choose peanut varieties that are best suited to your local climate and taste preferences. And, let’s be honest, the process of digging up those peanut-laden roots is just plain fun! It’s like a treasure hunt in your own backyard (or balcony!).
Don’t be afraid to experiment with variations! Try different types of containers – perhaps a large whiskey barrel or a repurposed laundry basket. Explore different soil mixes to find what works best for your peanuts. Consider companion planting with herbs like basil or rosemary, which can help deter pests and enhance the flavor of your peanuts. You can even try growing different varieties of peanuts, from the classic Virginia peanuts to the smaller, sweeter Spanish peanuts. The possibilities are endless!
We’ve covered a lot of ground, from understanding the peanut plant’s unique growth cycle to mastering the art of the peanut harvest. Remember to be patient, observe your plants closely, and adjust your approach as needed. Harvesting peanuts is a learning experience, and each season will bring new insights and discoveries.
Now, it’s your turn! We wholeheartedly encourage you to give this DIY trick a try. Whether you’re a seasoned gardener or a complete novice, we believe you can successfully grow your own peanuts. And once you’ve experienced the joy of harvesting your own homegrown peanuts, we want to hear all about it! Share your photos, tips, and stories with us in the comments section below. Let’s create a community of peanut-growing enthusiasts and inspire others to embrace the magic of homegrown food. Happy harvesting!
Frequently Asked Questions (FAQ)
What is the best time to harvest my peanuts?
Determining the perfect time for harvesting peanuts is crucial for optimal flavor and yield. The most reliable indicator is the maturity of the peanut pods themselves. Typically, peanuts are ready for harvest around 120-150 days after planting, but this can vary depending on the variety and your local climate.
To check for maturity, dig up a sample plant and examine the pods. The shells should be fully formed and the veins on the shells should be prominent and dark. The inside of the shell should also be dark in color. The kernels inside should be plump and fill the shell completely. If the kernels are shrunken or the shells are still thin and white, the peanuts are not yet ready.
Another telltale sign is the yellowing and browning of the peanut plant’s foliage. As the peanuts mature, the plant will naturally begin to decline. However, don’t rely solely on the foliage color, as this can also be caused by disease or nutrient deficiencies. Always check the pods themselves to confirm maturity.
If you’re unsure, it’s better to err on the side of harvesting slightly early rather than too late. Overripe peanuts can become susceptible to rot and disease.
How do I properly cure my harvested peanuts?
Curing is an essential step in the peanut harvesting process, as it allows the peanuts to dry properly and develop their characteristic flavor. Improper curing can lead to mold growth and spoilage.
After harvesting, gently shake off any excess soil from the peanut plants. Then, hang the entire plant upside down in a well-ventilated, dry location. A garage, shed, or covered porch works well. Avoid direct sunlight, as this can cause the peanuts to dry too quickly and become brittle.
The curing process typically takes 2-4 weeks, depending on the humidity and temperature. You’ll know the peanuts are properly cured when the shells are dry and brittle, and the kernels rattle inside.
Once cured, you can remove the peanuts from the plants and store them in a cool, dry place. Properly cured peanuts can be stored for several months.
Can I grow peanuts in containers indoors?
While it’s possible to grow peanuts in containers indoors, it’s generally more challenging than growing them outdoors. Peanuts require a significant amount of sunlight, typically 6-8 hours per day, to thrive. If you don’t have a south-facing window or access to strong grow lights, your peanuts may not produce a good yield.
Additionally, peanuts require a relatively large container to accommodate their root system. A container that is at least 18 inches in diameter and 12 inches deep is recommended.
If you decide to try growing peanuts indoors, be sure to provide them with plenty of light, well-draining soil, and regular watering. You may also need to hand-pollinate the flowers to ensure pod development.
What are some common pests and diseases that affect peanut plants?
Peanut plants can be susceptible to a variety of pests and diseases, including aphids, spider mites, leaf spot, and root rot.
Aphids and spider mites are common sap-sucking insects that can weaken peanut plants. They can be controlled with insecticidal soap or neem oil.
Leaf spot is a fungal disease that causes brown spots to appear on the leaves. It can be prevented by providing good air circulation and avoiding overhead watering. If leaf spot does occur, treat it with a fungicide.
Root rot is a fungal disease that affects the roots of peanut plants. It is often caused by overwatering or poorly draining soil. To prevent root rot, ensure that your soil is well-draining and avoid overwatering.
Regularly inspect your peanut plants for signs of pests and diseases, and take action promptly to prevent them from spreading.
What type of soil is best for growing peanuts?
Peanuts thrive in well-draining, sandy loam soil with a slightly acidic pH (around 6.0-6.5). Heavy clay soils can become waterlogged and inhibit peanut development. If your soil is heavy, amend it with compost, sand, and other organic matter to improve drainage.
Good drainage is crucial because peanut pods develop underground, and excessive moisture can lead to rot and disease. The sandy texture allows the pegs (the structures that carry the developing peanuts underground) to easily penetrate the soil.
You can also purchase a pre-made potting mix specifically designed for vegetables, which will typically provide the necessary drainage and nutrients for healthy peanut growth.
How often should I water my peanut plants?
Peanut plants need consistent moisture, especially during flowering and pod development. Water deeply whenever the top inch of soil feels dry to the touch. Avoid overwatering, as this can lead to root rot.
The frequency of watering will depend on your climate, soil type, and the size of your container. In hot, dry weather, you may need to water daily. In cooler, wetter weather, you may only need to water every few days.
Check the soil moisture regularly and adjust your watering schedule accordingly. A moisture meter can be a helpful tool for determining when to water.
Can I eat the peanut leaves?
While not commonly consumed, peanut leaves are technically edible and are consumed in some cultures. They are a good source of protein and fiber. However, they can be bitter, so it’s best to harvest young, tender leaves.
The leaves can be added to salads, soups, or stir-fries. They can also be dried and used to make tea.
Before consuming peanut leaves, be sure to wash them thoroughly to remove any dirt or debris. Also, avoid eating leaves that have been treated with pesticides or herbicides.
How do I know if my peanuts are safe to eat?
Properly grown and cured peanuts are generally safe to eat. However, it’s important to inspect your peanuts for signs of mold or spoilage before consuming them.
Discard any peanuts that have a musty odor, visible mold, or are discolored. These peanuts may contain aflatoxins, which are toxins produced by certain molds that can be harmful to humans.
Store your peanuts in a cool, dry place to prevent mold growth. Properly cured peanuts can be stored for several months without spoiling.
Leave a Comment