
Winged Bean Grocery Savings: Are you tired of watching your grocery bill soar while craving fresh, nutritious vegetables? I know I am! Imagine harvesting vibrant, protein-packed winged beans right from your own backyard, significantly reducing your reliance on expensive store-bought produce. This isn’t just a pipe dream; it’s an achievable reality with a little know-how and some DIY spirit!
The winged bean, also known as the Goa bean or asparagus pea, boasts a rich history, particularly in Southeast Asia and Papua New Guinea, where it has been a staple food source for centuries. Its resilience and nutritional value have made it a vital crop in these regions. But you don’t have to live in the tropics to enjoy its benefits. With the right techniques, you can cultivate this amazing plant in your own garden, no matter where you live.
This DIY guide is your key to unlocking incredible winged bean grocery savings. We’ll delve into simple yet effective methods for growing, harvesting, and utilizing every part of this versatile plant. From its protein-rich pods to its edible leaves and tubers, the winged bean offers a wealth of culinary possibilities. Learn how to propagate, nurture, and protect your winged bean plants, ensuring a bountiful harvest that will not only nourish your body but also lighten your wallet. Let’s get started on this exciting journey towards a more sustainable and affordable way of eating!
Grow Your Own Winged Beans: A Guide to Saving Money on Groceries
Hey there, fellow frugal foodies! Are you tired of sky-high grocery bills? I know I am! That’s why I’m so excited to share my favorite money-saving secret: growing your own winged beans! These amazing legumes are not only delicious and nutritious, but they’re also incredibly easy to grow, even if you don’t have a ton of space. Trust me, once you taste fresh, homegrown winged beans, you’ll be hooked!
This guide will walk you through every step of the process, from planting the seeds to harvesting your bountiful crop. Get ready to ditch those expensive grocery store beans and embrace the joy of homegrown goodness!
Why Winged Beans?
Before we dive into the how-to, let’s talk about why winged beans are such a fantastic choice for the budget-conscious gardener:
* Edible Everything: Seriously, almost every part of the winged bean plant is edible! You can eat the pods (the most common part), the leaves, the flowers, the tubers (roots), and even the dried seeds. Talk about maximizing your harvest!
* Nutrient Powerhouse: Winged beans are packed with protein, vitamins, and minerals. They’re a great source of fiber, iron, calcium, and vitamin C. Basically, they’re a superfood hiding in plain sight!
* Nitrogen Fixers: Like other legumes, winged beans help improve your soil by fixing nitrogen. This means they naturally fertilize the soil, reducing your need for chemical fertilizers.
* Beautiful and Functional: Winged bean plants are vining plants, so they’re perfect for growing on trellises or fences. They add a touch of beauty to your garden while providing a delicious and sustainable food source.
* Easy to Grow: Honestly, winged beans are surprisingly low-maintenance. Once they’re established, they pretty much take care of themselves.
Getting Started: What You’ll Need
Okay, let’s gather our supplies. Here’s what you’ll need to get your winged bean adventure started:
* Winged Bean Seeds: You can find these online or at some specialty nurseries. Make sure you’re getting seeds from a reputable source.
* Well-Draining Soil: Winged beans aren’t too picky, but they prefer well-draining soil. If your soil is heavy clay, amend it with compost or other organic matter.
* Trellis or Support Structure: Since winged beans are vining plants, they need something to climb on. A trellis, fence, or even a sturdy stake will work.
* Watering Can or Hose: To keep your plants hydrated.
* Compost or Organic Fertilizer (Optional): To give your plants a boost.
* Gloves (Optional): To protect your hands.
Planting Your Winged Beans: A Step-by-Step Guide
Now for the fun part! Here’s how to plant your winged bean seeds:
1. Soak the Seeds (Optional but Recommended): Soaking the seeds in water for 24 hours before planting can help improve germination rates. Just place the seeds in a bowl of water and let them sit overnight.
2. Choose Your Planting Location: Winged beans need plenty of sunlight (at least 6-8 hours per day) to thrive. Choose a spot in your garden that gets full sun.
3. Prepare the Soil: Loosen the soil and remove any weeds or debris. If your soil is poor, amend it with compost or other organic matter.
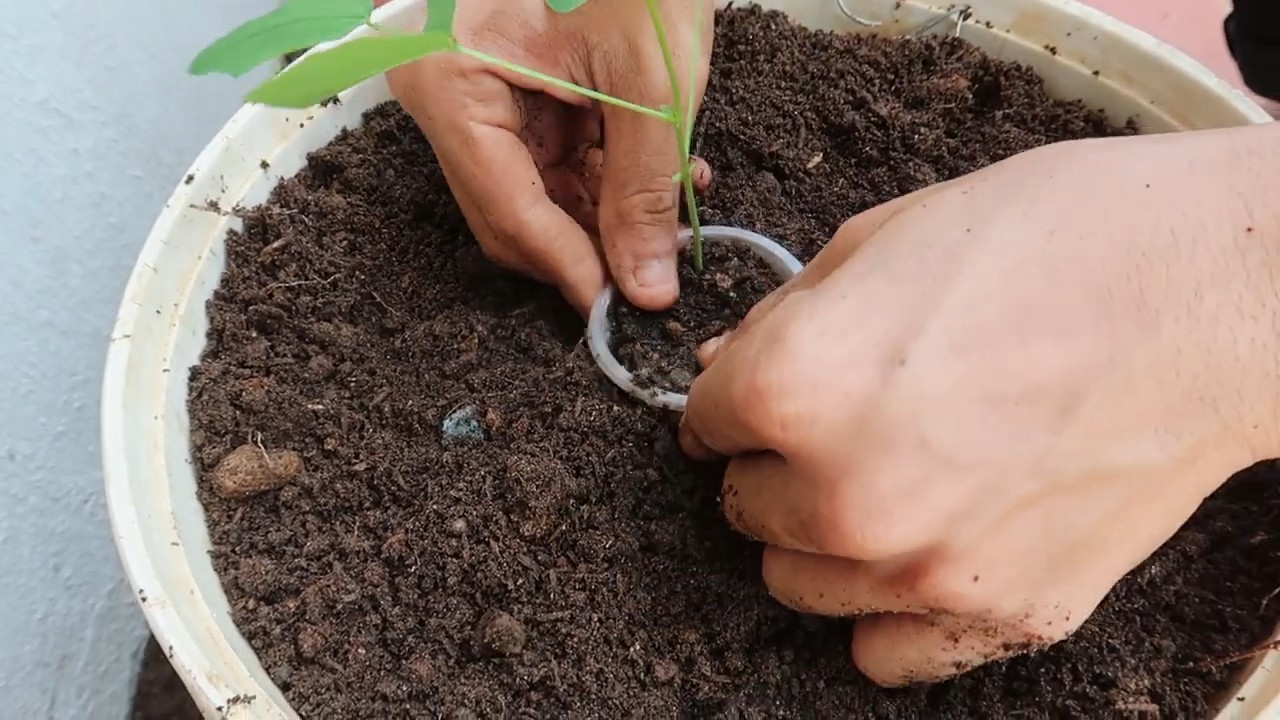
4. Plant the Seeds: Sow the seeds about 1 inch deep and 2-3 inches apart. If you’re planting multiple rows, space them about 2-3 feet apart.
5. Water Thoroughly: After planting, water the seeds gently but thoroughly. Keep the soil moist but not waterlogged.
6. Provide Support: As soon as the seedlings emerge, provide them with a trellis or other support structure to climb on. You can gently guide the vines towards the support.
Caring for Your Winged Beans: Keeping Them Happy and Healthy
Once your winged beans are planted, here’s how to keep them happy and healthy:
1. Water Regularly: Water your winged beans regularly, especially during dry spells. Aim to keep the soil consistently moist but not waterlogged.
2. Fertilize (Optional): If your soil is poor, you can fertilize your winged beans with a balanced organic fertilizer every few weeks. However, be careful not to over-fertilize, as this can lead to excessive foliage growth and fewer beans.
3. Weed Regularly: Keep the area around your winged beans free of weeds. Weeds can compete with your plants for nutrients and water.
4. Pest Control: Winged beans are generally pest-resistant, but they can sometimes be affected by aphids or other common garden pests. If you notice any pests, you can try spraying them with insecticidal soap or neem oil.
5. Pruning (Optional): You can prune your winged bean plants to encourage bushier growth and more bean production. Simply pinch off the tips of the vines.
Harvesting Your Winged Beans: Enjoying the Fruits (and Pods!) of Your Labor
Now for the best part: harvesting your winged beans!
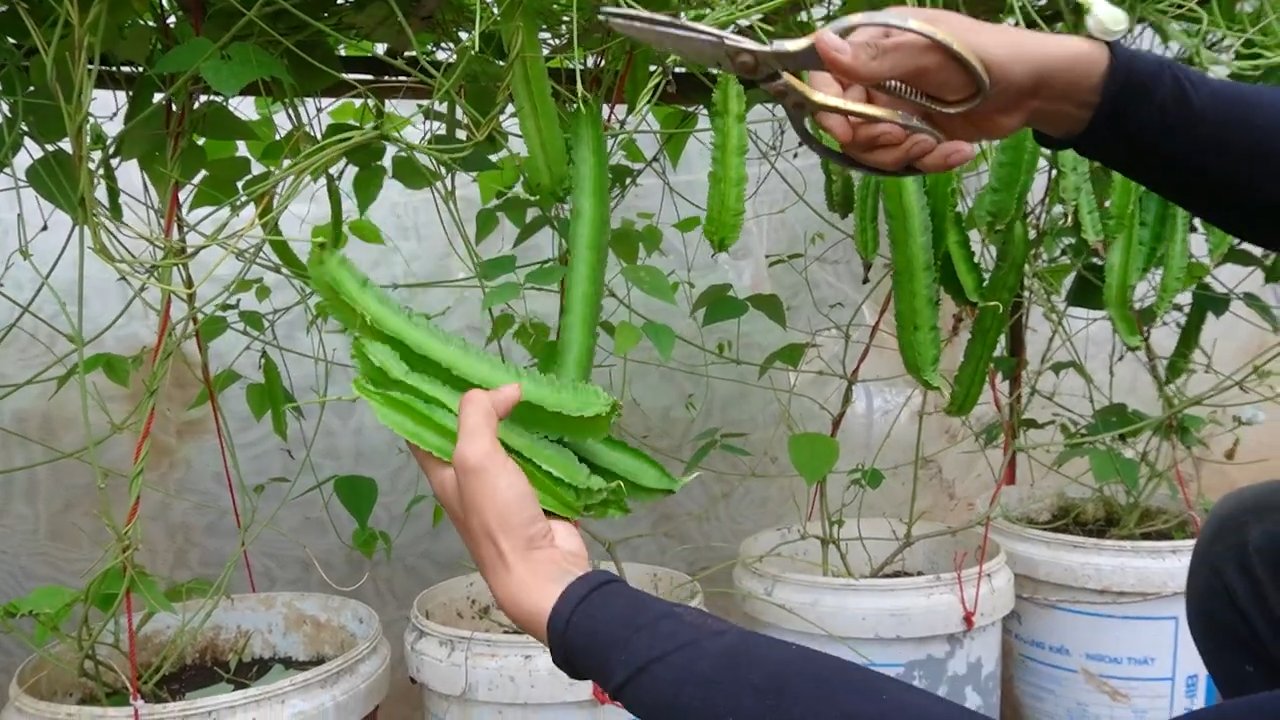
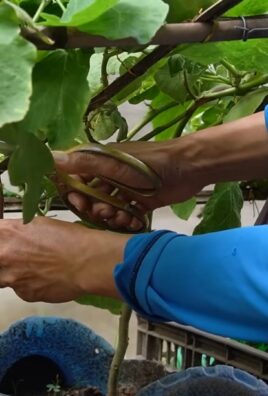
1. Harvesting the Pods: The pods are the most commonly eaten part of the winged bean plant. Harvest them when they are young and tender, about 6-8 inches long. You can harvest them every few days as they mature. The younger they are, the more tender they will be.
2. Harvesting the Leaves: You can harvest the leaves at any time. Choose young, tender leaves for the best flavor.
3. Harvesting the Flowers: The flowers are also edible and can be used in salads or as a garnish. Harvest them when they are fully open.
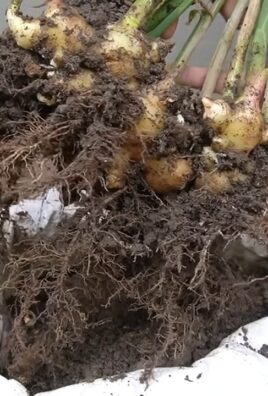
4. Harvesting the Tubers: The tubers (roots) can be harvested after the plant has died back in the fall. They can be eaten raw or cooked.
5. Harvesting the Dried Seeds: Allow some of the pods to mature and dry on the vine. Once they are completely dry, you can harvest the seeds and store them for future planting or for use in cooking.
Cooking with Winged Beans: Delicious and Versatile
Winged beans are incredibly versatile in the kitchen. Here are just a few ideas for how to use them:
* Steamed or Stir-Fried: The pods can be steamed or stir-fried like green beans.
* In Salads: The leaves and flowers can be added to salads for a unique flavor and texture.
* In Soups and Stews: The pods, leaves, and tubers can be added to soups and stews.
* Roasted: The tubers can be roasted like potatoes.
* As a Snack: Young, tender pods can even be eaten raw as a snack.
Troubleshooting: Common Problems and Solutions
Even with the best care, you might encounter a few problems along the way. Here are some common issues and how to address them:
* Poor Germination: If your seeds aren’t germinating, make sure the soil is warm enough and that you’re not overwatering. Soaking the seeds before planting can also help.
* Yellowing Leaves: Yellowing leaves can be a sign of nutrient deficiency. Try fertilizing your plants with a balanced organic fertilizer.
* Pest Infestations: If you notice pests, try spraying them with insecticidal soap or neem oil. You can also try attracting beneficial insects to your garden to help control pests.
* Lack of Bean Production: If your plants are growing well but not producing beans, it could be due to a lack of pollination. You can try hand-pollinating the flowers by gently transferring pollen from one flower to another with a small brush.
Saving Seeds for Next Year: Keeping the Cycle Going
To keep the winged bean goodness coming year after year, save some seeds from your best plants. Here’s how:
1. Select Healthy Plants: Choose plants that are healthy and productive.
2. Allow Pods to Dry: Allow some of the pods to mature and dry completely on the vine.
3. Harvest the Seeds: Once the pods are dry, harvest the seeds and spread them out on a tray to dry completely.
4. Store the Seeds: Store the dried seeds in an airtight container in a cool, dark, and dry place.
Winged Bean Varieties: Exploring Your Options
While there aren’t a ton of commercially available winged bean varieties, you might be able to find some different types with varying pod colors or growth habits. Experiment and see which ones you like best!
Final Thoughts: Enjoy the Journey!
Growing your own winged beans is a rewarding experience that can save you money on groceries and provide you with a delicious and nutritious food source. Don’t be afraid to
Conclusion
So, there you have it! This simple yet incredibly effective DIY trick for preserving your winged beans is more than just a way to save money; it’s a gateway to reducing food waste, enjoying fresh produce for longer, and embracing a more sustainable lifestyle. We’ve shown you how easy it is to extend the shelf life of your winged beans, ensuring you can savor their unique flavor and nutritional benefits whenever you desire.
This method isn’t just about preservation; it’s about empowerment. You’re taking control of your food supply, minimizing trips to the grocery store, and maximizing the value of your hard-earned money. In a world where food prices are constantly fluctuating, having a reliable way to keep your produce fresh is an invaluable asset.
But the beauty of this DIY trick lies in its adaptability. Feel free to experiment with different blanching times to find what works best for your specific winged bean variety and your freezer. Consider adding a touch of lemon juice to the blanching water to help preserve the vibrant green color of the beans. You could also try flash-freezing the blanched beans individually on a baking sheet before transferring them to freezer bags for even better separation and easier portioning later on.
Don’t be afraid to get creative! Perhaps you want to pre-chop your winged beans before freezing them, making them ready to toss into stir-fries or soups directly from the freezer. Or maybe you’d like to blanch and freeze them with other vegetables, creating a convenient mixed vegetable medley for future meals. The possibilities are endless!
This DIY method for preserving winged beans is a game-changer for anyone looking to save money on groceries and reduce food waste. It’s a simple, effective, and sustainable solution that will allow you to enjoy the deliciousness of winged beans year-round.
We wholeheartedly encourage you to give this DIY trick a try. It’s a small investment of time that yields significant returns in terms of cost savings, convenience, and environmental responsibility. Once you experience the satisfaction of pulling perfectly preserved winged beans from your freezer, ready to be transformed into a delicious meal, you’ll wonder why you didn’t start doing this sooner.
And most importantly, we want to hear about your experiences! Share your tips, variations, and successes in the comments below. Let’s build a community of resourceful individuals who are passionate about saving money, reducing food waste, and enjoying the bounty of nature’s harvest. Your insights could inspire others to embrace this simple yet powerful DIY trick and reap the rewards of a more sustainable and budget-friendly lifestyle. So, go ahead, give it a try, and let us know what you think! This method of preserving winged beans is a must-try for any home cook.
Frequently Asked Questions (FAQ)
What are winged beans and why should I preserve them?
Winged beans, also known as goa beans or asparagus peas, are a nutritious and versatile legume. They are rich in protein, fiber, vitamins, and minerals. They have a unique flavor that is often described as a cross between green beans and asparagus. Preserving them allows you to enjoy their flavor and nutritional benefits year-round, even when they are not in season. Plus, preserving them yourself is a great way to save money compared to buying frozen or canned versions.
How long will frozen winged beans last?
When properly blanched and frozen, winged beans can last for 8-12 months in the freezer without significant loss of quality. Be sure to use airtight freezer bags or containers to prevent freezer burn. Labeling the bags with the date is also helpful for tracking how long they’ve been stored.
Can I freeze winged beans without blanching them first?
While you can technically freeze winged beans without blanching, it is highly recommended that you blanch them first. Blanching helps to stop enzyme activity that can cause the beans to lose their color, flavor, and texture during freezing. Unblanched beans are more likely to become mushy and develop off-flavors over time.
What is the best way to blanch winged beans?
The best way to blanch winged beans is to bring a pot of water to a rolling boil. Add the cleaned and trimmed winged beans to the boiling water and cook for 2-3 minutes. Immediately transfer the blanched beans to a bowl of ice water to stop the cooking process. Once the beans are cooled, drain them thoroughly and pat them dry before freezing.
Can I use a microwave to blanch winged beans?
While microwaving is an option, it’s generally not recommended for blanching vegetables for freezing. It’s difficult to ensure even cooking, which can lead to some beans being overcooked and others undercooked. The boiling water method provides more consistent results.
How do I prevent freezer burn on my frozen winged beans?
To prevent freezer burn, make sure to remove as much air as possible from the freezer bags or containers before sealing them. You can use a vacuum sealer for optimal results. Also, store the beans in the coldest part of your freezer, away from the door.
What are some ways to use frozen winged beans?
Frozen winged beans can be used in a variety of dishes, just like fresh or canned beans. They are great in stir-fries, soups, stews, salads, and casseroles. You can also steam, sauté, or roast them. There’s no need to thaw them before cooking; simply add them directly to your recipe.
Can I refreeze winged beans after they have been thawed?
It is generally not recommended to refreeze winged beans after they have been thawed. Refreezing can compromise the texture and flavor of the beans, and it can also increase the risk of bacterial growth. It’s best to only thaw the amount of beans that you plan to use at one time.
What if my frozen winged beans are mushy after cooking?
If your frozen winged beans are mushy after cooking, it could be due to several factors. They may have been over-blanched, improperly frozen, or stored for too long. To minimize the risk of mushy beans, be sure to blanch them for the correct amount of time, remove as much air as possible from the freezer bags, and use them within 8-12 months.
Are there any other vegetables that can be preserved using this same method?
Yes, this blanching and freezing method works well for many other vegetables, including green beans, broccoli, cauliflower, peas, carrots, and spinach. The blanching time may vary depending on the vegetable, so be sure to research the recommended blanching time for each specific vegetable.
How does this DIY method help with grocery savings?
By preserving your winged beans when they are in season and often more affordable, you avoid paying higher prices for out-of-season produce. You also reduce food waste by using beans that might otherwise spoil before you have a chance to cook them. This combination of lower purchase prices and reduced waste directly translates into significant grocery savings over time.
Is this method environmentally friendly?
Yes, preserving your own winged beans is a more environmentally friendly option than buying commercially frozen or canned beans. It reduces the energy and resources required for processing, packaging, and transportation. It also helps to minimize food waste, which is a major contributor to greenhouse gas emissions.

Leave a Comment