
Bottle pepper growing: Ever dreamt of harvesting a vibrant array of peppers right from your windowsill, even if you don’t have a sprawling garden? Well, dream no more! This DIY guide unlocks the secrets to cultivating delicious peppers in recycled bottles, transforming your small space into a thriving edible oasis. For centuries, resourceful gardeners have sought innovative ways to maximize yields, and container gardening, including using repurposed materials, has a rich history across cultures. Think of the ancient hanging gardens, or the ingenious methods used by communities in arid regions to cultivate food in limited spaces.
But why bottle pepper growing, you ask? In today’s world, space is often a premium, and many of us are looking for sustainable ways to reduce waste. This project tackles both! Not only does it offer a fantastic solution for apartment dwellers or those with limited outdoor areas, but it also gives plastic bottles a new lease on life, diverting them from landfills. Imagine the satisfaction of snipping off a ripe, juicy pepper that you nurtured from seed, all within the confines of a recycled bottle. Plus, it’s incredibly rewarding and a fantastic way to connect with nature, even in the heart of the city. Let’s dive in and discover how easy it is to create your own miniature pepper paradise!
DIY Bottle Pepper Growing: A Fun and Sustainable Project
Hey there, fellow gardening enthusiasts! Ever thought about growing peppers in a plastic bottle? It’s a fantastic way to recycle, save space, and enjoy fresh peppers right from your windowsill or balcony. I’ve been doing this for a while now, and I’m excited to share my tried-and-true method with you. It’s surprisingly easy and rewarding!
Why Grow Peppers in Bottles?
Before we dive in, let’s quickly touch on why this is such a cool project:
* Space-Saving: Perfect for small apartments, balconies, or anyone with limited garden space.
* Recycling: Gives plastic bottles a new lease on life, reducing waste.
* Cost-Effective: You probably already have most of the materials you need.
* Educational: A great way to teach kids about gardening and sustainability.
* Portable: Easy to move your pepper plants around to find the best sunlight.
Materials You’ll Need
Okay, let’s gather our supplies. Here’s what you’ll need to get started:
* Plastic Bottles: 2-liter soda bottles or similar sizes work best. Make sure they’re clean!
* Potting Soil: Use a good quality potting mix that drains well.
* Pepper Seeds: Choose your favorite pepper variety! Bell peppers, jalapenos, chili peppers – the choice is yours.
* Scissors or Utility Knife: For cutting the bottles. Be careful!
* Drill or Nail: To create drainage holes.
* Water: For watering your pepper plants.
* Optional:
* Fertilizer: A balanced liquid fertilizer to feed your plants.
* Gravel or Small Stones: For drainage at the bottom of the bottle.
* Seed Starting Tray: If you prefer to start your seeds indoors.
* Gloves: To keep your hands clean.
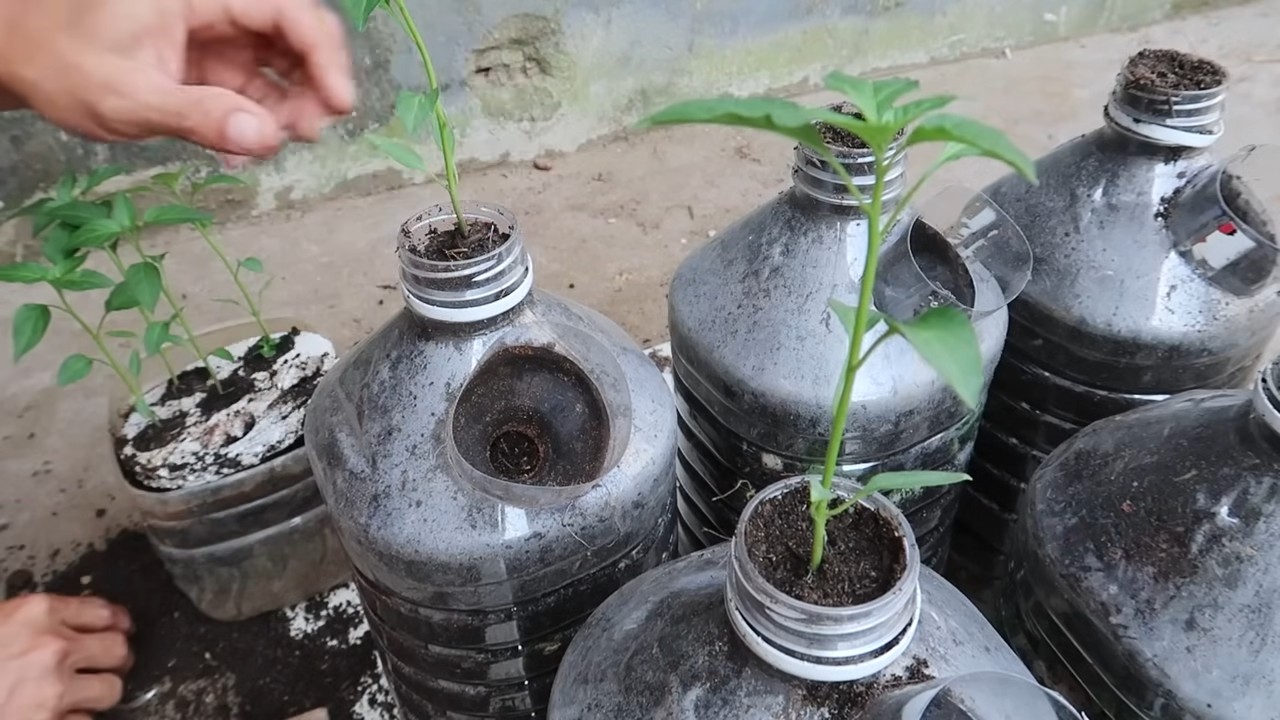
Preparing the Bottles
This is where we transform those empty bottles into mini-gardens!
1. Clean the Bottles: Thoroughly wash the bottles with soap and water to remove any residue. Rinse them well and let them dry completely. This is important to prevent any mold or bacteria growth.
2. Cut the Bottles: This step depends on the bottle design you want. I usually go for a self-watering setup. Here’s how I do it:
* Take one bottle and cut it in half. You’ll use the bottom half as the main container.
* Take the second bottle and cut it about 1/3 of the way down from the top. You’ll invert this top part into the bottom half, creating a self-watering reservoir.
* Alternatively, you can simply cut the bottle in half and use both halves as separate containers. Just make sure to add drainage holes.
3. Create Drainage Holes: This is crucial for preventing waterlogging.
* If you’re using the self-watering method, drill or poke several small holes in the bottle cap of the inverted top section. These holes will allow water to wick up into the soil.
* For the bottom container (or if you’re using both halves as separate containers), drill or poke several drainage holes in the bottom of the bottle.
4. Optional: Add Gravel: Place a layer of gravel or small stones at the bottom of the bottom container. This will further improve drainage and prevent the soil from becoming waterlogged.
Planting the Pepper Seeds
Now for the fun part – planting the seeds!
1. Starting Seeds Indoors (Optional): If you live in a colder climate or want a head start, you can start your pepper seeds indoors.
* Fill a seed starting tray with seed starting mix.
* Sow the pepper seeds about 1/4 inch deep.
* Water gently and keep the soil moist.
* Place the tray in a warm, sunny location or under grow lights.
* Once the seedlings have a few sets of true leaves, they’re ready to transplant into the bottles.
2. Direct Sowing: If you live in a warmer climate, you can sow the seeds directly into the bottles.
* Fill the bottom container (or both halves if you’re using them separately) with potting soil, leaving about an inch of space at the top.
* Sow 2-3 pepper seeds in the center of the soil, about 1/4 inch deep.
* Water gently and keep the soil moist.
3. Transplanting Seedlings: If you started your seeds indoors, carefully transplant the seedlings into the bottles.
* Gently remove the seedlings from the seed starting tray.
* Make a small hole in the center of the potting soil in the bottle.
* Place the seedling in the hole and gently pat the soil around it.
* Water gently.
Caring for Your Pepper Plants
This is where the patience comes in! But trust me, it’s worth it.
1. Watering: Water your pepper plants regularly, keeping the soil moist but not waterlogged.
* If you’re using the self-watering method, fill the bottom reservoir with water. The soil will wick up the water as needed. Check the reservoir regularly and refill it when it’s empty.
* If you’re not using the self-watering method, water the soil directly until water drains out of the drainage holes.
2. Sunlight: Pepper plants need plenty of sunlight to thrive. Place your bottles in a sunny location that receives at least 6-8 hours of direct sunlight per day. A south-facing window or a sunny balcony is ideal.
3. Fertilizing: Feed your pepper plants with a balanced liquid fertilizer every 2-3 weeks. Follow the instructions on the fertilizer label. This will provide your plants with the nutrients they need to grow and produce peppers.
4. Temperature: Pepper plants prefer warm temperatures. Keep them in a location where the temperature is between 70-85°F (21-29°C). Protect them from frost and cold temperatures.
5. Support: As your pepper plants grow, they may need support to prevent them from falling over. You can use small stakes or trellises to support the plants.
6. Pest Control: Keep an eye out for pests such as aphids, spider mites, and whiteflies. If you notice any pests, treat them with an insecticidal soap or neem oil.
Harvesting Your Peppers
The moment you’ve been waiting for!
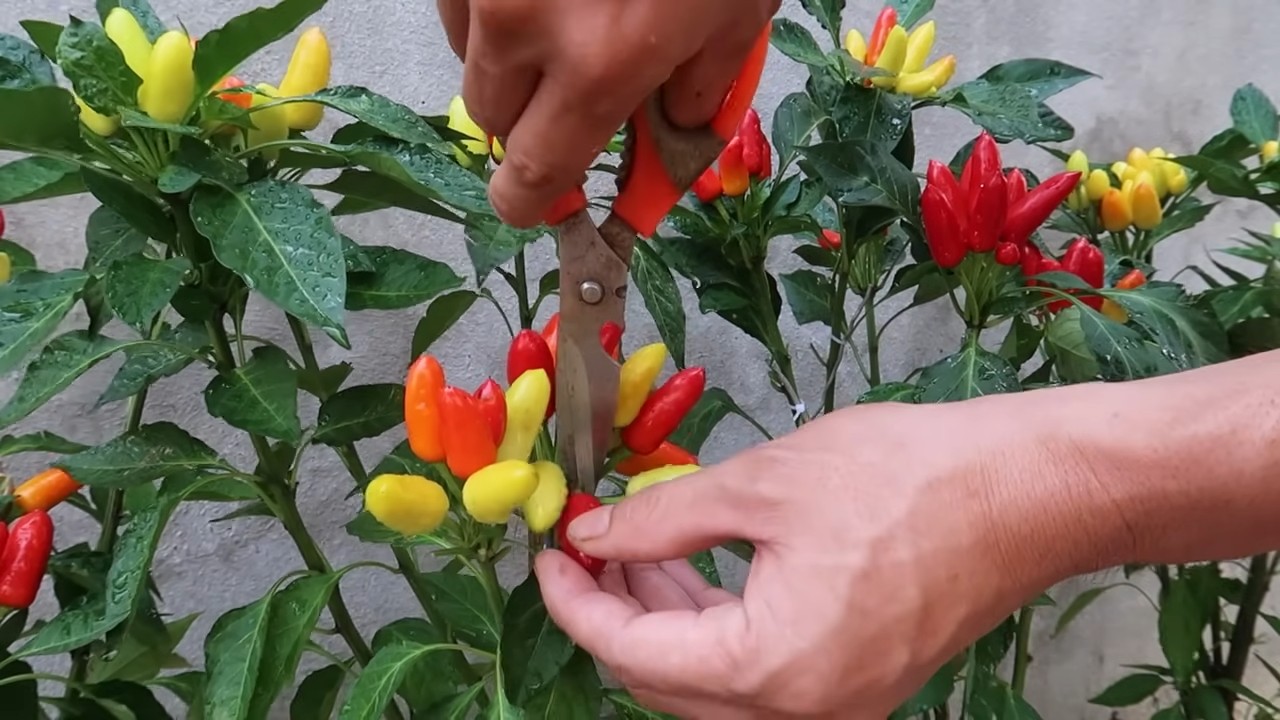
1. Harvest Time: Peppers are typically ready to harvest when they reach their mature size and color. The exact time will depend on the variety of pepper you’re growing.
2. How to Harvest: Use scissors or pruning shears to cut the peppers from the plant. Be careful not to damage the plant.
3. Enjoy Your Harvest: Use your fresh peppers in your favorite recipes! They’re delicious in salads, salsas, stir-fries, and more.
Troubleshooting
Even with the best care, sometimes things can go wrong. Here are a few common problems and how to fix them:
* Yellowing Leaves: This could be a sign of overwatering, underwatering, or nutrient deficiency. Adjust your watering schedule and fertilize your plants if needed.
* Drooping Leaves: This could be a sign of underwatering or heat stress. Water your plants more frequently and move them to a cooler location if necessary.
* Lack of Peppers: This could be due to insufficient sunlight, poor pollination, or nutrient deficiency. Make sure your plants are getting enough sunlight, hand-pollinate the flowers if needed, and fertilize your plants.
* Pests: Treat any pest infestations promptly with insecticidal soap or neem oil.
Tips for Success
Here are a few extra tips to help you succeed with your bottle pepper garden:
* Choose the Right Pepper Variety: Some pepper varieties are better suited for container growing than others. Look for compact or dwarf varieties.
* Use Good Quality Potting Soil: Don’t skimp on the potting soil. Use a good quality potting mix that drains well.
* Don’t Overwater: Overwatering is a common mistake. Make sure the soil is moist but not waterlogged.
* Provide Adequate Sunlight: Pepper plants need plenty of sunlight to thrive.
* Fertilize Regularly: Fertilize your plants every 2-3 weeks to provide them with the nutrients they need.
* Be Patient: Growing peppers takes time and patience. Don’t get discouraged if you don’t see results immediately.
Growing peppers in bottles is a fun, rewarding, and sustainable project. With a little bit of effort, you can enjoy fresh, homegrown peppers right from your own home. So, grab some plastic bottles, pepper seeds
Conclusion
So, there you have it! Transforming a simple plastic bottle into a thriving pepper garden is not just a fun project; it’s a sustainable, space-saving, and incredibly rewarding way to enjoy fresh, homegrown peppers. We’ve walked you through the entire process, from preparing your bottle to nurturing your seedlings, and hopefully, you’re feeling inspired to give it a try.
Why is this DIY bottle pepper growing method a must-try? Firstly, it’s incredibly accessible. You likely already have most of the materials you need lying around your home. Secondly, it’s perfect for those with limited space. Whether you have a small balcony, a sunny windowsill, or just a desire to maximize your garden’s potential, bottle pepper growing allows you to cultivate delicious peppers in even the most compact environments. Thirdly, it’s a fantastic way to recycle and reduce waste, giving those plastic bottles a new lease on life. Finally, and perhaps most importantly, it’s incredibly satisfying to watch your tiny seedlings grow into vibrant pepper plants, knowing you played a direct role in their success.
But the fun doesn’t stop there! Feel free to experiment with different varieties of peppers. From sweet bell peppers to fiery habaneros, the possibilities are endless. You can also try different soil mixes to see what works best for your specific climate and pepper type. Consider adding companion plants like basil or marigolds to your bottle gardens to deter pests and attract beneficial insects. For a decorative touch, paint your bottles with vibrant colors or add personalized labels. You can even create a vertical garden by hanging multiple bottle planters from a wall or fence.
Experiment with Pepper Varieties
Don’t limit yourself to just one type of pepper. Try growing a variety of peppers with different colors, shapes, and heat levels. This will not only add visual interest to your bottle garden but also provide you with a diverse range of flavors to enjoy in your cooking.
Consider Hydroponics
For a more advanced approach, you can adapt the bottle pepper growing method to a hydroponic system. This involves using a nutrient-rich water solution instead of soil to nourish your plants. Hydroponics can lead to faster growth and higher yields, but it requires more careful monitoring and maintenance.
Add a Self-Watering System
To simplify watering, you can create a self-watering system for your bottle planters. This can be done by adding a reservoir of water at the bottom of the bottle and using a wick to draw water up to the soil as needed. This is especially useful if you tend to forget to water your plants regularly.
We truly believe that bottle pepper growing is a game-changer for home gardeners of all levels. It’s a simple, sustainable, and incredibly rewarding way to enjoy fresh, homegrown peppers. So, what are you waiting for? Gather your supplies, follow our guide, and get ready to experience the joy of growing your own peppers in bottles.
We’re eager to hear about your experiences! Share your photos, tips, and challenges in the comments section below. Let’s create a community of bottle pepper growing enthusiasts and learn from each other. Happy gardening!
Frequently Asked Questions (FAQ)
What type of plastic bottle is best for growing peppers?
Ideally, you should use food-grade plastic bottles, such as those that previously contained water, juice, or soda. Avoid bottles that held harsh chemicals or cleaning products, as these may leach harmful substances into the soil and affect your plants. PET (polyethylene terephthalate) bottles are a common and safe choice. Make sure to thoroughly clean the bottles with soap and water before using them. The size of the bottle will depend on the pepper variety you choose. Smaller peppers like chili peppers can thrive in smaller bottles, while larger peppers like bell peppers will need larger bottles to accommodate their root systems. A 2-liter bottle is a good starting point for most pepper varieties.
What kind of soil should I use for bottle pepper growing?
A well-draining potting mix is essential for successful bottle pepper growing. Avoid using garden soil, as it tends to compact and doesn’t provide adequate drainage. A good potting mix should contain a blend of peat moss, perlite, and vermiculite. You can also add compost to enrich the soil with nutrients. Make sure the soil is loose and airy to allow for proper root development. You can also consider using a soilless mix specifically designed for container gardening. These mixes often contain coconut coir, which is a sustainable alternative to peat moss.
How often should I water my bottle pepper plants?
The frequency of watering will depend on several factors, including the size of the bottle, the type of soil, the climate, and the stage of growth of the pepper plant. As a general rule, water your plants when the top inch of soil feels dry to the touch. Avoid overwatering, as this can lead to root rot. When you water, water thoroughly until water drains out of the drainage holes at the bottom of the bottle. During hot and dry weather, you may need to water your plants more frequently. Check the soil moisture regularly and adjust your watering schedule accordingly.
How much sunlight do bottle pepper plants need?
Peppers are sun-loving plants and need at least 6-8 hours of direct sunlight per day to thrive. Place your bottle pepper plants in a sunny location, such as a south-facing window or a balcony that receives plenty of sunlight. If you don’t have access to enough natural sunlight, you can supplement with grow lights. LED grow lights are a good option, as they are energy-efficient and provide the full spectrum of light that plants need. Rotate your bottle pepper plants regularly to ensure that all sides receive equal sunlight.
Do I need to fertilize my bottle pepper plants?
Yes, peppers are heavy feeders and need regular fertilization to produce abundant fruit. Start fertilizing your plants a few weeks after they have been transplanted into the bottles. Use a balanced fertilizer with an NPK ratio of 10-10-10 or 20-20-20. Follow the instructions on the fertilizer package for application rates. You can also use organic fertilizers, such as compost tea or fish emulsion. Fertilize your plants every 2-3 weeks during the growing season. Avoid over-fertilizing, as this can burn the roots of your plants.
How do I protect my bottle pepper plants from pests and diseases?
Regularly inspect your bottle pepper plants for signs of pests and diseases. Common pests that affect peppers include aphids, spider mites, and whiteflies. You can control these pests with insecticidal soap or neem oil. Diseases that can affect peppers include fungal diseases like powdery mildew and blight. To prevent these diseases, ensure good air circulation around your plants and avoid overwatering. You can also use a fungicide if necessary. Consider using companion planting to deter pests. Marigolds, for example, are known to repel nematodes and other harmful insects.
How long does it take for bottle pepper plants to produce fruit?
The time it takes for bottle pepper plants to produce fruit will depend on the variety of pepper and the growing conditions. In general, it takes about 60-90 days from transplanting for peppers to start producing fruit. Some varieties, such as bell peppers, may take longer to mature than others, such as chili peppers. Provide your plants with optimal growing conditions, including plenty of sunlight, water, and fertilizer, to encourage fruit production.
Can I grow peppers indoors in bottles year-round?
Yes, you can grow peppers indoors in bottles year-round, provided you have adequate lighting and temperature control. Use grow lights to supplement natural sunlight, especially during the winter months. Maintain a consistent temperature of 70-80°F during the day and 60-70°F at night. Ensure good air circulation around your plants to prevent fungal diseases. You may need to hand-pollinate your pepper plants indoors, as there will be no bees or other pollinators to do the job.
What are some common problems with bottle pepper growing and how can I fix them?
Some common problems with bottle pepper growing include yellowing leaves, stunted growth, and lack of fruit production. Yellowing leaves can be caused by overwatering, underwatering, or nutrient deficiencies. Stunted growth can be caused by lack of sunlight, poor soil, or pests. Lack of fruit production can be caused by lack of pollination, insufficient sunlight, or nutrient deficiencies. Diagnose the problem and take corrective action accordingly. Adjust your watering schedule, provide more sunlight, fertilize your plants, or treat for pests as needed.
Leave a Comment