
Home gardening pumpkins! Imagine stepping into your backyard and harvesting plump, vibrant pumpkins that you nurtured from tiny seeds. Sounds dreamy, right? Well, it’s more achievable than you think! For centuries, pumpkins have been a symbol of abundance and harvest, deeply rooted in cultures worldwide. From ancient indigenous traditions to modern-day Halloween celebrations, these gourds hold a special place in our hearts and on our tables.
But let’s be honest, growing pumpkins can sometimes feel like a daunting task. Pests, diseases, and the sheer size of these beauties can leave even experienced gardeners scratching their heads. That’s where our DIY tricks and hacks come in! I’m here to share simple, effective, and budget-friendly solutions to help you cultivate a thriving pumpkin patch, no matter the size of your garden.
Why do you need these DIY tricks? Because everyone deserves the joy of growing their own food, and home gardening pumpkins is a rewarding experience. Plus, imagine the bragging rights when you carve your own homegrown jack-o’-lantern or bake a delicious pumpkin pie from scratch! So, let’s dive in and unlock the secrets to a bountiful pumpkin harvest. Get ready to transform your garden into a pumpkin paradise!
Growing Pumpkins at Home: A Comprehensive DIY Guide
Hey there, fellow gardening enthusiasts! Ever dreamt of carving your own homegrown pumpkin for Halloween or baking a delicious pumpkin pie with ingredients straight from your backyard? Well, you’ve come to the right place! Growing pumpkins at home is surprisingly rewarding, and with a little planning and effort, you can have a bountiful harvest. I’m going to walk you through everything you need to know, from choosing the right variety to harvesting your prize-winning pumpkins. Let’s get started!
Choosing the Right Pumpkin Variety
Before you even think about planting, you need to decide what kind of pumpkin you want to grow. There are so many options, each with its own unique characteristics. Here’s a breakdown of some popular choices:
* **Jack-o’-Lantern Pumpkins:** These are your classic carving pumpkins, like ‘Connecticut Field’ or ‘Howden’. They’re relatively easy to grow and produce large, round pumpkins perfect for spooky faces.
* **Pie Pumpkins:** If you’re after that sweet, pumpkiny flavor, go for varieties like ‘Sugar Pie’ or ‘Baby Pam’. They’re smaller and denser than carving pumpkins, with a richer, sweeter flesh.
* **Giant Pumpkins:** Feeling ambitious? Try growing a giant pumpkin like ‘Atlantic Giant’. Be warned, these require a lot of space, attention, and fertilizer, but the bragging rights are totally worth it!
* **Ornamental Pumpkins:** For a decorative touch, consider growing varieties like ‘Gourds’ or ‘Mini Pumpkins’. They come in a variety of shapes, sizes, and colors, adding a festive flair to your garden.
Consider your space and climate when making your choice. Some varieties are better suited for smaller gardens or shorter growing seasons.
Preparing Your Pumpkin Patch
Pumpkins are heavy feeders, meaning they need a lot of nutrients to thrive. They also need plenty of sunlight and space. Here’s how to prepare the perfect pumpkin patch:
* **Sunlight:** Choose a spot that gets at least 6-8 hours of direct sunlight per day.
* **Soil:** Pumpkins prefer well-drained soil that is rich in organic matter. Amend your soil with compost or aged manure before planting.
* **Space:** Give your pumpkins plenty of room to spread out. Allow at least 4-6 feet between plants, depending on the variety. Giant pumpkins need even more space!
* **pH:** Pumpkins prefer a soil pH between 6.0 and 6.8. You can test your soil pH with a home testing kit or send a sample to your local extension office.
Planting Your Pumpkin Seeds
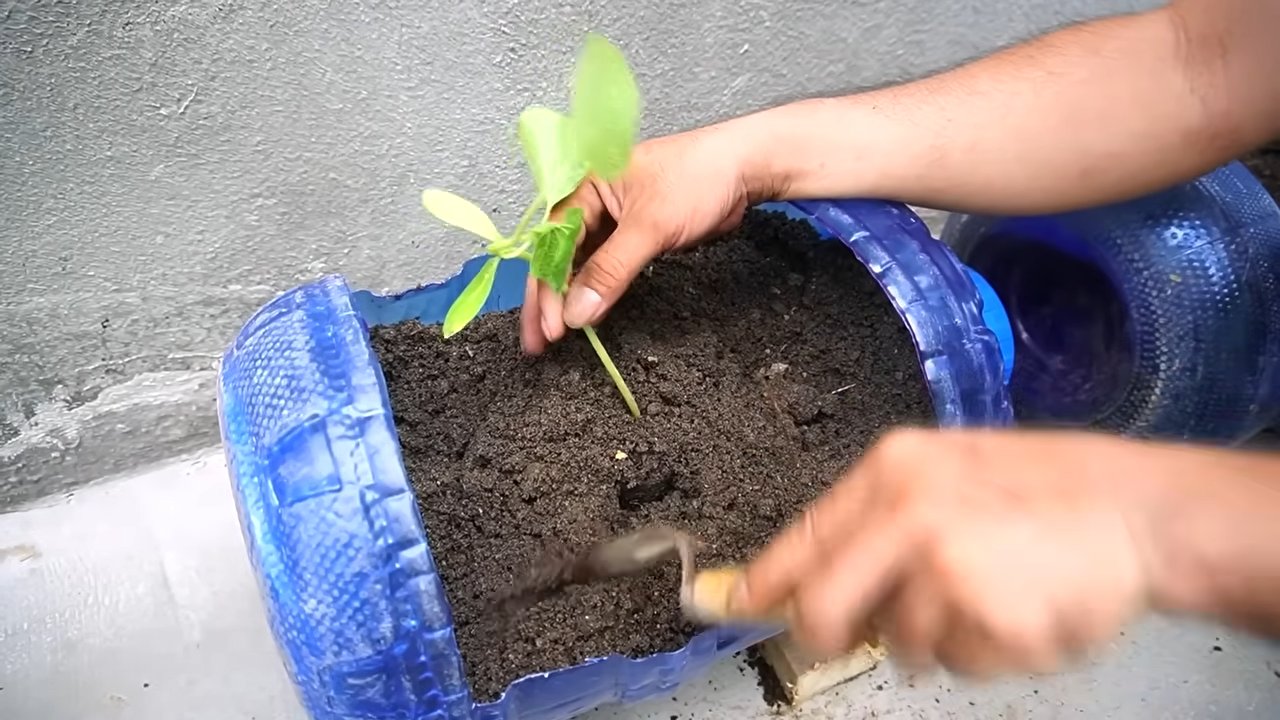
Now for the fun part! You can either start your pumpkin seeds indoors or direct sow them in your garden. I prefer direct sowing, as it avoids transplant shock.
Here’s how to plant your pumpkin seeds:
1. **Timing:** Plant your pumpkin seeds after the last frost, when the soil has warmed up to at least 60°F (15°C). Check your local frost dates to be sure.
2. **Mound Preparation:** Create small mounds of soil, about 1 foot in diameter and 4-6 feet apart. This will help with drainage and warming the soil.
3. **Sowing:** Sow 2-3 seeds per mound, about 1 inch deep.
4. **Watering:** Water the mounds thoroughly after planting.
5. **Thinning:** Once the seedlings emerge, thin them to one plant per mound, choosing the strongest and healthiest seedling.
Caring for Your Pumpkin Plants
Once your pumpkin plants are established, it’s important to provide them with the care they need to thrive.
* **Watering:** Pumpkins need consistent watering, especially during hot, dry weather. Water deeply at the base of the plant, avoiding wetting the foliage, which can lead to fungal diseases. Aim for about 1 inch of water per week.
* **Fertilizing:** Feed your pumpkin plants regularly with a balanced fertilizer. You can use a granular fertilizer or a liquid fertilizer. Follow the instructions on the fertilizer package. I like to use a fertilizer high in phosphorus to encourage flowering and fruit development.
* **Weeding:** Keep your pumpkin patch free of weeds, which can compete with your plants for nutrients and water. Hand-pull weeds or use a hoe to cultivate the soil.
* **Pest Control:** Pumpkins are susceptible to a variety of pests, including squash bugs, squash vine borers, and cucumber beetles. Inspect your plants regularly for signs of pests and take action promptly. You can use insecticidal soap, neem oil, or other organic pest control methods.
* **Pollination:** Pumpkins have separate male and female flowers. The female flowers need to be pollinated in order to produce fruit. If you’re not seeing any pumpkins forming, you may need to hand-pollinate the flowers. To do this, use a small paintbrush to transfer pollen from the male flower to the female flower. The female flowers have a small, immature pumpkin at the base of the flower.
Protecting Your Pumpkins
As your pumpkins grow, you’ll want to protect them from pests, diseases, and the elements.
* **Elevate Pumpkins:** Place a piece of cardboard or wood under each pumpkin to prevent it from rotting on the ground. This will also help to protect it from pests.
* **Protect from Sunburn:** If your pumpkins are exposed to intense sunlight, you can shade them with a piece of cloth or cardboard.
* **Monitor for Diseases:** Keep an eye out for signs of fungal diseases, such as powdery mildew or downy mildew. Treat affected plants with a fungicide.
* **Pest Control:** Continue to monitor for pests and take action as needed.
Harvesting Your Pumpkins
The moment you’ve been waiting for! Knowing when to harvest your pumpkins is key to getting the best flavor and storage life.
Here’s how to tell when your pumpkins are ready to harvest:
1. **Color:** The pumpkin should be a deep, solid color, typical of the variety.
2. **Rind:** The rind should be hard and resistant to scratching. You can test this by pressing your fingernail into the rind. If it doesn’t leave a mark, the pumpkin is ready.
3. **Stem:** The stem should be dry and brown.
4. **Sound:** When you tap the pumpkin, it should sound hollow.
Harvesting Steps:
1. **Cut the Stem:** Use a sharp knife or pruning shears to cut the stem, leaving at least 4 inches of stem attached to the pumpkin. This will help to prevent rot.
2. **Handle with Care:** Be careful not to drop or bruise the pumpkin, as this can shorten its storage life.
3. **Curing:** Cure your pumpkins in a warm, dry place for 1-2 weeks. This will help to harden the rind and improve their storage life.
Storing Your Pumpkins
Proper storage is essential for keeping your pumpkins fresh and flavorful.
* **Ideal Conditions:** Store your pumpkins in a cool, dry place with good ventilation. The ideal temperature is between 50°F and 60°F (10°C and 15°C).
* **Avoid Moisture:** Avoid storing pumpkins in damp or humid conditions, as this can lead to rot.
* **Single Layer:** Store pumpkins in a single layer, not stacked on top of each other.
* **Check Regularly:** Check your pumpkins regularly for signs of rot or spoilage. Discard any pumpkins that are damaged or decaying.
Troubleshooting Common Pumpkin Problems
Even with the best care, you may encounter some problems when growing pumpkins. Here are some common issues and how to address them:
* **Powdery Mildew:** This fungal disease causes a white, powdery coating on the leaves. Treat with a fungicide or a homemade remedy like baking soda spray.
* **Squash Bugs:** These pests suck the sap from pumpkin plants, causing them to wilt and die. Hand-pick squash bugs or use insecticidal soap.
* **Squash Vine Borers:** These pests bore into the stems of pumpkin plants, causing them to collapse. Wrap the base of the stems with aluminum foil to prevent borers from entering.
* **Lack of Pollination:** If you’re not seeing any pumpkins forming, you may need to hand-pollinate the flowers.
* **Rotting Pumpkins:** This can be caused by excessive moisture, pests, or diseases. Elevate pumpkins and monitor for signs of rot.
Enjoying Your Homegrown Pumpkins
Now that you’ve successfully grown and harvested your own pumpkins, it’s time to enjoy the fruits (or vegetables!) of your labor.
* **Carving:** Carve your pumpkins into spooky jack-o’-lanterns for Halloween.
* **Baking:** Use your pie pumpkins to make delicious pumpkin pies, breads, and muffins.
* **Roasting:** Roast pumpkin seeds for a healthy and tasty snack.
* **Decorating:** Use your ornamental pumpkins to add a festive touch to your home.
Growing pumpkins at home is a rewarding experience that can bring joy to your family and friends. With
Conclusion
So, there you have it! Mastering the art of growing your own pumpkins at home isn’t just about saving money; it’s about connecting with nature, nurturing life from seed to harvest, and experiencing the unparalleled satisfaction of serving up a pumpkin you grew yourself. This DIY approach to home gardening pumpkins offers a unique opportunity to control every aspect of the growing process, ensuring you get the exact size, shape, and variety you desire.
Think about it: no more settling for the picked-over pumpkins at the grocery store. Imagine the joy of selecting the perfect pumpkin for carving, baking, or decorating, knowing that you nurtured it from a tiny seed. And beyond the personal satisfaction, growing your own pumpkins is an environmentally friendly choice, reducing your carbon footprint by eliminating transportation and packaging.
But the benefits don’t stop there. This method allows for endless experimentation. Want to try growing miniature pumpkins for adorable fall decorations? Go for it! Curious about heirloom varieties with unique colors and textures? Now’s your chance! You can even tailor your growing practices to suit your specific climate and soil conditions, maximizing your yield and minimizing the risk of pests and diseases.
Consider these variations to elevate your home gardening pumpkins experience:
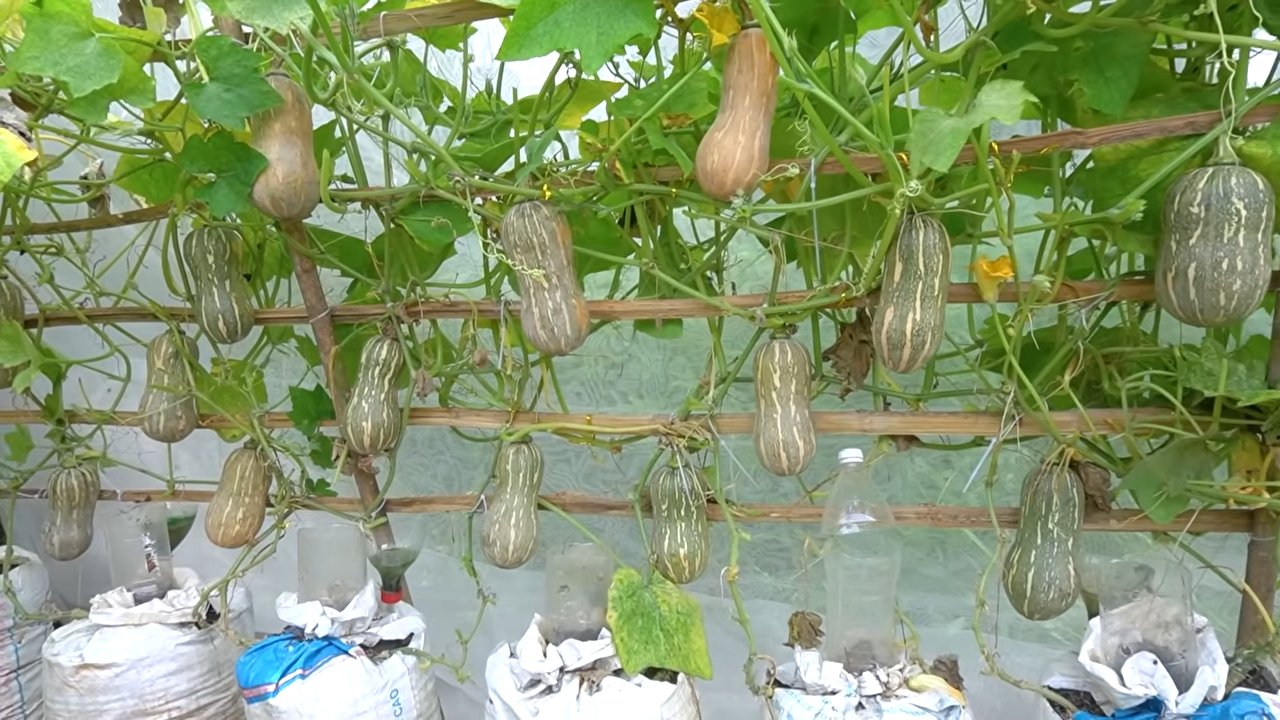
* **Vertical Gardening:** If space is limited, explore vertical gardening techniques. Train your pumpkin vines to climb a trellis or fence, saving valuable ground space and creating a stunning visual display.
* **Companion Planting:** Enhance your pumpkin patch by incorporating companion plants like marigolds, nasturtiums, and basil. These plants can deter pests, attract beneficial insects, and improve soil health.
* **Succession Planting:** Extend your harvest season by planting pumpkin seeds in stages, a few weeks apart. This ensures a continuous supply of fresh pumpkins throughout the fall.
* **Pumpkin Tower:** Build a pumpkin tower for a unique and eye-catching display. Use sturdy wire mesh or wooden frames to create a vertical structure, and train your pumpkin vines to grow upwards.
We understand that embarking on a new gardening adventure can be daunting, but we assure you that growing your own pumpkins is a rewarding and achievable goal. With a little planning, preparation, and patience, you’ll be harvesting your own homegrown pumpkins in no time.
We wholeheartedly encourage you to give this DIY trick a try. Don’t be afraid to experiment, learn from your mistakes, and most importantly, have fun! We’re confident that you’ll be amazed by the results.
And once you’ve harvested your bounty, we’d love to hear about your experience. Share your photos, tips, and stories in the comments below. Let’s create a community of pumpkin-growing enthusiasts and inspire others to embrace the joy of home gardening pumpkins!
FAQ
What are the best pumpkin varieties to grow at home?
The best pumpkin varieties for home gardening depend on your intended use and growing conditions. For carving, ‘Jack O’ Lantern’ and ‘Howden’ are popular choices. For baking, ‘Sugar Pie’ and ‘Baby Pam’ are known for their sweet and flavorful flesh. If you’re looking for something unique, consider heirloom varieties like ‘Rouge Vif d’Etampes’ (Cinderella pumpkin) or ‘Jarrahdale’. Consider the size of your garden when choosing a variety. Some pumpkins, like Atlantic Giant, require a lot of space.
How much space do pumpkins need to grow?
Pumpkins are sprawling plants that require ample space to thrive. As a general rule, allow at least 4-6 feet between plants. If you’re growing larger varieties, you may need even more space. Consider using vertical gardening techniques, such as trellising, to save space.
When is the best time to plant pumpkin seeds?
The best time to plant pumpkin seeds depends on your climate and the specific variety you’re growing. As a general rule, plant pumpkin seeds after the last frost, when the soil has warmed to at least 60°F (15°C). Check the seed packet for specific planting instructions. In most regions, this is typically in late spring or early summer.
How often should I water my pumpkin plants?
Pumpkin plants need consistent moisture, especially during hot and dry weather. Water deeply and regularly, aiming to keep the soil consistently moist but not waterlogged. Water at the base of the plants to avoid wetting the foliage, which can increase the risk of fungal diseases. Mulching around the plants can help retain moisture and suppress weeds.
What kind of fertilizer should I use for my pumpkin plants?
Pumpkins are heavy feeders and benefit from regular fertilization. Use a balanced fertilizer, such as 10-10-10, at planting time. As the plants grow, you can supplement with a fertilizer that is higher in phosphorus and potassium to promote fruit development. Avoid over-fertilizing with nitrogen, as this can lead to excessive foliage growth at the expense of fruit production.
How do I protect my pumpkins from pests and diseases?
Pumpkins are susceptible to various pests and diseases, including squash bugs, squash vine borers, powdery mildew, and downy mildew. Regularly inspect your plants for signs of infestation or disease. Use organic pest control methods, such as hand-picking pests, using insecticidal soap, or applying neem oil. To prevent fungal diseases, ensure good air circulation around the plants and avoid overhead watering.
How do I know when my pumpkins are ripe?
Pumpkins are typically ripe when they have reached their mature color and the rind is hard and resistant to scratching. The stem should also be dry and brown. To test for ripeness, tap the pumpkin. A ripe pumpkin will sound hollow.
Can I grow pumpkins in containers?
Yes, you can grow pumpkins in containers, but you’ll need to choose a smaller variety and use a large container with good drainage. Ensure the container is at least 20 gallons in size. Use a high-quality potting mix and provide regular watering and fertilization.
What can I do with my homegrown pumpkins?
The possibilities are endless! You can carve them for Halloween, bake them into pies, soups, and breads, roast the seeds for a healthy snack, or use them for fall decorations. Get creative and experiment with different recipes and crafts.
How can I store my pumpkins after harvesting?
To store pumpkins, choose pumpkins that are free from blemishes and have a hard rind. Cure them in a warm, dry place for about two weeks to harden the skin and extend their shelf life. Store them in a cool, dry place with good ventilation. Properly stored pumpkins can last for several months.

Leave a Comment