
Grow Potatoes Without a Garden? Absolutely! Imagine harvesting a bounty of fresh, earthy potatoes right from your balcony or patio, even if you don’t have a sprawling backyard. Sounds too good to be true? Well, get ready to be amazed because this DIY guide will show you exactly how to make it happen!
For centuries, potatoes have been a staple food in countless cultures, from the Andes Mountains where they originated to dinner tables around the globe. Their versatility and nutritional value have made them a beloved crop. But what if you’re an urban dweller with limited space? Does that mean you have to miss out on the joy of growing your own spuds? Not anymore!
This DIY trick is a game-changer for anyone who dreams of fresh, homegrown produce but lacks the traditional garden setting. We’ll walk you through a simple, step-by-step process to grow potatoes without a garden, using readily available materials and minimal effort. Think of it as a fun, rewarding project that not only provides you with delicious potatoes but also connects you to the earth in a meaningful way. Plus, who doesn’t love the satisfaction of saying, “I grew that myself?” So, let’s ditch the garden myth and get ready to grow potatoes without a garden – it’s easier than you think!
Grow Potatoes Anywhere: The Ultimate Guide to Container Potato Gardening
Hey there, fellow gardening enthusiasts! Ever dreamt of harvesting your own homegrown potatoes but lack the space for a traditional garden? Well, dream no more! I’m going to walk you through a super fun and rewarding project: growing potatoes in containers. It’s easier than you think, and the satisfaction of digging up your own spuds is simply unbeatable. Let’s get our hands dirty!
Choosing Your Potato Variety
First things first, let’s talk potatoes! Not all potatoes are created equal, especially when it comes to container gardening. Some varieties thrive in pots, while others might be a bit too demanding. Here’s what I recommend:
* Early-Season Varieties: These are your best bet. They mature quickly, meaning you’ll be harvesting sooner. Think ‘Yukon Gold’, ‘Irish Cobbler’, or ‘Red Norland’.
* Determinate vs. Indeterminate: This is key! Determinate potatoes produce one layer of potatoes on the seed potato and then stop growing. Indeterminate potatoes, on the other hand, continue to produce potatoes along the stem as it grows. For containers, indeterminate varieties are fantastic because you can “hill” them (more on that later) and get a much larger yield.
* Consider Your Climate: Research which potato varieties perform well in your specific climate. Your local garden center is a great resource for this!
Gathering Your Supplies
Okay, now for the fun part – gathering our supplies! Here’s what you’ll need to get started:
* A Large Container: This is crucial. You’ll need a container that’s at least 15-20 gallons in size. The bigger, the better, as it gives the potatoes plenty of room to grow. Think large buckets, trash cans (with drainage holes!), grow bags, or even repurposed containers.
* Seed Potatoes: You can’t just plant any old potato from the grocery store. You need seed potatoes, which are specifically grown for planting. You can find these at garden centers or online.
* Potting Mix: Don’t use garden soil! It’s too heavy and compacts easily. Opt for a high-quality, well-draining potting mix.
* Fertilizer: A balanced, slow-release fertilizer is ideal. Look for something like a 10-10-10 or 14-14-14 formula.
* Watering Can or Hose: For, you guessed it, watering!
* Optional: A trowel, gloves, and some straw or mulch.
Preparing Your Seed Potatoes
Before planting, you’ll want to “chit” your seed potatoes. This encourages them to sprout before they go into the container, giving them a head start.
* What is Chitting?: Chitting is simply allowing the seed potatoes to sprout “eyes” (small sprouts) before planting.
* How to Chit: Place your seed potatoes in a cool, bright location (but not direct sunlight) for a week or two. You’ll see small green sprouts emerging from the eyes.
* Cutting Seed Potatoes: If your seed potatoes are large (bigger than an egg), you can cut them into pieces, making sure each piece has at least one or two eyes. Let the cut pieces dry for a day or two before planting to prevent rotting.
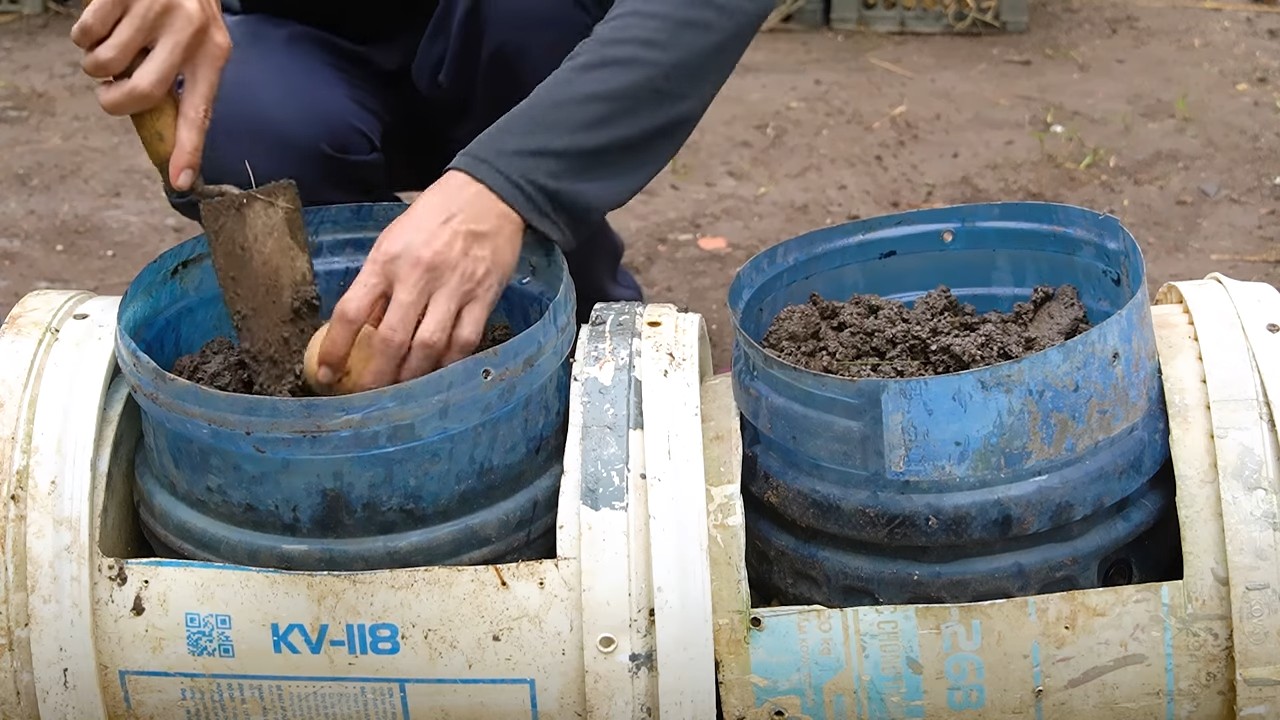
Planting Your Potatoes
Alright, let’s get planting! This is where the magic happens.
1. Prepare the Container: Make sure your container has drainage holes. If it doesn’t, drill some!
2. Add Potting Mix: Fill the bottom of the container with about 4-6 inches of potting mix.
3. Fertilize: Sprinkle some slow-release fertilizer over the potting mix. Follow the instructions on the fertilizer package.
4. Plant the Seed Potatoes: Place the seed potatoes on top of the potting mix, with the eyes facing up. Space them evenly if you’re planting multiple pieces.
5. Cover with Potting Mix: Cover the seed potatoes with another 4-6 inches of potting mix.
6. Water Thoroughly: Water the container well until water drains out of the bottom.
Hilling Your Potatoes
This is the secret to maximizing your potato yield in containers! Hilling encourages the potato plants to produce more potatoes along the buried stem.
1. Wait for Growth: Once the potato plants have grown about 6-8 inches tall, it’s time to hill.
2. Add More Potting Mix: Add more potting mix to the container, burying the stems up to the bottom set of leaves. Leave the top leaves exposed.
3. Repeat: Continue to hill the potatoes every few weeks as they grow, until you reach the top of the container.
4. Why This Works: The buried stems will sprout roots and produce more potatoes. It’s like giving your potato plants extra real estate to grow!
Caring for Your Potato Plants
Now that your potatoes are planted and hilled, it’s time to provide them with the care they need to thrive.
* Watering: Potatoes need consistent moisture, especially during tuber formation. Water deeply whenever the top inch of soil feels dry to the touch. Avoid overwatering, as this can lead to rot.
* Sunlight: Potatoes need at least 6-8 hours of sunlight per day. Place your container in a sunny location.
* Fertilizing: Continue to fertilize your potatoes every few weeks with a balanced fertilizer. You can also use a liquid fertilizer for a quick boost.
* Pest Control: Keep an eye out for pests like aphids, potato beetles, and flea beetles. Treat infestations promptly with insecticidal soap or other appropriate methods.
* Weeding: Remove any weeds that pop up in the container. Weeds compete with the potatoes for nutrients and water.
Harvesting Your Potatoes
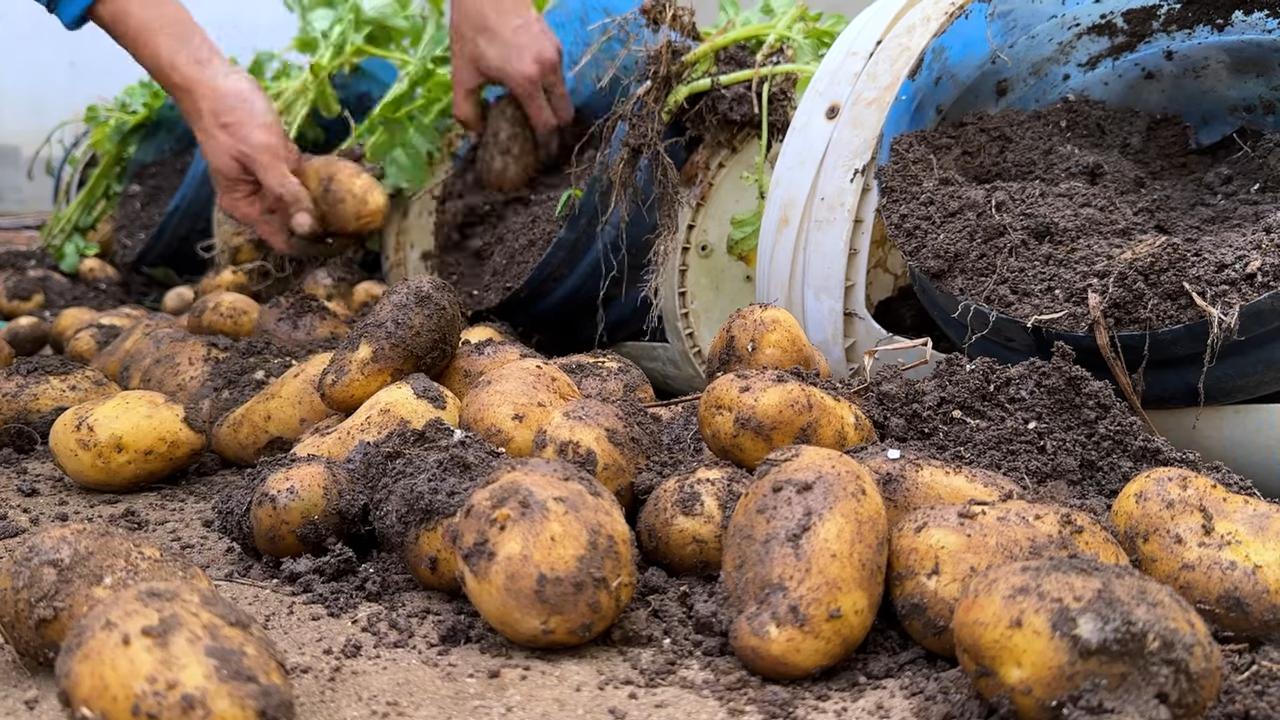
The moment we’ve all been waiting for! Harvesting your homegrown potatoes is incredibly rewarding.
1. When to Harvest: Early-season potatoes can be harvested when the plants start to flower. For larger potatoes, wait until the foliage starts to die back.
2. How to Harvest: Gently dig around the base of the plant with your hands or a trowel. Be careful not to damage the potatoes.
3. Harvesting “New” Potatoes: You can harvest “new” potatoes (small, tender potatoes) at any time by carefully digging around the edges of the container.
4. Storing Your Potatoes: Store your harvested potatoes in a cool, dark, and dry place. Avoid storing them near apples or bananas, as these fruits release ethylene gas, which can cause potatoes to sprout.
Troubleshooting Common Problems
Even with the best care, you might encounter some challenges along the way. Here are a few common problems and how to address them:
* Potato Blight: This fungal disease can cause brown spots on the leaves and stems. Prevent blight by providing good air circulation and avoiding overhead watering. Treat with a fungicide if necessary.
* Potato Scab: This disease causes rough, scabby patches on the potato skins. It’s more common in alkaline soils. Amend the soil with sulfur to lower the pH.
* Pests: As mentioned earlier, keep an eye out for pests and treat them promptly.
* Lack of Potatoes: If your plants are growing well but not producing potatoes, it could be due to a lack of sunlight, insufficient watering, or poor soil. Adjust your care accordingly.
Tips for Success
Here are a few extra tips to help you succeed with container potato gardening:
* Use Grow Bags: Grow bags are a great option for container potato gardening. They’re lightweight, breathable, and allow for excellent drainage.
* Rotate Your Crops: Don’t plant potatoes in the same container year after year. Rotate your crops to prevent soilborne diseases.
* Amend Your Soil: Add compost or other organic matter to your potting mix to improve its fertility and drainage.
* Have Fun!: Gardening should be enjoyable! Experiment with different varieties, try different techniques, and don’t be afraid to make mistakes.
Growing potatoes in containers is a fantastic way to enjoy fresh, homegrown potatoes, even if you don’t have a traditional garden. With a little planning and care, you can harvest a bountiful crop of delicious spuds. So, grab your supplies, get planting, and get ready to enjoy the fruits (or rather, the tubers) of your labor! Happy gardening!
Conclusion
So, there you have it! Growing potatoes without a garden isn’t just a whimsical idea; it’s a genuinely achievable and rewarding experience. We’ve explored a simple, space-saving method that allows anyone, regardless of their gardening limitations, to enjoy the satisfaction of harvesting their own homegrown potatoes. This DIY trick is a must-try for several compelling reasons.
Firstly, it democratizes potato cultivation. No longer is a sprawling garden a prerequisite for enjoying the fresh, earthy flavor of homegrown potatoes. Apartment dwellers, balcony gardeners, and anyone with limited outdoor space can now participate in the joy of growing their own food. This method is incredibly accessible, requiring minimal materials and effort.
Secondly, it’s a fantastic learning opportunity. Witnessing the entire potato life cycle, from sprouting eyes to a bountiful harvest, is an educational experience for both adults and children. It fosters a deeper appreciation for the food we consume and the natural processes that bring it to our tables.
Thirdly, the taste! Let’s be honest, homegrown potatoes simply taste better. They’re fresher, more flavorful, and free from the waxes and preservatives often found on commercially grown potatoes. The difference is truly remarkable.
But the beauty of this method lies in its adaptability. Feel free to experiment with different potato varieties. Russets, Yukon Golds, red potatoes – each will offer a unique flavor and texture to your harvest. You can also adjust the size of your container to suit your space and desired yield. Consider using organic potting mix and fertilizer for the healthiest and most flavorful potatoes.
Don’t be afraid to get creative! Try adding companion plants like marigolds or basil to your container to deter pests and enhance the overall health of your potato plants. You can even experiment with different types of containers, from traditional grow bags to repurposed buckets or barrels.
We encourage you to embrace this DIY trick and embark on your own potato-growing adventure. It’s a fun, educational, and ultimately delicious way to connect with nature and enjoy the fruits (or rather, tubers) of your labor.
And most importantly, we want to hear about your experiences! Share your successes, your challenges, and your creative variations in the comments below. Let’s build a community of urban potato growers and inspire others to discover the joy of homegrown food. Did you find a particularly effective fertilizer? Did you discover a unique way to protect your plants from pests? Share your knowledge and help us all become better potato growers.
This method of growing potatoes is not only practical but also sustainable. By growing your own food, you’re reducing your reliance on industrial agriculture and minimizing your carbon footprint. You’re also contributing to a more resilient and localized food system.
So, what are you waiting for? Grab a container, some seed potatoes, and get ready to experience the satisfaction of growing your own delicious, homegrown potatoes, even without a traditional garden. This **DIY potato growing** method is a game-changer!
Frequently Asked Questions (FAQ)
What kind of potatoes should I use?
You can use any variety of potato you like! However, seed potatoes are specifically grown for planting and are certified disease-free. These are the best option for a successful harvest. If you can’t find seed potatoes, you can use potatoes from the grocery store, but make sure they are organic and haven’t been treated with sprout inhibitors. Look for potatoes with “eyes” (small buds) that are starting to sprout.
How big should my container be?
A good starting point is a container that is at least 15-20 gallons in size. This will provide enough space for the potato plants to grow and produce a decent yield. The larger the container, the more potatoes you can potentially harvest. You can use grow bags, buckets, barrels, or even repurposed containers. Just make sure the container has drainage holes to prevent waterlogging.
What kind of soil should I use?
Use a well-draining potting mix. Avoid using garden soil, as it can be too heavy and compact, which can hinder potato growth. A mix of peat moss, perlite, and vermiculite is a good option. You can also add compost to the mix to provide extra nutrients.
How often should I water my potato plants?
Water your potato plants regularly, especially during hot and dry weather. The soil should be consistently moist, but not waterlogged. Check the soil moisture by sticking your finger into the soil. If the top inch feels dry, it’s time to water.
How much sunlight do potato plants need?
Potato plants need at least 6-8 hours of sunlight per day. Choose a location that receives plenty of sunlight. If you’re growing your potatoes indoors, you may need to supplement with grow lights.
When should I start planting my potatoes?
The best time to plant potatoes is in early spring, after the last frost. You can also start them indoors a few weeks before the last frost to get a head start.
How do I “hill” the potatoes?
As the potato plants grow, you’ll need to “hill” them by adding more soil to the container. This encourages the plants to produce more potatoes along the buried stem. When the plants are about 6 inches tall, add a few inches of soil to the container, leaving only the top leaves exposed. Repeat this process every few weeks until the container is full.
How long does it take to grow potatoes?
It typically takes 70-100 days to grow potatoes, depending on the variety. You can start harvesting “new potatoes” (small, immature potatoes) after about 70 days. For larger, more mature potatoes, wait until the plants have flowered and the foliage starts to die back.
How do I know when my potatoes are ready to harvest?
The best way to tell if your potatoes are ready to harvest is to check the foliage. When the plants have flowered and the foliage starts to turn yellow and die back, it’s time to harvest. You can also gently dig around the base of the plant to check the size of the potatoes.
What are some common potato pests and diseases?
Some common potato pests include aphids, potato beetles, and flea beetles. Common potato diseases include blight and scab. You can prevent pests and diseases by using healthy seed potatoes, providing good air circulation, and avoiding overwatering. If you do encounter pests or diseases, you can use organic pest control methods or fungicides.
Can I grow potatoes in a container indoors?
Yes, you can grow potatoes in a container indoors, but you’ll need to provide them with plenty of light. A sunny window or grow lights are essential for successful indoor potato growing.
What if my potato plants don’t flower?
Not all potato varieties flower, so don’t be alarmed if your plants don’t produce flowers. The foliage die-back is a more reliable indicator of harvest time.
Can I reuse the soil from my potato container?
It’s generally not recommended to reuse the soil from your potato container, as it may contain pests or diseases. It’s best to start with fresh potting mix each year.
How do I store my harvested potatoes?
Store your harvested potatoes in a cool, dark, and dry place. A root cellar is ideal, but a basement or garage will also work. Avoid storing potatoes in the refrigerator, as this can cause them to develop a sweet taste.
What can I do with my homegrown potatoes?
The possibilities are endless! You can boil them, bake them, fry them, mash them, roast them, or use them in soups, stews, and salads. Enjoy the delicious flavor of your homegrown potatoes!

Leave a Comment