
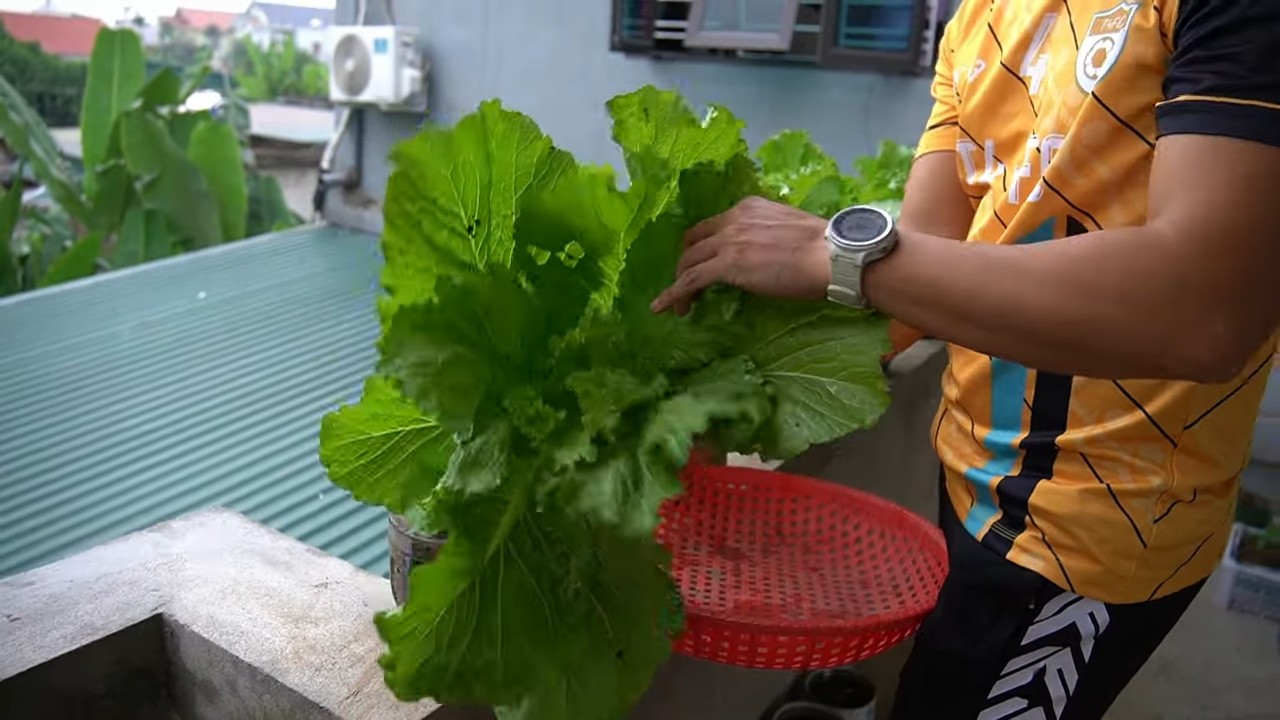
No Water Bottle Mustard Greens: Sounds intriguing, right? I know, it might seem a little out there, but trust me, this simple DIY trick can revolutionize your home gardening experience, especially if you’re craving fresh, peppery mustard greens! For centuries, mustard greens have been a staple in various cuisines, from Asian stir-fries to Southern comfort food. Their vibrant flavor and nutritional benefits have made them a beloved ingredient worldwide. But growing them can sometimes be tricky, especially when it comes to consistent watering and space constraints.
That’s where the magic of repurposing comes in! We’ve all got those empty water bottles lying around, destined for the recycling bin. What if I told you that you could transform them into mini-greenhouses, perfectly suited for nurturing your very own crop of mustard greens? This method is not only incredibly eco-friendly, giving those bottles a new lease on life, but it also simplifies the growing process, making it accessible to even the most novice gardeners.
Think about it: no more worrying about overwatering or underwatering, no more battling pests that thrive in open gardens. With this no water bottle mustard greens method, you’ll create a self-contained ecosystem that provides the ideal environment for your plants to flourish. So, ditch the store-bought greens and get ready to enjoy the satisfaction of harvesting your own delicious, homegrown mustard greens, all thanks to a simple water bottle and a little bit of know-how! Let’s get started!
Senfgrün Anbauen in einer Wasserflasche: Dein DIY-Garten für die Fensterbank
Hallo liebe Gartenfreunde! Habt ihr Lust auf frische, würzige Senfgrünblätter direkt aus eurer Küche? Und das Ganze ohne viel Aufwand und Platz? Dann seid ihr hier genau richtig! Ich zeige euch, wie ihr mit einer einfachen Wasserflasche und ein paar Handgriffen euren eigenen kleinen Senfgrün-Garten zaubern könnt. Das ist nicht nur super einfach, sondern auch eine tolle Möglichkeit, Plastik wiederzuverwerten und eure Mahlzeiten mit frischen, gesunden Zutaten aufzupeppen. Los geht’s!
Was du brauchst:
* Eine leere Plastikwasserflasche (1,5 oder 2 Liter sind ideal)
* Ein scharfes Messer oder eine Schere
* Erde (am besten Anzuchterde oder Blumenerde)
* Senfgrünsamen (gibt es in jedem Gartencenter oder online)
* Optional: Sprühflasche mit Wasser
* Optional: Kleine Steine oder Kies für die Drainage
Schritt-für-Schritt-Anleitung:
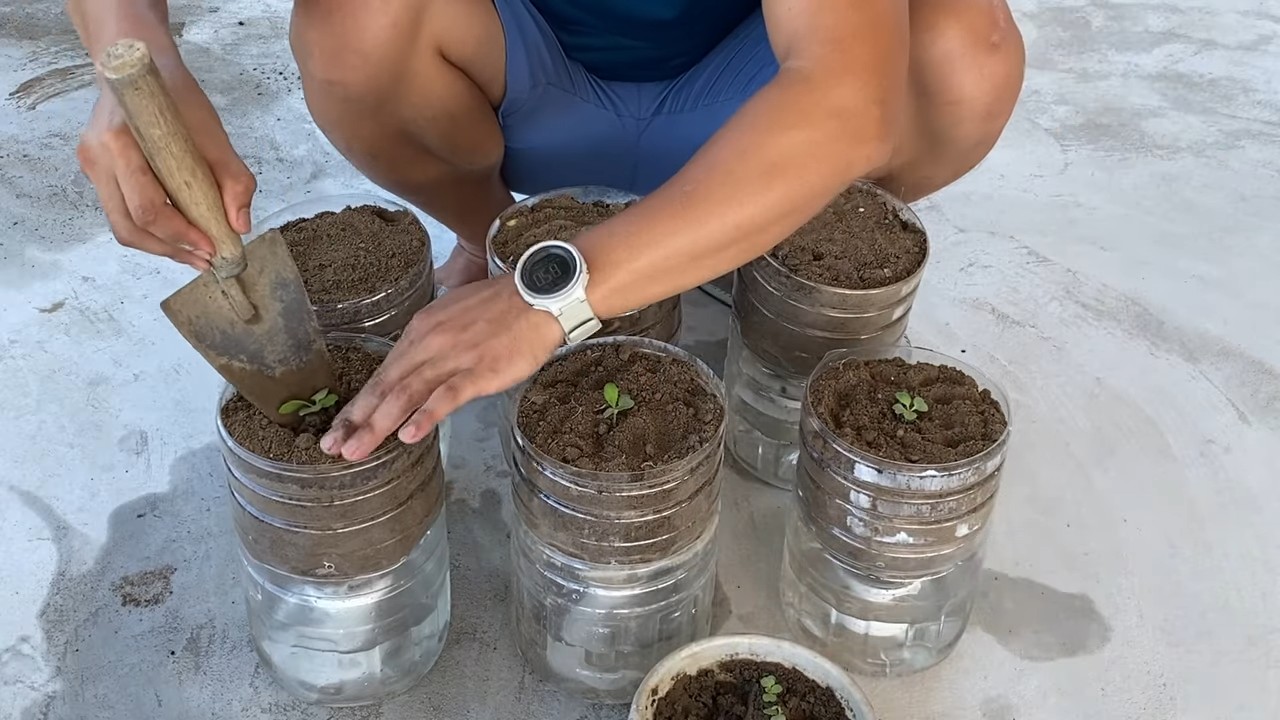
1. Die Wasserflasche vorbereiten: Zuerst müsst ihr die Wasserflasche gründlich reinigen. Entfernt alle Etiketten und spült sie mit warmem Wasser und etwas Spülmittel aus. Achtet darauf, dass keine Spülmittelreste zurückbleiben.
2. Die Flasche zuschneiden: Jetzt kommt der spannende Teil! Mit dem Messer oder der Schere schneidet ihr die Wasserflasche in zwei Hälften. Am besten schneidet ihr sie etwa 10-15 cm unterhalb des Flaschenhalses durch. Die obere Hälfte (mit dem Flaschenhals) wird später als eine Art Mini-Gewächshaus dienen.
3. Drainage schaffen (optional): Wenn ihr wollt, könnt ihr in den Boden der unteren Flaschenhälfte ein paar kleine Löcher bohren oder schneiden. Das sorgt für eine bessere Drainage und verhindert Staunässe. Alternativ könnt ihr auch eine dünne Schicht kleine Steine oder Kies auf den Boden der Flasche legen.
4. Erde einfüllen: Füllt die untere Flaschenhälfte mit Erde. Lasst dabei etwa 2-3 cm Platz bis zum Rand. Drückt die Erde leicht an, aber nicht zu fest. Sie sollte locker und luftig bleiben.
5. Samen aussäen: Verteilt die Senfgrünsamen gleichmäßig auf der Erde. Achtet darauf, dass sie nicht zu dicht beieinander liegen. Eine gute Faustregel ist, etwa 1-2 cm Abstand zwischen den Samen zu lassen.
6. Samen bedecken: Bedeckt die Samen mit einer dünnen Schicht Erde (etwa 0,5 cm). Drückt die Erde leicht an.
7. Angießen: Gießt die Erde vorsichtig an. Am besten verwendet ihr dafür eine Sprühflasche, damit die Samen nicht weggespült werden. Die Erde sollte feucht, aber nicht nass sein.
8. Mini-Gewächshaus aufsetzen: Setzt die obere Flaschenhälfte (mit dem Flaschenhals) umgekehrt auf die untere Hälfte. So entsteht ein kleines Mini-Gewächshaus, das für ein feuchtwarmes Klima sorgt und die Keimung der Samen beschleunigt.
9. Standort wählen: Stellt euren Mini-Senfgrün-Garten an einen hellen, warmen Ort. Ein Fensterbrett ist ideal. Vermeidet direkte Sonneneinstrahlung, da die Blätter sonst verbrennen können.
10. Pflege: Haltet die Erde feucht, aber nicht nass. Gießt regelmäßig mit einer Sprühflasche. Lüftet das Mini-Gewächshaus regelmäßig, indem ihr die obere Flaschenhälfte kurz abnehmt. So vermeidet ihr Schimmelbildung.
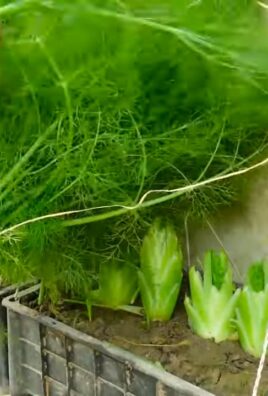
11. Ernten: Nach etwa 2-3 Wochen könnt ihr die ersten Senfgrünblätter ernten. Schneidet sie einfach mit einer Schere ab. Die Pflanze wird weiterwachsen und neue Blätter bilden.
Tipps und Tricks für eine erfolgreiche Senfgrün-Ernte
* Die richtige Erde: Verwendet am besten Anzuchterde oder Blumenerde. Diese ist locker und nährstoffreich und bietet den Samen optimale Bedingungen zum Keimen.
* Die richtige Wassermenge: Achtet darauf, dass die Erde immer feucht ist, aber nicht nass. Staunässe kann zu Schimmelbildung führen.
* Der richtige Standort: Senfgrün braucht viel Licht, aber keine direkte Sonneneinstrahlung. Ein helles Fensterbrett ist ideal.
* Regelmäßiges Lüften: Lüftet das Mini-Gewächshaus regelmäßig, um Schimmelbildung zu vermeiden.
* Nachdüngen: Wenn die Blätter gelb werden, kann das ein Zeichen für Nährstoffmangel sein. Düngt die Pflanzen dann mit einem milden Flüssigdünger.
* Mehrere Flaschen: Um eine kontinuierliche Ernte zu gewährleisten, könnt ihr mehrere Wasserflaschen gleichzeitig bepflanzen.
* Verschiedene Sorten: Es gibt verschiedene Senfgrünsorten mit unterschiedlichen Geschmacksrichtungen. Probiert verschiedene Sorten aus, um euren Favoriten zu finden.
* Schnecken und Schädlinge: Da ihr die Senfgrün in der Wohnung anbaut, ist die Wahrscheinlichkeit für Schädlingsbefall gering. Sollten dennoch Schädlinge auftreten, könnt ihr sie mit natürlichen Mitteln bekämpfen.
* Erntezeitpunkt: Erntet die Blätter, wenn sie etwa 5-10 cm groß sind. Je jünger die Blätter, desto milder ist der Geschmack.
* Verwendung: Senfgrün ist vielseitig verwendbar. Es schmeckt gut in Salaten, Suppen, Smoothies oder als Beilage zu Fleisch- und Fischgerichten.
Warum Senfgrün so gesund ist
Senfgrün ist nicht nur lecker, sondern auch sehr gesund. Es ist reich an Vitaminen (A, C, K), Mineralstoffen (Kalzium, Eisen, Kalium) und Antioxidantien. Senfgrün soll entzündungshemmend wirken, das Immunsystem stärken und die Verdauung fördern. Außerdem ist es kalorienarm und somit ideal für eine gesunde Ernährung.
Weitere Ideen für deinen DIY-Garten
Wenn ihr Gefallen an eurem Mini-Senfgrün-Garten gefunden habt, könnt ihr auch andere Kräuter und Gemüsesorten in Wasserflaschen anbauen. Wie wäre es mit Basilikum, Petersilie, Schnittlauch, Radieschen oder Salat? Der Fantasie sind keine Grenzen gesetzt!
Problemlösung: Häufige Fehler und wie man sie vermeidet
* Samen keimen nicht: Möglicherweise sind die Samen zu alt oder die Erde zu trocken. Achtet darauf, frische Samen zu verwenden und die Erde feucht zu halten.
* Schimmelbildung: Zu hohe Luftfeuchtigkeit und mangelnde Belüftung können zu Schimmelbildung führen. Lüftet das Mini-Gewächshaus regelmäßig und achtet darauf, dass die Erde nicht zu nass ist.
* Gelbe Blätter: Nährstoffmangel kann zu gelben Blättern führen. Düngt die Pflanzen mit einem milden Flüssigdünger.
* Schädlinge: Obwohl selten, können Schädlinge auftreten. Bekämpft sie mit natürlichen Mitteln wie Neemöl oder Schmierseifenlösung.
* Pflanzen wachsen nicht: Zu wenig Licht kann das Wachstum beeinträchtigen. Stellt die Pflanzen an einen helleren Ort.
Ich hoffe, diese Anleitung hat euch gefallen und inspiriert, euren eigenen Mini-Senfgrün-Garten zu starten. Es ist wirklich kinderleicht und macht Spaß! Viel Erfolg und guten Appetit!
Conclusion
So, there you have it! Ditch the wilting, sad-looking greens and embrace the vibrant, crisp deliciousness that comes from growing your own mustard greens using this incredibly simple, no-water-bottle method. This isn’t just about saving a trip to the grocery store; it’s about connecting with your food, understanding its journey from seed to plate, and enjoying the unparalleled flavor of freshly harvested greens.
This DIY trick is a game-changer for several reasons. First, it’s incredibly space-efficient. Whether you have a sprawling garden or a tiny balcony, you can easily tuck a few of these mini-gardens into any sunny spot. Second, it’s budget-friendly. You’re repurposing materials you likely already have, minimizing your expenses and reducing waste. Third, it’s incredibly rewarding. There’s something deeply satisfying about nurturing a plant from seed and watching it flourish, knowing you played a direct role in its growth.
But the best part? The taste! Homegrown mustard greens, especially those nurtured with a little extra care, boast a flavor that’s far superior to anything you’ll find in a supermarket. They’re peppery, slightly tangy, and bursting with freshness.
Ready to take your mustard greens game to the next level? Consider these variations:
* Spice it up: Experiment with different varieties of mustard greens. Some are milder, while others pack a serious punch. Try ‘Red Giant’ for a beautiful color and a slightly milder flavor, or ‘Florida Broadleaf’ for a classic, robust taste.
* Companion Planting: Plant your mustard greens alongside other beneficial herbs and vegetables. Marigolds can help deter pests, while dill can attract beneficial insects.
* Succession Planting: Plant new seeds every few weeks to ensure a continuous harvest of fresh greens throughout the growing season.
* Vertical Gardening: If space is truly limited, consider creating a vertical garden using multiple water bottles or other recycled containers.
This no-water-bottle method for growing mustard greens is more than just a gardening hack; it’s a gateway to a more sustainable, flavorful, and fulfilling way of eating. It’s a simple, accessible way to bring the joy of gardening into your life, regardless of your experience level or available space.
Don’t just take our word for it. We wholeheartedly encourage you to try this DIY trick for yourself. Start small, experiment with different varieties, and discover the joy of growing your own fresh, delicious mustard greens. We’re confident you’ll be amazed by the results.
And most importantly, we want to hear about your experience! Share your photos, tips, and stories in the comments below. Let’s build a community of passionate gardeners who are committed to growing their own food and sharing their knowledge with others. What challenges did you face? What successes did you celebrate? What unique variations did you try? Your feedback will help us refine this method and inspire others to embark on their own gardening adventures. So, grab a water bottle, some seeds, and get ready to experience the magic of homegrown mustard greens!
Frequently Asked Questions (FAQ)
What kind of soil should I use for growing mustard greens in water bottles?
The best soil for growing mustard greens in water bottles is a well-draining potting mix. Avoid using garden soil, as it can be too heavy and compact, hindering root growth. Look for a potting mix that contains ingredients like peat moss, perlite, and vermiculite, which will provide good drainage and aeration. You can also amend your potting mix with compost to add nutrients and improve its water-holding capacity. A slightly acidic to neutral pH (around 6.0 to 7.0) is ideal for mustard greens.
How often should I water my mustard greens grown in water bottles?
Watering frequency depends on several factors, including the weather, the size of your water bottle container, and the type of potting mix you’re using. Generally, you should water your mustard greens when the top inch of soil feels dry to the touch. Avoid overwatering, as this can lead to root rot. Ensure that your water bottle has drainage holes to allow excess water to escape. During hot, dry weather, you may need to water your plants daily, while during cooler, wetter weather, you may only need to water them every few days. Check the soil moisture regularly and adjust your watering schedule accordingly.
How much sunlight do mustard greens need when grown in water bottles?
Mustard greens thrive in full sun, which means they need at least 6 hours of direct sunlight per day. However, they can also tolerate partial shade, especially during the hottest part of the day. If you’re growing your mustard greens indoors, place them near a sunny window or use grow lights to supplement natural light. Insufficient sunlight can result in leggy growth and reduced yields. Monitor your plants closely and adjust their position as needed to ensure they’re getting enough light.
When is the best time to harvest my mustard greens grown in water bottles?
You can start harvesting your mustard greens when the leaves are about 4-6 inches long. This is typically about 30-45 days after planting. Harvest the outer leaves first, leaving the inner leaves to continue growing. This will allow you to enjoy a continuous harvest for several weeks. You can also harvest the entire plant at once if you prefer. The flavor of mustard greens tends to become stronger as they mature, so harvest them when they’re at your preferred level of spiciness.
What are some common pests and diseases that affect mustard greens grown in water bottles, and how can I prevent them?
Common pests that can affect mustard greens include aphids, flea beetles, and cabbage worms. To prevent pest infestations, inspect your plants regularly and remove any pests you find by hand. You can also use insecticidal soap or neem oil to control pests. Diseases that can affect mustard greens include downy mildew and white rust. To prevent diseases, ensure good air circulation around your plants and avoid overwatering. You can also use a fungicide to control diseases if necessary. Practicing crop rotation and using disease-resistant varieties can also help prevent pest and disease problems.
Can I grow other types of greens in water bottles using the same method?
Yes, absolutely! This no-water-bottle method is versatile and can be used to grow a variety of other greens, including spinach, lettuce, kale, and arugula. The principles are the same: provide well-draining soil, adequate sunlight, and regular watering. You may need to adjust the spacing and harvesting times depending on the specific type of greens you’re growing. Experiment with different varieties and find what works best for you and your growing conditions.
How do I prevent my water bottle containers from tipping over?
To prevent your water bottle containers from tipping over, especially in windy conditions, you can use a few different strategies. First, ensure that the bottom of the water bottle is stable and flat. You can also add some weight to the bottom of the container by placing rocks or gravel inside. Another option is to group several water bottles together and secure them with twine or zip ties. You can also place the water bottles inside a larger container, such as a crate or a tray, to provide additional stability.
Can I reuse the soil from my water bottle containers for future plantings?
While you can reuse the soil from your water bottle containers, it’s important to amend it with fresh compost or other organic matter to replenish nutrients that have been depleted. Over time, the soil can also become compacted and lose its drainage capacity. Before reusing the soil, remove any plant debris and break up any clumps. You can also sterilize the soil by baking it in the oven or microwaving it to kill any potential pests or diseases. However, sterilizing the soil can also kill beneficial microorganisms, so it’s important to add compost or other organic matter to reintroduce them.
Leave a Comment