
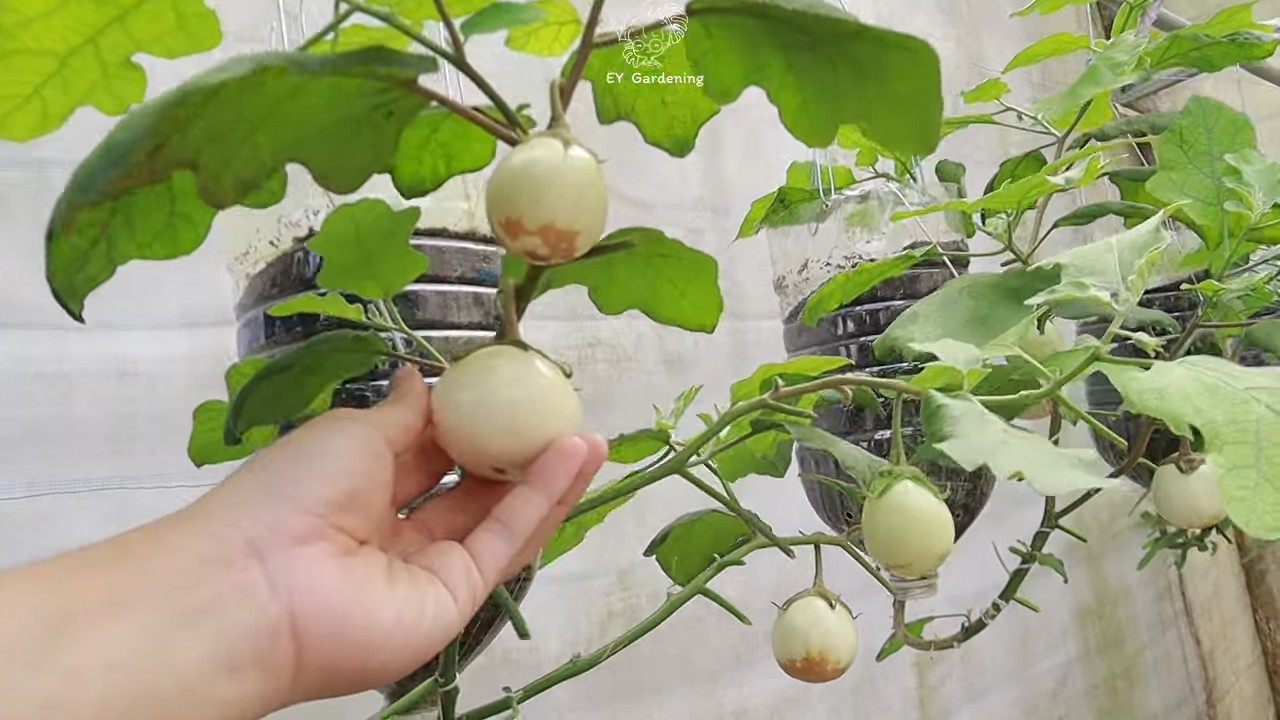
Upside Down Eggplant Garden: Imagine plucking plump, juicy eggplants right from hanging baskets on your patio! Sounds like something out of a fairytale, right? Well, it’s not! With a few simple steps and a dash of DIY spirit, you can create your very own upside down eggplant garden and enjoy a bountiful harvest.
The concept of upside-down gardening isn’t new. While its exact origins are debated, resourceful gardeners have long experimented with unconventional methods to maximize space and yield. Some believe it draws inspiration from ancient hanging gardens, while others see it as a modern adaptation for urban dwellers. Regardless of its history, the appeal is undeniable.
Why should you try this unique gardening method? Well, for starters, it’s a fantastic solution for those with limited space. If you’re dreaming of fresh eggplants but lack a traditional garden plot, this is your answer! Plus, an upside down eggplant garden minimizes soilborne diseases and pests, keeping your precious plants healthy and thriving. I’ve found that it also makes watering and harvesting a breeze. So, ditch the digging and embrace the delightful world of upside-down gardening – your taste buds (and your neighbors) will thank you!
Kopfstehende Auberginen-Garten: Dein DIY-Guide für eine ungewöhnliche Ernte
Hey Gartenfreunde! Habt ihr schon mal darüber nachgedacht, eure Auberginen kopfüber anzubauen? Klingt verrückt, oder? Aber glaubt mir, es ist nicht nur ein Hingucker, sondern kann auch echt praktisch sein. Weniger Unkraut, weniger Schädlinge und eine platzsparende Lösung – was will man mehr? Ich zeige euch heute, wie ihr euren eigenen Kopfstehenden Auberginen-Garten ganz einfach selber bauen könnt. Los geht’s!
Was du brauchst: Die Materialliste
Bevor wir loslegen, hier eine Liste mit allem, was du für dein Kopfstehendes Auberginen-Projekt benötigst:
* Eimer: Ein stabiler Eimer aus Plastik (ca. 10-20 Liter Fassungsvermögen) ist ideal. Achte darauf, dass er sauber ist und keine scharfen Kanten hat.
* Auberginenpflanze: Wähle eine gesunde, junge Auberginenpflanze aus. Am besten eine Sorte, die nicht allzu groß wird.
* Erde: Hochwertige Blumenerde ist wichtig für das Wachstum deiner Aubergine.
* Gartenvlies oder Jute: Um die Pflanze im Eimer zu fixieren und die Erde zurückzuhalten.
* Messer oder Bohrer: Zum Anbringen eines Abflusslochs und zum Schneiden des Gartenvlies.
* Haken oder Kette: Zum Aufhängen des Eimers. Achte darauf, dass der Haken oder die Kette das Gewicht des bepflanzten Eimers tragen kann.
* Gießkanne: Zum Bewässern deiner Aubergine.
* Dünger: Ein organischer Dünger unterstützt das Wachstum und die Fruchtbildung.
* Handschuhe: Zum Schutz deiner Hände.
* Maßband oder Lineal: Zum genauen Messen.
* Schere: Zum Zuschneiden des Gartenvlies.
Schritt-für-Schritt-Anleitung: So baust du deinen Kopfstehenden Auberginen-Garten
Jetzt geht’s ans Eingemachte! Folge diesen Schritten, um deinen eigenen Kopfstehenden Auberginen-Garten zu bauen:
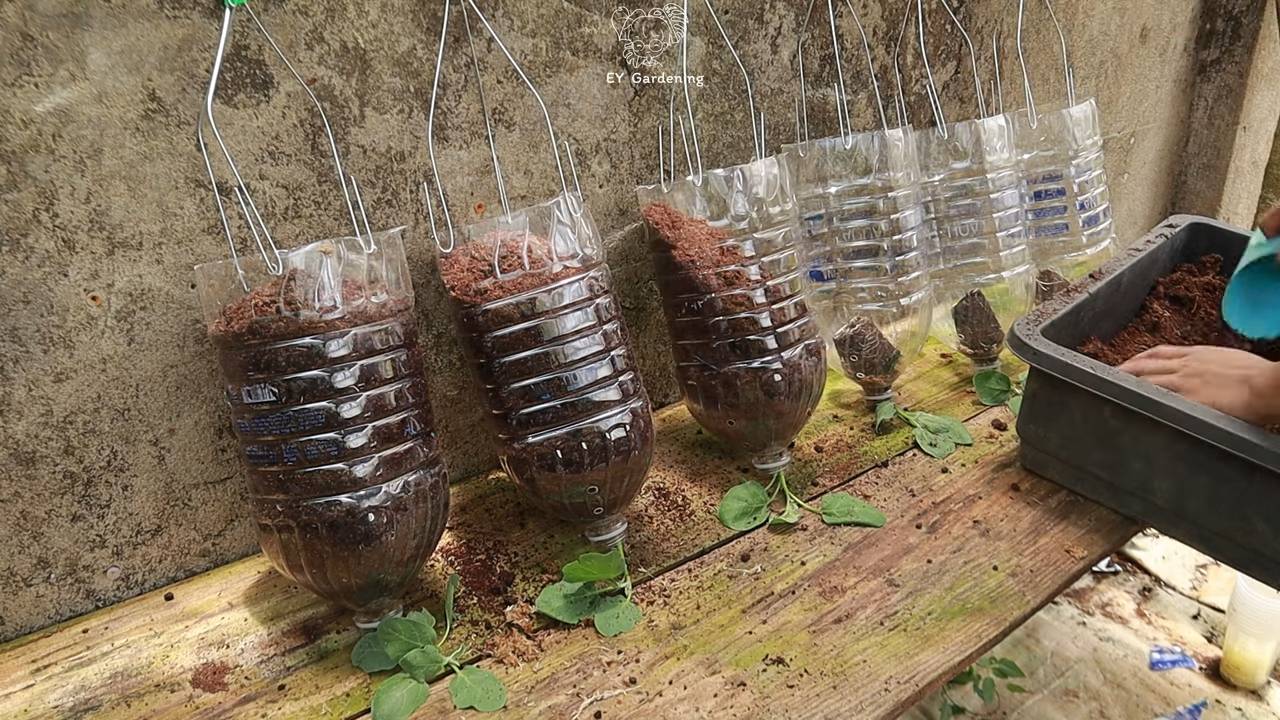
1. Abflussloch bohren: Zuerst bohren wir ein Abflussloch in den Boden des Eimers. Das ist wichtig, damit überschüssiges Wasser ablaufen kann und die Wurzeln nicht faulen. Ein Loch mit einem Durchmesser von ca. 1 cm reicht völlig aus.
2. Loch für die Pflanze vorbereiten: Nun kommt der knifflige Teil: Wir müssen ein Loch in den Boden des Eimers schneiden, durch das die Auberginenpflanze später hindurchgesteckt wird. Das Loch sollte groß genug sein, damit die Pflanze hindurchpasst, aber nicht so groß, dass die Erde herausfällt. Ein Durchmesser von ca. 5-7 cm ist ein guter Richtwert. Ich empfehle, das Loch mit einem Messer vorsichtig auszuschneiden.
3. Gartenvlies zuschneiden: Schneide ein Stück Gartenvlies oder Jute zu, das etwas größer ist als das Loch, das du gerade in den Eimer geschnitten hast. Das Vlies dient dazu, die Erde im Eimer zu halten und zu verhindern, dass sie beim Gießen herausfällt.
4. Pflanze vorbereiten: Nimm deine Auberginenpflanze vorsichtig aus dem Topf. Lockere die Wurzeln etwas auf, damit sie sich später besser im Eimer ausbreiten können.
5. Pflanze einsetzen: Führe die Auberginenpflanze vorsichtig von unten durch das Loch im Eimer. Achte darauf, die Wurzeln nicht zu beschädigen. Das Gartenvlies legst du dabei um den Stiel der Pflanze, sodass es das Loch gut abdichtet.
6. Eimer befüllen: Jetzt füllen wir den Eimer mit Erde. Achte darauf, dass die Erde gut um die Wurzeln der Pflanze verteilt ist. Drücke die Erde leicht an, aber nicht zu fest. Lass oben noch ein paar Zentimeter Platz, damit du später gut gießen kannst.
7. Aufhängung anbringen: Befestige den Haken oder die Kette an den Seiten des Eimers. Achte darauf, dass die Aufhängung stabil ist und das Gewicht des bepflanzten Eimers tragen kann.
8. Aufhängen und gießen: Hänge den Eimer an einem sonnigen Ort auf. Gieße die Auberginenpflanze gründlich, bis das Wasser aus dem Abflussloch läuft.
Pflege deiner Kopfstehenden Aubergine: Tipps und Tricks
Damit deine Kopfstehende Aubergine prächtig gedeiht, hier noch ein paar Pflegetipps:
* Gießen: Auberginen brauchen regelmäßig Wasser, besonders an heißen Tagen. Überprüfe die Erde regelmäßig und gieße, wenn sie sich trocken anfühlt.
* Düngen: Dünge deine Aubergine regelmäßig mit einem organischen Dünger. Das fördert das Wachstum und die Fruchtbildung.
* Sonnenschein: Auberginen lieben die Sonne! Stelle sicher, dass deine Pflanze mindestens 6 Stunden Sonne pro Tag bekommt.
* Schädlinge: Kontrolliere deine Pflanze regelmäßig auf Schädlinge wie Blattläuse oder Spinnmilben. Bei Bedarf kannst du biologische Schädlingsbekämpfungsmittel einsetzen.
* Stützen: Wenn die Auberginen größer werden, kann es sein, dass du die Pflanze zusätzlich stützen musst, damit sie nicht abbricht.
Häufige Probleme und Lösungen
Auch beim Kopfstehenden Auberginen-Anbau können Probleme auftreten. Hier sind einige häufige Probleme und wie du sie lösen kannst:
* Gelbe Blätter: Gelbe Blätter können ein Zeichen für Wassermangel, Nährstoffmangel oder Schädlingsbefall sein. Überprüfe die Erde, dünge die Pflanze und kontrolliere sie auf Schädlinge.
* Faule Früchte: Faule Früchte können durch zu viel Feuchtigkeit oder Pilzbefall verursacht werden. Achte darauf, dass die Erde gut abtrocknen kann und entferne befallene Früchte sofort.
* Wachstumsstörungen: Wachstumsstörungen können durch zu wenig Sonne, Nährstoffmangel oder Wurzelschäden verursacht werden. Stelle sicher, dass die Pflanze genügend Sonne bekommt, dünge sie regelmäßig und achte darauf, die Wurzeln beim Umtopfen nicht zu beschädigen.
Die richtige Auberginensorte wählen
Nicht jede Auberginensorte eignet sich gleich gut für den Anbau im Kopfstehenden Garten. Kleinere, buschige Sorten sind in der Regel besser geeignet als große, ausladende Sorten. Hier sind ein paar Sorten, die ich empfehlen kann:
* ‘Patio Baby’: Eine kompakte Sorte mit kleinen, dunkelvioletten Früchten.
* ‘Fairy Tale’: Eine Sorte mit gestreiften, länglichen Früchten.
* ‘Hansel’: Eine Sorte mit kleinen, dunkelvioletten Früchten, die in Büscheln wachsen.
Der richtige Standort für deinen Kopfstehenden Auberginen-Garten
Der Standort ist entscheidend für den Erfolg deines Kopfstehenden Auberginen-Gartens. Auberginen brauchen viel Sonne, daher solltest du einen Standort wählen, der mindestens 6 Stunden Sonne pro Tag bekommt. Außerdem sollte der Standort windgeschützt sein, damit die Pflanze nicht beschädigt wird. Ein Balkon, eine Terrasse oder ein Garten mit einer stabilen Aufhängung sind ideal.
Erntezeit: Wann sind die Auberginen reif?
Die Erntezeit hängt von der Sorte und den Wachstumsbedingungen ab. In der Regel sind Auberginen reif, wenn sie eine glänzende, pralle Haut haben und sich leicht eindrücken lassen. Die Farbe sollte intensiv sein und der Stiel sollte sich leicht vom Stängel lösen lassen. Ernte die Auberginen regelmäßig, um die Fruchtbildung anzuregen.
Winterfest machen: So überwinterst du deine Auberginenpflanze
Auberginen sind nicht winterhart. Wenn du deine Pflanze überwintern möchtest, musst du sie vor dem ersten Frost ins Haus holen. Schneide die Pflanze zurück und stelle sie an einen hellen, kühlen Ort. Gieße sie nur sparsam und dünge sie nicht. Im Frühjahr kannst du die Pflanze wieder ins Freie stellen, sobald die Temperaturen steigen.
Ich hoffe, diese Anleitung hilft dir dabei, deinen
Conclusion
So, there you have it! Creating your own upside down eggplant garden is not just a quirky gardening project; it’s a game-changer for anyone looking to maximize space, deter pests, and enjoy a bountiful harvest of delicious eggplants. We’ve walked you through the simple steps, highlighted the benefits, and hopefully, inspired you to give this method a try.
Why is this a must-try? Because it’s efficient, effective, and frankly, incredibly rewarding. Imagine the satisfaction of watching your eggplants dangle gracefully, ripening in the sun, all while taking up minimal ground space. This method is particularly beneficial for those with limited garden space, such as apartment dwellers with balconies or homeowners with small yards. It’s also a fantastic way to keep your precious eggplants away from ground-dwelling pests and diseases that can wreak havoc on your crop. Plus, the improved air circulation around the plant helps to prevent fungal issues, leading to healthier, more productive plants.
But the beauty of this DIY project lies in its adaptability. Feel free to experiment with different container sizes and materials. While we’ve suggested using a 5-gallon bucket, you could also repurpose old plastic tubs or even create your own hanging planters from burlap sacks for a more rustic look. Just ensure that the container is sturdy enough to support the weight of the mature eggplant plant and that it has adequate drainage.
Consider also the variety of eggplant you choose. While smaller, more compact varieties like ‘Fairy Tale’ or ‘Hansel’ are particularly well-suited for upside down gardening, you can certainly try larger varieties as well. Just be mindful of the extra weight and provide additional support if needed. You can also companion plant herbs like basil or marigolds in the top of the container to deter pests and attract beneficial insects.
Don’t be afraid to get creative with your setup. You can hang your upside down eggplant garden from a sturdy tree branch, a porch railing, or even a specially designed plant stand. The key is to ensure that the plant receives plenty of sunlight and is protected from strong winds.
Ultimately, the success of your upside down eggplant garden depends on your willingness to experiment and adapt. Pay close attention to your plants, monitor their growth, and adjust your watering and fertilizing schedule as needed. Remember, gardening is a learning process, and even experienced gardeners encounter challenges along the way.
We are confident that you’ll find this DIY trick to be a valuable addition to your gardening repertoire. It’s a fun, engaging, and ultimately rewarding way to grow your own fresh, delicious eggplants.
So, what are you waiting for? Gather your supplies, follow our simple instructions, and get ready to experience the joy of growing your own upside down eggplant garden. We can’t wait to hear about your experiences! Share your photos, tips, and challenges in the comments below. Let’s create a community of upside down eggplant gardeners and learn from each other. Happy gardening!
Frequently Asked Questions (FAQ)
What type of eggplant is best for upside down gardening?
Smaller, more compact eggplant varieties like ‘Fairy Tale,’ ‘Hansel,’ ‘Patio Baby,’ or even some Japanese eggplant varieties tend to thrive in upside down containers. Their smaller size and less extensive root systems make them well-suited for the limited space. However, you can certainly try larger varieties, but be prepared to provide extra support as the plant grows and the fruits develop. Consider the weight of the mature plant and choose a container and hanging system that can handle it.
How often should I water my upside down eggplant?
Watering frequency depends on several factors, including the weather, the size of the container, and the type of potting mix you use. Generally, you’ll need to water your upside down eggplant more frequently than you would a plant in the ground, as the container dries out more quickly. Check the soil moisture regularly by sticking your finger about an inch into the soil. If it feels dry, it’s time to water. Aim to keep the soil consistently moist but not waterlogged. During hot, sunny weather, you may need to water daily, while during cooler, cloudy weather, you may only need to water every other day.
What kind of fertilizer should I use for my upside down eggplant?
Eggplants are heavy feeders, so regular fertilization is essential for healthy growth and abundant fruit production. Use a balanced fertilizer with an NPK ratio (nitrogen, phosphorus, potassium) of around 10-10-10 or 14-14-14. You can use either a slow-release granular fertilizer or a liquid fertilizer. If using a granular fertilizer, mix it into the potting mix at planting time and then side-dress the plant every few weeks. If using a liquid fertilizer, dilute it according to the package instructions and apply it every one to two weeks. Be sure to follow the instructions carefully to avoid over-fertilizing, which can damage the plant. Organic options like compost tea or fish emulsion are also excellent choices.
How do I prevent pests from attacking my upside down eggplant?
While upside down gardening can help deter some ground-dwelling pests, your eggplant may still be susceptible to other pests like aphids, flea beetles, and spider mites. Regularly inspect your plants for signs of infestation, such as yellowing leaves, sticky residue, or webbing. If you spot any pests, take action immediately. You can try spraying the plant with a strong stream of water to dislodge the pests, or you can use an insecticidal soap or neem oil. Companion planting with herbs like basil, marigolds, or nasturtiums can also help to deter pests.
How much sunlight does my upside down eggplant need?
Eggplants need at least 6-8 hours of direct sunlight per day to thrive. Choose a location for your upside down eggplant garden that receives plenty of sunlight throughout the day. If you live in a particularly hot climate, you may need to provide some afternoon shade to prevent the plant from getting scorched.
What if the eggplant falls out of the hole?
This is a common concern, especially when the plant is young and the root system is not yet fully established. To prevent this, make sure the hole in the container is not too large. You can also use a piece of burlap or landscape fabric to create a “sling” to support the root ball. Gently wrap the fabric around the root ball and secure it with twine before inserting the plant into the hole. As the plant grows, the roots will eventually fill the container and provide more stability.
Can I grow other vegetables upside down besides eggplant?
Yes, you can! Tomatoes, peppers, cucumbers, and even some herbs can be successfully grown upside down. The same principles apply: choose compact varieties, use a sturdy container, and provide adequate support.
How do I know when my eggplants are ready to harvest?
Eggplants are typically ready to harvest when they are firm, glossy, and have reached their mature size and color. The skin should be smooth and unblemished. Gently press the skin with your thumb; if it springs back, the eggplant is ripe. If it feels hard and doesn’t give, it’s likely overripe. Use a sharp knife or pruning shears to cut the eggplant from the plant, leaving a short stem attached.
What do I do if my upside down eggplant plant isn’t producing fruit?
There are several reasons why your eggplant plant may not be producing fruit. It could be due to insufficient sunlight, inadequate watering or fertilization, or a lack of pollination. Make sure your plant is receiving at least 6-8 hours of direct sunlight per day, water it regularly, and fertilize it every one to two weeks. You can also try hand-pollinating the flowers by gently shaking the plant or using a small paintbrush to transfer pollen from one flower to another.
Can I reuse the soil from my upside down eggplant garden next year?
It’s generally not recommended to reuse the same soil year after year, as it can become depleted of nutrients and harbor pests and diseases. However, if you want to reuse the soil, you can amend it with compost, aged manure, and other organic matter to replenish the nutrients. You should also sterilize the soil by baking it in the oven or solarizing it in the sun to kill any harmful pathogens.

Leave a Comment