
Mushroom Bowl Gardening DIY: Ever dreamt of having a miniature, whimsical forest right on your kitchen counter? I know I have! Forget sprawling gardens and endless weeding; we’re diving into the enchanting world of mushroom bowl gardening. This isn’t just about growing mushrooms; it’s about creating a living piece of art, a conversation starter, and a sustainable source of delicious fungi, all in one charming bowl.
The practice of cultivating mushrooms dates back centuries, with evidence suggesting that the Chinese were among the first to intentionally grow them. While not exactly the same as our modern mushroom bowl gardening, their early efforts highlight the enduring appeal of these fascinating organisms. Today, with space at a premium and a growing desire for fresh, locally sourced food, the mushroom bowl gardening DIY approach offers a perfect solution.
Why do you need this DIY trick? Because it’s incredibly rewarding! Imagine harvesting your own oyster mushrooms for a gourmet meal, or simply enjoying the calming presence of a thriving ecosystem in your home. Plus, it’s a fantastic way to reduce food waste by using coffee grounds and other kitchen scraps as a growing medium. So, let’s embark on this exciting journey together and unlock the secrets to successful mushroom bowl gardening!
Pilzzucht im Schüsselgarten: Dein DIY-Leitfaden für zu Hause
Hallo liebe Gartenfreunde und Pilzliebhaber! Habt ihr euch jemals gefragt, wie es wäre, eure eigenen köstlichen Pilze direkt in eurer Küche zu züchten? Mit diesem DIY-Projekt verwandeln wir eine einfache Schüssel in einen blühenden Pilzgarten. Keine Angst, es ist einfacher als es klingt und macht unglaublich viel Spaß! Lasst uns gemeinsam in die Welt der Pilzzucht eintauchen.
Was du für deinen Pilz-Schüsselgarten brauchst:
* Eine Schüssel: Wähle eine Schüssel aus Keramik, Glas oder Kunststoff. Die Größe hängt davon ab, wie viele Pilze du züchten möchtest. Eine Schüssel mit einem Durchmesser von 20-30 cm ist ein guter Anfang.
* Pilzbrut: Das ist das Herzstück unseres Projekts! Du kannst Pilzbrut online oder in Gartencentern kaufen. Beliebte Sorten für Anfänger sind Austernpilze (Pleurotus ostreatus) oder Shiitake (Lentinula edodes). Achte darauf, dass die Brut frisch ist.
* Substrat: Das Substrat ist die Nahrungsgrundlage für deine Pilze. Geeignete Substrate sind Stroh, Sägemehl, Kaffeesatz oder eine Mischung daraus. Wir werden uns hier auf die Verwendung von Stroh konzentrieren, da es leicht zugänglich und einfach zu verarbeiten ist.
* Kalk: Kalk hilft, den pH-Wert des Substrats zu regulieren und unerwünschte Mikroorganismen zu unterdrücken.
* Wasserstoffperoxid (3%): Dies dient zur Desinfektion des Substrats und zur Bekämpfung von Schimmel.
* Sprühflasche: Um das Substrat feucht zu halten.
* Plastikfolie oder ein durchsichtiger Plastikbeutel: Um eine hohe Luftfeuchtigkeit zu gewährleisten.
* Handschuhe: Um Kontamination zu vermeiden.
* Optional: Ein Thermometer, um die Temperatur zu überwachen.
Vorbereitung des Substrats: Der Schlüssel zum Erfolg
Die Vorbereitung des Substrats ist ein entscheidender Schritt, um sicherzustellen, dass deine Pilze gesund und kräftig wachsen. Wir wollen ein sauberes und nährstoffreiches Umfeld schaffen, in dem sich die Pilzbrut wohlfühlt.
1. Stroh zerkleinern: Schneide oder zerkleinere das Stroh in kleine Stücke von etwa 5-10 cm Länge. Dies erleichtert die Sterilisation und die Durchdringung durch die Pilzbrut. Ich benutze dafür gerne eine Gartenschere oder einen alten Mixer (nur für diesen Zweck!).
2. Stroh pasteurisieren: Die Pasteurisierung tötet unerwünschte Mikroorganismen ab, ohne die nützlichen Nährstoffe zu zerstören. Es gibt verschiedene Methoden, aber wir verwenden hier die Heißwasser-Methode:
* Fülle einen großen Topf oder Eimer mit Wasser und erhitze es auf etwa 70-80°C. Ein Kochthermometer ist hier sehr hilfreich.
* Gib das zerkleinerte Stroh in das heiße Wasser und stelle sicher, dass es vollständig bedeckt ist.
* Lasse das Stroh für etwa 1-2 Stunden im heißen Wasser ziehen. Rühre gelegentlich um, um sicherzustellen, dass alles gleichmäßig erhitzt wird.
* Gieße das heiße Wasser ab und lasse das Stroh abkühlen, bis du es anfassen kannst, ohne dich zu verbrennen. Es sollte feucht, aber nicht tropfnass sein.
3. Kalk hinzufügen: Mische etwa 1-2 Esslöffel Kalk pro Kilogramm Stroh unter. Der Kalk hilft, den pH-Wert zu stabilisieren und Schimmelbildung vorzubeugen. Trage dabei Handschuhe, um deine Haut zu schützen.
4. Wasserstoffperoxid hinzufügen (optional, aber empfohlen): Sprühe das pasteurisierte und gekalkte Stroh leicht mit einer 3%igen Wasserstoffperoxidlösung ein. Dies hilft, verbleibende unerwünschte Mikroorganismen abzutöten.
Die Schüssel befüllen und die Pilzbrut einbringen:
Jetzt kommt der spaßige Teil! Wir bauen unseren kleinen Pilzgarten.
1. Schüssel vorbereiten: Reinige die Schüssel gründlich mit heißem Wasser und Seife, um sicherzustellen, dass sie frei von Verunreinigungen ist.
2. Substrat einfüllen: Fülle die Schüssel mit dem vorbereiteten Stroh-Substrat. Drücke es leicht an, aber nicht zu fest.
3. Pilzbrut verteilen: Verteile die Pilzbrut gleichmäßig über die Oberfläche des Substrats. Du kannst auch eine Schicht Substrat, dann eine Schicht Pilzbrut und so weiter schichten, bis die Schüssel voll ist. Achte darauf, dass die oberste Schicht aus Substrat besteht.
4. Befeuchten: Besprühe die Oberfläche des Substrats mit Wasser, bis es feucht, aber nicht durchnässt ist.
5. Abdecken: Decke die Schüssel mit Plastikfolie oder einem durchsichtigen Plastikbeutel ab, um eine hohe Luftfeuchtigkeit zu gewährleisten. Steche ein paar kleine Löcher in die Folie, um die Luftzirkulation zu ermöglichen.
Die Inkubationsphase: Warten und Beobachten
Die Inkubationsphase ist die Zeit, in der die Pilzbrut das Substrat besiedelt. Geduld ist hier gefragt!
1. Standort wählen: Stelle die Schüssel an einen dunklen, kühlen Ort mit einer Temperatur von etwa 18-24°C. Ein Keller, ein Schrank oder eine Speisekammer sind ideal. Vermeide direkte Sonneneinstrahlung.
2. Feuchtigkeit kontrollieren: Überprüfe die Feuchtigkeit des Substrats regelmäßig. Es sollte immer feucht, aber nicht tropfnass sein. Besprühe es bei Bedarf mit Wasser.
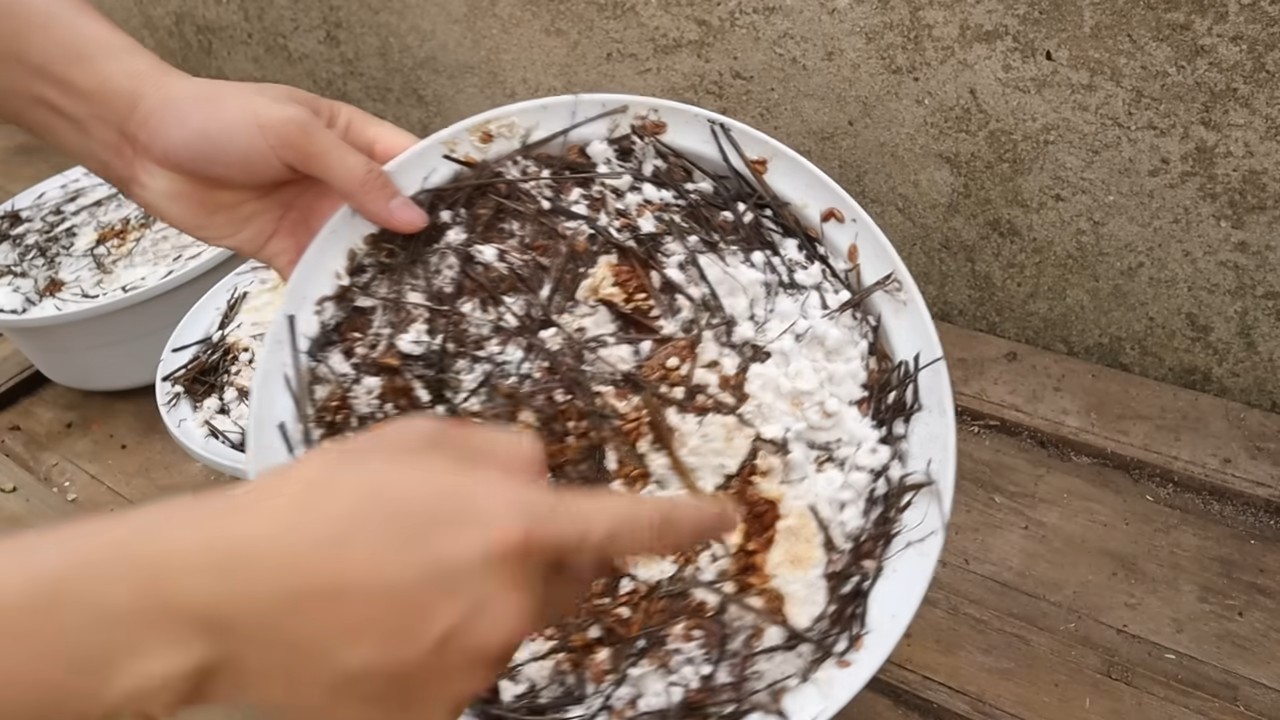
3. Beobachten: Nach einigen Tagen oder Wochen (je nach Pilzsorte) solltest du ein weißes, flaumiges Myzel (das Pilzgeflecht) auf der Oberfläche des Substrats sehen. Das ist ein gutes Zeichen!
4. Lüften: Lüfte die Schüssel regelmäßig, indem du die Plastikfolie kurz entfernst, um frische Luft zuzuführen.
Die Fruchtungsphase: Die Pilze wachsen lassen
Sobald das Substrat vollständig mit Myzel besiedelt ist, ist es Zeit für die Fruchtungsphase, in der die Pilze tatsächlich wachsen.
1. Standort wechseln: Stelle die Schüssel an einen helleren Ort, aber immer noch ohne direkte Sonneneinstrahlung. Ein Fensterbrett oder eine Arbeitsfläche in der Küche sind gut geeignet.
2. Luftfeuchtigkeit erhöhen: Die Luftfeuchtigkeit ist jetzt besonders wichtig. Besprühe die Pilze mehrmals täglich mit Wasser, um sie feucht zu halten. Du kannst auch ein feuchtes Tuch um die Schüssel legen, um die Luftfeuchtigkeit zu erhöhen.
3. Temperatur kontrollieren: Die ideale Temperatur für die Fruchtung hängt von der Pilzsorte ab. Austernpilze bevorzugen in der Regel kühlere Temperaturen (15-20°C), während Shiitake etwas wärmere Temperaturen (20-25°C) bevorzugen.
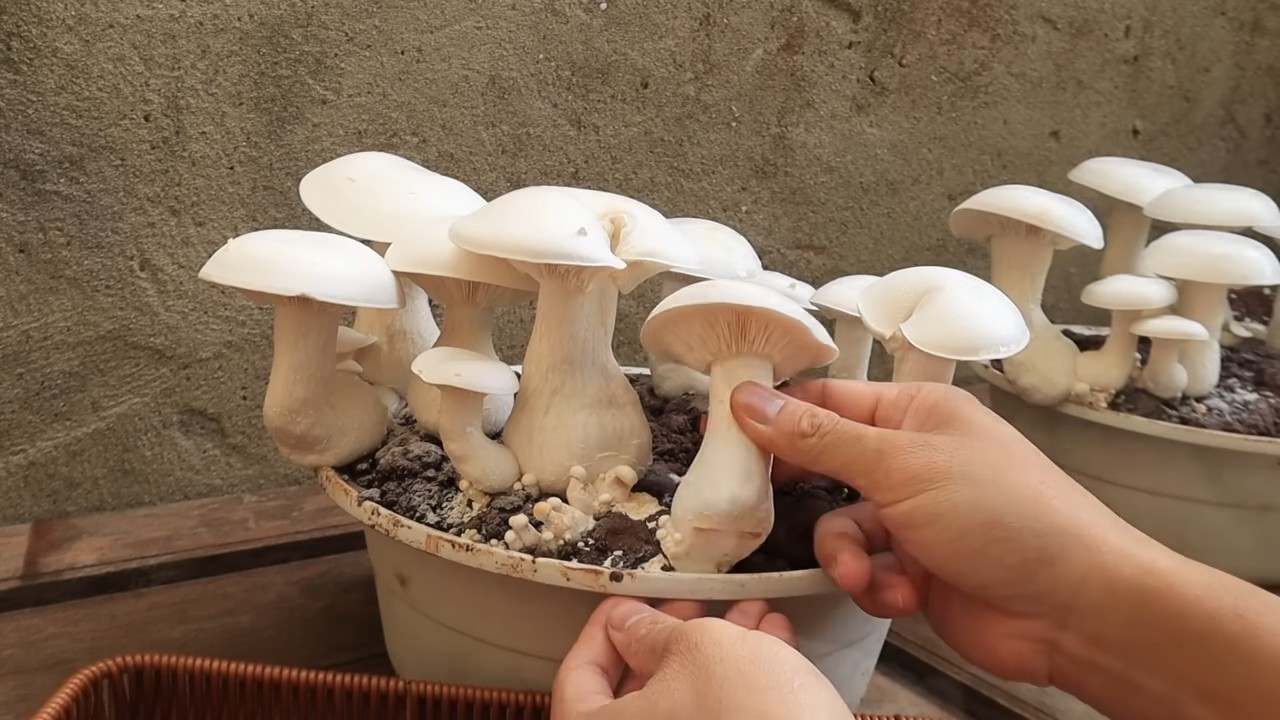
4. Beobachten und ernten: Beobachte die Pilze täglich. Sie sollten schnell wachsen. Ernte die Pilze, wenn sie ihre volle Größe erreicht haben, aber bevor sie anfangen, Sporen abzuwerfen. Schneide sie mit einem scharfen Messer am Stiel ab.
Nach der Ernte: Eine zweite Ernte?
Nach der ersten Ernte kannst du oft noch eine zweite oder sogar dritte Ernte erzielen.
1. Substrat befeuchten: Befeuchte das Substrat gründlich, nachdem du die Pilze geerntet hast.
2. Inkubationsphase wiederholen: Stelle die Schüssel wieder an einen dunklen, kühlen Ort und bedecke sie mit Plastikfolie.
3. Fruchtungsphase wiederholen: Sobald das Myzel wieder gewachsen ist, kannst du die Schüssel wieder an einen helleren Ort stellen und die Fruchtungsphase wiederholen.
Problemlösung: Was tun, wenn etwas schief geht?
Manchmal läuft nicht alles nach Plan. Hier sind einige häufige Probleme und wie du sie beheben kannst:
* Schimmel: Wenn du Schimmel auf dem Substrat entdeckst,
Conclusion
So, there you have it! Transforming a simple bowl into a thriving mushroom garden is not only surprisingly easy but also incredibly rewarding. Forget those expensive, pre-packaged mushroom kits that often yield disappointing results. This DIY approach puts you in control, allowing you to cultivate fresh, delicious mushrooms right in your own home, using readily available materials and a little bit of patience.
Why is this Mushroom Bowl Gardening DIY a must-try? Because it’s sustainable, cost-effective, and offers a fascinating glimpse into the world of fungi. You’re not just growing food; you’re creating a mini-ecosystem, a conversation starter, and a source of endless fascination. Imagine the satisfaction of harvesting your own gourmet mushrooms, knowing exactly where they came from and how they were grown.
But the beauty of this project lies in its adaptability. Feel free to experiment with different types of mushrooms. Oyster mushrooms are a great starting point, but once you’ve mastered the basics, why not try shiitake, lion’s mane, or even wine cap mushrooms? Each variety offers a unique flavor profile and texture, adding exciting new dimensions to your culinary creations.
Consider also experimenting with different substrates. While straw is a common and effective choice, you can also use coffee grounds, cardboard, or even wood chips, depending on the type of mushroom you’re growing. Just be sure to properly sterilize your substrate to prevent contamination.
And don’t be afraid to get creative with your bowl! Use a decorative ceramic bowl, a repurposed plastic container, or even a woven basket lined with plastic. The possibilities are endless. Just ensure that your container is clean, non-toxic, and provides adequate drainage.
This Mushroom Bowl Gardening DIY is more than just a gardening project; it’s an opportunity to connect with nature, learn new skills, and enjoy the fruits (or rather, fungi) of your labor. It’s a chance to reduce your reliance on store-bought produce, minimize your environmental impact, and savor the unparalleled flavor of homegrown mushrooms.
We wholeheartedly encourage you to give this DIY trick a try. It’s a fun, educational, and ultimately delicious experience that you won’t soon forget. And once you’ve harvested your first batch of mushrooms, we’d love to hear about your experience! Share your photos, tips, and tricks in the comments below. Let’s build a community of mushroom enthusiasts and inspire others to embark on their own mushroom-growing adventures. Happy growing!
Frequently Asked Questions (FAQ)
What type of mushrooms are best for a beginner using the Mushroom Bowl Gardening DIY method?
Oyster mushrooms are generally considered the easiest and most forgiving mushrooms for beginners. They are relatively fast-growing, tolerate a wider range of conditions, and are less susceptible to contamination than some other varieties. They also produce a generous yield and have a delicious, mild flavor. Shiitake mushrooms are another good option, but they require a bit more patience and attention to detail. Avoid more challenging varieties like morels or truffles until you have more experience.
How do I sterilize the substrate for my mushroom bowl?
Sterilization is crucial to prevent unwanted molds and bacteria from outcompeting your mushroom spawn. The most common method is to pasteurize the substrate by heating it to 160-180°F (71-82°C) for 60-90 minutes. You can do this by placing the substrate in a heat-resistant container, adding water, and simmering it on the stovetop or in a large pot. Alternatively, you can use a pressure cooker for a more thorough sterilization, but this is generally not necessary for oyster mushrooms. After pasteurization, allow the substrate to cool completely before adding the mushroom spawn.
How long does it take to grow mushrooms in a bowl?
The time it takes to grow mushrooms depends on several factors, including the type of mushroom, the temperature, and the humidity. Oyster mushrooms typically take 2-3 weeks to colonize the substrate and another 1-2 weeks to fruit. Shiitake mushrooms can take longer, up to several months to colonize and fruit. Maintain a consistent temperature of around 65-75°F (18-24°C) and a humidity level of 80-90% to optimize growth.
How do I maintain the humidity in my mushroom bowl?
Maintaining adequate humidity is essential for mushroom growth. You can increase humidity by misting the bowl with water several times a day, especially during fruiting. You can also cover the bowl with a clear plastic bag or container to create a mini-greenhouse effect. Be sure to leave some ventilation to prevent the buildup of excess moisture, which can lead to mold growth. A humidity sensor can help you monitor the humidity levels and adjust your watering accordingly.
What do I do if my mushroom bowl gets contaminated with mold?
Contamination is a common problem in mushroom cultivation. If you notice any signs of mold, such as green, black, or blue spots, it’s important to act quickly. In some cases, you may be able to remove the contaminated area with a clean spoon or knife. However, if the contamination is widespread, it’s best to discard the entire bowl to prevent the mold from spreading. To prevent contamination, always sterilize your substrate properly, use clean tools, and maintain good hygiene.
How often should I water my mushroom bowl?
The frequency of watering depends on the humidity levels and the type of substrate you’re using. Generally, you should water the bowl whenever the substrate feels dry to the touch. Avoid overwatering, as this can lead to mold growth. Mist the bowl with water until the substrate is moist but not soggy.
Can I reuse the substrate after harvesting mushrooms?
Yes, you can often get multiple flushes (harvests) from a single mushroom bowl. After harvesting, allow the substrate to rest for a few days, then rehydrate it by soaking it in water for several hours. Drain the excess water and place the bowl back in its growing environment. You may need to add more nutrients to the substrate to encourage further growth. However, the yield will typically decrease with each subsequent flush.
Where is the best place to put my mushroom bowl?
The ideal location for your mushroom bowl is a cool, dark, and humid place. A basement, closet, or spare room is often a good choice. Avoid placing the bowl in direct sunlight or near heat sources, as this can dry out the substrate and inhibit growth. Good air circulation is also important to prevent the buildup of excess moisture.
Are there any safety precautions I should take when growing mushrooms at home?
While most cultivated mushrooms are safe to eat, it’s important to be certain of the species before consuming them. Only eat mushrooms that you have positively identified as edible. If you are unsure, consult with a mycologist or experienced mushroom grower. Wash your hands thoroughly after handling mushroom spawn or substrate. And always cook mushrooms thoroughly before eating them.
How do I know when my mushrooms are ready to harvest?
The timing of harvest depends on the type of mushroom. Oyster mushrooms are typically ready to harvest when the caps are fully formed and the edges are still slightly curled under. Shiitake mushrooms are ready when the caps have flattened out and the gills are visible. Harvest the mushrooms by gently twisting them off the substrate or cutting them off with a clean knife.

Leave a Comment