
Water spinach zero watering – sounds like a dream, right? Imagine lush, vibrant greens thriving in your garden without you having to lift a finger (or a watering can!). That’s the promise of this incredible DIY trick, and I’m so excited to share it with you. For centuries, water spinach, also known as kangkong or ong choy, has been a staple in Asian cuisine, prized for its delicious flavor and nutritional benefits. From stir-fries to soups, this versatile vegetable is a must-have for any home cook.
But let’s be honest, gardening can be time-consuming, and remembering to water your plants daily can feel like a chore. That’s where this game-changing hack comes in. This method of water spinach zero watering is perfect for busy individuals, apartment dwellers with limited space, or anyone who simply wants to enjoy fresh, homegrown vegetables with minimal effort. I’ll guide you through a simple, step-by-step process that will have you harvesting your own delicious water spinach in no time. Get ready to ditch the watering can and embrace the ease of zero-watering gardening!
Wasserspinat ohne Gießen: Dein DIY-Guide für eine pflegeleichte Ernte
Hey Gärtnerfreunde! Habt ihr auch manchmal das Gefühl, dass das Gießen zur täglichen Last wird? Ich kenne das nur zu gut! Deshalb zeige ich euch heute, wie ihr Wasserspinat (auch bekannt als Kangkong oder Morning Glory) anbauen könnt, ohne euch ständig um das Gießen kümmern zu müssen. Klingt zu gut, um wahr zu sein? Ist es aber nicht! Mit dieser einfachen DIY-Methode könnt ihr euch entspannt zurücklehnen und trotzdem eine üppige Ernte genießen.
Was du für dein Wasserspinat-Paradies brauchst:
* Ein großer Behälter: Eine Mörtelwanne, ein großer Eimer oder sogar eine alte Badewanne eignen sich hervorragend. Je größer, desto besser!
* Erde: Normale Gartenerde oder Blumenerde tut’s. Ich persönlich bevorzuge eine Mischung aus Gartenerde und Kompost.
* Wasserspinatsamen oder Stecklinge: Samen sind online oder in gut sortierten Gartencentern erhältlich. Stecklinge kannst du von bereits gewachsenem Wasserspinat nehmen.
* Wasser: Logisch, oder?
* Optional: Dünger (organisch oder mineralisch) für einen zusätzlichen Wachstumsschub.
* Optional: Eine dunkle Plane oder Folie, um das Algenwachstum zu reduzieren.
Die Vorbereitung: Dein Behälter wird zum Biotop
Bevor wir loslegen, müssen wir unseren Behälter vorbereiten. Das ist der wichtigste Schritt, denn er bildet die Grundlage für unser selbstbewässerndes System.
1. Reinigung: Zuerst reinige ich den Behälter gründlich mit Wasser und eventuell etwas Spülmittel. Achte darauf, dass keine Rückstände bleiben, die das Wachstum des Wasserspinats beeinträchtigen könnten.
2. Löcher bohren (optional): Wenn du einen Behälter ohne Abflusslöcher verwendest (wie eine Mörtelwanne), musst du keine Löcher bohren. Wenn dein Behälter Löcher hat, solltest du diese abdichten, z.B. mit Silikon oder einer wasserdichten Folie. Wir wollen ja, dass das Wasser im Behälter bleibt!
3. Erde einfüllen: Fülle den Behälter mit Erde. Ich fülle ihn meistens zu etwa zwei Dritteln voll. Die Erde sollte locker und gut durchlässig sein. Wenn du Kompost verwendest, mische ihn gut unter die Erde.
4. Wasser hinzufügen: Jetzt kommt das Wasser ins Spiel! Fülle den Behälter mit Wasser, bis die Erde gut durchfeuchtet ist. Das Wasser sollte fast bis zur Oberfläche der Erde reichen. Keine Sorge, wenn es am Anfang etwas trüb ist, das legt sich wieder.
Aussaat oder Stecklinge: Der Startschuss für dein Wasserspinat-Projekt
Jetzt wird es spannend! Wir bringen den Wasserspinat in sein neues Zuhause. Du hast zwei Möglichkeiten: Aussaat mit Samen oder Vermehrung durch Stecklinge.
Aussaat mit Samen:
1. Samen vorbereiten (optional): Um die Keimung zu beschleunigen, kannst du die Samen vor der Aussaat für 24 Stunden in lauwarmem Wasser einweichen. Das macht die Samenschale weicher und erleichtert das Keimen.
2. Aussaat: Verteile die Samen gleichmäßig auf der feuchten Erde. Drücke sie leicht an, aber bedecke sie nicht vollständig mit Erde. Wasserspinat ist ein Lichtkeimer, das heißt, er braucht Licht zum Keimen.
3. Feuchtigkeit halten: Achte darauf, dass die Erde während der Keimung feucht bleibt. Du kannst die Erde vorsichtig mit einer Sprühflasche befeuchten.
4. Geduld haben: Die Keimung dauert in der Regel 7-14 Tage. Hab Geduld und halte die Erde feucht.
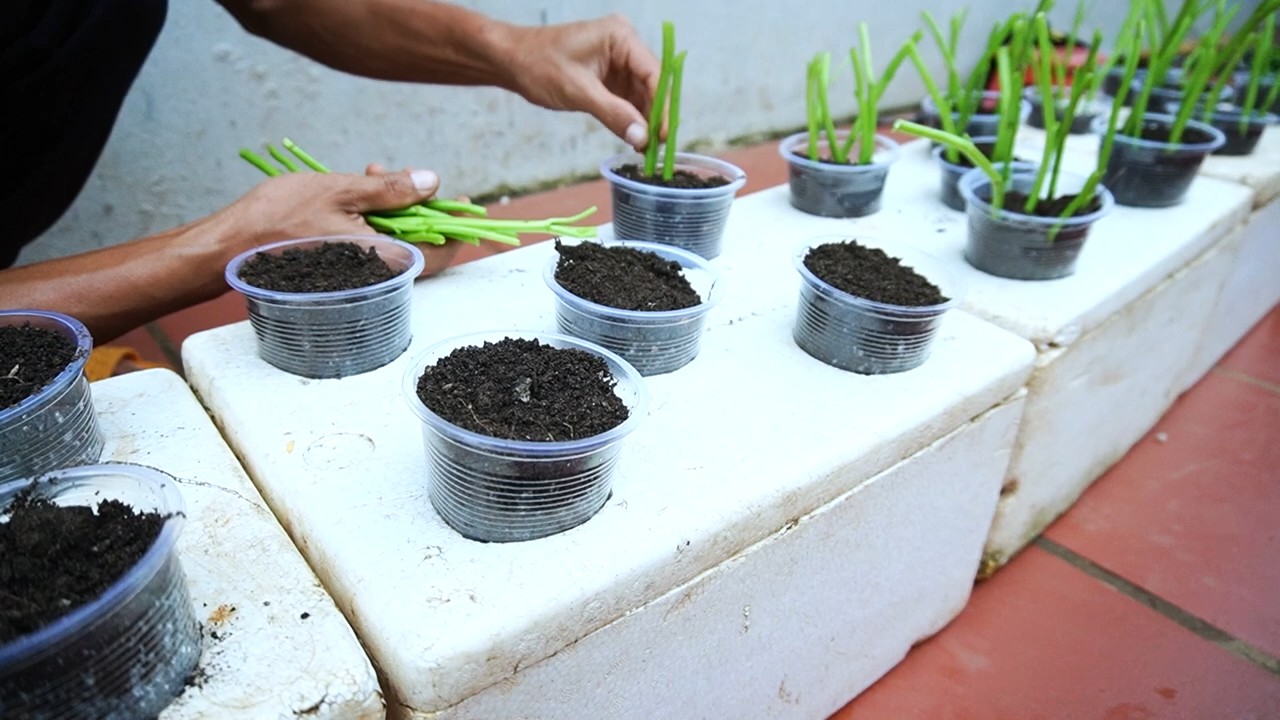
Vermehrung durch Stecklinge:
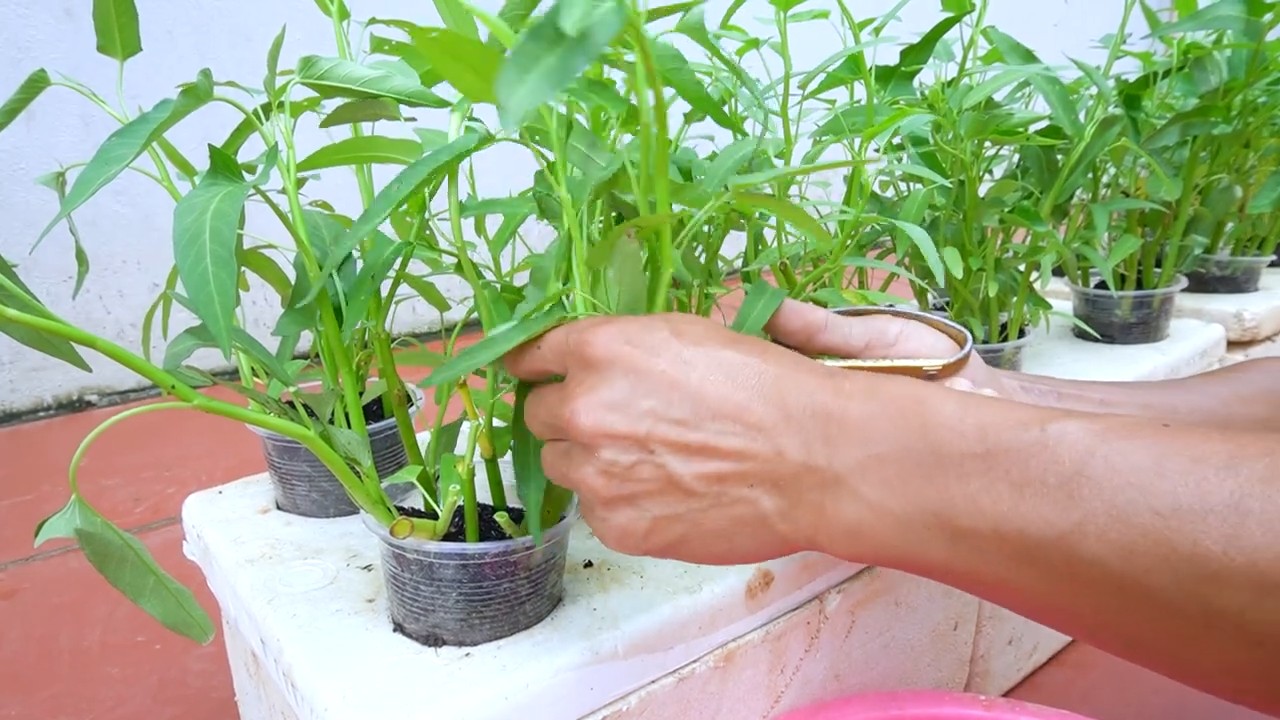
1. Stecklinge schneiden: Schneide etwa 10-15 cm lange Stecklinge von bereits gewachsenem Wasserspinat. Entferne die unteren Blätter, damit die Stecklinge leichter Wurzeln bilden können.
2. Stecklinge einsetzen: Stecke die Stecklinge etwa 5 cm tief in die feuchte Erde. Achte darauf, dass die Erde gut um die Stecklinge angedrückt wird.
3. Feuchtigkeit halten: Auch hier ist es wichtig, die Erde feucht zu halten. Besprühe die Stecklinge regelmäßig mit Wasser.
4. Wurzelbildung abwarten: Die Stecklinge bilden in der Regel innerhalb von 1-2 Wochen Wurzeln. Du erkennst die Wurzelbildung daran, dass die Stecklinge neue Blätter bilden.
Die Pflege: Wenig Aufwand, viel Ertrag
Das Schöne an dieser Methode ist, dass du dich kaum um die Pflege kümmern musst. Der Wasserspinat versorgt sich quasi selbst mit Wasser.
1. Standort: Wasserspinat liebt die Sonne! Stelle den Behälter an einen sonnigen Standort, an dem er mindestens 6 Stunden Sonne pro Tag bekommt.
2. Wasserstand kontrollieren: Überprüfe regelmäßig den Wasserstand im Behälter. Das Wasser sollte immer bis fast zur Oberfläche der Erde reichen. Wenn der Wasserstand sinkt, fülle einfach Wasser nach.
3. Düngen (optional): Wenn du möchtest, kannst du den Wasserspinat regelmäßig düngen. Verwende dazu einen organischen oder mineralischen Dünger. Ich dünge meistens alle 2-3 Wochen mit einem Flüssigdünger.
4. Algenwachstum reduzieren (optional): Um das Algenwachstum im Behälter zu reduzieren, kannst du die Oberfläche der Erde mit einer dunklen Plane oder Folie abdecken. Das verhindert, dass Licht auf die Erde gelangt und das Algenwachstum fördert.
5. Schädlinge kontrollieren: Wasserspinat ist relativ resistent gegen Schädlinge. Trotzdem solltest du die Pflanzen regelmäßig auf Schädlinge kontrollieren. Wenn du Schädlinge entdeckst, kannst du sie mit natürlichen Mitteln bekämpfen, z.B. mit einer Seifenlauge.
Die Ernte: Dein Lohn für die Mühe
Nach etwa 4-6 Wochen kannst du mit der Ernte beginnen!
1. Ernten: Schneide die Stängel des Wasserspinats mit einem scharfen Messer oder einer Schere ab. Du kannst die Blätter und Stängel ernten.
2. Regelmäßig ernten: Je öfter du erntest, desto mehr wächst der Wasserspinat nach. Ernte regelmäßig, um eine kontinuierliche Ernte zu gewährleisten.
3. Verwendung: Wasserspinat ist vielseitig verwendbar. Du kannst ihn roh in Salaten essen, kochen, braten oder in Suppen und Eintöpfen verwenden. Er schmeckt leicht nussig und ist reich an Vitaminen und Mineralstoffen.
Zusätzliche Tipps und Tricks:
* Winterruhe: Wasserspinat ist nicht winterhart. In kälteren Regionen musst du ihn im Winter ins Haus holen oder ihn als einjährige Pflanze anbauen.
* Sortenwahl: Es gibt verschiedene Sorten von Wasserspinat. Informiere dich vor dem Kauf über die verschiedenen Sorten und wähle die Sorte, die am besten zu deinen Bedürfnissen passt.
* Kombination mit anderen Pflanzen: Du kannst Wasserspinat auch mit anderen Pflanzen kombinieren, z.B. mit Kräutern oder Gemüse, die ähnliche Ansprüche an Wasser und Sonne haben.
* Beobachtung: Beobachte deine Pflanzen regelmäßig und passe die Pflege bei Bedarf an. Jede Pflanze ist anders und braucht individuelle Pflege.
Häufige Probleme und Lösungen:
* Gelbe Blätter: Gelbe Blätter können ein Zeichen für Nährstoffmangel sein. Dünge den Wasserspinat mit einem geeigneten Dünger.
* Schleimige Blätter: Schleimige Blätter können ein Zeichen für eine Pilzerkrankung sein. Entferne die befallenen Blätter und sorge für eine gute Belüftung.
* Algenwachstum: Algenwachstum ist normal, kann aber unschön aussehen. Bedecke die Oberfläche der Erde mit einer dunklen Plane oder Folie, um das Algenwachstum zu reduzieren.
Fazit:
Mit dieser einfachen DIY-Methode kannst du Wasserspinat ohne Gießen anbauen und eine üppige Ernte genießen. Es ist eine tolle Möglichkeit, um Zeit und Wasser zu sparen und trotzdem frisches Gemüse aus dem eigenen Garten zu ernten. Probiere es aus und lass mich wissen, wie es bei dir funktioniert! Viel Spaß beim Gärtnern!
Conclusion
So, there you have it! Cultivating water spinach with our zero-watering method is more than just a gardening hack; it’s a gateway to fresh, nutritious greens right at your fingertips, regardless of your gardening experience or available space. We’ve shown you how to bypass the daily watering routine, freeing up your time and conserving precious water resources. This method isn’t just about convenience; it’s about sustainability and making fresh produce accessible to everyone.
The beauty of this DIY trick lies in its simplicity and adaptability. Imagine the satisfaction of harvesting crisp, vibrant water spinach, knowing you nurtured it with minimal effort and maximum resourcefulness. This isn’t just about growing a vegetable; it’s about connecting with nature, understanding the resilience of plants, and enjoying the fruits (or rather, the leaves!) of your labor.
But don’t just take our word for it. The real magic happens when you try it yourself. Experiment with different containers – perhaps a repurposed plastic tub or a stylish ceramic pot. Consider adding a slow-release fertilizer to the soil mix for an extra boost of nutrients. You could even try growing different varieties of water spinach to discover your favorite flavor profile. The possibilities are endless!
We encourage you to embark on this zero-watering water spinach adventure. It’s a rewarding experience that will not only provide you with delicious greens but also deepen your appreciation for the natural world. And most importantly, we want to hear about your journey! Share your experiences, your successes, and even your challenges in the comments below. Let’s build a community of zero-watering water spinach enthusiasts, sharing tips and tricks to make this method even more effective and enjoyable.
This zero-watering method is a game-changer for anyone looking to grow water spinach effortlessly. It’s a testament to the power of simple solutions and a reminder that even the busiest individuals can enjoy the benefits of homegrown produce. So, grab your seeds, prepare your container, and get ready to experience the joy of harvesting your own delicious, zero-watering water spinach. We can’t wait to see what you create!
Variations and Further Exploration
Don’t be afraid to experiment! Try adding a layer of mulch on top of the soil to further retain moisture. You could also explore different types of soil mixes to see which one works best for your climate and growing conditions. Consider companion planting with herbs like basil or mint to deter pests and enhance the flavor of your water spinach. The key is to have fun and learn along the way.
Share Your Success!
We’re passionate about this zero-watering method and believe it has the potential to revolutionize how people grow water spinach. But we need your help to spread the word! Share your photos and videos on social media using the hashtag #ZeroWateringSpinach. Let’s inspire others to embrace this simple and sustainable way to grow their own food.
Frequently Asked Questions (FAQ)
What exactly is water spinach, and why should I grow it?
Water spinach, also known as ong choy or kangkong, is a leafy green vegetable popular in Asian cuisine. It’s incredibly nutritious, packed with vitamins A and C, iron, and fiber. Growing your own water spinach ensures you have access to fresh, organic greens whenever you want them. Plus, it’s a fast-growing plant, so you’ll be harvesting in no time!
How does the zero-watering method actually work?
The zero-watering method relies on creating a self-contained ecosystem within your container. By using a moisture-retentive soil mix and a container with good drainage, you create a reservoir of water that the water spinach can access as needed. The key is to choose a container that’s large enough to hold enough water for the plant to thrive without needing constant replenishment. The soil mix retains moisture, and the plant’s roots draw up water as needed.
What type of soil mix is best for this zero-watering method?
A well-draining but moisture-retentive soil mix is crucial. We recommend a blend of potting soil, compost, and perlite or vermiculite. The potting soil provides a base, the compost adds nutrients and helps retain moisture, and the perlite or vermiculite improves drainage and aeration. A good ratio is roughly 2 parts potting soil, 1 part compost, and 1 part perlite or vermiculite.
What size container should I use for growing water spinach with this method?
The size of the container depends on how much water spinach you want to grow. A container that is at least 12 inches in diameter and 10 inches deep is a good starting point. Larger containers will hold more water and allow the plants to grow larger. Make sure the container has drainage holes to prevent waterlogging.
How often should I fertilize my water spinach grown with the zero-watering method?
While the zero-watering method minimizes watering, fertilization is still important. We recommend adding a slow-release fertilizer to the soil mix at planting time. This will provide the plants with a steady supply of nutrients over several weeks. You can also supplement with a liquid fertilizer every few weeks, but be careful not to over-fertilize.
What if I live in a very hot or dry climate? Will this method still work?
Yes, the zero-watering method can still work in hot or dry climates, but you may need to make some adjustments. Choose a container that is made of a material that doesn’t heat up too quickly, such as plastic or ceramic. You can also add a layer of mulch on top of the soil to help retain moisture. In extremely hot weather, you may need to provide some shade during the hottest part of the day.
How do I know when to harvest my water spinach?
You can start harvesting water spinach when the stems are about 6-8 inches long. Simply cut the stems a few inches above the soil line, and the plant will continue to produce new growth. Harvest regularly to encourage continued production.
What if my water spinach starts to turn yellow or wilt?
Yellowing or wilting leaves can indicate a few different problems. It could be a sign of nutrient deficiency, overwatering, or underwatering. Check the soil moisture to see if it’s too wet or too dry. If the soil is dry, add some water. If the soil is wet, make sure the container has good drainage. If the problem persists, try adding a liquid fertilizer.
Can I grow water spinach indoors using this zero-watering method?
Yes, you can grow water spinach indoors using this method, but you’ll need to provide adequate light. Place the container near a sunny window or use a grow light. Indoor water spinach may not grow as quickly as outdoor water spinach, but it’s still a great way to have fresh greens on hand.
Is this method truly “zero-watering”? Do I ever need to add water?
While we call it the “zero-watering” method, it’s more accurately a “minimal-watering” method. In most cases, you won’t need to water the plants after the initial planting. However, if you live in a very hot or dry climate, or if you notice the soil drying out, you may need to add a small amount of water occasionally. The key is to monitor the soil moisture and only water when necessary. The goal is to create a self-sustaining system where the plant can thrive with minimal intervention.
Can I use this method for other vegetables besides water spinach?
While this method is particularly well-suited for water spinach due to its water-loving nature, it can potentially be adapted for other leafy greens like lettuce or spinach. However, you’ll need to adjust the soil mix and watering schedule accordingly. Experiment and see what works best for you!
What are some common pests or diseases that affect water spinach, and how can I prevent them?
Water spinach is generally a hardy plant, but it can be susceptible to pests like aphids and spider mites. To prevent infestations, inspect your plants regularly and remove any pests you find. You can also use insecticidal soap or neem oil to control pests. Good air circulation can also help prevent fungal diseases.
How long does it take to grow water spinach from seed using this method?
Water spinach is a fast-growing plant. You can expect to start harvesting in about 4-6 weeks from planting seeds. The exact time will depend on your climate and growing conditions.
What do I do with my water spinach harvest?
Water spinach is a versatile vegetable that can be used in a variety of dishes. It’s commonly stir-fried, steamed, or added to soups and stews. It has a mild, slightly sweet flavor that pairs well with garlic, ginger, and soy sauce. Enjoy your homegrown water spinach!


Leave a Comment