
Grow Chili Peppers Backyard and ignite your culinary adventures! Have you ever dreamed of plucking fiery peppers straight from your garden, adding a burst of homegrown flavor to your favorite dishes? Well, dream no more! This DIY guide is your passport to a thriving chili pepper patch, right in your own backyard.
For centuries, chili peppers have been more than just a spice; they’re woven into the fabric of cultures worldwide. From the ancient Aztecs using them in rituals to the vibrant street food of Southeast Asia, these fiery fruits have a rich and fascinating history. But you don’t need to be a seasoned gardener or a world traveler to enjoy the thrill of growing your own.
Why should you embark on this chili-growing journey? Because store-bought peppers simply can’t compare to the fresh, vibrant taste of homegrown. Plus, knowing exactly where your food comes from is incredibly rewarding. Imagine the satisfaction of serving up a spicy salsa made with peppers you nurtured from tiny seedlings! And let’s be honest, who wouldn’t want to impress their friends and family with their green thumb and fiery creations? This article will provide you with simple, effective, and fun DIY tricks and hacks to grow chili peppers backyard, even if you’re a complete beginner. So, grab your gardening gloves, and let’s get started!

Chili Peppers im eigenen Garten ziehen: Eine Schritt-für-Schritt Anleitung
Hey Chili-Liebhaber! Habt ihr euch jemals gefragt, wie es wäre, eure eigenen, super-frischen Chili Peppers direkt im Garten zu ziehen? Ich kann euch sagen, es ist einfacher als ihr denkt und unglaublich befriedigend! Ich zeige euch, wie ihr das ganz einfach hinbekommt. Lasst uns gemeinsam in die Welt des Chili-Anbaus eintauchen!
Die Vorbereitung: Alles, was ihr braucht
Bevor wir loslegen, brauchen wir natürlich das richtige Equipment und Wissen. Hier ist eine Liste, damit ihr gut vorbereitet seid:
* Chili-Samen: Wählt eure Lieblingssorten! Von mild bis feurig ist alles möglich. Achtet auf qualitativ hochwertige Samen von vertrauenswürdigen Anbietern.
* Anzuchterde: Normale Blumenerde ist oft zu nährstoffreich für junge Keimlinge. Anzuchterde ist feiner und weniger gedüngt.
* Anzuchtgefäße: Kleine Töpfe, Anzuchtschalen oder sogar Eierkartons funktionieren super. Hauptsache, sie haben Abzugslöcher.
* Mini-Gewächshaus oder Frischhaltefolie: Um die Luftfeuchtigkeit hoch zu halten, besonders in der Keimphase.
* Sprühflasche: Zum sanften Befeuchten der Erde.
* Pikierstab oder Löffel: Zum vorsichtigen Vereinzeln der Keimlinge.
* Gartenerde: Für das spätere Umpflanzen in größere Töpfe oder ins Beet.
* Dünger: Spezieller Chili-Dünger oder Tomatendünger ist ideal.
* Gießkanne: Mit feinem Brausekopf.
* Standort: Ein sonniger, warmer Platz im Garten oder auf dem Balkon.
* Geduld: Chili Peppers brauchen Zeit und Zuwendung!
Phase 1: Die Anzucht – Der Start eurer Chili-Reise
Die Anzucht ist der erste und wichtigste Schritt. Hier legen wir den Grundstein für eine reiche Ernte.
1. Samen vorbereiten (optional): Um die Keimung zu beschleunigen, könnt ihr die Samen für 12-24 Stunden in lauwarmem Kamillentee einweichen. Das weicht die Samenschale auf.
2. Anzuchtgefäße befüllen: Füllt eure Anzuchtgefäße mit Anzuchterde. Drückt die Erde leicht an.
3. Samen aussäen: Legt 1-2 Samen pro Gefäß etwa 0,5-1 cm tief in die Erde. Bedeckt die Samen leicht mit Erde.
4. Befeuchten: Besprüht die Erde vorsichtig mit Wasser, sodass sie gut durchfeuchtet ist, aber nicht triefend nass.
5. Mini-Gewächshaus oder Folie: Stellt die Anzuchtgefäße in ein Mini-Gewächshaus oder bedeckt sie mit Frischhaltefolie. Das sorgt für eine hohe Luftfeuchtigkeit.
6. Warm und hell stellen: Stellt das Mini-Gewächshaus an einen warmen (22-28°C) und hellen Ort. Direkte Sonneneinstrahlung vermeiden!
7. Lüften: Lüftet das Mini-Gewächshaus oder die Folie täglich für etwa 15-30 Minuten, um Schimmelbildung zu vermeiden.
8. Geduld haben: Die Keimung kann je nach Sorte und Temperatur 1-3 Wochen dauern. Haltet die Erde feucht, aber nicht nass.
Phase 2: Pikieren – Den kleinen Chili-Pflanzen mehr Raum geben
Sobald die ersten Blätter (Keimblätter) zu sehen sind und die Pflänzchen etwas größer werden, ist es Zeit zum Pikieren.
1. Vorbereitung: Füllt kleine Töpfe (ca. 8-10 cm Durchmesser) mit Gartenerde.
2. Bewässern: Befeuchtet die Erde in den neuen Töpfen leicht.
3. Vereinzeln: Wählt die kräftigsten Keimlinge aus. Mit einem Pikierstab oder Löffel hebt ihr die Keimlinge vorsichtig aus den Anzuchtgefäßen. Achtet darauf, die Wurzeln nicht zu beschädigen.
4. Einpflanzen: Setzt jeden Keimling einzeln in einen der vorbereiteten Töpfe. Die Wurzeln sollten ausreichend Platz haben. Die Keimblätter sollten knapp über der Erde liegen.
5. Andrücken: Drückt die Erde um die Pflänzchen leicht an.
6. Gießen: Gießt die Pflanzen vorsichtig an.
7. Heller Standort: Stellt die pikierten Pflanzen an einen hellen, aber nicht vollsonnigen Standort.
8. Pflege: Gießt die Pflanzen regelmäßig, aber vermeidet Staunässe.
Phase 3: Abhärten – Vorbereitung auf das Leben im Freien
Bevor die Chili-Pflanzen ins Freie umziehen, müssen sie sich an die Bedingungen gewöhnen. Dieser Prozess nennt sich Abhärten.
1. Beginnende Abhärtung: Stellt die Pflanzen tagsüber für einige Stunden ins Freie (an einen geschützten Ort, z.B. Halbschatten).
2. Steigerung: Verlängert die Zeit im Freien täglich um etwa eine Stunde.
3. Sonnengewöhnung: Gewöhnt die Pflanzen langsam an die Sonne. Vermeidet pralle Mittagssonne in den ersten Tagen.
4. Nachtabsenkung: Wenn die Temperaturen nachts nicht mehr unter 10°C fallen, können die Pflanzen auch nachts draußen bleiben.
5. Dauer: Die Abhärtungsphase sollte etwa 1-2 Wochen dauern.
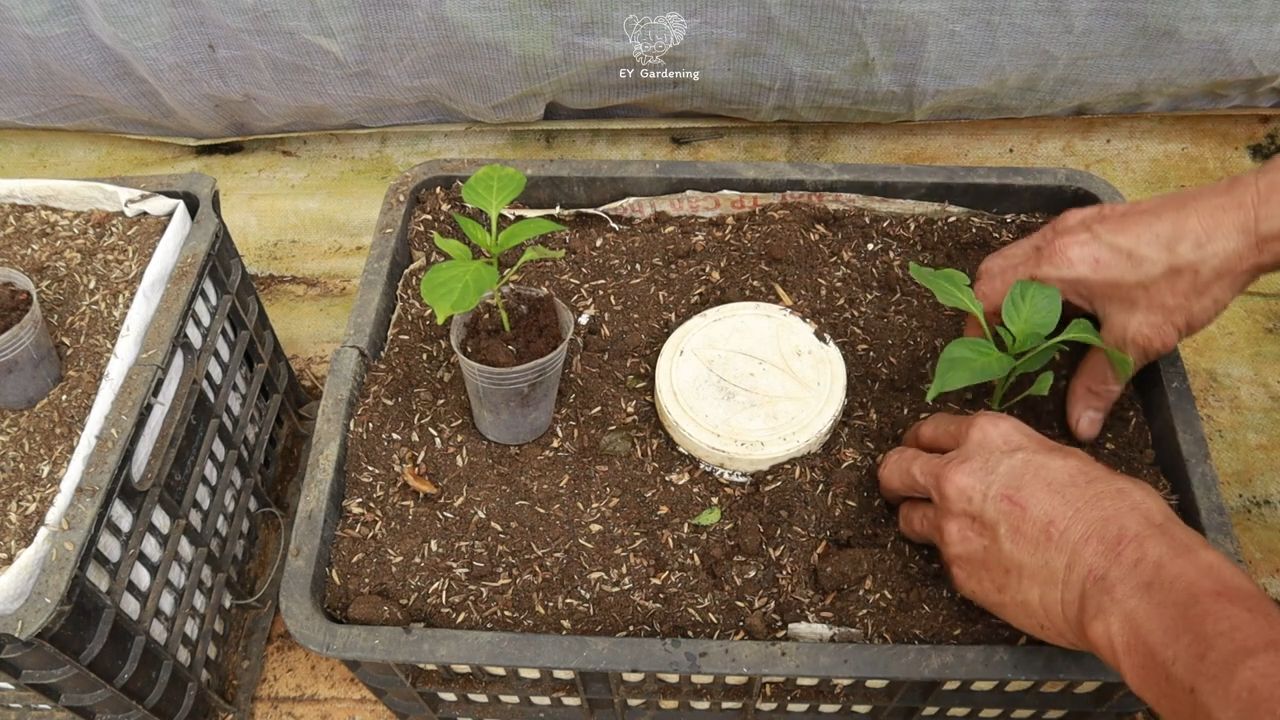
Phase 4: Auspflanzen – Endlich ins Beet oder den Topf!
Nach der Abhärtung sind eure Chili-Pflanzen bereit für ihr endgültiges Zuhause.
1. Zeitpunkt: Pflanzt die Chili Peppers erst nach den Eisheiligen (Mitte Mai) ins Freie, wenn keine Frostgefahr mehr besteht.
2. Standortwahl: Wählt einen sonnigen, warmen und windgeschützten Standort.
3. Bodenvorbereitung: Lockert den Boden gut auf und entfernt Unkraut. Mischt Kompost oder organischen Dünger unter die Erde.
4. Pflanzabstand: Haltet einen Pflanzabstand von etwa 40-50 cm ein.
5. Pflanzloch: Grabt ein ausreichend großes Pflanzloch.
6. Einsetzen: Setzt die Chili-Pflanzen vorsichtig in die Pflanzlöcher. Die Oberkante des Wurzelballens sollte mit der Erdoberfläche abschließen.
7. Andrücken: Drückt die Erde um die Pflanzen leicht an.
8. Gießen: Gießt die Pflanzen gründlich an.
9. Stütze (optional): Bei hochwachsenden Sorten kann eine Stütze sinnvoll sein.
Phase 5: Pflege – Damit eure Chili Peppers prächtig gedeihen
Die richtige Pflege ist entscheidend für eine reiche Ernte.
1. Gießen: Gießt die Chili Peppers regelmäßig, besonders bei Trockenheit. Vermeidet Staunässe.
2. Düngen: Düngt die Pflanzen regelmäßig mit speziellem Chili-Dünger oder Tomatendünger. Befolgt die Anweisungen auf der Verpackung.
3. Ausgeizen (optional): Bei einigen Sorten kann das Ausgeizen (Entfernen der Seitentriebe in den Blattachseln) die Ernte erhöhen. Informiert euch, ob eure Sorte ausgegeizt werden muss.
4. Schutz vor Schädlingen: Kontrolliert die Pflanzen regelmäßig auf Schädlinge wie Blattläuse oder Spinnmilben. Bei Bedarf könnt ihr biologische Schädlingsbekämpfungsmittel einsetzen.
5. Schutz vor Krankheiten: Achtet auf Anzeichen von Krankheiten wie Pilzbefall. Sorgt für eine gute Belüftung und vermeidet Staunässe.
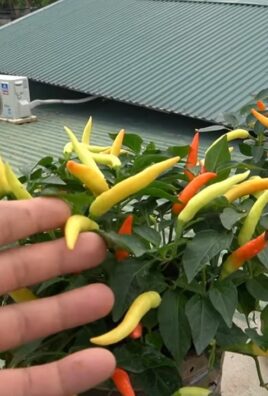
6. Ernte: Die Chili Peppers sind reif, wenn sie ihre endgültige Farbe erreicht haben und sich leicht vom Stiel lösen lassen.
Zusätzliche Tipps für eine erfolgreiche Chili-Ernte
* Sortenwahl: Wählt Sorten, die für euer Klima geeignet
Conclusion
So, there you have it! Growing chili peppers in your backyard isn’t just a gardening project; it’s an adventure in flavor, a vibrant addition to your landscape, and a rewarding experience that connects you directly to the food you eat. We’ve explored the essential steps, from selecting the right varieties to nurturing your plants and harvesting your fiery bounty. But why is this DIY trick a must-try?
Firstly, the taste. Store-bought chili peppers, while convenient, often lack the nuanced flavors and intense heat that homegrown peppers possess. When you grow your own, you control every aspect of their development, from the soil they grow in to the amount of sunlight they receive, resulting in peppers that are bursting with character. Imagine the satisfaction of adding a chili pepper, still warm from the sun, to your favorite dish, knowing that you nurtured it from seed to table.
Secondly, the cost savings. While there’s an initial investment in seeds, soil, and perhaps a few basic gardening tools, growing your own chili peppers can significantly reduce your grocery bill over time. Think of all the chili peppers you buy throughout the year – those costs add up! Plus, you can save seeds from your best plants to grow even more peppers next season, creating a sustainable cycle of deliciousness.
Thirdly, the sheer joy of gardening. There’s something incredibly therapeutic about tending to plants, watching them grow, and harvesting the fruits (or in this case, the peppers) of your labor. It’s a chance to connect with nature, de-stress, and learn new skills. And let’s be honest, showing off your impressive chili pepper harvest to friends and family is pretty satisfying too!
But the best part about growing chili peppers in your backyard is the endless possibilities for experimentation. Why not try growing a variety of peppers, from mild jalapenos to scorching habaneros? You could even experiment with different growing methods, such as container gardening or hydroponics. Consider companion planting, pairing your chili peppers with herbs like basil or rosemary to enhance their flavor and deter pests.
For those looking to take their chili pepper game to the next level, consider fermenting your peppers to create homemade hot sauces or pickling them for a tangy treat. You can also dry your peppers and grind them into chili powder, creating your own custom spice blends. The possibilities are truly endless!
We wholeheartedly encourage you to give this DIY trick a try. It’s easier than you might think, and the rewards are well worth the effort. Don’t be afraid to experiment, learn from your mistakes, and most importantly, have fun!
And now, we want to hear from you! Have you tried growing chili peppers in your backyard? What varieties did you grow? What challenges did you face, and how did you overcome them? Share your experiences, tips, and tricks in the comments below. Let’s create a community of chili pepper enthusiasts and inspire others to embark on this exciting gardening adventure. Let’s talk about **grow chili peppers backyard** and share our experiences.
Frequently Asked Questions (FAQ)
What are the best chili pepper varieties to grow for beginners?
For beginners, we recommend starting with easier-to-grow varieties like jalapenos, bell peppers (if you want something mild), Anaheim peppers, or poblano peppers. These varieties are relatively forgiving and produce a good yield, even for novice gardeners. They also have a wide range of culinary uses, making them a versatile addition to your kitchen. Avoid extremely hot varieties like habaneros or ghost peppers until you have some experience under your belt. These require more specific care and can be more challenging to grow successfully. Remember to check your local climate and choose varieties that are well-suited to your growing conditions.
How much sunlight do chili peppers need?
Chili peppers thrive in full sun, meaning they need at least 6-8 hours of direct sunlight per day. Insufficient sunlight can lead to leggy plants, reduced fruit production, and less intense flavor. Choose a location in your backyard that receives plenty of sunlight throughout the day. If you’re growing chili peppers in containers, you can move them around to maximize their sun exposure. If you live in a particularly hot climate, you may need to provide some afternoon shade to prevent the peppers from scorching.
What kind of soil is best for growing chili peppers?
Chili peppers prefer well-draining soil that is rich in organic matter. Amend your soil with compost, aged manure, or other organic materials to improve its fertility and drainage. Avoid heavy clay soils, as these can become waterlogged and lead to root rot. A slightly acidic to neutral soil pH (around 6.0-7.0) is ideal. You can test your soil pH using a soil testing kit and amend it accordingly. If you’re growing chili peppers in containers, use a high-quality potting mix that is specifically formulated for vegetables.
How often should I water my chili pepper plants?
Water your chili pepper plants regularly, especially during hot, dry weather. The frequency of watering will depend on your climate, soil type, and the size of your plants. Generally, you should water deeply whenever the top inch of soil feels dry to the touch. Avoid overwatering, as this can lead to root rot. Use a soaker hose or drip irrigation system to water your plants at the base, avoiding wetting the foliage. This will help prevent fungal diseases.
How do I fertilize my chili pepper plants?
Fertilize your chili pepper plants regularly throughout the growing season. Use a balanced fertilizer that is specifically formulated for vegetables. Follow the instructions on the fertilizer package carefully. Avoid over-fertilizing, as this can lead to excessive foliage growth and reduced fruit production. You can also supplement your fertilizer with organic amendments like compost tea or fish emulsion.
How do I protect my chili pepper plants from pests and diseases?
Monitor your chili pepper plants regularly for signs of pests and diseases. Common pests include aphids, spider mites, and whiteflies. Common diseases include fungal diseases like powdery mildew and blossom end rot. Use organic pest control methods like insecticidal soap or neem oil to control pests. Ensure good air circulation around your plants to prevent fungal diseases. Avoid overhead watering, as this can create a humid environment that is conducive to fungal growth. If you notice signs of blossom end rot, which is caused by a calcium deficiency, amend your soil with calcium or use a calcium-rich fertilizer.
When should I harvest my chili peppers?
The timing of harvest will depend on the variety of chili pepper you are growing and your personal preference. Generally, chili peppers are ready to harvest when they have reached their mature size and color. The color will vary depending on the variety. You can harvest chili peppers at any stage of ripeness, but the flavor and heat will intensify as they ripen. Use pruning shears or scissors to cut the peppers from the plant, leaving a small stem attached.
Can I grow chili peppers indoors?
Yes, you can grow chili peppers indoors, but you will need to provide them with adequate light and warmth. Use grow lights to supplement natural sunlight, especially during the winter months. Choose a sunny window that receives at least 6-8 hours of direct sunlight per day. Use a well-draining potting mix and water regularly. Fertilize your plants regularly throughout the growing season.
How can I increase the heat of my chili peppers?
Several factors can influence the heat of chili peppers, including genetics, growing conditions, and stress. To increase the heat of your chili peppers, provide them with plenty of sunlight, well-draining soil, and regular fertilization. Avoid overwatering, as this can dilute the capsaicin, the compound that gives chili peppers their heat. You can also stress your plants slightly by withholding water for a few days before harvesting. This can encourage them to produce more capsaicin.
What can I do with my harvested chili peppers?
The possibilities are endless! You can use your harvested chili peppers fresh in salsas, sauces, and other dishes. You can also dry them, pickle them, ferment them, or make chili powder. Store your harvested chili peppers in a cool, dry place. Dried chili peppers can be stored for several months. Pickled or fermented chili peppers can be stored in the refrigerator for several weeks.
Leave a Comment