
Terrace Grown Guava Harvest: Imagine stepping onto your terrace and plucking a sun-ripened, juicy guava straight from your own tree! That’s the magic we’re unlocking today. For centuries, cultivating fruit trees has been a symbol of prosperity and self-sufficiency, with guava holding a special place in tropical and subtropical cultures. From ancient medicinal uses to delicious culinary applications, the guava has always been a prized possession.
But let’s be honest, not everyone has acres of land for an orchard. That’s where this DIY guide comes in! I’m going to share my tried-and-true secrets for a bountiful terrace grown guava harvest, even in limited spaces. We’ll cover everything from choosing the right variety and container to mastering pruning techniques and pest control.
Why do you need this? Because store-bought guavas simply can’t compare to the flavor and satisfaction of harvesting your own. Plus, growing your own food is a fantastic way to connect with nature, reduce your carbon footprint, and enjoy fresh, healthy produce. So, grab your gardening gloves, and let’s get started on your journey to a thriving guava harvest right on your terrace!
Terrassen-Guave-Ernte: So machst du es richtig!
Hey Gartenfreunde! Ich freue mich riesig, euch heute von meiner eigenen Guave-Ernte auf meiner Terrasse zu erzählen. Es ist wirklich ein tolles Gefühl, frische, selbst angebaute Früchte zu ernten, und ich möchte euch zeigen, wie ihr das auch schaffen könnt. Keine Angst, es ist einfacher als ihr denkt!
Die Vorbereitung: Was du brauchst
Bevor wir loslegen, lass uns sicherstellen, dass wir alles Nötige parat haben. Eine gute Vorbereitung ist das A und O für eine erfolgreiche Ernte.
* Eine reife Guave: Das klingt offensichtlich, aber die Reife ist entscheidend. Ich zeige euch gleich, worauf ihr achten müsst.
* Eine scharfe Gartenschere oder ein Messer: Damit schneiden wir die Guave sauber vom Baum.
* Eine weiche Unterlage: Ein Korb mit einem Tuch ausgelegt oder eine Schüssel mit Küchenpapier, um die geernteten Früchte sanft abzulegen.
* Handschuhe (optional): Wenn ihr empfindliche Haut habt, sind Handschuhe eine gute Idee.
* Ein Eimer mit Wasser (optional): Um die geernteten Guaven direkt zu waschen.
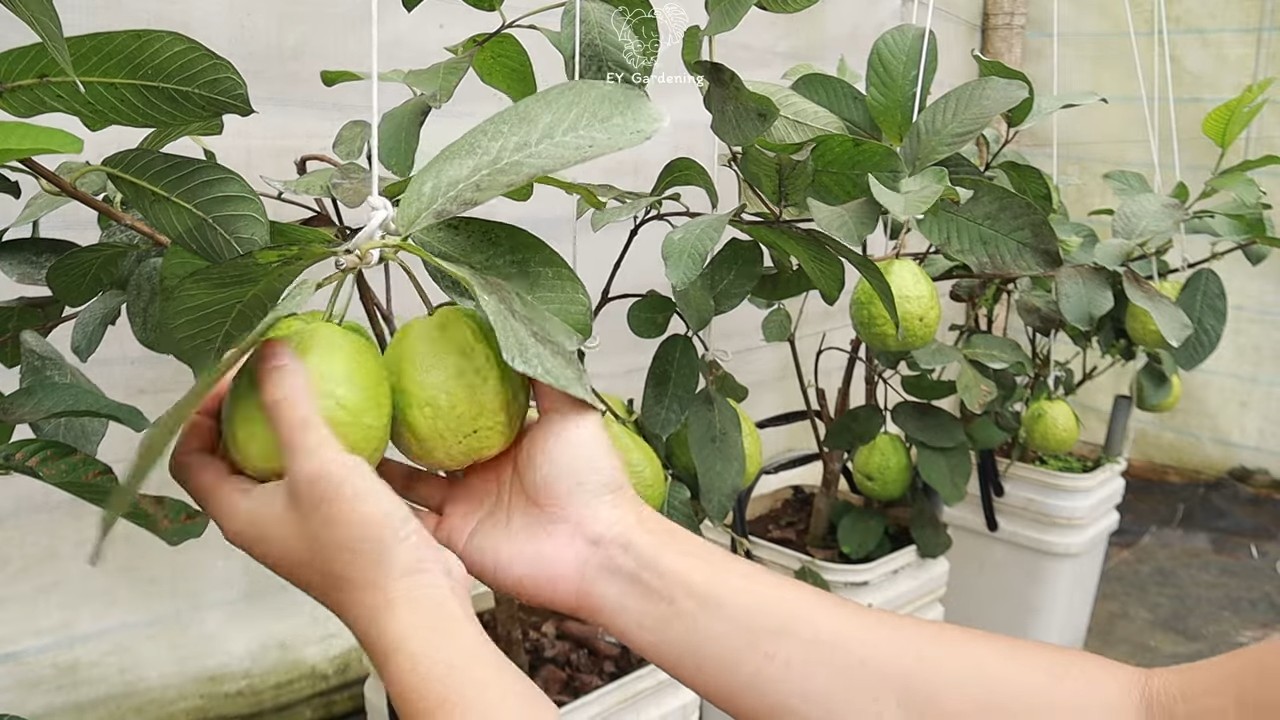
Die Reife erkennen: Wann ist der richtige Zeitpunkt?
Das ist die wichtigste Frage überhaupt! Eine unreife Guave schmeckt nicht gut, und eine überreife ist matschig. Hier sind meine Tipps, um den perfekten Zeitpunkt zu erkennen:
* Die Farbe: Die Farbe der Guave verändert sich, wenn sie reif wird. Je nach Sorte kann sie von Grün zu Gelb, Rosa oder sogar Rot wechseln. Achtet auf eine gleichmäßige, satte Farbe.
* Der Duft: Reife Guaven verströmen einen süßen, tropischen Duft. Wenn ihr die Frucht in die Nähe eurer Nase haltet, solltet ihr diesen Duft deutlich wahrnehmen.
* Der Drucktest: Drückt die Guave vorsichtig mit dem Finger. Sie sollte leicht nachgeben, aber nicht zu weich sein. Eine unreife Guave ist steinhart, eine überreife fühlt sich matschig an.
* Der Stiel: Der Stiel, der die Guave mit dem Baum verbindet, sollte sich leicht lösen lassen. Wenn ihr die Frucht leicht dreht, sollte sie sich fast von selbst lösen.
Die Ernte: Schritt für Schritt
Jetzt geht’s ans Eingemachte! Mit diesen Schritten erntet ihr eure Guaven schonend und effizient:
1. Die richtige Guave auswählen: Sucht euch die Guave aus, die alle Reifezeichen erfüllt. Achtet darauf, dass sie keine Beschädigungen oder Anzeichen von Schädlingsbefall aufweist.
2. Die Gartenschere vorbereiten: Stellt sicher, dass eure Gartenschere oder euer Messer sauber und scharf ist. Eine stumpfe Klinge kann den Baum beschädigen.
3. Den Schnitt setzen: Schneidet den Stiel der Guave etwa 2-3 cm vom Fruchtansatz entfernt ab. Achtet darauf, den Baum nicht zu verletzen.
4. Die Guave auffangen: Fangt die Guave vorsichtig mit eurer Hand oder der weichen Unterlage auf, damit sie nicht herunterfällt und beschädigt wird.
5. Die Guave ablegen: Legt die geerntete Guave vorsichtig in den Korb oder die Schüssel.
6. Wiederholen: Wiederholt die Schritte 1-5, bis ihr alle reifen Guaven geerntet habt.
7. Reinigung (optional): Wenn ihr möchtet, könnt ihr die geernteten Guaven direkt in einem Eimer mit Wasser waschen, um Schmutz und Staub zu entfernen.
8. Kontrolle: Überprüft die geernteten Guaven noch einmal auf Beschädigungen oder Schädlingsbefall. Sortiert beschädigte Früchte aus.
Nach der Ernte: Lagerung und Verwendung
Was macht man nun mit all den leckeren Guaven? Hier sind ein paar Tipps zur Lagerung und Verwendung:
* Lagerung: Reife Guaven sind nicht lange haltbar. Am besten lagert ihr sie im Kühlschrank, wo sie sich etwa 3-5 Tage halten. Unreife Guaven können bei Zimmertemperatur nachreifen.
* Verwendung: Die Möglichkeiten sind endlos! Ihr könnt die Guaven pur essen, zu Saft, Marmelade, Gelee oder Chutney verarbeiten. Sie eignen sich auch hervorragend für Smoothies, Salate oder Desserts.
Häufige Fehler vermeiden: Meine Tipps aus der Praxis
Ich habe im Laufe der Jahre so einige Fehler gemacht, aber daraus gelernt! Hier sind meine wichtigsten Tipps, um häufige Fehler bei der Guave-Ernte zu vermeiden:
* Zu früh ernten: Geduld ist eine Tugend! Erntet die Guaven erst, wenn sie wirklich reif sind. Eine unreife Guave schmeckt nicht gut und wird auch nicht mehr richtig nachreifen.
* Zu spät ernten: Eine überreife Guave ist matschig und verliert ihren Geschmack. Achtet darauf, sie rechtzeitig zu ernten.
* Den Baum beschädigen: Seid vorsichtig beim Schneiden der Stiele, um den Baum nicht zu verletzen. Eine saubere, scharfe Klinge ist hier Gold wert.
* Die Guaven fallen lassen: Fangt die Guaven vorsichtig auf, um Beschädigungen zu vermeiden. Eine weiche Unterlage ist hier sehr hilfreich.
* Die Guaven falsch lagern: Lagert reife Guaven im Kühlschrank, um ihre Haltbarkeit zu verlängern. Unreife Guaven können bei Zimmertemperatur nachreifen.
* Schädlinge ignorieren: Achtet auf Anzeichen von Schädlingsbefall und behandelt den Baum gegebenenfalls rechtzeitig.
Zusätzliche Tipps für eine reiche Ernte
Hier sind noch ein paar zusätzliche Tipps, die euch helfen können, eine reiche Guave-Ernte zu erzielen:
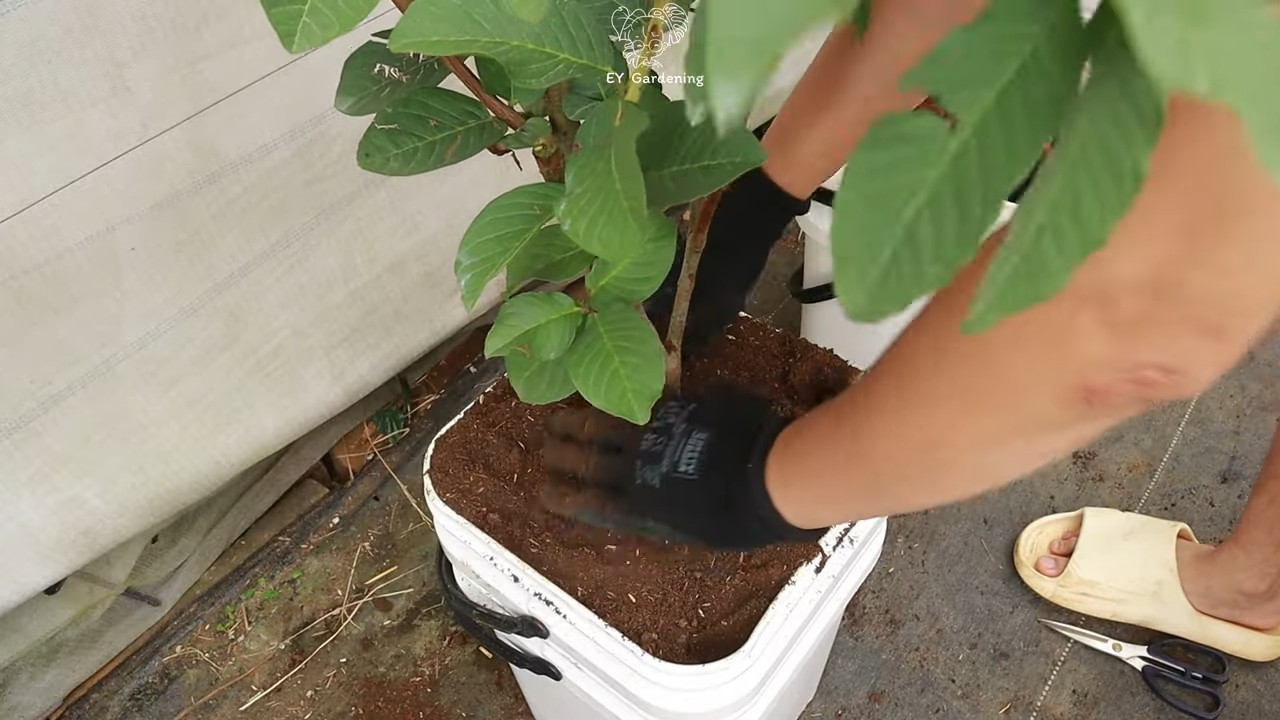
* Der richtige Standort: Guavenbäume lieben die Sonne! Stellt sicher, dass euer Baum an einem sonnigen Standort steht, der mindestens 6 Stunden Sonnenlicht pro Tag erhält.
* Die richtige Bewässerung: Guavenbäume brauchen regelmäßige Bewässerung, besonders während der Trockenzeit. Achtet darauf, dass der Boden feucht, aber nicht durchnässt ist.
* Die richtige Düngung: Düngt euren Guavenbaum regelmäßig mit einem ausgewogenen Dünger. Achtet auf die Anweisungen auf der Verpackung.
* Der richtige Schnitt: Schneidet euren Guavenbaum regelmäßig, um seine Form zu erhalten und die Fruchtbildung zu fördern. Entfernt abgestorbene oder beschädigte Äste.
* Schutz vor Frost: Guavenbäume sind frostempfindlich. Schützt euren Baum vor Frost, indem ihr ihn mit einer Decke abdeckt oder ihn in einen geschützten Bereich bringt.
Fazit: Guave-Ernte leicht gemacht!
Ich hoffe, dieser Artikel hat euch geholfen, eure eigene Guave-Ernte auf der Terrasse erfolgreich zu gestalten. Mit ein wenig Geduld und Sorgfalt könnt ihr schon bald eure eigenen, frischen Guaven genießen. Viel Spaß beim Ernten! Und vergesst nicht, eure Erfahrungen mit mir zu teilen! Ich bin gespannt auf eure Erfolgsgeschichten!
Conclusion
So, there you have it! Transforming your terrace-grown guavas into a delectable, homemade guava paste is not just a recipe; it’s an experience. It’s about connecting with the fruits of your labor, minimizing waste, and creating something truly special from your own little urban oasis. This DIY guava paste recipe is more than just a way to use your harvest; it’s a celebration of the journey from seed to table.
Why is this a must-try? Because store-bought guava paste simply cannot compare to the vibrant flavor and freshness of homemade. You control the ingredients, ensuring a product free from artificial preservatives and excessive sugars. Plus, the satisfaction of creating something delicious from scratch, using guavas you nurtured yourself, is unparalleled. It’s a rewarding process that brings you closer to nature and your food.
But the fun doesn’t stop there! Feel free to experiment with variations. Add a pinch of chili flakes for a spicy kick, or a splash of lime juice for a tangy twist. Infuse the paste with cinnamon or star anise for a warm, aromatic flavor profile. Consider adding other fruits like pineapple or mango for a tropical blend. The possibilities are endless, and the only limit is your imagination.
Don’t be afraid to get creative and personalize your guava paste to suit your taste preferences.
We wholeheartedly encourage you to try this DIY guava paste recipe. It’s easier than you might think, and the results are well worth the effort. Imagine serving this homemade delicacy to your friends and family, knowing that it came from your very own terrace garden. It’s a conversation starter, a source of pride, and a delicious treat all rolled into one.
More importantly, making your own guava paste is a sustainable way to utilize your harvest. Instead of letting those precious guavas go to waste, you’re transforming them into a long-lasting, versatile ingredient that you can enjoy for months to come. This is particularly important for those committed to reducing food waste and embracing a more eco-conscious lifestyle.
We are confident that you will love this recipe and the process of making your own guava paste. It’s a simple yet rewarding way to connect with your garden and create something truly special.
So, gather your terrace-grown guavas, put on your apron, and get ready to embark on a culinary adventure. We can’t wait to hear about your experience! Share your photos, tips, and variations with us in the comments below. Let’s build a community of guava paste enthusiasts and celebrate the joys of homemade goodness.
Frequently Asked Questions (FAQ)
1. What kind of guavas work best for making guava paste?
The best guavas for making guava paste are those that are ripe but still firm. Overripe guavas can be too soft and may result in a paste that is too watery. Pink guavas are generally preferred for their flavor and color, but white guavas can also be used. The key is to choose guavas that are fragrant and have a smooth, unblemished skin. Avoid guavas with bruises or soft spots. The variety of guava you grow on your terrace will influence the final flavor, so experiment to find your favorite!
2. How do I store guava paste?
Proper storage is crucial for preserving the quality and extending the shelf life of your homemade guava paste. Once the paste has cooled completely, wrap it tightly in plastic wrap, ensuring that there are no air pockets. Then, store it in an airtight container in the refrigerator. Guava paste can typically last for several months when stored properly. You can also freeze guava paste for longer storage. Wrap it tightly in plastic wrap and then place it in a freezer-safe bag or container. Frozen guava paste can last for up to a year. When ready to use, thaw it in the refrigerator overnight.
3. Can I use a food processor instead of a blender to puree the guavas?
Yes, you can use a food processor to puree the guavas. However, a blender generally produces a smoother puree, which is desirable for guava paste. If using a food processor, make sure to process the guavas until they are as smooth as possible. You may need to scrape down the sides of the bowl several times during processing. If the puree is still a bit chunky, you can strain it through a fine-mesh sieve to remove any remaining pieces.
4. How do I know when the guava paste is done cooking?
Determining the doneness of guava paste is crucial for achieving the right consistency. The paste is ready when it has thickened considerably and pulls away from the sides of the pot as you stir it. You should also be able to draw a line through the paste with a spoon, and the line should hold its shape for a few seconds. Another test is to place a small spoonful of the paste on a cold plate. If it sets up quickly and has a firm, jelly-like consistency, it’s ready. Be careful not to overcook the paste, as it can become too hard and brittle.
5. Can I reduce the amount of sugar in the recipe?
Yes, you can reduce the amount of sugar in the recipe, but keep in mind that sugar acts as a preservative and contributes to the texture of the guava paste. If you reduce the sugar too much, the paste may not set properly and may have a shorter shelf life. You can try reducing the sugar by about 25% and see how it turns out. You can also use a sugar substitute, such as stevia or erythritol, but be aware that these may affect the flavor and texture of the paste. Experiment to find the right balance that suits your taste preferences.
6. What can I do if my guava paste is too soft?
If your guava paste is too soft, it means it hasn’t cooked long enough. Simply return the paste to the pot and continue cooking it over medium heat, stirring constantly, until it thickens further. Be sure to monitor it closely to prevent burning. You can also add a small amount of pectin to help it set.
7. What can I do if my guava paste is too hard?
If your guava paste is too hard, it means it has been overcooked. Unfortunately, there’s no way to completely reverse this. However, you can try adding a small amount of water or guava juice to the paste and heating it gently to soften it slightly. You can then use it as a spread or filling, even if it’s not perfectly smooth.
8. Can I use this guava paste in other recipes?
Absolutely! Guava paste is a versatile ingredient that can be used in a variety of recipes. It’s delicious served with cheese and crackers, used as a filling for pastries and empanadas, or added to smoothies and desserts. You can also melt it down and use it as a glaze for meats or vegetables. Get creative and experiment with different ways to incorporate your homemade guava paste into your favorite dishes.
9. How do I prevent the guava paste from sticking to the pot while cooking?
To prevent the guava paste from sticking to the pot, use a heavy-bottomed pot and stir the paste constantly, especially as it thickens. You can also add a small amount of butter or oil to the pot before adding the guava puree to help prevent sticking.
10. Can I make guava paste without pectin?
Yes, you can make guava paste without pectin. The natural pectin in the guavas will help the paste to set. However, the paste may take longer to thicken and may not be as firm as paste made with added pectin. If you prefer a firmer paste, you can add a small amount of pectin to the recipe.
11. What are some creative ways to use my terrace-grown guavas besides making paste?
Besides making guava paste, there are many other delicious ways to use your terrace-grown guavas. You can make guava juice, guava jam, guava jelly, or guava chutney. You can also add guavas to smoothies, salads, or desserts. Guavas can also be used in savory dishes, such as stews and curries. Experiment with different recipes and find your favorite ways to enjoy your homegrown guavas.
12. Is it necessary to remove the seeds from the guavas before making paste?
While it’s not strictly necessary to remove all the seeds, doing so will result in a smoother, more refined guava paste. The seeds are edible, but they can be quite hard and may detract from the overall texture of the paste. If you prefer a smoother paste, you can strain the guava puree through a fine-mesh sieve to remove the seeds.
13. How can I make my guava paste a deeper, richer color?
To enhance the color of your guava paste, you can add a small amount of beet juice or pomegranate juice to the mixture while it’s cooking. These natural colorings will give the paste a deeper, richer hue without affecting the flavor significantly.
14. Can I use frozen guavas to make guava paste?
Yes, you can use frozen guavas to make guava paste. Thaw the guavas completely before pureeing them. Keep in mind that frozen guavas may release more water than fresh guavas, so you may need to cook the paste for a longer time to achieve the desired consistency.
15. What are the health benefits of eating guava paste?
Guava paste retains many of the nutritional benefits of fresh guavas. Guavas are rich in vitamin C
Leave a Comment