
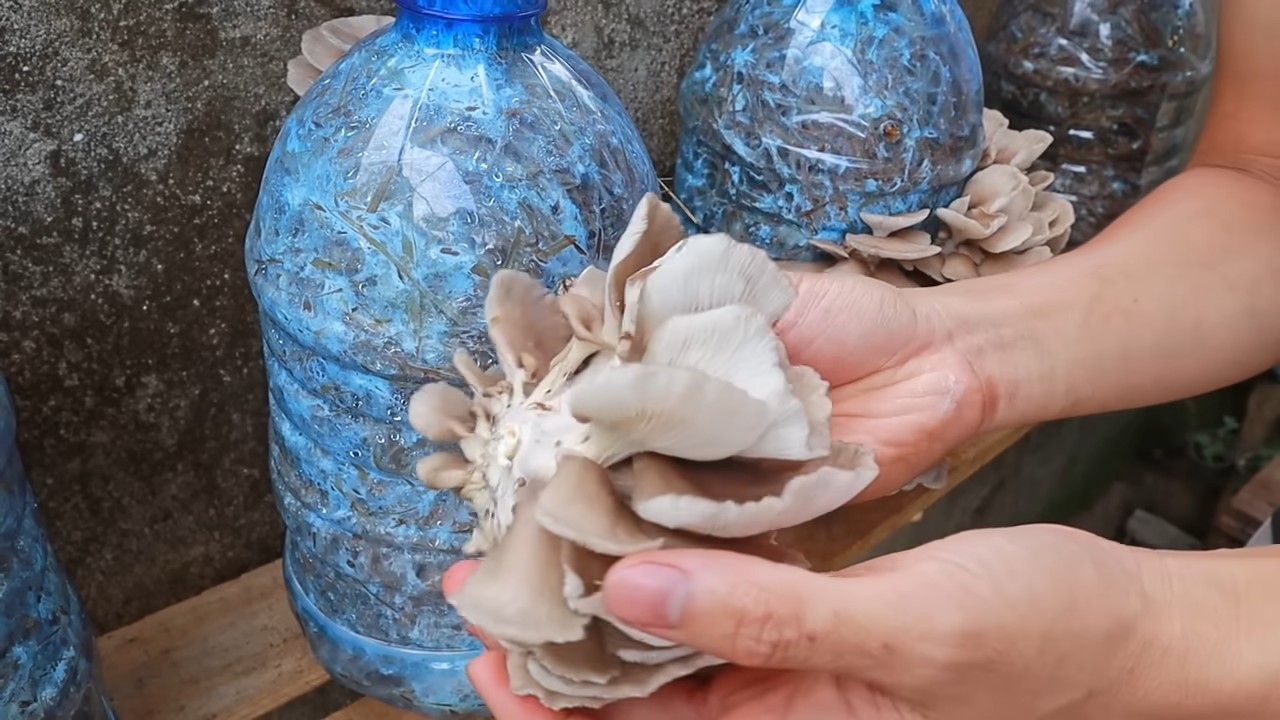
Mushroom Growing in Plastic Bottles: Unlock the secrets to cultivating your own delicious fungi right in your home! Have you ever looked at those empty plastic bottles piling up and thought, “There *must* be a better use for these?” Well, I’m here to tell you there is! We’re diving into the fascinating world of home gardening with a clever and sustainable twist: growing mushrooms in recycled plastic bottles.
The practice of cultivating mushrooms has ancient roots, dating back centuries across various cultures. From the medicinal uses in traditional Chinese medicine to the culinary delights in European cuisine, mushrooms have always held a special place in human history. Now, we’re bringing this time-honored tradition into the modern age with a DIY project that’s both eco-friendly and incredibly rewarding.
Why should you try mushroom growing in plastic bottles? Because it’s a fantastic way to reduce waste, learn a new skill, and enjoy fresh, homegrown mushrooms without needing a sprawling garden. Imagine the satisfaction of harvesting your own oyster mushrooms for a delicious stir-fry, all thanks to a few repurposed plastic bottles! Plus, it’s a fun and educational project for the whole family. Let’s get started and transform those discarded bottles into a thriving mushroom farm!
Pilzzucht im Plastikflaschen-Upcycling: Dein DIY-Guide für zu Hause
Hey Pilzfreunde! Habt ihr euch jemals gefragt, wie ihr eure eigenen köstlichen Pilze zu Hause züchten könnt, ohne viel Platz oder teure Ausrüstung zu benötigen? Dann seid ihr hier genau richtig! In diesem Artikel zeige ich euch, wie ihr mit einfachen Plastikflaschen eine kleine, aber feine Pilzzucht aufbauen könnt. Das ist nicht nur super nachhaltig, weil wir Plastikmüll recyceln, sondern auch unglaublich befriedigend, wenn ihr eure eigenen, frisch geernteten Pilze auf dem Teller habt. Los geht’s!
Was du brauchst: Die Materialliste
Bevor wir loslegen, hier eine Liste aller Materialien, die du für dein Pilzzucht-Projekt benötigst:
* Plastikflaschen: Am besten eignen sich 1,5-Liter- oder 2-Liter-Flaschen. Je mehr, desto mehr Pilze! Achtet darauf, dass sie sauber und leer sind.
* Pilzbrut: Das ist das “Saatgut” für eure Pilze. Ihr könnt verschiedene Sorten wählen, z.B. Austernpilze, Shiitake oder Kräuterseitlinge. Die Brut bekommt ihr im Fachhandel oder online.
* Substrat: Das ist die Nährgrundlage für eure Pilze. Hierfür könnt ihr Stroh, Sägespäne (von unbehandeltem Holz!), Kaffeesatz oder eine Mischung aus allem verwenden.
* Kalk: Um den pH-Wert des Substrats zu regulieren.
* Wasser: Zum Befeuchten des Substrats.
* Sprühflasche: Zum regelmäßigen Befeuchten der Pilze.
* Bohrer oder Messer: Zum Anbringen von Belüftungslöchern in den Flaschen.
* Klebeband oder Frischhaltefolie: Zum Abdecken der Löcher während der Inkubationsphase.
* Optional: Eine dunkle Plastiktüte oder ein Karton, um die Flaschen während der Inkubationsphase abzudecken.
Schritt-für-Schritt-Anleitung: So baust du deine Pilzzucht
Jetzt geht’s ans Eingemachte! Hier ist eine detaillierte Anleitung, wie du deine Pilzzucht in Plastikflaschen aufbaust:
1. Die Vorbereitung der Flaschen
1. Reinigung: Spüle die Plastikflaschen gründlich mit heißem Wasser und Spülmittel aus. Achte darauf, dass alle Rückstände entfernt werden. Trockne sie anschließend gut ab.
2. Belüftungslöcher: Bohre oder schneide mit einem Messer mehrere kleine Löcher (ca. 0,5-1 cm Durchmesser) in die Seiten der Flaschen. Diese Löcher sind wichtig für die Belüftung der Pilze. Verteile die Löcher gleichmäßig über die gesamte Oberfläche der Flasche. Ich empfehle, etwa 5-7 Löcher pro Flasche anzubringen.
3. Abdecken der Löcher: Bedecke die Löcher mit Klebeband oder Frischhaltefolie. Diese Abdeckung dient dazu, die Feuchtigkeit im Inneren der Flasche zu halten und das Eindringen von Schädlingen während der Inkubationsphase zu verhindern.
2. Die Vorbereitung des Substrats
Die Vorbereitung des Substrats ist entscheidend für den Erfolg deiner Pilzzucht. Je nach verwendetem Material gibt es unterschiedliche Methoden:
* Stroh:
1. Pasteurisierung: Schneide das Stroh in kurze Stücke (ca. 5-10 cm). Gib das Stroh in einen großen Topf oder Eimer und übergieße es mit kochendem Wasser. Lasse das Stroh für mindestens eine Stunde im heißen Wasser ziehen. Dieser Schritt dient dazu, unerwünschte Mikroorganismen abzutöten.
2. Abtropfen: Gieße das Wasser ab und lasse das Stroh gut abtropfen. Es sollte feucht, aber nicht nass sein.
* Sägespäne:
1. Pasteurisierung: Gib die Sägespäne in einen hitzebeständigen Behälter und übergieße sie mit kochendem Wasser. Lasse die Sägespäne für mindestens eine Stunde im heißen Wasser ziehen.
2. Abtropfen: Gieße das Wasser ab und lasse die Sägespäne gut abtropfen.
* Kaffeesatz:
1. Verwendung: Frischer Kaffeesatz ist bereits pasteurisiert, da er mit heißem Wasser aufgebrüht wurde. Du kannst ihn direkt verwenden, sobald er abgekühlt ist. Achte darauf, dass er nicht zu feucht ist.
* Mischung: Wenn du eine Mischung aus verschiedenen Substraten verwendest, pasteurisiere die Materialien, die es benötigen (Stroh, Sägespäne), separat und mische sie anschließend mit dem Kaffeesatz.
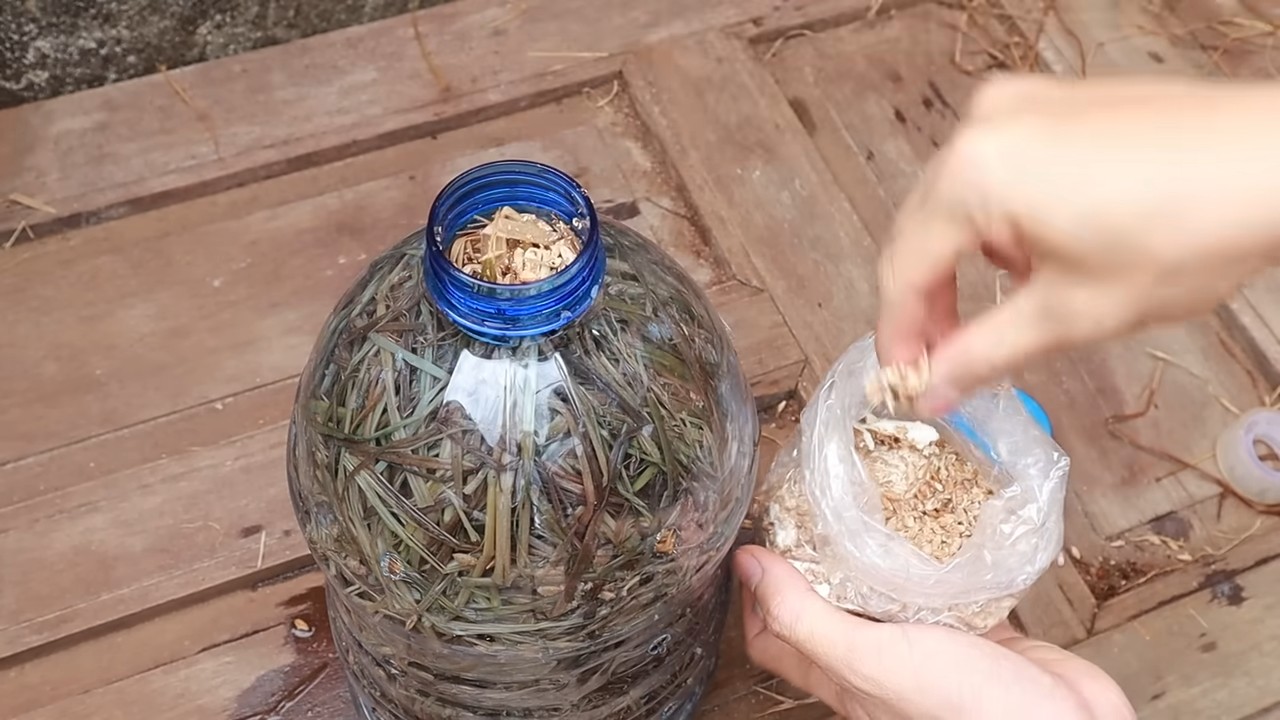
3. Das Befüllen der Flaschen
1. Mischen: Mische das vorbereitete Substrat mit der Pilzbrut. Das Verhältnis sollte etwa 10-20% Pilzbrut zu 80-90% Substrat betragen. Verteile die Brut gleichmäßig im Substrat.
2. Schichten: Fülle die Plastikflaschen schichtweise mit dem Substrat-Brut-Gemisch. Drücke jede Schicht leicht an, um Lufteinschlüsse zu vermeiden. Lasse oben etwa 5-10 cm Platz frei.
3. Abschluss: Verschließe die Flaschen mit dem Deckel oder mit Frischhaltefolie und einem Gummiband.
4. Die Inkubationsphase
Die Inkubationsphase ist entscheidend für das Wachstum des Myzels (des Pilzgeflechts).
1. Standort: Stelle die gefüllten Flaschen an einen dunklen, kühlen (ca. 18-24°C) und gut belüfteten Ort. Ein Keller, eine Speisekammer oder ein Schrank eignen sich gut.
2. Abdeckung: Optional kannst du die Flaschen mit einer dunklen Plastiktüte oder einem Karton abdecken, um sie vor Licht zu schützen.
3. Kontrolle: Überprüfe die Flaschen regelmäßig auf Schimmelbildung oder andere Verunreinigungen. Wenn du Schimmel entdeckst, entsorge die betroffene Flasche sofort, um eine Ausbreitung zu verhindern.
4. Dauer: Die Inkubationsphase dauert in der Regel 2-4 Wochen. Während dieser Zeit wird das Myzel das Substrat durchwachsen. Du erkennst das daran, dass das Substrat weißlich wird.
5. Die Fruchtungsphase
Sobald das Substrat vollständig mit Myzel durchwachsen ist, beginnt die Fruchtungsphase, in der die Pilze wachsen.
1. Belüftung: Entferne das Klebeband oder die Frischhaltefolie von den Belüftungslöchern.
2. Licht: Stelle die Flaschen an einen helleren Ort, aber vermeide direkte Sonneneinstrahlung. Indirektes Licht ist ideal.
3. Feuchtigkeit: Besprühe die Flaschen und die Umgebung regelmäßig mit Wasser, um eine hohe Luftfeuchtigkeit zu gewährleisten. Die Pilze benötigen eine feuchte Umgebung, um gut zu wachsen.
4. Temperatur: Die ideale Temperatur für die Fruchtungsphase hängt von der Pilzsorte ab. Informiere dich über die spezifischen Bedürfnisse deiner Pilze.
5. Wachstum: Innerhalb weniger Tage sollten sich kleine Pilzköpfe bilden. Beobachte das Wachstum und besprühe die Pilze weiterhin regelmäßig mit Wasser.
6. Die Ernte
1. Erntezeitpunkt: Die Pilze sind erntereif, wenn die Hüte sich vollständig geöffnet haben und die Lamellen (die feinen Blättchen unter dem Hut) sichtbar sind.
2. Erntemethode: Drehe die Pilze vorsichtig ab oder schneide sie mit einem scharfen Messer ab. Achte darauf, das Myzel nicht zu beschädigen.
3. Zweite Ernte: Nach der ersten Ernte kannst du die Flaschen weiterhin befeuchten und pflegen. Oftmals gibt es noch eine zweite oder sogar dritte Erntewelle.
Zusätzliche Tipps und Tricks
* Hygiene: Achte während des gesamten Prozesses auf Sauberkeit und Hygiene, um Schimmelbildung und andere Verunreinigungen zu vermeiden.
* Belüftung: Eine gute Belüftung ist entscheidend für das Wachstum der Pilze. Sorge für
Conclusion
So, there you have it! Transforming humble plastic bottles into thriving mushroom farms is not just a quirky DIY project; it’s a sustainable, cost-effective, and incredibly rewarding way to cultivate your own delicious fungi. We’ve walked you through the process, highlighting the simplicity and accessibility of this method. Forget expensive kits and complicated setups. With a few readily available materials and a little patience, you can unlock the magic of mushroom cultivation right in your own home.
Why is this DIY trick a must-try? Because it empowers you to take control of your food source, reduces plastic waste, and connects you with the natural world in a tangible way. Imagine the satisfaction of harvesting fresh, flavorful mushrooms that you nurtured from start to finish. Think of the conversations you’ll spark when friends and family see your innovative bottle garden. And consider the positive impact you’ll be making on the environment by repurposing materials that would otherwise end up in landfills.
But the beauty of this method lies in its adaptability. Feel free to experiment with different mushroom varieties. Oyster mushrooms are a fantastic starting point due to their resilience and rapid growth, but don’t be afraid to branch out and try shiitake, lion’s mane, or even wine cap mushrooms once you’ve gained some experience.
Consider the substrate you use as well. While straw and coffee grounds are excellent choices, you can also incorporate other organic materials like shredded cardboard, wood chips, or even spent grain from brewing. Just be sure to pasteurize or sterilize your substrate properly to prevent contamination.
Another variation to explore is the placement of your bottle farms. While a dark, humid environment is ideal, you can adjust the conditions to suit your specific needs and space. Experiment with different levels of light and ventilation to see what works best for your chosen mushroom variety. You can even create a mini-greenhouse around your bottles to further control the humidity and temperature.
Don’t be afraid to get creative with the bottles themselves! Paint them, decorate them, or arrange them in unique and eye-catching displays. Turn your mushroom farm into a work of art that reflects your personal style.
Ultimately, the goal is to have fun and learn along the way. Mushroom cultivation is a journey of discovery, and there’s always something new to learn and experiment with.
We wholeheartedly encourage you to give this DIY mushroom growing in plastic bottles a try. It’s a project that’s both educational and rewarding, and it’s a fantastic way to connect with nature and reduce your environmental footprint.
Once you’ve embarked on your mushroom-growing adventure, we’d love to hear about your experiences! Share your photos, tips, and challenges in the comments section below. Let’s build a community of bottle-farming enthusiasts and learn from each other. Together, we can unlock the full potential of this simple yet powerful technique. So, grab some plastic bottles, gather your supplies, and get ready to grow your own delicious and sustainable mushrooms! Happy growing!
Frequently Asked Questions (FAQ)
What types of mushrooms grow best in plastic bottles?
Oyster mushrooms (Pleurotus spp.) are generally considered the easiest and most reliable choice for beginners. They are fast-growing, relatively tolerant of varying conditions, and produce abundant yields. Other suitable options include shiitake (Lentinula edodes), lion’s mane (Hericium erinaceus), and wine cap mushrooms (Stropharia rugosoannulata), although these may require more specific conditions and experience. Experimentation is key to finding what works best in your environment.
How do I properly pasteurize or sterilize the substrate?
Pasteurization aims to reduce the number of competing microorganisms in the substrate, while sterilization aims to eliminate them entirely. For straw, a common method is to soak it in hot water (around 160-180°F or 71-82°C) for 1-2 hours. This can be done in a large pot or container. For coffee grounds, which are already partially sterilized by the brewing process, a shorter pasteurization time may suffice. Sterilization, typically done in an autoclave or pressure cooker, is more effective but also more energy-intensive. For home growers, pasteurization is often sufficient, especially for oyster mushrooms. Ensure the substrate cools down completely before inoculation.
How do I maintain the proper humidity levels inside the bottle?
Humidity is crucial for mushroom growth. You can maintain humidity by regularly misting the inside of the bottle with water. The frequency of misting will depend on the ambient humidity and ventilation. Aim for a humidity level of around 80-90%. You can also create a humidity tent by placing a plastic bag loosely over the bottle, ensuring there’s still some airflow. Monitoring the substrate’s moisture level is also important; it should be damp but not waterlogged.
What if I see mold growing in my bottle?
Mold contamination is a common issue in mushroom cultivation. If you see mold, especially green or black mold, it’s best to remove the affected area immediately. If the contamination is widespread, it’s usually best to discard the entire bottle to prevent the mold from spreading to other bottles. Proper pasteurization or sterilization of the substrate is crucial to minimize the risk of mold contamination. Maintaining good hygiene practices, such as washing your hands and tools before handling the substrate, can also help.
How long does it take for mushrooms to grow in plastic bottles?
The time it takes for mushrooms to grow depends on several factors, including the mushroom variety, the substrate used, and the environmental conditions. Oyster mushrooms typically begin to fruit within 1-2 weeks after inoculation, while other varieties may take longer. Maintaining optimal humidity, temperature, and ventilation will help accelerate the growth process. Be patient and observe your bottles regularly for signs of mushroom formation.
Where should I place my mushroom bottles for optimal growth?
Mushrooms generally prefer a dark, humid environment with good ventilation. A basement, garage, or closet are often suitable locations. Avoid direct sunlight, as it can dry out the substrate and inhibit growth. The ideal temperature range varies depending on the mushroom variety, but most prefer temperatures between 60-75°F (15-24°C). Ensure there’s adequate airflow to prevent the buildup of carbon dioxide, which can also inhibit growth.
Can I reuse the plastic bottles for multiple mushroom crops?
Yes, you can reuse the plastic bottles, but it’s important to clean and disinfect them thoroughly between crops to prevent the buildup of contaminants. Wash the bottles with soap and water, and then rinse them with a diluted bleach solution (1 part bleach to 10 parts water). Allow the bottles to dry completely before reusing them. However, keep in mind that plastic can degrade over time, so it’s best to replace the bottles after a few uses.
What should I do with the spent substrate after harvesting the mushrooms?
The spent substrate is a valuable resource that can be used as compost in your garden. It’s rich in nutrients and organic matter, making it an excellent soil amendment. You can also add it to your compost pile to enrich the compost. Alternatively, you can use it as mulch around plants to help retain moisture and suppress weeds.
How do I know when the mushrooms are ready to harvest?
The timing of harvest depends on the mushroom variety. Oyster mushrooms are typically ready to harvest when the caps are fully formed and the edges are still slightly curled downwards. Shiitake mushrooms are ready when the caps have flattened out and the gills are visible. Harvest the mushrooms by gently twisting or cutting them off at the base of the stem.
Is growing mushrooms in plastic bottles safe?
Yes, growing mushrooms in plastic bottles is generally safe, as long as you follow proper hygiene practices and use food-grade plastic bottles. Avoid using bottles that have contained harmful chemicals or pesticides. Ensure the substrate is properly pasteurized or sterilized to prevent the growth of harmful bacteria or fungi. And always cook the mushrooms thoroughly before eating them. If you have any concerns about the safety of your mushrooms, consult with a mycologist or other expert.
Leave a Comment