
Cucumber harvest mistake? Oh no! Don’t worry, we’ve all been there. I remember the first time I grew cucumbers; I was so excited, but I ended up with a bunch of bitter, overgrown gourds. It was a total cucumber catastrophe! But fear not, because today, we’re diving deep into the world of cucumber harvesting to ensure you avoid those same pitfalls and enjoy a bountiful, delicious crop.
Cucumbers have a rich history, dating back thousands of years to their origins in India. They’ve been enjoyed by civilizations across the globe, from the ancient Romans to the Egyptians, who believed in their medicinal properties. Today, cucumbers are a staple in salads, pickles, and refreshing drinks, and growing your own allows you to enjoy them at their freshest and most flavorful.
But here’s the thing: knowing when and how to harvest your cucumbers is crucial. A simple cucumber harvest mistake can lead to bitter-tasting fruits, reduced yields, and even damage to your plants. That’s why I’ve put together this guide filled with easy-to-follow DIY tricks and hacks that will transform you from a cucumber novice to a harvesting pro. We’ll cover everything from identifying the perfect harvest size to using the right tools and techniques. Get ready to unlock the secrets to a successful cucumber harvest and enjoy the crisp, refreshing taste of homegrown goodness!
Gurken-Ernte-Fauxpas vermeiden: So machst du es richtig!
Hallo liebe Gartenfreunde! Ich bin’s, eure DIY-Expertin, und heute sprechen wir über ein Thema, das vielen von uns schon mal Kopfzerbrechen bereitet hat: die Gurkenernte. Klingt einfach, oder? Gurke sehen, abschneiden, fertig. Aber glaubt mir, da steckt mehr dahinter, als man denkt! Falsch geerntete Gurken können nicht nur den Geschmack beeinträchtigen, sondern auch die Pflanze schwächen und die weitere Ernte reduzieren. Keine Panik, ich zeige euch, wie ihr diese typischen Fehler vermeidet und eine reiche, leckere Gurkenernte einfahrt!
Warum die richtige Ernte so wichtig ist
Bevor wir ins Detail gehen, lasst uns kurz darüber sprechen, warum die richtige Ernte überhaupt so wichtig ist. Eine reife Gurke, die zu lange an der Pflanze hängt, entzieht ihr unnötig Energie. Das führt dazu, dass die Pflanze weniger neue Früchte produziert. Außerdem können überreife Gurken bitter werden und ihre knackige Textur verlieren. Und wer will schon bittere, labberige Gurken? Eben!
Die häufigsten Fehler bei der Gurkenernte (und wie du sie vermeidest!)
Hier sind die häufigsten Fehler, die ich bei der Gurkenernte beobachtet habe, und natürlich, wie du sie vermeidest:
* Zu frühe Ernte: Die Gurke ist noch nicht reif und schmeckt wässrig.
* Zu späte Ernte: Die Gurke ist überreif, bitter und hat harte Kerne.
* Falsches Werkzeug: Du reißt die Gurke ab, anstatt sie abzuschneiden, was die Pflanze beschädigen kann.
* Falsche Tageszeit: Du erntest in der prallen Mittagssonne, was die Gurken unnötig stresst.
* Ignorieren der Sortenmerkmale: Du kennst die typische Größe und Farbe deiner Gurkensorte nicht und erntest deshalb falsch.
So erntest du Gurken richtig: Eine Schritt-für-Schritt-Anleitung
Jetzt kommt der spannende Teil: die richtige Erntetechnik! Keine Sorge, es ist einfacher als du denkst.
Phase 1: Vorbereitung
1. Das richtige Werkzeug: Besorge dir eine scharfe Gartenschere oder ein Messer. Eine stumpfe Schere quetscht den Stiel und kann die Pflanze beschädigen. Ich persönlich bevorzuge eine kleine, handliche Gartenschere.
2. Der richtige Zeitpunkt: Ernte deine Gurken am besten am frühen Morgen oder am späten Nachmittag, wenn die Sonne nicht mehr so stark scheint. So vermeidest du, dass die Gurken durch die Hitze gestresst werden.
3. Handschuhe (optional): Wenn du empfindliche Haut hast, trage Gartenhandschuhe. Die Gurkenpflanze kann leicht reizen.
Phase 2: Die Reife erkennen
1. Die Größe: Die Größe ist ein wichtiger Indikator für die Reife. Informiere dich, welche Größe für deine Gurkensorte typisch ist. Auf der Saatgutpackung oder im Internet findest du diese Information.
2. Die Farbe: Die Farbe sollte gleichmäßig und intensiv sein. Vermeide Gurken mit gelblichen oder bräunlichen Stellen.
3. Die Festigkeit: Die Gurke sollte sich fest anfühlen, aber nicht steinhart sein. Wenn du leicht darauf drückst, sollte sie leicht nachgeben.
4. Die Stachel: Einige Gurkensorten haben kleine Stacheln. Diese sollten sich leicht abwischen lassen, wenn die Gurke reif ist.
Phase 3: Die Ernte
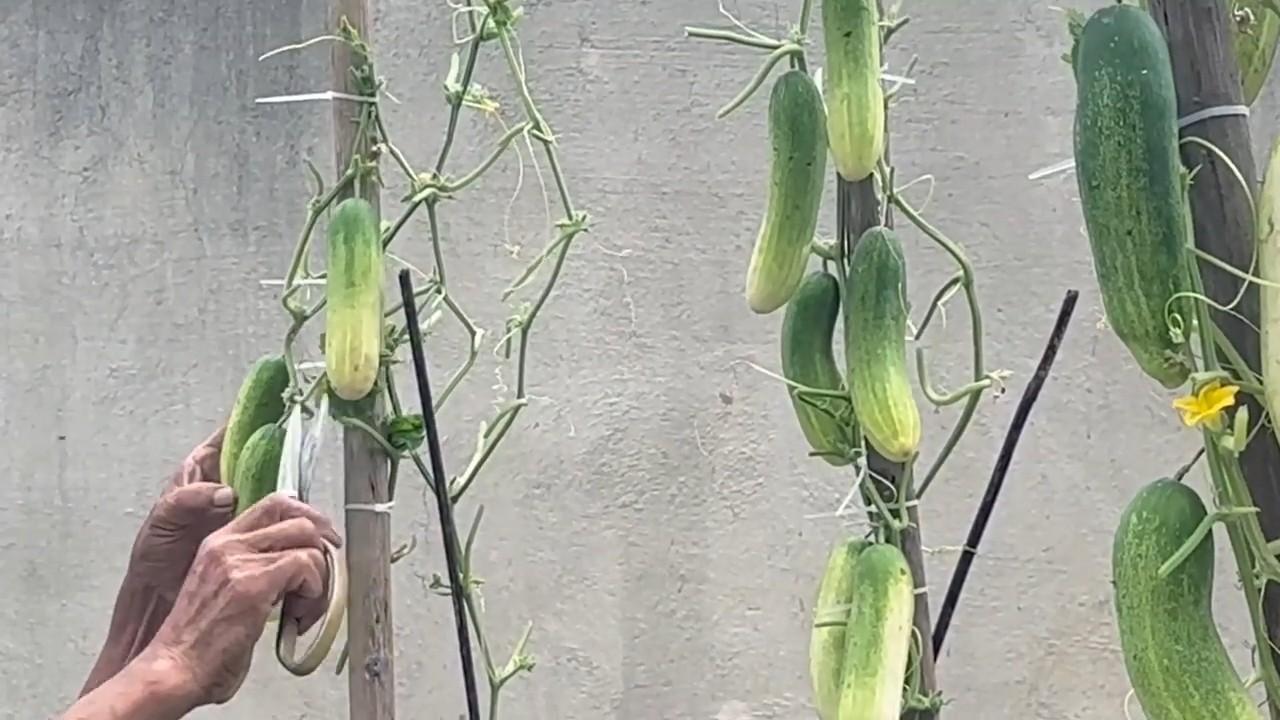
1. Den Stiel finden: Suche den Stiel, der die Gurke mit der Pflanze verbindet.
2. Schneiden, nicht reißen: Setze die Gartenschere oder das Messer am Stiel an, etwa 1-2 cm von der Gurke entfernt. Schneide den Stiel sauber durch. Vermeide es unbedingt, die Gurke abzureißen, da du dadurch die Pflanze beschädigen kannst.
3. Sanft behandeln: Lege die geerntete Gurke vorsichtig in einen Korb oder eine Schüssel. Vermeide es, sie zu werfen oder zu quetschen.
Spezialfall: Einlegegurken ernten
Wenn du Einlegegurken anbaust, gibt es ein paar Besonderheiten zu beachten:
* Klein und knackig: Einlegegurken werden in der Regel kleiner geerntet als Salatgurken. Sie sollten fest und knackig sein.
* Regelmäßige Ernte: Ernte Einlegegurken regelmäßig, damit die Pflanze neue Früchte produziert.
* Die richtige Größe: Die ideale Größe für Einlegegurken hängt von deinem Rezept ab. Informiere dich, welche Größe du für deine Einmachgläser benötigst.
Was tun, wenn die Gurke bitter schmeckt?
Manchmal kann es vorkommen, dass Gurken bitter schmecken. Das liegt an Bitterstoffen, den sogenannten Cucurbitacinen. Hier sind ein paar Tipps, um bittere Gurken zu vermeiden:
* Die richtige Sorte wählen: Es gibt Gurkensorten, die weniger anfällig für Bitterstoffe sind. Informiere dich vor dem Kauf.
* Gleichmäßige Bewässerung: Trockenstress kann die Bildung von Bitterstoffen fördern. Achte auf eine gleichmäßige Bewässerung.
* Sonnenschutz: Zu viel Sonne kann ebenfalls die Bildung von Bitterstoffen begünstigen. Schütze deine Gurkenpflanzen vor extremer Hitze.
* Die richtige Ernte: Überreife Gurken sind eher bitter. Ernte deine Gurken rechtzeitig.
* Schälen: Wenn die Gurke bitter schmeckt, schäle sie großzügig. Die Bitterstoffe konzentrieren sich oft in der Schale.
* Enden abschneiden: Schneide die Enden der Gurke großzügig ab. Auch hier konzentrieren sich die Bitterstoffe.
Häufige Fragen zur Gurkenernte
* Wie oft sollte ich Gurken ernten? Am besten erntest du deine Gurken alle paar Tage. So verhinderst du, dass sie überreif werden.
* Kann ich Gurken auch im Regen ernten? Ja, das ist kein Problem. Achte nur darauf, dass du die Gurken nach der Ernte gut abtrocknest, um Schimmelbildung zu vermeiden.
* Wie lagere ich geerntete Gurken am besten? Gurken lagerst du am besten im Kühlschrank. Sie halten sich dort etwa eine Woche.
Zusätzliche Tipps für eine erfolgreiche Gurkenernte
* Regelmäßig düngen: Gurken sind Starkzehrer und benötigen ausreichend Nährstoffe. Dünge deine Gurkenpflanzen regelmäßig mit einem geeigneten Dünger.
* Rankhilfe: Gurkenpflanzen benötigen eine Rankhilfe, an der sie hochklettern können. Das erleichtert die Ernte und sorgt für eine bessere Belüftung der Pflanzen.
* Schädlinge und Krankheiten: Achte auf Schädlinge und Krankheiten und bekämpfe sie rechtzeitig.
* Mulchen: Mulche den Boden um deine Gurkenpflanzen, um die Feuchtigkeit zu halten und Unkraut zu unterdrücken.
Ich hoffe, diese Tipps helfen dir dabei, eine reiche und leckere Gurkenernte einzufahren! Viel Spaß beim Gärtnern!
Conclusion
So, you’ve accidentally harvested a batch of cucumbers that are a little too big, a little too yellow, or perhaps even a little bitter. Don’t despair! What might seem like a cucumber harvest mistake can actually be transformed into a culinary opportunity. This simple DIY trick – turning those “imperfect” cucumbers into delicious, tangy refrigerator pickles – is a game-changer. It’s not just about salvaging your harvest; it’s about unlocking a new level of flavor and reducing food waste.
Why is this a must-try? First and foremost, it’s incredibly easy. You don’t need any fancy equipment or specialized canning knowledge. The process is straightforward, quick, and yields results that are far superior to store-bought pickles in terms of freshness and flavor. Secondly, it’s incredibly versatile. You can customize the brine to your exact liking, adjusting the sweetness, sourness, and spice levels to create a pickle that perfectly complements your palate. Think dill and garlic for a classic flavor, or add red pepper flakes for a spicy kick. You could even experiment with different herbs like tarragon or mustard seeds for a unique twist.
Beyond the basic recipe, consider these variations to truly make it your own:
* **Sweet and Sour Pickles:** Increase the sugar content in the brine for a sweeter pickle. A touch of honey or maple syrup can add a delightful depth of flavor.
* **Spicy Pickles:** Add sliced jalapeños, serrano peppers, or a pinch of cayenne pepper to the brine for a fiery kick. Remember to adjust the amount to your spice tolerance.
* **Garlic Lover’s Pickles:** Double or even triple the amount of garlic in the recipe. Roasted garlic cloves can also add a mellow, sweet garlic flavor.
* **Dill-icious Pickles:** Use fresh dill instead of dried for a more vibrant and aromatic pickle. Add dill seeds for an extra layer of dill flavor.
* **Bread and Butter Pickles:** Add turmeric and celery seed to the brine for a classic bread and butter pickle flavor.
This DIY refrigerator pickle trick is more than just a way to rescue your less-than-perfect cucumbers; it’s a gateway to a world of homemade deliciousness. It’s a chance to connect with your garden, experiment with flavors, and create something truly special. Plus, homemade pickles make fantastic gifts!
We wholeheartedly encourage you to give this DIY trick a try. It’s a simple, rewarding, and delicious way to turn a potential cucumber harvest mistake into a culinary triumph. And most importantly, don’t forget to share your experience! We’d love to hear about your variations, your successes, and any tips you discover along the way. Share your photos and stories on social media using #DIYCucumberPickles and let’s inspire others to embrace the beauty of homemade goodness. Happy pickling!
Frequently Asked Questions (FAQ)
What kind of cucumbers work best for refrigerator pickles?
While this trick is designed to rescue cucumbers that aren’t perfect for slicing and eating fresh, the best results come from cucumbers that are still firm. Overripe cucumbers that are very soft or mushy won’t hold their shape well in the brine. Smaller cucumbers, even if slightly yellowed, tend to work better than very large, seedy ones. If your cucumbers are particularly large, consider removing the seeds before pickling. Kirby cucumbers are ideal, but any garden variety will work.
How long do refrigerator pickles last?
Refrigerator pickles are not processed for long-term storage, so they have a shorter shelf life than canned pickles. They will typically last for 2-3 weeks in the refrigerator. Be sure to store them in an airtight container to maintain their crispness and flavor. Always check for any signs of spoilage, such as a cloudy brine or an off odor, before consuming.
Can I use different types of vinegar?
Yes, you can experiment with different types of vinegar to create different flavor profiles. White vinegar is the most common choice for its neutral flavor, but apple cider vinegar adds a slightly sweet and tangy flavor. Rice vinegar is another good option for a milder, slightly sweet pickle. Avoid using balsamic vinegar, as its strong flavor can overpower the other ingredients.
Do I need to peel the cucumbers?
Peeling the cucumbers is optional. Leaving the peel on will give the pickles a slightly firmer texture and a more rustic appearance. If your cucumbers have a thick or tough skin, you may prefer to peel them. You can also partially peel them, leaving some strips of skin on for visual appeal.
Can I use this recipe for other vegetables?
Yes, this basic brine recipe can be adapted for other vegetables, such as green beans, carrots, bell peppers, and onions. Adjust the slicing or chopping of the vegetables to ensure they fit comfortably in your jars and that the brine can penetrate them effectively. The pickling time may vary depending on the vegetable, so taste them periodically to check for desired flavor and texture.
My pickles are too salty/sour/sweet. What can I do?
The beauty of refrigerator pickles is that you can adjust the brine to your liking. If your pickles are too salty, you can add a little water to the brine. If they are too sour, add a little sugar. If they are too sweet, add a little vinegar. Taste the brine after each adjustment and let the pickles sit for a few hours to allow the flavors to meld.
Why are my pickles not crunchy?
Several factors can contribute to soft pickles. Using very ripe or overripe cucumbers is a common cause. Another factor is the temperature of the brine. Make sure the brine is completely cooled before pouring it over the cucumbers. Adding a grape leaf or a pinch of calcium chloride (pickle crisp) to the jar can also help maintain crispness.
Can I double or triple the recipe?
Yes, you can easily double or triple the recipe to make a larger batch of pickles. Just be sure to adjust the amount of brine accordingly. Use a large pot to heat the brine and ensure that all the ingredients are well combined.
Is it safe to can these pickles for long-term storage?
No, this recipe is specifically for refrigerator pickles and is not suitable for canning. Refrigerator pickles are not processed at a high enough temperature to kill all the bacteria that can cause spoilage. If you want to make pickles for long-term storage, you need to use a tested and approved canning recipe.
What are some creative ways to use refrigerator pickles?
Refrigerator pickles are delicious on their own as a snack or side dish, but they can also be used in a variety of other ways. Chop them up and add them to salads, sandwiches, or burgers. Use them as a topping for tacos or nachos. Add them to potato salad or egg salad for a tangy twist. You can even blend them into a pickle relish or use the brine as a marinade for chicken or fish. The possibilities are endless!


Leave a Comment