
Grow Watermelon Cheaply? Absolutely! Imagine biting into a juicy, sweet watermelon you’ve grown yourself, without breaking the bank. Sounds amazing, right? Well, it’s totally achievable, and I’m here to show you how with some clever DIY tricks and hacks.
Watermelons have a rich history, dating back thousands of years to Africa. They were even found in King Tut’s tomb! Over time, different cultures have embraced this refreshing fruit, developing various growing techniques. But let’s face it, buying watermelons from the store can get expensive, especially if you’re a watermelon fanatic like me!
That’s where these DIY tricks come in. We all want to enjoy fresh, healthy produce, but sometimes the cost can be a barrier. This article is packed with simple, budget-friendly methods to grow watermelon cheaply, even if you have limited space or gardening experience. I’ll share my secrets for seed starting, soil preparation, and pest control, all without emptying your wallet. Get ready to impress your friends and family with your homegrown watermelons – they’ll never guess how little it cost you!
Wassermelonen günstig selbst anbauen: Dein DIY-Guide für eine reiche Ernte
Hey Gartenfreunde! Wer liebt es nicht, an einem heißen Sommertag in eine saftige, süße Wassermelone zu beißen? Aber Wassermelonen im Supermarkt können ganz schön teuer sein. Deshalb zeige ich dir heute, wie du mit ein paar einfachen Tricks und Kniffen deine eigenen Wassermelonen günstig und erfolgreich anbauen kannst. Keine Angst, du brauchst keinen riesigen Garten oder teure Ausrüstung. Mit etwas Geduld und den richtigen Tipps klappt das auch bei dir!
Die Grundlagen: Was Wassermelonen zum Wachsen brauchen
Bevor wir loslegen, lass uns kurz die wichtigsten Bedürfnisse deiner zukünftigen Wassermelonenpflanzen besprechen. Das hilft dir, Fehler zu vermeiden und die besten Bedingungen für eine reiche Ernte zu schaffen.
* Sonne, Sonne, Sonne: Wassermelonen sind Sonnenanbeter. Sie brauchen mindestens 6-8 Stunden direkte Sonneneinstrahlung pro Tag. Wähle also einen sonnigen Standort in deinem Garten oder auf deinem Balkon.
* Warme Temperaturen: Wassermelonen lieben Wärme. Die Bodentemperatur sollte idealerweise zwischen 21°C und 32°C liegen. Warte also, bis die Frostgefahr vorbei ist, bevor du mit dem Anbau beginnst.
* Gut durchlässiger Boden: Wassermelonen mögen keinen nassen Boden. Achte darauf, dass der Boden gut durchlässig ist und überschüssiges Wasser ablaufen kann. Sandiger Lehmboden ist ideal.
* Ausreichend Platz: Wassermelonenpflanzen brauchen Platz, um sich auszubreiten. Plane genügend Raum ein, damit sich die Ranken entwickeln können.
* Regelmäßige Bewässerung: Wassermelonen brauchen viel Wasser, besonders während der Fruchtbildung. Gieße regelmäßig, aber vermeide Staunässe.
* Nährstoffe: Wassermelonen sind Starkzehrer. Sie brauchen ausreichend Nährstoffe, um gesund zu wachsen und leckere Früchte zu produzieren. Dünge regelmäßig mit einem geeigneten Dünger.
Phase 1: Die Vorbereitung – So sparst du schon beim Start
Hier zeige ich dir, wie du schon vor dem eigentlichen Anbau Geld sparen kannst.
1. Samen selbst gewinnen oder günstig kaufen: Anstatt teure Samen im Gartencenter zu kaufen, kannst du Samen aus einer gekauften Wassermelone gewinnen. Achte darauf, dass die Melone reif und von guter Qualität ist. Spüle die Samen gründlich ab und lasse sie trocknen. Alternativ kannst du auch online oder auf dem Flohmarkt nach günstigen Samen suchen. Oft gibt es Restposten oder Angebote.
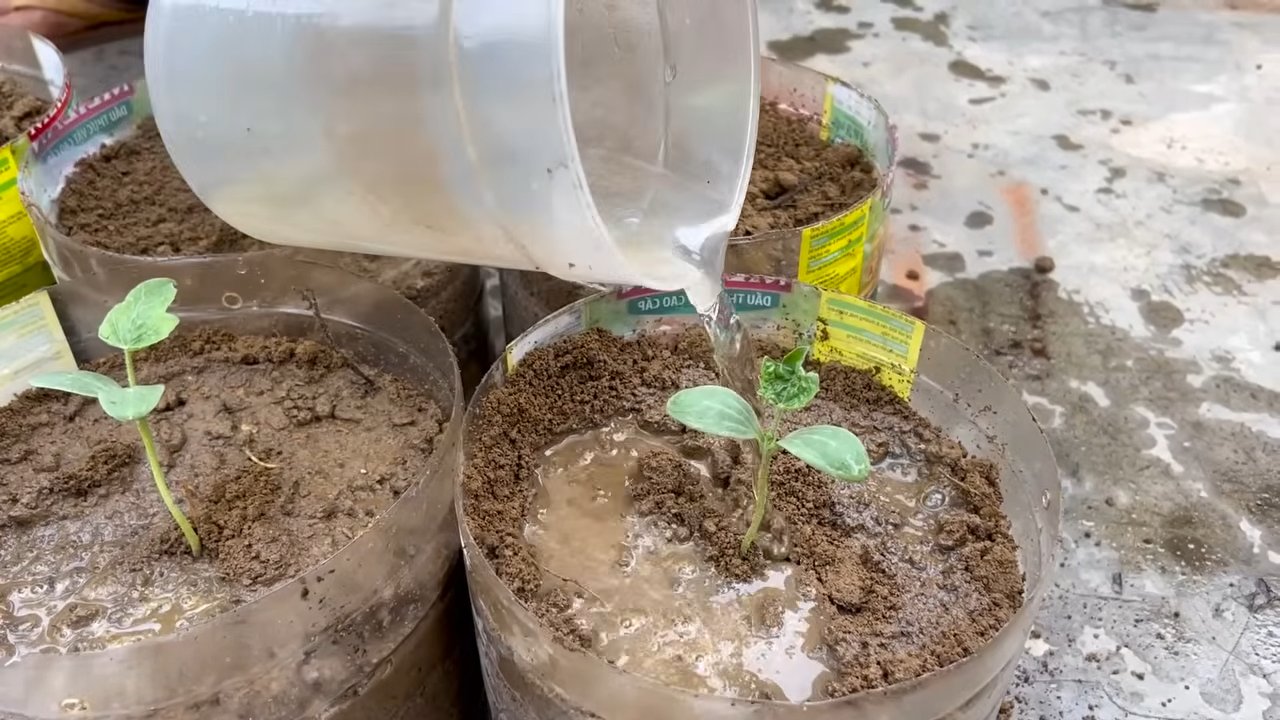
2. Anzucht in recycelten Behältern: Du brauchst keine teuren Anzuchttöpfe. Verwende stattdessen leere Joghurtbecher, Eierkartons oder andere recycelte Behälter. Achte darauf, dass die Behälter Löcher im Boden haben, damit das Wasser ablaufen kann.
3. Günstige Anzuchterde selbst mischen: Anzuchterde kann teuer sein. Mische sie stattdessen selbst aus Gartenerde, Kompost und Sand. Das ist nicht nur günstiger, sondern auch umweltfreundlicher. Ein gutes Verhältnis ist 1:1:1.
4. Frühstart im Haus: Um die Wachstumsperiode zu verlängern und die Ernte zu verfrühen, kannst du die Samen bereits im April oder Mai im Haus vorziehen. Das gibt den Pflanzen einen Vorsprung und schützt sie vor Spätfrösten.
Phase 2: Die Anzucht – So ziehst du gesunde Jungpflanzen
Jetzt geht es ans Eingemachte! Hier zeige ich dir, wie du aus den Samen kräftige Jungpflanzen ziehst.
1. Samen vorbereiten: Um die Keimung zu beschleunigen, kannst du die Samen vor dem Aussäen für 24 Stunden in lauwarmem Wasser einweichen. Das weicht die harte Schale auf und erleichtert das Keimen.
2. Aussaat: Fülle die Anzuchtbehälter mit der vorbereiteten Anzuchterde. Drücke die Erde leicht an und säe die Samen etwa 2-3 cm tief ein. Bedecke die Samen mit Erde und gieße sie vorsichtig an.
3. Warm und feucht halten: Stelle die Anzuchtbehälter an einen warmen und hellen Ort. Die ideale Keimtemperatur liegt bei 25-30°C. Halte die Erde feucht, aber nicht nass. Du kannst die Behälter mit Frischhaltefolie abdecken, um die Luftfeuchtigkeit zu erhöhen. Lüfte die Folie regelmäßig, um Schimmelbildung zu vermeiden.
4. Pikieren: Sobald die Keimlinge 2-3 echte Blätter haben, kannst du sie pikieren. Das bedeutet, dass du sie vorsichtig aus den Anzuchtbehältern nimmst und in größere Töpfe umpflanzt. Verwende dafür eine hochwertige Pflanzerde.
5. Abhärten: Bevor du die Jungpflanzen ins Freie pflanzt, solltest du sie abhärten. Das bedeutet, dass du sie langsam an die Bedingungen im Freien gewöhnst. Stelle die Pflanzen tagsüber für einige Stunden ins Freie und hole sie abends wieder herein. Steigere die Zeit im Freien allmählich, bis die Pflanzen den ganzen Tag draußen bleiben können.
Phase 3: Das Auspflanzen – Der Umzug ins Freie
Endlich dürfen deine kleinen Wassermelonenpflanzen ins Freie! Aber auch hier gibt es ein paar Dinge zu beachten.
1. Der richtige Zeitpunkt: Warte, bis die Frostgefahr vorbei ist und die Bodentemperatur mindestens 18°C beträgt. Das ist in der Regel ab Mitte Mai der Fall.
2. Der richtige Standort: Wähle einen sonnigen und windgeschützten Standort mit gut durchlässigem Boden. Bereite den Boden vor, indem du ihn lockerst und mit Kompost anreicherst.
3. Pflanzabstand: Wassermelonenpflanzen brauchen viel Platz. Halte einen Pflanzabstand von mindestens 1 Meter zwischen den Pflanzen und 2 Meter zwischen den Reihen ein.
4. Pflanzen: Grabe ein Loch, das etwas größer ist als der Wurzelballen der Pflanze. Setze die Pflanze vorsichtig in das Loch und fülle es mit Erde auf. Drücke die Erde leicht an und gieße die Pflanze gründlich an.
5. Mulchen: Mulche den Boden um die Pflanzen herum mit Stroh oder Holzhackschnitzeln. Das hält den Boden feucht, unterdrückt Unkraut und schützt die Früchte vor direktem Bodenkontakt.
Phase 4: Die Pflege – So bringst du deine Wassermelonen zum Wachsen
Jetzt heißt es: Geduld und Pflege! Hier zeige ich dir, wie du deine Wassermelonenpflanzen optimal versorgst.
1. Regelmäßige Bewässerung: Wassermelonen brauchen viel Wasser, besonders während der Fruchtbildung. Gieße regelmäßig, aber vermeide Staunässe. Am besten gießt du morgens, damit die Blätter bis zum Abend abtrocknen können.
2. Düngung: Wassermelonen sind Starkzehrer. Dünge regelmäßig mit einem organischen Dünger oder einem speziellen Wassermelonendünger. Beginne mit der Düngung etwa 2 Wochen nach dem Auspflanzen und wiederhole sie alle 2-3 Wochen.
3. Unkrautbekämpfung: Halte den Boden um die Pflanzen herum unkrautfrei. Unkraut konkurriert mit den Wassermelonen um Nährstoffe und Wasser.
4. Ranken lenken: Wassermelonenranken können sehr lang werden. Lenke die Ranken in die gewünschte Richtung, damit sie nicht zu viel Platz einnehmen und die Früchte gut belüftet sind.
5. Fruchtansatz fördern: Um den Fruchtansatz zu fördern, kannst du die Blüten von Hand bestäuben. Übertrage dazu mit einem Pinsel Pollen von den männlichen auf die weiblichen Blüten. Die weiblichen Blüten erkennst du an dem kleinen Fruchtansatz unterhalb der Blüte.
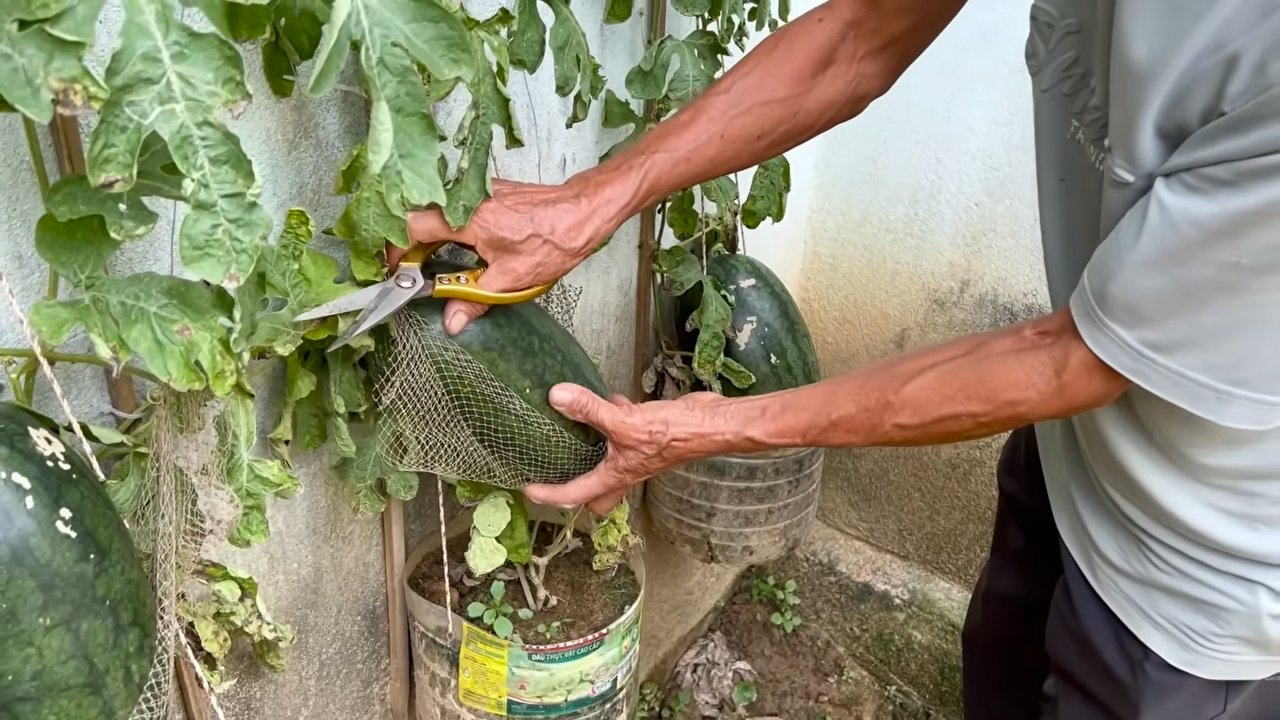
6. Früchte schützen: Lege die wachsenden Früchte auf Stroh oder Holzbretter, um sie vor direktem Bodenkontakt und Fäulnis zu schützen.
7. Schädlinge und Krankheiten: Achte auf Schädlinge und Krankheiten. Blattläuse, Schnecken und Mehltau können Wassermelonen befallen. Bekämpfe
Conclusion
So, there you have it! Growing watermelons doesn’t have to break the bank. This DIY trick for growing watermelons cheaply is more than just a cost-effective solution; it’s a gateway to a more rewarding gardening experience. Imagine biting into a juicy, sweet watermelon, knowing you nurtured it from seed to fruit without emptying your wallet. The satisfaction is unparalleled.
This method, focusing on resourcefulness and utilizing readily available materials, empowers you to cultivate these summer delights regardless of your budget. It’s about maximizing your yield with minimal investment, proving that you don’t need expensive equipment or specialized fertilizers to achieve impressive results. Think of all the money you’ll save compared to buying watermelons at the grocery store, and the added bonus of knowing exactly what went into growing your food.
Beyond the financial benefits, this DIY approach fosters a deeper connection with nature. You’ll learn firsthand about the watermelon’s growth cycle, its needs, and the subtle nuances that contribute to its flavor and texture. It’s an educational journey that transforms you from a consumer into a producer, giving you a newfound appreciation for the fruits (and vegetables!) of your labor.
Variations and Suggestions:
Don’t be afraid to experiment! Try using different types of containers, such as repurposed plastic tubs or even old tires (ensure they are clean and safe). You can also explore various soil amendments to enhance drainage and nutrient content. Consider adding compost tea or worm castings to boost the soil’s fertility naturally.
For those in colder climates, starting your watermelon seeds indoors a few weeks before the last frost can give them a head start. Use biodegradable pots to minimize transplant shock when you move them outdoors. You can also use row covers to protect young plants from frost and pests.
Another variation is to explore different watermelon varieties. While classic red watermelons are always a hit, consider trying yellow or orange varieties for a unique flavor and visual appeal. Seedless watermelons are also a popular choice for convenience.
Share Your Experience!
We encourage you to try this DIY trick for growing watermelons cheaply and share your experiences with us. Post photos of your watermelon plants, tell us about any challenges you faced, and let us know what worked best for you. Your insights can help other gardeners learn and improve their own watermelon-growing endeavors. Join our community of resourceful gardeners and let’s cultivate a bountiful harvest together! Let us know if you have any other tips for growing watermelons cheaply. We are always looking for new ideas.
Frequently Asked Questions (FAQ)
What are the best watermelon varieties to grow using this cheap method?
The best watermelon varieties for this method are generally those that are known for their adaptability and relatively shorter growing season. Some excellent choices include:
* Sugar Baby: This is a popular variety known for its compact size and early maturity, making it ideal for smaller gardens or containers. It produces sweet, juicy watermelons that are perfect for individual servings.
* Bush Sugar Baby: A bush-type watermelon, perfect for container gardening and limited spaces. It offers the same great taste as the original Sugar Baby but in a more manageable form.
* Blacktail Mountain: This variety is known for its cold tolerance and early maturity, making it a great option for gardeners in cooler climates. It produces small to medium-sized watermelons with a deep red flesh.
* Golden Midget: This unique variety produces small, round watermelons with a golden-yellow rind when ripe. It’s a fun and flavorful option that’s sure to impress.
* Moon and Stars: An heirloom variety with a dark green rind speckled with yellow “stars” and a larger “moon.” It’s known for its sweet, flavorful flesh and its striking appearance.
Consider your local climate and growing conditions when selecting a watermelon variety. Check with your local nursery or extension office for recommendations specific to your region.
How much sunlight do watermelons need when grown using this method?
Watermelons are sun-loving plants and require at least 6-8 hours of direct sunlight per day to thrive. When growing watermelons cheaply using this DIY method, ensure that your plants are placed in a location that receives ample sunlight throughout the day. Insufficient sunlight can lead to stunted growth, reduced fruit production, and less flavorful watermelons.
If you’re growing watermelons in containers, you may need to move them around to follow the sun’s path. This is especially important in areas with limited sunlight or during periods of cloudy weather.
What type of soil is best for growing watermelons cheaply?
Watermelons thrive in well-drained, sandy loam soil that is rich in organic matter. The soil should have a pH between 6.0 and 6.8. When growing watermelons cheaply, you can improve the soil quality by adding compost, aged manure, or other organic amendments. These amendments will help to improve drainage, aeration, and nutrient content.
Avoid heavy clay soils, as they can retain too much water and lead to root rot. If you have clay soil, amend it with plenty of organic matter and consider growing your watermelons in raised beds or containers to improve drainage.
How often should I water my watermelons when using this DIY method?
Watermelons need consistent watering, especially during hot, dry weather. Water deeply and regularly, aiming to keep the soil consistently moist but not waterlogged. The frequency of watering will depend on the weather conditions, soil type, and the size of your plants.
As a general rule, watermelons need about 1-2 inches of water per week. Check the soil moisture regularly by sticking your finger into the soil. If the top inch of soil feels dry, it’s time to water.
During fruit development, watermelons require even more water. Be sure to provide adequate moisture to support the growing fruit. However, avoid overwatering as the fruit ripens, as this can dilute the sugars and affect the flavor.
How can I prevent pests and diseases when growing watermelons cheaply?
Preventing pests and diseases is crucial for a successful watermelon harvest. Here are some tips for keeping your plants healthy:
* Choose disease-resistant varieties: Select watermelon varieties that are known to be resistant to common diseases in your area.
* Practice crop rotation: Avoid planting watermelons in the same location year after year. Crop rotation helps to prevent the buildup of soilborne diseases and pests.
* Provide good air circulation: Space your plants adequately to allow for good air circulation. This will help to prevent fungal diseases.
* Water at the base of the plants: Avoid wetting the foliage when watering, as this can create a favorable environment for fungal diseases.
* Monitor for pests and diseases: Regularly inspect your plants for signs of pests or diseases. Early detection is key to effective treatment.
* Use organic pest control methods: If you encounter pests, try using organic pest control methods such as insecticidal soap, neem oil, or diatomaceous earth.
* Remove diseased leaves or plants: If you find any diseased leaves or plants, remove them immediately to prevent the spread of the disease.
Can I grow watermelons in containers using this cheap method?
Yes, absolutely! Growing watermelons in containers is a great option for those with limited space or poor soil conditions. When growing watermelons in containers, choose a large container (at least 20 gallons) with good drainage. Use a high-quality potting mix that is rich in organic matter.
Be sure to provide adequate support for the vines as they grow. You can use a trellis or stake to keep the vines off the ground. Water container-grown watermelons more frequently than those grown in the ground, as the soil in containers tends to dry out more quickly.
How do I know when my watermelons are ripe?
Determining when a watermelon is ripe can be tricky, but here are a few indicators to look for:
* The tendril closest to the fruit turns brown and dries up: This is one of the most reliable indicators of ripeness.
* The underside of the watermelon (where it rests on the ground) turns from white to a creamy yellow: This is known as the “ground spot.”
* The watermelon sounds dull and hollow when thumped: A ripe watermelon will have a deep, resonant sound.
* The rind becomes dull and loses its shine: A ripe watermelon will have a slightly dull appearance.
It may take some practice to learn how to identify a ripe watermelon, but with a little experience, you’ll be able to pick the perfect one every time.
Leave a Comment