
Growing Brussels Sprouts Beginner can seem daunting, I know! But trust me, with a few simple tricks and a little patience, you can harvest your own delicious, homegrown sprouts right in your backyard. Forget those bland, overcooked sprouts you might remember from childhood – fresh, homegrown Brussels sprouts are a revelation!
Brussels sprouts have a fascinating history, originating in (you guessed it!) Brussels, Belgium, way back in the 13th century. They’ve been a staple in European cuisine for centuries, and now it’s your turn to bring this healthy and versatile vegetable to your table.
Why bother with growing Brussels Sprouts Beginner, you ask? Well, for starters, they’re packed with vitamins and nutrients, making them a superfood powerhouse. Plus, store-bought sprouts often lack the freshness and flavor of homegrown ones. But more importantly, learning to grow your own food is incredibly rewarding! There’s nothing quite like the satisfaction of nurturing a plant from seed to harvest and enjoying the fruits (or in this case, sprouts!) of your labor. This DIY guide will provide you with the essential knowledge and practical tips to successfully cultivate Brussels sprouts, even if you’re a complete beginner. So, let’s get started and transform your garden into a sprout-producing paradise!
Growing Brussels Sprouts for Beginners: Your DIY Guide
Growing Brussels sprouts might seem intimidating at first, but believe me, it’s easier than you think! With a little patience and the right steps, you can harvest your own delicious Brussels sprouts. I’ll show you how, from sowing to harvest. Let’s get started!
What You Need:
- Brussels sprout seeds (choose a variety suitable for your climate)
- Seed starting pots or trays
- Seed starting mix
- Garden soil (well-draining and nutrient-rich)
- Compost or organic fertilizer
- Watering can or a hose with a rose head
- Stakes or a trellis (optional, but recommended)
- Mulch (straw, wood chips, etc.)
- Pest netting (optional, but very useful)
- Garden shears or a knife
The Roadmap:
- Sowing: Start your Brussels sprout seeds indoors, about 4-6 weeks before the last expected frost.
- Transplanting: Once the seedlings are strong enough (about 15-20 cm or 6-8 inches tall), plant them outdoors.
- Care: Water regularly, fertilize as needed, and protect your plants from pests.
- Harvest: Harvest the Brussels sprouts when they are firm and closed, working from the bottom up.
Sowing Indoors: Kicking off the Brussels Sprout Season
- Prepare the seed pots: Fill your seed starting pots or trays with seed starting mix. Press the soil down lightly, but not too firmly.
- Sow the seeds: Place 2-3 seeds per pot, about 1 cm (0.4 inches) deep in the soil. Lightly cover the seeds with soil and water them gently.
- The right location: Place the seed pots in a bright, warm spot. A windowsill with plenty of sunlight is ideal. You can also use a grow light if you don’t have enough natural light.
- Maintain moisture: Keep the soil moist, but not wet. Regularly spray the soil with a spray bottle or water gently with a watering can.
- Wait for germination: The seeds should germinate within 7-14 days. Once the seedlings have emerged, you can remove the weakest ones, leaving only the strongest seedling per pot.
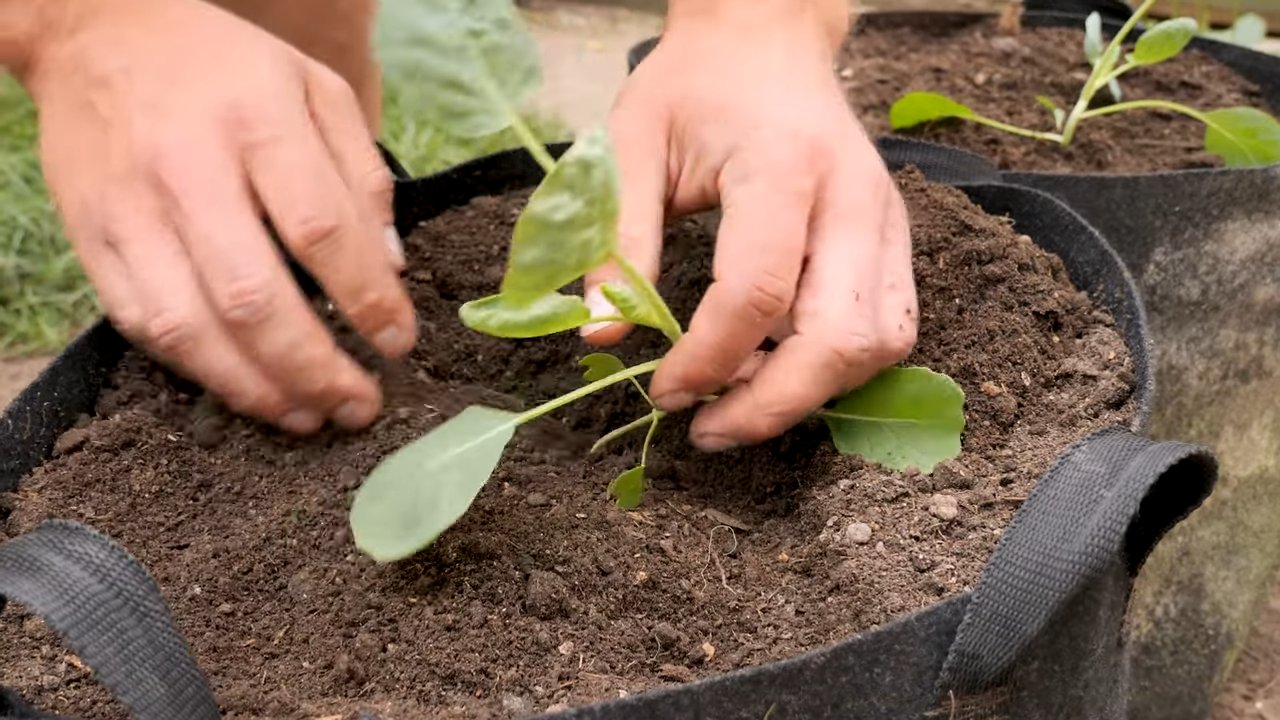
Transplanting Outdoors: The Move to Brussels Sprout Paradise
- Prepare the soil: Brussels sprouts love a sunny spot with well-draining, nutrient-rich soil. Prepare the soil by working in compost or organic fertilizer. This improves the soil structure and provides the plants with essential nutrients.
- Harden off the seedlings: Before you plant the seedlings outdoors, you need to harden them off. Place the pots outside for a few hours a day, starting with one hour and increasing the time each day. This helps the plants acclimate to outdoor conditions.
- The right time: Plant the seedlings outdoors once the danger of frost has passed and the soil temperature is at least 10°C (50°F).
- Plant spacing: Plant the seedlings about 60-75 cm (24-30 inches) apart. This gives the plants enough space to grow.
- Transplanting: Dig a hole that is slightly larger than the seedling’s root ball. Carefully place the seedling in the hole and fill it with soil. Press the soil down lightly and water the plant thoroughly.
Care: Helping Your Brussels Sprouts Thrive
- Watering: Brussels sprouts need regular watering, especially during dry periods. Water the plants deeply so the water reaches the roots. Avoid wetting the leaves to prevent fungal diseases.
- Fertilizing: Brussels sprouts are heavy feeders and require regular fertilization. Feed the plants about every 2-3 weeks with an organic fertilizer or compost tea.
- Mulching: Mulch the soil around the plants with straw, wood chips, or other organic material. This helps retain soil moisture, suppress weeds, and keep the soil cool.
- Staking: Brussels sprout plants can get quite tall and heavy, especially when they bear a lot of sprouts. Support the plants with stakes or a trellis to prevent them from falling over.
- Pest control: Brussels sprouts are susceptible to various pests, such as cabbage whites, aphids, and flea beetles. Check the plants regularly for pests and combat them with natural methods if necessary, such as neem oil or insecticidal soap. Pest netting can also be very helpful in keeping pests away.
- Removing yellow leaves: Regularly remove yellow or damaged leaves to improve air circulation and prevent diseases.
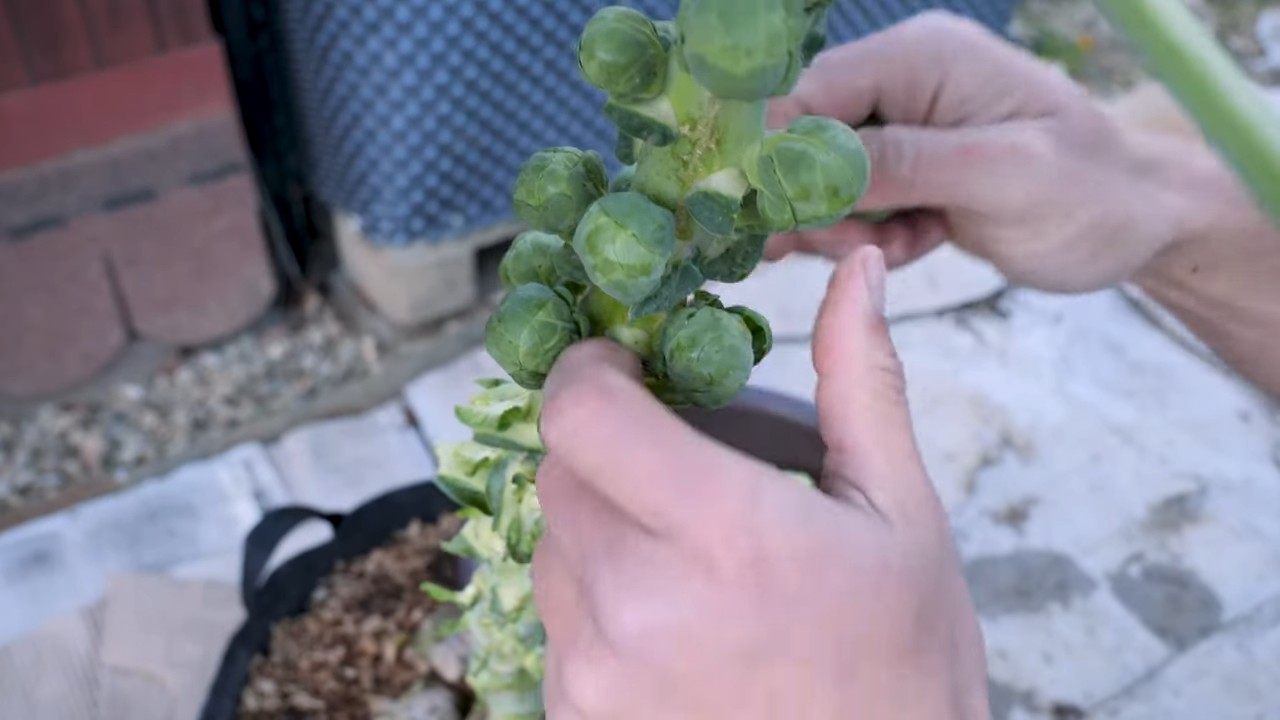
The Harvest: Finally, Brussels Sprouts from Your Own Garden!
- The right time: Brussels sprouts are ready for harvest when they are firm, closed, and have a diameter of about 2.5-4 cm (1-1.5 inches). The sprouts should be easy to detach from the stem.
- Harvesting technique: Harvest the sprouts from the bottom up. Start with the lowest sprouts and work your way up. Gently twist or cut the sprouts off the stem.
- After the harvest: Remove the leaves below the harvested sprouts to improve air circulation and encourage the development of the upper sprouts.
- Storage: Brussels sprouts can be stored in the refrigerator for about 1-2 weeks. You can also freeze them for longer storage. Blanch the sprouts briefly in boiling water before freezing to preserve their color and texture.
Additional Tips for Brussels Sprout Success:
- Test your soil: Before you start planting, you should test your soil to ensure it contains the right nutrients. Brussels sprouts prefer a slightly acidic soil with a pH between 6.0 and 7.0.
- Practice crop rotation: Do not plant Brussels sprouts in the same spot every year to prevent diseases and pests. Rotate the location with other types of vegetables.
- Variety selection: Choose a Brussels sprout variety that is suitable for your climate and growing conditions. There are early, mid-season, and late varieties.
- Be patient: Brussels sprouts take time to grow. Be patient and give your plants the care they need.
Common Problems and Solutions:
Flea beetles: Small beetles that chew holes in the leaves. Control with pest netting or diatomaceous earth.
Clubroot: A fungal disease that affects the roots. Prevent it with crop rotation and by liming the soil.
Cabbage whites: Caterpillars that eat the leaves. Control with Bacillus thuringiensis (Bt) or pest netting.
Aphids: Suck plant sap. Control with insecticidal soap or neem oil.
Conclusion
So, there you have it! Growing Brussels sprouts, even for a complete beginner, is entirely achievable and incredibly rewarding. We’ve walked you through the process, from selecting the right variety to harvesting those delicious, miniature cabbages. But why should you bother with this DIY project when you can simply buy Brussels sprouts at the grocery store? The answer lies in the unparalleled freshness, flavor, and satisfaction that comes from nurturing your own food.
Imagine biting into a Brussels sprout you’ve grown yourself, bursting with a sweetness and subtle nutty flavor that store-bought versions simply can’t match. Think about the pride you’ll feel knowing you’ve successfully cultivated a healthy, nutritious vegetable from seed to table. And consider the cost savings – a single packet of seeds can yield a bounty of Brussels sprouts, far exceeding the price of purchasing them week after week.
This isn’t just about growing vegetables; it’s about connecting with nature, learning new skills, and enjoying the fruits (or rather, vegetables) of your labor. It’s about knowing exactly where your food comes from and ensuring it’s free from harmful pesticides and chemicals. It’s about embracing a more sustainable and self-sufficient lifestyle.
But the best part? You can customize your Brussels sprouts growing experience to suit your preferences. Want to add a touch of spice? Try growing ‘Redarling’ Brussels sprouts, known for their slightly peppery flavor. Prefer a milder taste? Opt for ‘Long Island Improved,’ a classic variety with a sweet and delicate flavor. You can even experiment with different planting times to extend your harvest season.
Don’t be afraid to get creative! Consider companion planting your Brussels sprouts with herbs like rosemary and thyme, which can help deter pests and enhance their flavor. Or try growing them in raised beds or containers if you have limited space. The possibilities are endless.
We understand that starting something new can be daunting, but we’re confident that with a little patience and dedication, you’ll be harvesting your own delicious Brussels sprouts in no time. Remember to pay attention to the specific needs of your chosen variety and adjust your care accordingly.
Growing Brussels sprouts is a journey, not a destination. There will be challenges along the way, but the rewards are well worth the effort. So, grab your seeds, get your hands dirty, and embark on this exciting adventure.
We encourage you to try this DIY trick and share your experience with us. Let us know what varieties you’ve grown, what challenges you’ve faced, and what tips you’ve discovered along the way. Share your photos and stories on social media using #DIYBrusselsSprouts and inspire others to join the fun. We can’t wait to see what you create!
Frequently Asked Questions (FAQ)
Q: How long does it take to grow Brussels sprouts from seed?
A: Brussels sprouts typically take 80 to 120 days to mature from seed to harvest. This timeframe can vary depending on the variety, climate, and growing conditions. Starting seeds indoors 4-6 weeks before the last expected frost can give you a head start.
Q: What are the best growing conditions for Brussels sprouts?
A: Brussels sprouts thrive in cool weather, ideally with temperatures between 60°F and 75°F (15°C and 24°C). They require full sun (at least 6 hours of direct sunlight per day) and well-drained soil that is rich in organic matter. A soil pH of 6.0 to 7.5 is ideal.
Q: How often should I water my Brussels sprouts plants?
A: Water your Brussels sprouts plants regularly, especially during dry periods. Aim to keep the soil consistently moist but not waterlogged. Water deeply at the base of the plants, avoiding wetting the foliage, which can promote fungal diseases. A good rule of thumb is to water when the top inch of soil feels dry to the touch.
Q: What kind of fertilizer do Brussels sprouts need?
A: Brussels sprouts are heavy feeders and benefit from regular fertilization. Before planting, amend the soil with compost or well-rotted manure. During the growing season, fertilize every 2-3 weeks with a balanced fertilizer or a fertilizer specifically formulated for vegetables. Avoid over-fertilizing with nitrogen, as this can lead to excessive foliage growth at the expense of sprout development.
Q: How do I prevent pests and diseases from affecting my Brussels sprouts?
A: Several pests and diseases can affect Brussels sprouts, including aphids, cabbage worms, cabbage loopers, and clubroot. To prevent these problems, practice crop rotation, choose disease-resistant varieties, and inspect your plants regularly for signs of infestation or disease. Handpick pests when possible, and use organic pest control methods such as insecticidal soap or Bacillus thuringiensis (Bt) for cabbage worms. Ensure good air circulation around the plants to prevent fungal diseases.
Q: When and how do I harvest Brussels sprouts?
A: Brussels sprouts are typically ready to harvest when the sprouts are firm, green, and about 1 to 2 inches in diameter. Start harvesting from the bottom of the plant, working your way upwards. Twist or snap off the sprouts, leaving the leaves intact. You can harvest over several weeks as the sprouts mature. The flavor of Brussels sprouts improves after a light frost.
Q: Can I grow Brussels sprouts in containers?
A: Yes, you can grow Brussels sprouts in containers, but you’ll need a large container (at least 12 inches in diameter and depth) to accommodate their root system. Choose a well-draining potting mix and provide regular watering and fertilization. Container-grown Brussels sprouts may require more frequent watering than those grown in the ground.
Q: What are some common problems when growing Brussels sprouts?
A: Some common problems include:
* **Sprouts not forming:** This can be caused by insufficient sunlight, poor soil, or inadequate fertilization.
* **Sprouts being loose or bitter:** This can be caused by hot weather or overwatering.
* **Pest infestations:** Cabbage worms, aphids, and other pests can damage the plants and reduce yields.
* **Diseases:** Clubroot and other fungal diseases can affect the roots and leaves.
Q: Can I eat the leaves of Brussels sprouts plants?
A: Yes, the leaves of Brussels sprouts plants are edible and can be cooked like kale or collard greens. They have a slightly stronger flavor than the sprouts themselves. Harvest the leaves from the bottom of the plant as the sprouts mature.
Q: How do I store harvested Brussels sprouts?
A: Store harvested Brussels sprouts in the refrigerator in a plastic bag or container. They will keep for up to a week. For longer storage, you can freeze them after blanching them for a few minutes.
Q: What are some delicious ways to cook Brussels sprouts?
A: Brussels sprouts can be roasted, sautéed, steamed, grilled, or even eaten raw in salads. Some popular recipes include roasted Brussels sprouts with balsamic glaze, sautéed Brussels sprouts with bacon, and shaved Brussels sprouts salad with lemon vinaigrette. Experiment with different flavors and seasonings to find your favorite way to enjoy this versatile vegetable.
Q: What varieties of Brussels sprouts are best for beginners?
A: Some good varieties for beginners include ‘Long Island Improved,’ ‘Jade Cross,’ and ‘Royal Marvel.’ These varieties are known for their ease of growth and good yields. ‘Redarling’ is also a good choice if you want a slightly peppery flavor.
Q: How do I deal with tall Brussels sprouts plants falling over?
A: Brussels sprouts plants can get quite tall and may become unstable, especially in windy conditions. To prevent them from falling over, you can stake them or mound soil around the base of the stem for added support. You can also pinch off the top of the plant once the sprouts have started to form to encourage more compact growth.

Leave a Comment