
Mogra Jasmine Propagation at Home: Ever dreamed of filling your garden (or even just your windowsill!) with the intoxicating fragrance of Mogra Jasmine? I know I have! There’s something truly magical about this flower, its delicate white petals unfurling to release that sweet, heady scent. But what if I told you that you don’t need to be a seasoned gardener to cultivate your own Mogra Jasmine paradise?
For centuries, Mogra Jasmine, also known as Arabian Jasmine, has been cherished in India and across Southeast Asia, not just for its beauty but also for its cultural significance. It’s often used in religious ceremonies, weddings, and even as a natural perfume. Imagine bringing that rich history and captivating aroma into your own home!
Many people shy away from propagating plants, thinking it’s too complicated or time-consuming. But trust me, with a few simple tricks and a little patience, Mogra Jasmine propagation at home is totally achievable, even for beginners. This DIY guide will walk you through the process step-by-step, showing you how to create new Mogra Jasmine plants from cuttings. Not only will you save money compared to buying mature plants, but you’ll also experience the immense satisfaction of nurturing new life. Plus, who wouldn’t want more of that incredible Mogra Jasmine fragrance wafting through their home? Let’s get started!
Propagating Mogra Jasmine at Home: Your DIY Guide to Fragrant Blooms
Hello plant friends! I love the intoxicating scent of Mogra Jasmine (Arabian Jasmine) and have always wanted to have more of it in my garden. Instead of buying new plants, I decided to propagate them myself. And guess what? It’s easier than you think! In this article, I’ll show you step-by-step how to propagate Mogra Jasmine at home, so you too can soon be surrounded by an abundance of fragrant flowers.
What You Need for Mogra Jasmine Propagation
Before we get started, let’s make sure we have everything we need. Here is a list of the materials and tools you’ll require:
- A healthy Mogra Jasmine mother plant: Choose a plant that is growing vigorously and shows no signs of disease or pests.
- Sharp and clean garden shears or a knife: This is important for making clean cuts and preventing the spread of disease. I always disinfect my tools with alcohol before using them.
- Rooting hormone (optional): Rooting hormone can speed up the rooting process, but it’s not strictly necessary. I usually use it to increase the success rate.
- Small pots or propagation trays: You’ll need containers to plant the cuttings. I prefer small pots with a diameter of about 7-10 cm (3-4 inches).
- Well-draining propagation mix: Use a special seed starting mix or combine potting soil with perlite or vermiculite to improve drainage. Waterlogging is the enemy of young cuttings!
- A spray bottle with water: To keep the cuttings moist.
- A plastic bag or mini-greenhouse (optional): To create high humidity, which promotes rooting.
- Patience: Rooting can take several weeks, so don’t give up!
The Best Time for Mogra Jasmine Propagation
The best time to propagate Mogra Jasmine is in the spring or early summer when the plant is actively growing. The warmer temperatures and longer days encourage rooting. However, I’ve also successfully propagated cuttings in late summer, so don’t be discouraged if you want to try it at a different time of year.
Step-by-Step Guide to Propagating Mogra Jasmine from Cuttings
Now, let’s get down to business! Here is a detailed guide on how you can propagate Mogra Jasmine from cuttings:
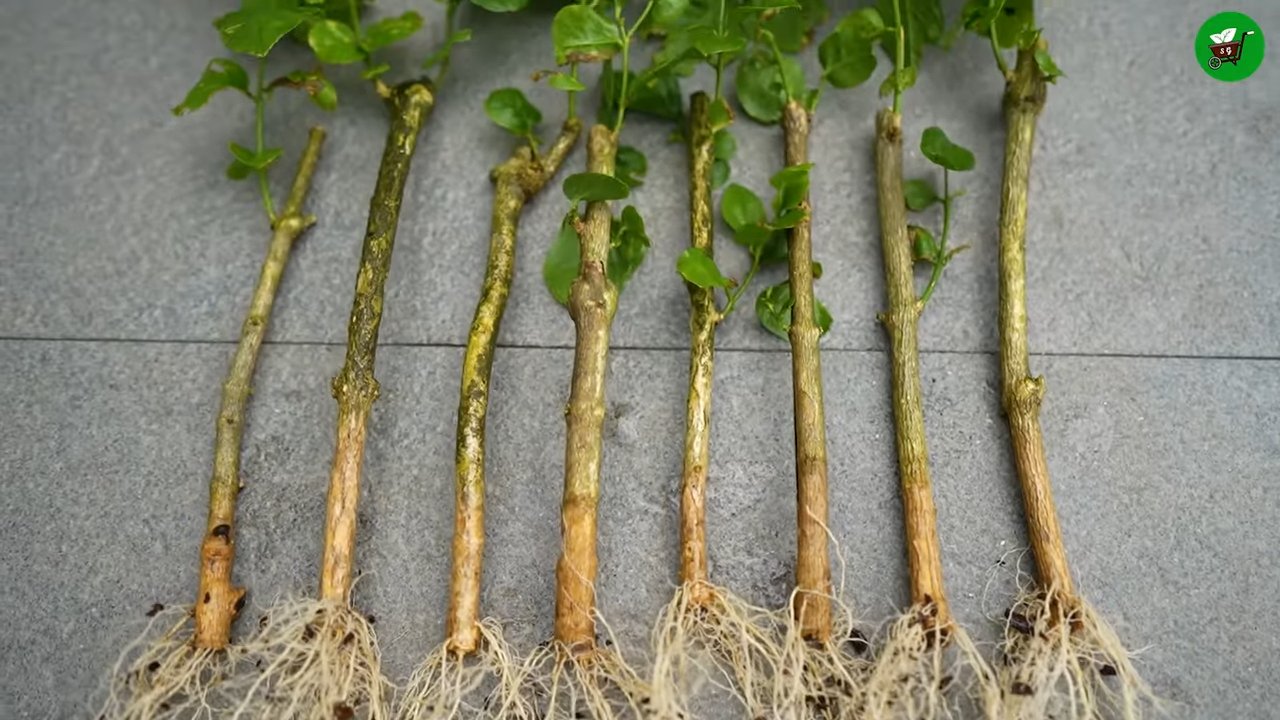
1. Selecting and Preparing the Cuttings
- Choose healthy stems: Look for healthy, non-flowering stems on your mother plant. The stems should be about 10-15 cm (4-6 inches) long and have at least 2-3 leaf nodes.
- Cut the cuttings: Use your sharp and clean garden shears or knife to cut the stems right below a leaf node. A clean cut is important to avoid infections.
- Remove the lower leaves: Remove the leaves from the bottom third of the cutting. This prevents the leaves from rotting in the soil and encourages rooting. I usually leave only the top 2-3 leaves.
- Reduce the leaf surface area (optional): If the remaining leaves are very large, you can cut them in half to reduce evaporation. This helps the cutting conserve moisture before it has formed roots.
2. Rooting the Cuttings
- Apply rooting hormone (optional): If you’re using rooting hormone, dip the bottom end of the cutting into the hormone powder or solution. Shake off any excess hormone.
- Plant the cuttings: Fill your pots or propagation trays with the propagation mix. Make a hole in the soil with a pencil or your finger and insert the cutting. Make sure the leaf nodes from which you removed the leaves are under the soil.
- Press the soil down: Gently press the soil around the cutting to stabilize it.
- Water: Water the cuttings gently until the soil is moist. Avoid waterlogging.
3. Creating a Humid Environment
- Increase humidity: To increase humidity, you can cover the pots with a plastic bag or place them in a mini-greenhouse. Make sure the bag or greenhouse doesn’t rest directly on the leaves.
- Ventilate: Air out the cuttings daily by briefly opening the bag or greenhouse to prevent mold growth.
- Misting: Regularly spray the cuttings with water to keep them moist.
4. Caring for the Cuttings During Rooting
- Location: Place the cuttings in a bright spot, but out of direct sunlight. Direct sunlight can burn the cuttings.
- Moisture: Keep the soil moist, but not wet. Check the moisture level regularly and water as needed.
- Temperature: The ideal temperature for rooting is between 20 and 25 degrees Celsius (68-77°F).
- Patience: Rooting can take 4-8 weeks. Be patient and don’t give up!
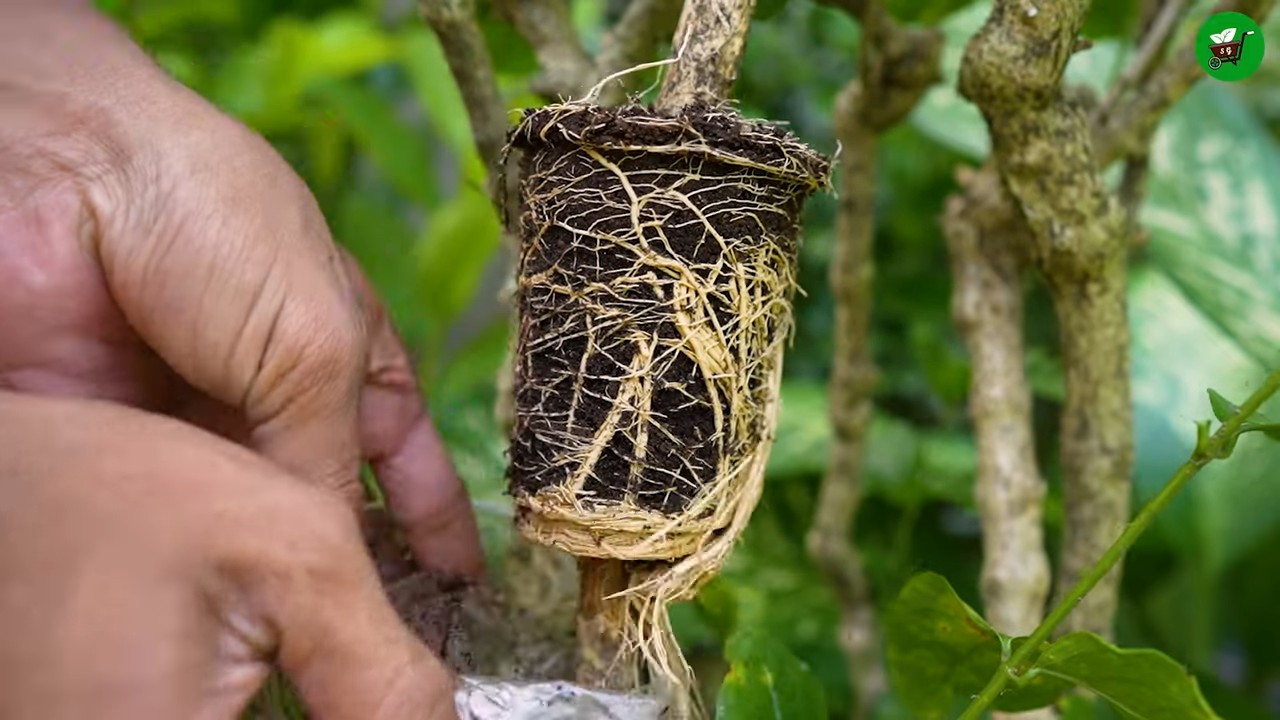
5. Repotting the Rooted Cuttings
- Check for root formation: After a few weeks, you can gently tug on the cuttings to check if they have formed roots. If you feel resistance, they probably have roots.
- Repotting: Once the cuttings are well-rooted, you can repot them into larger pots with regular potting soil.
- Care: Care for the young plants as you would for mature Mogra Jasmine plants. Water them regularly, fertilize them during the growing season, and place them in a sunny location.
Additional Tips for Successful Mogra Jasmine Propagation
- Use fresh propagation mix: Fresh mix is sterile and does not contain pathogens that could harm the cuttings.
- Avoid overwatering: Overwatering is one of the most common reasons for rooting failure. Make sure the soil is moist, but not wet.
- Be patient: Rooting can take several weeks. Don’t give up if you don’t see immediate results.
- Experiment: There are different methods for propagating Mogra Jasmine. Try different methods to find out which works best for you.
Common Problems and Solutions in Mogra Jasmine Propagation
- Cuttings are rotting: This is usually due to overwatering or a lack of ventilation. Reduce watering and air out the cuttings regularly.
- Cuttings are not rooting: This can be due to various factors, such as poor quality cuttings, incorrect temperature, or humidity. Check the conditions and adjust them if necessary.
- Mold growth: Mold usually occurs with high humidity and a lack of ventilation. Air out the cuttings regularly and use a fungicide if necessary.
Conclusion
Propagating Mogra Jasmine from cuttings is a simple and rewarding way to expand your collection of these fragrant plants. With a little patience and the right techniques, you too can soon be growing your own Mogra Jasmine plants and enjoying their beautiful, scented blossoms.
Conclusion
So, there you have it! Mastering Mogra Jasmine propagation at home isn’t just about saving money; it’s about connecting with nature, nurturing life, and experiencing the profound satisfaction of creating something beautiful with your own hands. This DIY trick, while seemingly simple, unlocks a world of possibilities for expanding your fragrant garden and sharing the joy of Mogra Jasmine with friends and family.
Why is this a must-try? Because store-bought Mogra Jasmine plants can be expensive, and often, you’re limited to the varieties available. Propagating your own allows you to clone your favorite plant, ensuring you have more of what you love. Imagine filling your garden with the intoxicating scent of Mogra Jasmine, all thanks to a few simple steps and a little patience. Plus, the process itself is incredibly rewarding. Watching a tiny cutting develop roots and eventually blossom into a thriving plant is an experience that’s hard to beat.
But don’t stop there! Experiment with different propagation methods. While we’ve focused on stem cuttings, you can also explore air layering or even try propagating from seeds (though this is a much longer and less reliable process). Consider using different rooting hormones to see which yields the best results for you. You can also vary the potting mix; some gardeners swear by a mix of perlite and vermiculite, while others prefer a blend of coco coir and compost. The key is to find what works best for your environment and your gardening style.
Think about the possibilities! You could create a stunning Mogra Jasmine hedge, line your walkway with fragrant blooms, or even give away propagated plants as thoughtful, handmade gifts. The options are endless.
We strongly encourage you to give this DIY trick a try. It’s easier than you might think, and the rewards are well worth the effort. Don’t be afraid to experiment and learn along the way. Gardening is a journey, not a destination.
And most importantly, we want to hear about your experience! Share your successes (and even your failures) in the comments below. What propagation method did you use? What challenges did you encounter? What tips do you have for other gardeners? Your feedback will help us improve this guide and help other Mogra Jasmine enthusiasts achieve their propagation goals. Let’s create a community of passionate gardeners, all sharing our love for this beautiful and fragrant plant. So, grab your pruning shears, prepare your potting mix, and get ready to embark on your Mogra Jasmine propagation adventure! Happy gardening!
Frequently Asked Questions (FAQ)
What is the best time of year to propagate Mogra Jasmine?
The ideal time to propagate Mogra Jasmine is during the late spring or early summer. This is when the plant is actively growing, and the cuttings are more likely to root successfully. The warmer temperatures and longer daylight hours provide the optimal conditions for root development. Avoid propagating during the dormant winter months, as the cuttings will have a much lower chance of survival. However, if you have a controlled environment like a greenhouse, you might be able to propagate at other times of the year, but spring and early summer are generally the most reliable.
What kind of stem cuttings should I use for propagation?
The best stem cuttings for Mogra Jasmine propagation are semi-hardwood cuttings. These are stems that are neither too young and green nor too old and woody. Look for stems that are about 4-6 inches long and have several leaf nodes. The ideal cutting should be firm and slightly flexible. Avoid using cuttings that are too thin or brittle, as they may not have enough energy reserves to develop roots. Also, avoid using cuttings that are flowering or have flower buds, as the plant will focus its energy on flowering rather than rooting.
Do I need to use rooting hormone for Mogra Jasmine propagation?
While not strictly necessary, using rooting hormone significantly increases the chances of successful propagation. Rooting hormone contains auxins, which are plant hormones that stimulate root development. Dipping the cut end of the stem cutting in rooting hormone before planting it in the potting mix will encourage faster and more robust root growth. You can find rooting hormone in powder or liquid form at most garden centers. Follow the instructions on the product label for proper application. If you prefer a natural alternative, you can try using honey or willow water, which also contain rooting compounds.
What type of potting mix is best for propagating Mogra Jasmine?
A well-draining potting mix is crucial for successful Mogra Jasmine propagation. The potting mix should retain enough moisture to keep the cuttings hydrated but also allow excess water to drain away to prevent root rot. A good mix consists of equal parts perlite, vermiculite, and peat moss or coco coir. You can also add a small amount of compost to provide nutrients. Avoid using garden soil, as it can be too heavy and may contain pathogens that can harm the cuttings. The goal is to create a light, airy mix that promotes root growth.
How often should I water the cuttings after planting them?
Keep the potting mix consistently moist but not waterlogged. Water the cuttings whenever the top inch of the soil feels dry to the touch. Avoid overwatering, as this can lead to root rot. You can also mist the cuttings regularly to increase humidity, which helps prevent them from drying out. A humidity dome or plastic bag can also be used to create a humid environment. Be sure to ventilate the cuttings regularly to prevent fungal growth.
How long does it take for Mogra Jasmine cuttings to root?
It typically takes 4-8 weeks for Mogra Jasmine cuttings to root. The exact time will depend on factors such as the temperature, humidity, and the quality of the cuttings. You can check for root development by gently tugging on the cuttings. If you feel resistance, it means that roots have formed. You can also carefully remove a cutting from the potting mix to inspect the roots. Once the cuttings have developed a good root system, you can transplant them into individual pots.
What kind of light do Mogra Jasmine cuttings need during propagation?
Mogra Jasmine cuttings need bright, indirect light during propagation. Avoid placing them in direct sunlight, as this can scorch the leaves. A location near a window that receives filtered sunlight is ideal. You can also use grow lights to provide supplemental lighting, especially if you are propagating indoors. The goal is to provide enough light for photosynthesis without exposing the cuttings to excessive heat or direct sunlight.
How do I know if my Mogra Jasmine cuttings have failed to root?
There are several signs that indicate that your Mogra Jasmine cuttings have failed to root. These include:
* The cuttings turn brown or black.
* The leaves wilt and drop off.
* The stems become soft and mushy.
* There is no sign of new growth after several weeks.
If you observe any of these signs, it is likely that the cuttings have rotted or dried out. You can try again with fresh cuttings, making sure to follow the propagation instructions carefully.
Can I propagate Mogra Jasmine in water?
Yes, you can propagate Mogra Jasmine in water, although it’s generally less successful than propagating in a potting mix. To propagate in water, place the stem cuttings in a jar or glass filled with water, making sure that the leaves are above the waterline. Change the water every few days to prevent bacterial growth. Once the cuttings have developed roots, you can transplant them into a potting mix. However, cuttings propagated in water may be more susceptible to transplant shock, so it’s important to handle them carefully.
What are some common problems encountered during Mogra Jasmine propagation and how can I solve them?
Some common problems include root rot (caused by overwatering), fungal infections (caused by high humidity), and drying out (caused by insufficient humidity). To prevent root rot, use a well-draining potting mix and avoid overwatering. To prevent fungal infections, ventilate the cuttings regularly and avoid overcrowding. To prevent drying out, mist the cuttings regularly or use a humidity dome. If you encounter any of these problems, take immediate action to correct the situation. For example, if you suspect root rot, remove the affected cuttings and repot the healthy ones in fresh potting mix.


Leave a Comment