
Sack Growing Bitter Melon: Unlock the secrets to bountiful harvests, even in the smallest spaces! Have you ever dreamt of enjoying fresh, homegrown bitter melon but felt limited by a tiny balcony or lack of garden space? Well, dream no more! This DIY guide is your passport to cultivating this unique and nutritious vegetable using a simple, space-saving sack growing method.
Bitter melon, also known as bitter gourd, has a rich history deeply intertwined with traditional medicine and culinary practices across Asia and Africa for centuries. Its distinctive bitter flavor is prized for its health benefits, believed to aid in digestion and regulate blood sugar. But let’s be honest, getting your hands on fresh, high-quality bitter melon can sometimes be a challenge, and that’s where this DIY project comes in!
I’m going to show you how to create your own thriving sack growing bitter melon garden, right at home. This method is perfect for urban dwellers, apartment residents, or anyone looking for an easy and affordable way to grow their own food. Imagine the satisfaction of harvesting your own bitter melon, knowing exactly where it came from and how it was grown. Plus, you’ll be amazed at how much you can produce in such a small footprint. So, grab your gardening gloves, and let’s get started on this exciting journey to fresh, homegrown goodness!
Sack Growing Bitter Melon: Dein eigener Mini-Garten für Zuhause
Ich liebe Bittermelonen! Ihr einzigartiger, leicht bitterer Geschmack ist einfach unwiderstehlich, und sie sind auch noch super gesund. Aber der Anbau im Garten kann manchmal eine Herausforderung sein, besonders wenn man wenig Platz hat. Deshalb zeige ich dir heute, wie du Bittermelonen ganz einfach in Säcken anbauen kannst – eine platzsparende und effektive Methode, die auch noch Spaß macht!
Was du brauchst:
* Samen der Bittermelone: Wähle eine Sorte, die dir schmeckt. Es gibt verschiedene Größen und Formen.
* Große Säcke: Jutesäcke, Pflanzsäcke oder sogar stabile Müllsäcke (mit Löchern!) funktionieren gut. Die Größe sollte mindestens 40 Liter Fassungsvermögen haben.
* Hochwertige Blumenerde: Eine Mischung aus Gartenerde, Kompost und Kokosfaser ist ideal.
* Kompost oder gut verrotteter Mist: Für eine extra Portion Nährstoffe.
* Perlite oder Vermiculit: Zur Verbesserung der Drainage.
* Rankhilfe: Bambusstäbe, ein Gitter oder ein Zaun, an dem die Bittermelonen hochklettern können.
* Gießkanne oder Schlauch: Zum Bewässern.
* Gartenschere: Zum Beschneiden.
* Handschuhe: Zum Schutz deiner Hände.
* Optional: Langzeitdünger für Gemüse.
Vorbereitung ist alles: Die Samen zum Keimen bringen
Bevor wir mit dem Bepflanzen der Säcke beginnen, ist es ratsam, die Bittermelonensamen vorzukeimen. Das beschleunigt den Keimprozess und erhöht die Erfolgsrate.
1. Samen vorbereiten: Bittermelonensamen haben eine harte Schale. Um die Keimung zu erleichtern, kannst du sie leicht anrauen. Reibe die Samen vorsichtig mit Schleifpapier oder einer Nagelfeile an. Achte darauf, die Samen nicht zu beschädigen.
2. Einweichen: Lege die angerauten Samen für 24 Stunden in lauwarmes Wasser. Das Wasser sollte nicht heiß sein, da dies die Samen schädigen kann.
3. Keimung: Wickle die eingeweichten Samen in ein feuchtes Papiertuch oder Küchenpapier. Lege das Papiertuch in einen wiederverschließbaren Plastikbeutel und verschließe ihn.
4. Warm und dunkel: Platziere den Beutel an einem warmen, dunklen Ort (z.B. in einem Schrank oder einer Schublade). Die ideale Temperatur liegt zwischen 25 und 30 Grad Celsius.
5. Kontrolle: Überprüfe die Samen täglich. Halte das Papiertuch feucht und lüfte den Beutel, um Schimmelbildung zu vermeiden. Nach einigen Tagen sollten die Samen keimen.
Die Säcke bepflanzen: Schritt für Schritt zum Erfolg
Jetzt, wo die Samen keimen, können wir die Säcke vorbereiten und bepflanzen.
1. Säcke vorbereiten: Wenn du Müllsäcke verwendest, schneide mehrere Löcher in den Boden, um eine gute Drainage zu gewährleisten. Jutesäcke und Pflanzsäcke haben in der Regel bereits eine gute Drainage.
2. Erde mischen: Mische die Blumenerde mit Kompost oder gut verrottetem Mist und Perlite oder Vermiculit. Das Verhältnis sollte etwa 2:1:1 sein (2 Teile Blumenerde, 1 Teil Kompost/Mist, 1 Teil Perlite/Vermiculit).
3. Säcke befüllen: Fülle die Säcke mit der Erdmischung. Lasse etwa 10-15 cm Platz bis zum Rand.
4. Pflanzlöcher machen: Grabe kleine Löcher in die Erde, etwa 2-3 cm tief. Pro Sack kannst du 2-3 vorgekeimte Samen pflanzen.
5. Samen einsetzen: Setze die gekeimten Samen vorsichtig in die Löcher ein. Achte darauf, die zarten Wurzeln nicht zu beschädigen.
6. Mit Erde bedecken: Bedecke die Samen mit etwas Erde und drücke sie leicht an.
7. Gießen: Gieße die Erde vorsichtig an, bis sie gut durchfeuchtet ist. Vermeide Staunässe.
Die Rankhilfe installieren: Bittermelonen brauchen Unterstützung
Bittermelonen sind Kletterpflanzen und benötigen eine Rankhilfe, um sich optimal zu entwickeln.
1. Rankhilfe auswählen: Wähle eine Rankhilfe, die stabil genug ist, um das Gewicht der wachsenden Bittermelonen zu tragen. Bambusstäbe, ein Gitter oder ein Zaun sind gute Optionen.
2. Rankhilfe installieren: Platziere die Rankhilfe in der Nähe der Säcke. Achte darauf, dass sie stabil steht und nicht umkippen kann.
3. Pflanzen anleiten: Sobald die Bittermelonenpflanzen groß genug sind, leite sie vorsichtig an der Rankhilfe entlang. Du kannst sie mit Pflanzenbindern oder weichen Schnüren befestigen.
Pflege und Bewässerung: So bleiben deine Bittermelonen glücklich
Die richtige Pflege ist entscheidend für eine reiche Ernte.
1. Bewässerung: Gieße die Bittermelonen regelmäßig, besonders während der heißen Sommermonate. Die Erde sollte immer feucht, aber nicht nass sein. Vermeide Staunässe, da dies zu Wurzelfäule führen kann.
2. Düngung: Dünge die Bittermelonen alle 2-3 Wochen mit einem Flüssigdünger für Gemüse oder einem Langzeitdünger. Achte darauf, die Anweisungen auf der Verpackung zu befolgen.
3. Beschneiden: Beschneide die Bittermelonen regelmäßig, um das Wachstum zu fördern und die Fruchtbildung anzuregen. Entferne abgestorbene oder gelbe Blätter und Seitentriebe, die keine Früchte tragen.
4. Schutz vor Schädlingen: Überprüfe die Bittermelonen regelmäßig auf Schädlinge wie Blattläuse oder Spinnmilben. Bei Bedarf kannst du natürliche Schädlingsbekämpfungsmittel einsetzen.
5. Bestäubung: Bittermelonen sind einhäusig, das heißt, sie haben männliche und weibliche Blüten auf derselben Pflanze. In einigen Fällen kann es notwendig sein, die Blüten von Hand zu bestäuben, um die Fruchtbildung zu fördern. Verwende dazu einen kleinen Pinsel, um den Pollen von den männlichen Blüten auf die weiblichen Blüten zu übertragen.
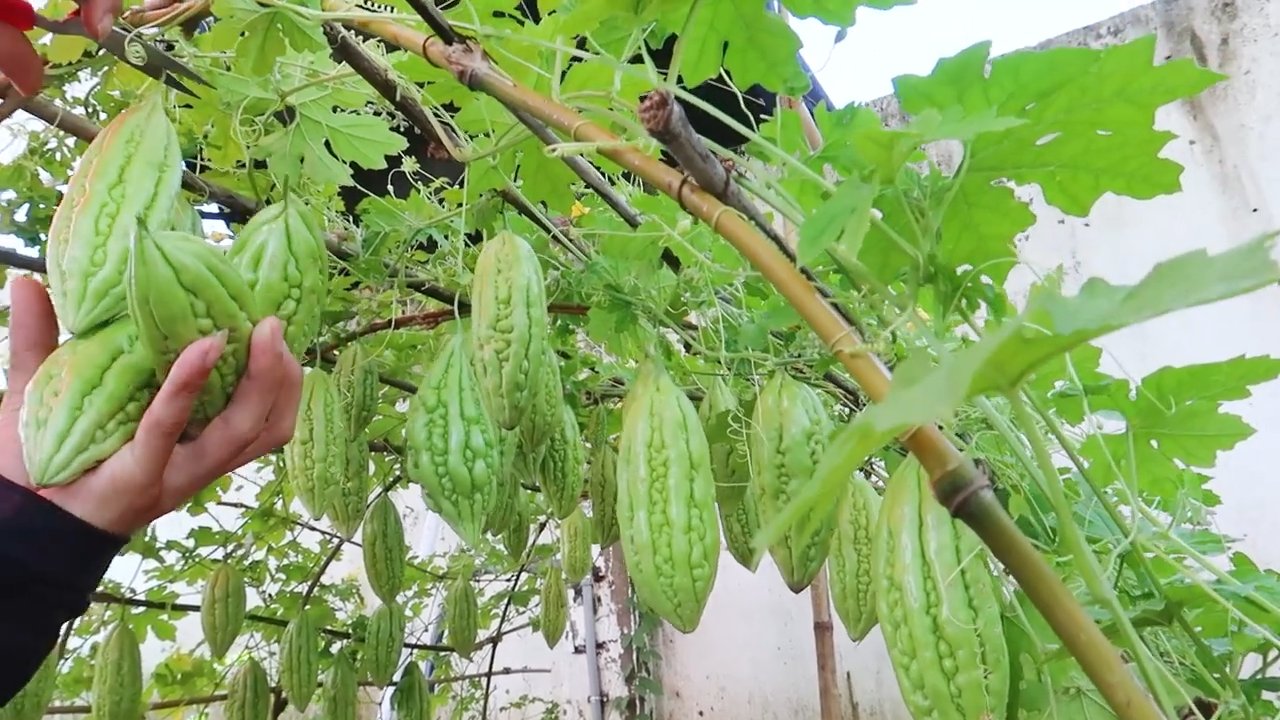
Erntezeit: Die Früchte deiner Arbeit genießen
Nach etwa 2-3 Monaten kannst du die ersten Bittermelonen ernten.
1. Erntezeitpunkt: Die Bittermelonen sind reif, wenn sie eine grüne oder gelbliche Farbe haben und sich leicht vom Stiel lösen lassen.
2. Ernten: Schneide die Bittermelonen mit einer Gartenschere vom Stiel ab. Achte darauf, die Pflanze nicht zu beschädigen.
3. Lagerung: Bittermelonen können im Kühlschrank für einige Tage gelagert werden.
Zusätzliche Tipps für eine erfolgreiche Ernte:
* Sonnenschein: Bittermelonen lieben die Sonne. Stelle die Säcke an einen sonnigen Standort, der mindestens 6 Stunden Sonnenlicht pro Tag erhält.
* Windschutz: Schütze die Bittermelonen vor starkem Wind, da dies die Pflanzen beschädigen kann.
* Bodenverbesserung: Wenn du feststellst, dass die Erde in den Säcken zu schnell austrocknet, kannst du sie mit Mulch abdecken. Mulch hilft, die Feuchtigkeit im Boden zu halten und das Wachstum von Unkraut zu unterdrücken.
* Krankheiten vorbeugen: Achte auf eine gute Belüftung, um Krankheiten vorzubeugen. Vermeide es, die Blätter beim Gießen zu benetzen.
* Geduld: Der Anbau von Bittermelonen erfordert Geduld. Gib nicht auf, wenn es nicht sofort klappt. Mit der richtigen Pflege und etwas Glück wirst du bald eine reiche Ernte genießen können.
Ich hoffe, diese Anleitung hilft dir dabei, deine eigenen Bittermelonen in Säcken anzubauen. Es ist ein lohnendes Projekt, das dir nicht nur frische, gesunde Bittermelonen liefert, sondern auch Spaß macht und deinen grünen Daumen herausfordert. Viel Erfolg!

Conclusion
So, there you have it! Sack growing bitter melon isn’t just a gardening trend; it’s a game-changer for anyone looking to maximize their yield, minimize space, and enjoy the freshest, most vibrant bitter melon possible. We’ve walked you through the process, highlighting the benefits of this innovative technique, and hopefully, dispelled any initial hesitations you might have had.
The beauty of sack growing lies in its simplicity and adaptability. It’s a method that democratizes gardening, making it accessible to apartment dwellers, balcony enthusiasts, and seasoned gardeners alike. Imagine harvesting plump, healthy bitter melons right outside your kitchen window, knowing you nurtured them from seedling to maturity in a humble sack. That’s the power of this DIY trick.
But why is this a must-try? Beyond the space-saving aspect, sack growing offers superior drainage, preventing root rot, a common ailment for bitter melon. The elevated position also improves air circulation, reducing the risk of fungal diseases. Plus, the concentrated soil volume allows for precise nutrient control, leading to healthier, more productive plants. You’re essentially creating the perfect microclimate for your bitter melon to thrive.
Don’t be afraid to experiment! Consider variations like using different types of sacks – burlap, grow bags, or even repurposed rice sacks. Each material offers unique benefits in terms of drainage and aeration. You can also tailor your soil mix to suit your specific climate and bitter melon variety. Adding compost tea or worm castings to your watering routine can further boost growth and fruit production.
For those in cooler climates, consider using a dark-colored sack to absorb more heat, creating a warmer environment for your bitter melon. Conversely, in hotter regions, opt for a lighter-colored sack to reflect sunlight and prevent overheating. You can even train your bitter melon vines to climb a trellis attached to the sack, creating a stunning vertical garden.
The possibilities are endless! The key is to embrace the spirit of experimentation and adapt the technique to your specific needs and preferences.
We wholeheartedly encourage you to give sack growing bitter melon a try. It’s a rewarding experience that connects you with nature, provides you with fresh, healthy produce, and adds a touch of green to your living space.
Once you’ve embarked on your sack growing adventure, we’d love to hear about your experience! Share your photos, tips, and challenges in the comments below. Let’s build a community of sack growing enthusiasts and learn from each other’s successes and failures. Together, we can unlock the full potential of this amazing DIY trick and enjoy a bountiful harvest of delicious bitter melon. So, grab a sack, some soil, and a few bitter melon seeds, and get growing! You won’t regret it.
Frequently Asked Questions (FAQ)
What type of sack is best for growing bitter melon?
The best type of sack depends on your specific needs and preferences. Burlap sacks are a popular choice due to their excellent drainage and breathability. Grow bags, made from durable fabric, are another great option, offering good aeration and longevity. Repurposed rice sacks can also be used, but ensure they are thoroughly cleaned and have adequate drainage holes. Consider the size of the sack as well; a larger sack (at least 10 gallons) is recommended to provide ample space for the bitter melon’s root system.
How often should I water my sack-grown bitter melon?
Watering frequency depends on the climate, soil type, and the size of the sack. Generally, you should water when the top inch of soil feels dry to the touch. During hot, dry weather, you may need to water daily. Ensure the sack has good drainage to prevent waterlogging, which can lead to root rot. A good rule of thumb is to water deeply until water drains from the bottom of the sack.
What type of soil should I use for sack growing bitter melon?
A well-draining, nutrient-rich soil mix is crucial for successful sack growing. A good mix consists of equal parts garden soil, compost, and perlite or vermiculite. The compost provides essential nutrients, while the perlite or vermiculite improves drainage and aeration. You can also add slow-release fertilizer to the soil mix to provide a steady supply of nutrients throughout the growing season. Avoid using heavy clay soil, as it can retain too much water and suffocate the roots.
How much sunlight does sack-grown bitter melon need?
Bitter melon thrives in full sun, requiring at least 6-8 hours of direct sunlight per day. Choose a location for your sack that receives ample sunlight throughout the day. If you live in a particularly hot climate, providing some afternoon shade can help prevent the plants from overheating.
How do I fertilize my sack-grown bitter melon?
Bitter melon is a heavy feeder and requires regular fertilization. In addition to incorporating slow-release fertilizer into the soil mix, you can supplement with liquid fertilizer every 2-3 weeks. Use a balanced fertilizer (e.g., 10-10-10) or a fertilizer specifically formulated for vegetables. Compost tea and worm castings are also excellent organic fertilizers that can boost growth and fruit production.
How do I support the bitter melon vines in a sack?
Bitter melon vines are climbers and require support. You can use a trellis, stakes, or even a nearby fence to provide support. Train the vines to climb the support structure by gently tying them with soft twine or plant ties. Regular pruning can also help maintain the shape of the vines and encourage fruit production.
What are some common pests and diseases that affect sack-grown bitter melon?
Common pests that affect bitter melon include aphids, spider mites, and squash bugs. Regularly inspect your plants for signs of infestation and take appropriate action, such as spraying with insecticidal soap or neem oil. Common diseases include powdery mildew and fungal leaf spots. Ensure good air circulation and avoid overwatering to prevent these diseases. You can also use fungicides if necessary.
When can I harvest my sack-grown bitter melon?
Bitter melon is typically ready for harvest 60-80 days after planting. The fruits should be firm and have a vibrant green color (or the color specific to the variety you are growing). Harvest the fruits when they reach the desired size, typically 6-10 inches long. Use a sharp knife or pruning shears to cut the fruits from the vine, leaving a short stem attached.
Can I grow bitter melon in a sack during the winter?
Growing bitter melon in a sack during the winter depends on your climate. Bitter melon is a warm-season crop and requires temperatures above 60°F (15°C) to thrive. If you live in a region with mild winters, you may be able to grow bitter melon in a greenhouse or indoors under grow lights. However, in colder climates, it’s best to start seeds indoors in late winter or early spring and transplant them outdoors after the last frost.
Is sack growing bitter melon better than growing it in the ground?
Sack growing offers several advantages over growing bitter melon in the ground, especially for those with limited space or poor soil conditions. Sack growing provides better drainage, improved air circulation, and precise nutrient control. It also reduces the risk of soilborne diseases and pests. However, ground growing can be more suitable for larger-scale cultivation and may require less frequent watering. Ultimately, the best method depends on your individual circumstances and preferences.

Leave a Comment