
Grow Purple Kohlrabi Easily and add a vibrant splash of color and a burst of flavor to your garden and kitchen! Have you ever looked at those intriguing purple globes at the farmer’s market and wondered, “Could I actually grow that myself?” Well, I’m here to tell you, absolutely you can! This often-overlooked vegetable, with its slightly sweet and subtly peppery taste, is surprisingly easy to cultivate at home, even if you’re a beginner gardener.
Kohlrabi, sometimes called a German turnip, has a fascinating history, dating back to the Roman Empire. While the green variety is more common, the purple kohlrabi offers not only a visual treat but also boasts similar nutritional benefits, packed with Vitamin C and fiber. For centuries, it’s been a staple in European cuisine, and now, you can bring that tradition to your own backyard.
Why should you learn to grow purple kohlrabi easily? Because fresh, homegrown produce tastes infinitely better than anything you can buy in a store! Plus, knowing exactly where your food comes from and how it’s grown gives you peace of mind. This DIY guide will provide you with simple, step-by-step instructions and helpful tips to ensure a bountiful harvest of these unique and delicious vegetables. Say goodbye to bland meals and hello to a garden bursting with color and flavor!
Lila Kohlrabi ganz einfach selbst anbauen: Mein DIY-Guide für eine reiche Ernte
Ich liebe es, mein eigenes Gemüse anzubauen, und lila Kohlrabi ist einer meiner absoluten Favoriten! Er ist nicht nur super lecker, sondern auch ein echter Hingucker im Garten und auf dem Teller. In diesem Artikel zeige ich dir, wie du ganz einfach lila Kohlrabi selbst anbauen kannst – von der Aussaat bis zur Ernte. Keine Angst, es ist einfacher als du denkst!
Was du für den Anbau von lila Kohlrabi brauchst
Bevor wir loslegen, hier eine Liste mit allem, was du benötigst:
* Kohlrabisamen (lila Sorte): Achte darauf, dass du hochwertiges Saatgut von einer vertrauenswürdigen Quelle beziehst.
* Anzuchterde: Für die Vorkultur im Haus oder Gewächshaus.
* Anzuchttöpfe oder -schalen: Kleine Behälter für die Aussaat.
* Pflanzerde: Für das Beet oder den Kübel, in dem der Kohlrabi später wachsen soll.
* Kompost oder organischer Dünger: Um den Boden mit Nährstoffen anzureichern.
* Gießkanne oder Gartenschlauch: Zum Bewässern der Pflanzen.
* Gartengeräte: Spaten, Harke, Pflanzkelle.
* Schneckenkorn (optional): Zum Schutz vor Schneckenfraß.
* Vlies oder Netz (optional): Zum Schutz vor Schädlingen wie Kohlweißlingen.
Aussaat und Vorkultur: Der Start in ein lila Gemüseabenteuer
Die Vorkultur ist ein wichtiger Schritt, um den Kohlrabi einen Vorsprung zu verschaffen. So gehst du vor:
1. Aussaatzeitpunkt bestimmen: Ich beginne meistens im März oder April mit der Vorkultur. So haben die Pflanzen genug Zeit, um kräftig zu werden, bevor sie ins Freiland kommen.
2. Anzuchtgefäße vorbereiten: Fülle die Anzuchttöpfe oder -schalen mit Anzuchterde. Drücke die Erde leicht an.
3. Samen aussäen: Lege in jeden Topf oder jede Schale 1-2 Samen. Bedecke die Samen mit einer dünnen Schicht Erde (ca. 0,5 cm).
4. Bewässern: Gieße die Erde vorsichtig an, sodass sie feucht, aber nicht nass ist.
5. Standort wählen: Stelle die Anzuchtgefäße an einen hellen und warmen Ort (z.B. Fensterbank oder Gewächshaus). Die ideale Keimtemperatur liegt bei 18-22°C.
6. Feuchtigkeit halten: Halte die Erde gleichmäßig feucht, indem du sie regelmäßig besprühst oder gießt.
7. Pikieren: Sobald die Keimlinge 2-3 Blätter entwickelt haben (nach ca. 2-3 Wochen), kannst du sie pikieren. Das bedeutet, dass du die einzelnen Pflänzchen vorsichtig aus den Anzuchtgefäßen nimmst und in größere Töpfe mit Pflanzerde umsetzt. Achte darauf, die Wurzeln nicht zu beschädigen.
Vorbereitung des Beetes: Der perfekte Platz für deinen Kohlrabi
Kohlrabi liebt einen sonnigen Standort und einen nährstoffreichen Boden. So bereitest du das Beet vor:
1. Standort wählen: Suche einen sonnigen Platz in deinem Garten aus. Kohlrabi benötigt mindestens 6 Stunden Sonne pro Tag.
2. Boden vorbereiten: Lockere den Boden gründlich auf und entferne Unkraut und Steine.
3. Boden verbessern: Mische Kompost oder organischen Dünger unter die Erde, um sie mit Nährstoffen anzureichern. Kohlrabi ist ein Starkzehrer und benötigt viele Nährstoffe für ein gesundes Wachstum.
4. pH-Wert prüfen: Der ideale pH-Wert für Kohlrabi liegt zwischen 6,0 und 7,5. Du kannst den pH-Wert mit einem Bodentest überprüfen und gegebenenfalls mit Kalk oder Schwefel anpassen.
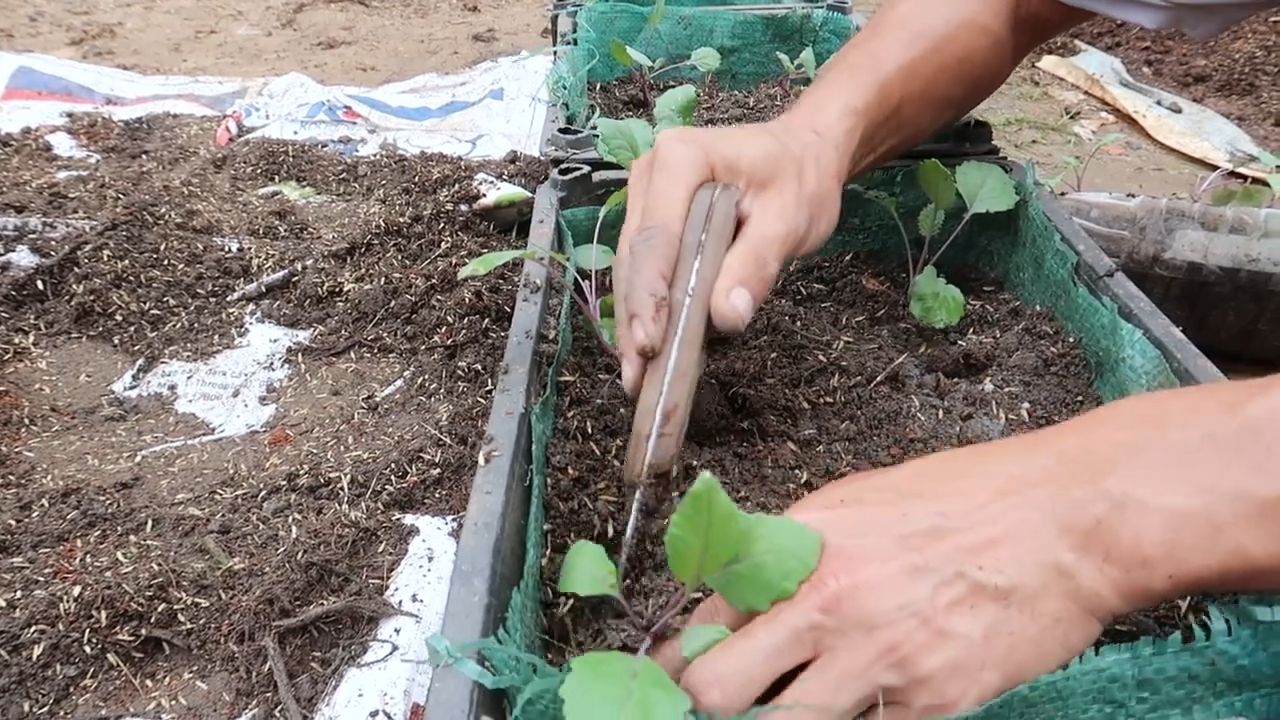
Auspflanzen: Raus in die Freiheit!
Sobald die Jungpflanzen kräftig genug sind und die Temperaturen es zulassen (keine Frostgefahr mehr), können sie ins Freiland ausgepflanzt werden.
1. Abhärten: Bevor du die Pflanzen ins Freiland setzt, solltest du sie einige Tage lang abhärten. Stelle sie dazu tagsüber für einige Stunden ins Freie und hole sie abends wieder rein. So gewöhnen sie sich langsam an die Bedingungen im Freien.
2. Pflanzabstand: Pflanze die Kohlrabipflanzen im Abstand von 25-30 cm in das vorbereitete Beet.
3. Pflanzloch ausheben: Hebe ein Pflanzloch aus, das etwas größer ist als der Wurzelballen der Pflanze.
4. Pflanze einsetzen: Setze die Pflanze vorsichtig in das Pflanzloch und fülle es mit Erde auf. Drücke die Erde leicht an.
5. Angießen: Gieße die Pflanzen nach dem Einpflanzen gründlich an.
Pflege: Damit dein Kohlrabi prächtig gedeiht
Die richtige Pflege ist entscheidend für eine reiche Ernte.
1. Bewässerung: Kohlrabi benötigt regelmäßig Wasser, besonders während trockener Perioden. Achte darauf, dass die Erde immer leicht feucht ist. Vermeide Staunässe, da dies zu Wurzelfäule führen kann.
2. Düngung: Dünge den Kohlrabi regelmäßig mit Kompost oder organischem Dünger. Ich dünge meine Pflanzen alle 2-3 Wochen.
3. Unkraut entfernen: Halte das Beet unkrautfrei, da Unkraut den Kohlrabi Nährstoffe und Wasser entzieht.
4. Schutz vor Schädlingen: Kohlrabi kann von verschiedenen Schädlingen befallen werden, wie z.B. Kohlweißlingen, Erdflöhen und Schnecken.
* Kohlweißlinge: Schütze deine Pflanzen mit einem Vlies oder Netz vor Kohlweißlingen.
* Erdflöhe: Halte den Boden feucht und streue Holzasche um die Pflanzen, um Erdflöhe fernzuhalten.
* Schnecken: Verwende Schneckenkorn oder sammle die Schnecken ab, um deine Pflanzen vor Schneckenfraß zu schützen.
5. Häufeln: Häufle die Pflanzen regelmäßig an, um die Stabilität zu erhöhen und die Bildung von Seitentrieben zu fördern.
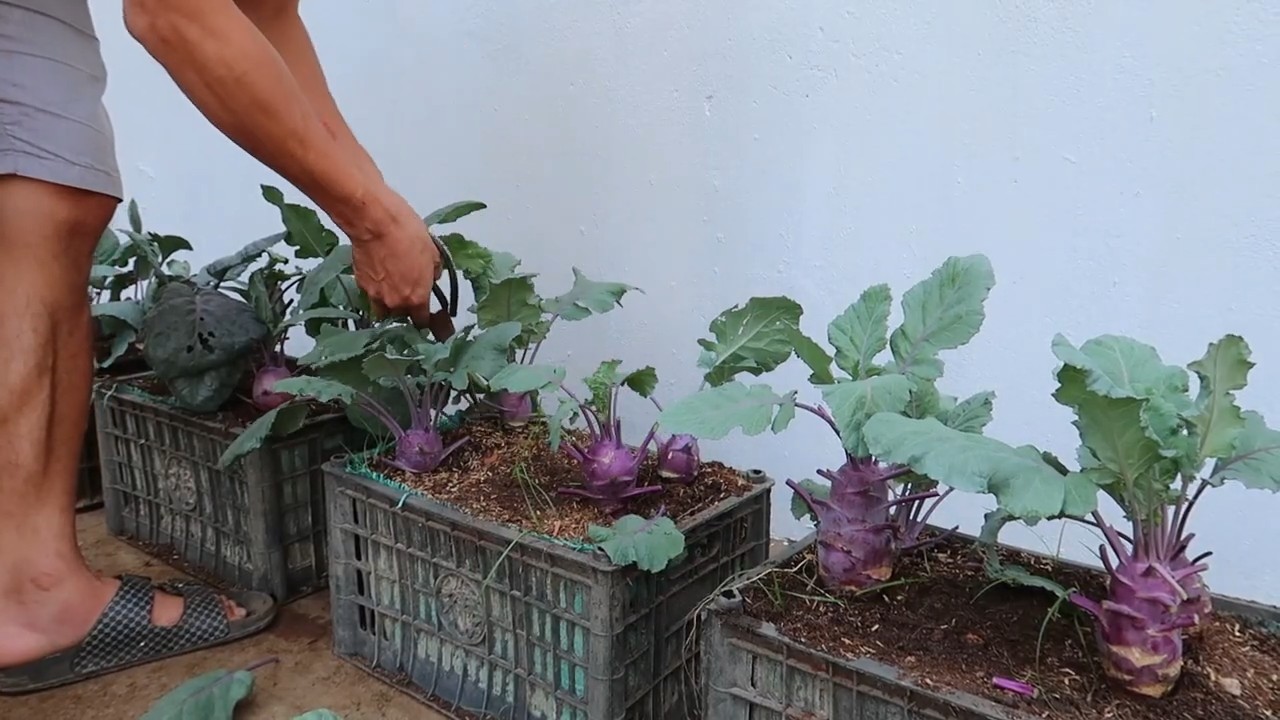
Ernte: Der Lohn deiner Mühe
Die Erntezeit für Kohlrabi ist in der Regel 8-10 Wochen nach der Aussaat.
1. Erntezeitpunkt bestimmen: Ernte den Kohlrabi, wenn die Knollen eine Größe von etwa 8-10 cm erreicht haben. Sie sollten sich fest anfühlen.
2. Ernten: Schneide die Knollen mit einem scharfen Messer direkt über dem Boden ab.
3. Lagerung: Kohlrabi kann im Kühlschrank einige Tage gelagert werden. Wickle die Knollen in ein feuchtes Tuch, um sie frisch zu halten.
Häufige Probleme und Lösungen
Auch beim Anbau von Kohlrabi können Probleme auftreten. Hier sind einige häufige Probleme und wie du sie lösen kannst:
* Kohlrabiknollen platzen: Dies kann durch unregelmäßige Bewässerung oder zu viel Dünger verursacht werden. Achte auf eine gleichmäßige Bewässerung und dünge sparsam.
* Kohlrabiknollen werden holzig: Dies kann durch zu späte Ernte oder zu wenig Wasser verursacht werden. Ernte den Kohlrabi rechtzeitig und achte auf eine ausreichende Bewässerung.
* Schädlinge: Wie bereits erwähnt, können Kohlweißlinge, Erdflöhe und Schnecken Probleme verursachen. Schütze deine Pflanzen mit den oben genannten Maßnahmen.
Sortenempfehlungen: Welche lila Kohlrabisorten sind die besten?
Es gibt verschiedene lila Kohlrabisorten, die sich gut für den Anbau im eigenen Garten eignen. Hier sind einige meiner Favoriten:
* ‘Azur Star’: Eine frühe Sorte mit violetten Knollen und einem milden Geschmack.
* ‘Blaro’: Eine robuste Sorte mit dunkelvioletten Knollen und einer guten Lagerfähigkeit.
* ‘Purple Vienna’: Eine klassische
Conclusion
So, there you have it! Growing purple kohlrabi doesn’t have to be a daunting task reserved for seasoned gardeners. With a little planning, the right conditions, and these simple DIY tricks, you can cultivate your own vibrant and delicious crop of this unique vegetable. We’ve shown you how to optimize your soil, manage pests naturally, and even extend your growing season. The result? A bountiful harvest of purple kohlrabi, ready to be enjoyed in countless culinary creations.
But why should you bother with growing your own purple kohlrabi when you can simply buy it at the store? The answer lies in the unparalleled freshness and flavor. Store-bought kohlrabi often lacks the crispness and subtle sweetness of homegrown varieties. Plus, you have complete control over the growing process, ensuring that your kohlrabi is free from harmful pesticides and chemicals. You’ll also experience the immense satisfaction of nurturing a plant from seed to table.
This DIY approach is a must-try because it empowers you to take control of your food source, connect with nature, and enjoy the freshest, most flavorful purple kohlrabi imaginable. It’s also incredibly rewarding to share your homegrown produce with friends and family, knowing that you’ve put in the effort to create something truly special.
Don’t be afraid to experiment with different varieties of purple kohlrabi. Some are sweeter, some are more pungent, and some are better suited for specific climates. Try growing ‘Purple Vienna’ for its classic flavor and reliable performance, or ‘Kolibri’ for its early maturity and compact size. You can also explore different planting times to extend your harvest season. Consider succession planting, sowing new seeds every few weeks, to ensure a continuous supply of fresh kohlrabi throughout the growing season.
Another variation to consider is growing kohlrabi in containers. This is a great option if you have limited space or if you want to protect your plants from pests and diseases. Choose a large container with good drainage and use a high-quality potting mix. Be sure to water your container-grown kohlrabi regularly and fertilize them every few weeks.
We encourage you to embrace this DIY project and discover the joy of growing your own purple kohlrabi. It’s a fun, rewarding, and delicious experience that you won’t soon forget. Once you’ve harvested your first crop, be sure to share your experience with us! Tell us about your successes, your challenges, and your favorite ways to enjoy your homegrown purple kohlrabi. Share your photos and recipes on social media using #GrowPurpleKohlrabi and let’s inspire others to join the fun. We can’t wait to see what you create!
Now, let’s delve into some frequently asked questions to further assist you on your purple kohlrabi growing journey.
Frequently Asked Questions (FAQ)
What is the best time of year to plant purple kohlrabi?
The ideal time to plant purple kohlrabi depends on your climate. In cooler regions, you can start seeds indoors 4-6 weeks before the last expected frost and transplant them outdoors once the soil has warmed up. In warmer regions, you can direct sow seeds in the spring or fall. Avoid planting during the hottest months of summer, as high temperatures can cause the kohlrabi to bolt (go to seed prematurely). For a fall harvest, sow seeds in late summer. Remember to check your local frost dates for the most accurate planting times.
How much sunlight does purple kohlrabi need?
Purple kohlrabi thrives in full sun, requiring at least 6 hours of direct sunlight per day. If you live in a particularly hot climate, providing some afternoon shade can help prevent bolting. Insufficient sunlight can result in leggy plants with small bulbs.
What kind of soil is best for growing purple kohlrabi?
Purple kohlrabi prefers well-drained, fertile soil with a pH between 6.0 and 7.5. Amend your soil with compost or other organic matter to improve drainage and fertility. Avoid heavy clay soils, as they can become waterlogged and inhibit root growth. A soil test can help you determine the pH and nutrient levels of your soil.
How often should I water purple kohlrabi?
Water your purple kohlrabi regularly, especially during dry periods. Aim to keep the soil consistently moist but not waterlogged. Water deeply and less frequently, rather than shallowly and more often. Mulching around the plants can help retain moisture and suppress weeds.
What are some common pests and diseases that affect purple kohlrabi?
Common pests that can affect purple kohlrabi include cabbage worms, aphids, and flea beetles. You can control these pests with organic methods such as handpicking, insecticidal soap, or neem oil. Diseases that can affect purple kohlrabi include clubroot and downy mildew. Prevent these diseases by practicing crop rotation, ensuring good drainage, and avoiding overcrowding.
How do I know when my purple kohlrabi is ready to harvest?
Purple kohlrabi is typically ready to harvest when the bulb is about 2-3 inches in diameter. The exact size will depend on the variety. The bulb should be firm and smooth. Don’t let the kohlrabi get too large, as it can become tough and woody. Harvest by cutting the bulb from the stem just above the soil line.
Can I eat the leaves of purple kohlrabi?
Yes, the leaves of purple kohlrabi are edible and nutritious. They can be eaten raw in salads or cooked like spinach or kale. Choose young, tender leaves for the best flavor and texture.
How do I store purple kohlrabi?
Store unwashed purple kohlrabi in the refrigerator for up to several weeks. Remove the leaves before storing, as they can draw moisture from the bulb. You can also freeze kohlrabi after blanching it for a few minutes.
My purple kohlrabi bolted (went to seed prematurely). What did I do wrong?
Bolting can be caused by several factors, including high temperatures, inconsistent watering, and nutrient deficiencies. To prevent bolting, choose bolt-resistant varieties, plant at the appropriate time of year, water regularly, and fertilize as needed.
Can I grow purple kohlrabi in containers?
Yes, purple kohlrabi can be grown successfully in containers. Choose a large container with good drainage and use a high-quality potting mix. Be sure to water your container-grown kohlrabi regularly and fertilize them every few weeks.
What are some ways to use purple kohlrabi in cooking?
Purple kohlrabi can be eaten raw or cooked. It can be grated into salads, sliced and stir-fried, roasted, or added to soups and stews. The bulb has a mild, slightly sweet flavor that is similar to broccoli stems or turnips. The leaves can be used in salads or cooked like spinach.
How can I encourage my children to eat purple kohlrabi?
Make it fun! Cut the kohlrabi into interesting shapes, such as stars or animals. Serve it with a dip, such as hummus or yogurt. Add it to smoothies or juices. Get your children involved in the growing and harvesting process.
We hope these FAQs have answered your questions and provided you with the confidence to embark on your purple kohlrabi growing adventure. Happy gardening!

Leave a Comment