
Balcony pepper growing tips are your ticket to fresh, flavorful peppers right outside your door! Imagine plucking a vibrant red chili straight from the plant to spice up your dinner – that’s the magic we’re unlocking today. For centuries, peppers have been cherished across cultures, from their origins in South America where they were used for both culinary and medicinal purposes, to their global spread thanks to explorers and traders. Now, even if you don’t have a sprawling garden, you can participate in this rich history.
But why should you bother with balcony pepper growing? Well, store-bought peppers can be expensive and sometimes lack that fresh, vibrant taste. Plus, there’s something incredibly satisfying about nurturing a plant from seed to harvest. This DIY guide is packed with simple, effective tricks and hacks to help you overcome common challenges and maximize your yield, even in a small space. I’m going to share my secrets to successful balcony pepper growing tips, ensuring you enjoy a bountiful harvest of delicious peppers all season long. Let’s get started and transform your balcony into a pepper paradise!
Balkon-Paprika-Paradies: Dein DIY-Guide für eine reiche Ernte
Hey Paprika-Liebhaber! Träumst du auch von saftigen, selbstgezogenen Paprika direkt von deinem Balkon? Dann bist du hier genau richtig! Ich zeige dir, wie du deinen Balkon in ein kleines Paprika-Paradies verwandelst. Keine Angst, es ist einfacher als du denkst!
Was du für deinen Balkon-Paprika-Garten brauchst
Bevor wir loslegen, lass uns sicherstellen, dass du alles Nötige zur Hand hast. Hier ist eine Liste der Dinge, die du brauchst:
* Paprika-Samen oder Jungpflanzen: Wähle Sorten, die für den Anbau im Topf geeignet sind. Kleine, buschige Sorten wie Mini-Paprika oder Chili-Sorten sind ideal.
* Töpfe oder Pflanzkästen: Achte auf eine ausreichende Größe (mindestens 10 Liter pro Pflanze) und eine gute Drainage.
* Hochwertige Blumenerde: Verwende spezielle Gemüseerde oder mische Blumenerde mit Kompost.
* Dünger: Flüssigdünger für Gemüse oder Langzeitdünger.
* Gießkanne oder Gartenschlauch: Zum regelmäßigen Gießen.
* Pflanzstäbe oder Rankhilfen: Für Sorten, die etwas Unterstützung benötigen.
* Gartenschere: Zum Ausgeizen und Ernten.
* Sprühflasche: Für die Blattdüngung und zur Vorbeugung von Schädlingen.
* Handschuhe: Um deine Hände sauber zu halten.
* Ein sonniger Standort: Paprika lieben die Sonne!
Die Vorbereitung: Der Grundstein für eine erfolgreiche Ernte
Bevor du deine Paprika einpflanzt, ist eine gute Vorbereitung das A und O.
1. Samen vorziehen (optional): Wenn du mit Samen startest, beginne am besten im Februar oder März mit der Vorzucht im Haus.
* Fülle kleine Anzuchttöpfe mit Anzuchterde.
* Lege 1-2 Samen pro Topf auf die Erde und bedecke sie leicht mit Erde.
* Befeuchte die Erde vorsichtig mit einer Sprühflasche.
* Stelle die Töpfe an einen warmen, hellen Ort (z.B. auf eine Fensterbank).
* Halte die Erde feucht, aber nicht nass.
* Sobald die Keimlinge 2-3 Blätter haben, kannst du sie in größere Töpfe pikieren.
2. Töpfe vorbereiten: Egal ob du Samen vorgezogen oder Jungpflanzen gekauft hast, die Töpfe müssen vorbereitet werden.
* Reinige die Töpfe gründlich.
* Fülle eine Schicht Blähton oder Kies auf den Boden der Töpfe, um eine gute Drainage zu gewährleisten.
* Fülle die Töpfe mit hochwertiger Blumenerde. Lass dabei etwa 5 cm Platz bis zum Rand.
Das Einpflanzen: Der Start ins Paprika-Glück
Jetzt kommt der spannende Teil: Das Einpflanzen deiner Paprika!
1. Jungpflanzen vorbereiten: Wenn du Jungpflanzen gekauft hast, wässere sie vor dem Einpflanzen gründlich.
2. Pflanzen einsetzen:
* Grabe ein Loch in die Erde, das groß genug für den Wurzelballen der Pflanze ist.
* Nimm die Pflanze vorsichtig aus dem Topf und lockere den Wurzelballen etwas auf.
* Setze die Pflanze in das Loch und fülle es mit Erde auf.
* Drücke die Erde leicht an.
3. Angießen: Gieße die Pflanzen nach dem Einpflanzen gründlich an.
Die Pflege: Damit deine Paprika sich wohlfühlen
Damit deine Paprika prächtig gedeihen und eine reiche Ernte bringen, ist die richtige Pflege entscheidend.
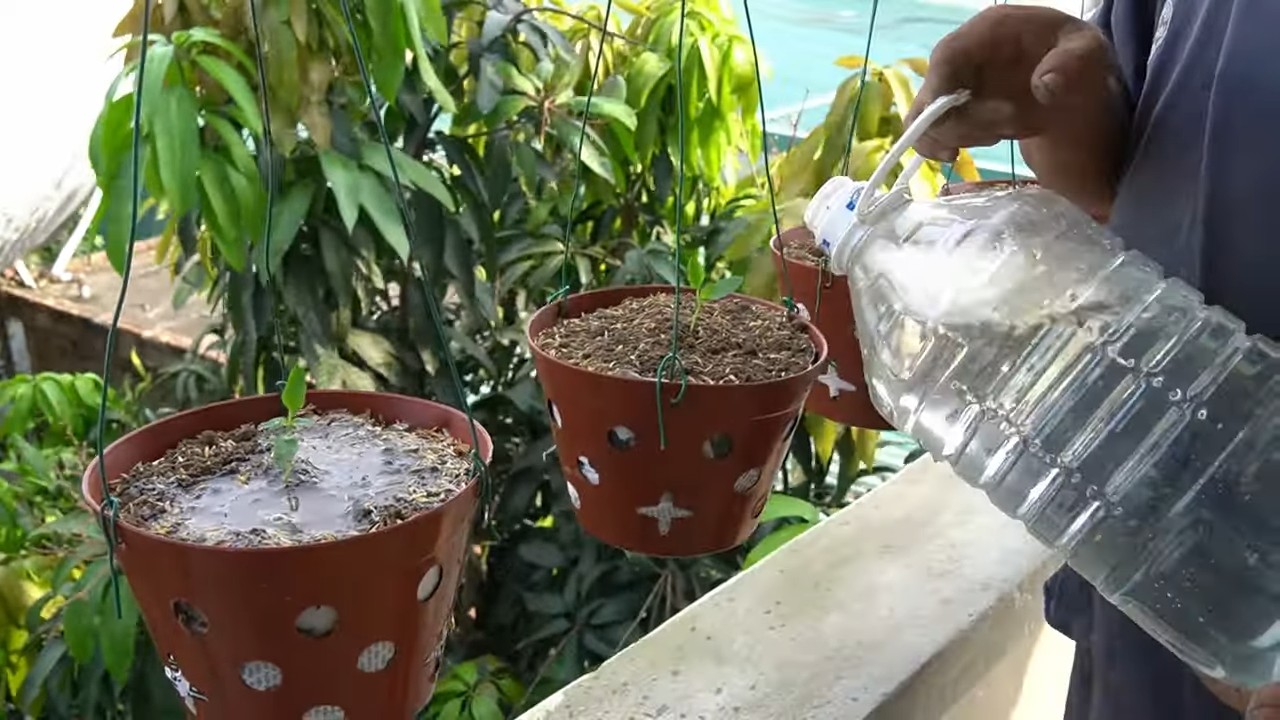
1. Gießen:
* Gieße deine Paprika regelmäßig, besonders an heißen Tagen.
* Die Erde sollte immer leicht feucht sein, aber nicht nass. Vermeide Staunässe!
* Gieße am besten morgens oder abends, um Verbrennungen durch die Sonne zu vermeiden.
* Gieße direkt an die Wurzeln und vermeide es, die Blätter zu benetzen.
2. Düngen:
* Dünge deine Paprika regelmäßig, um sie mit ausreichend Nährstoffen zu versorgen.
* Verwende einen Flüssigdünger für Gemüse oder einen Langzeitdünger.
* Beachte die Dosierungsanleitung auf der Verpackung.
* Beginne mit dem Düngen etwa 2-3 Wochen nach dem Einpflanzen.
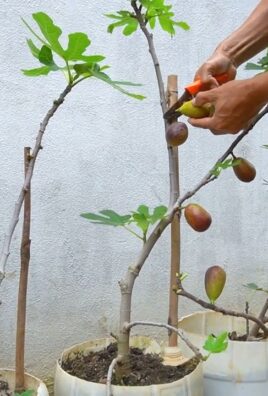
3. Ausgeizen:
* Entferne regelmäßig die Seitentriebe, die sich in den Blattachseln bilden (sogenannte Geiztriebe).
* Dadurch wird die Pflanze besser belüftet und die Früchte bekommen mehr Sonne.
* Außerdem fördert das Ausgeizen die Bildung größerer Früchte.
4. Stützen:
* Einige Paprika-Sorten benötigen Unterstützung, besonders wenn sie viele Früchte tragen.
* Verwende Pflanzstäbe oder Rankhilfen, um die Pflanzen zu stützen.
* Binde die Pflanzen vorsichtig an den Stäben fest.
5. Schutz vor Schädlingen und Krankheiten:
* Kontrolliere deine Paprika regelmäßig auf Schädlinge und Krankheiten.
* Blattläuse, Spinnmilben und Weiße Fliegen können Paprika befallen.
* Entferne befallene Blätter oder Pflanzen.
* Bei starkem Befall kannst du biologische Schädlingsbekämpfungsmittel einsetzen.
* Achte auf eine gute Belüftung, um Pilzkrankheiten vorzubeugen.
* Entferne regelmäßig abgestorbene Blätter.
Die Ernte: Der Lohn deiner Mühe
Endlich ist es soweit: Du kannst deine selbstgezogenen Paprika ernten!
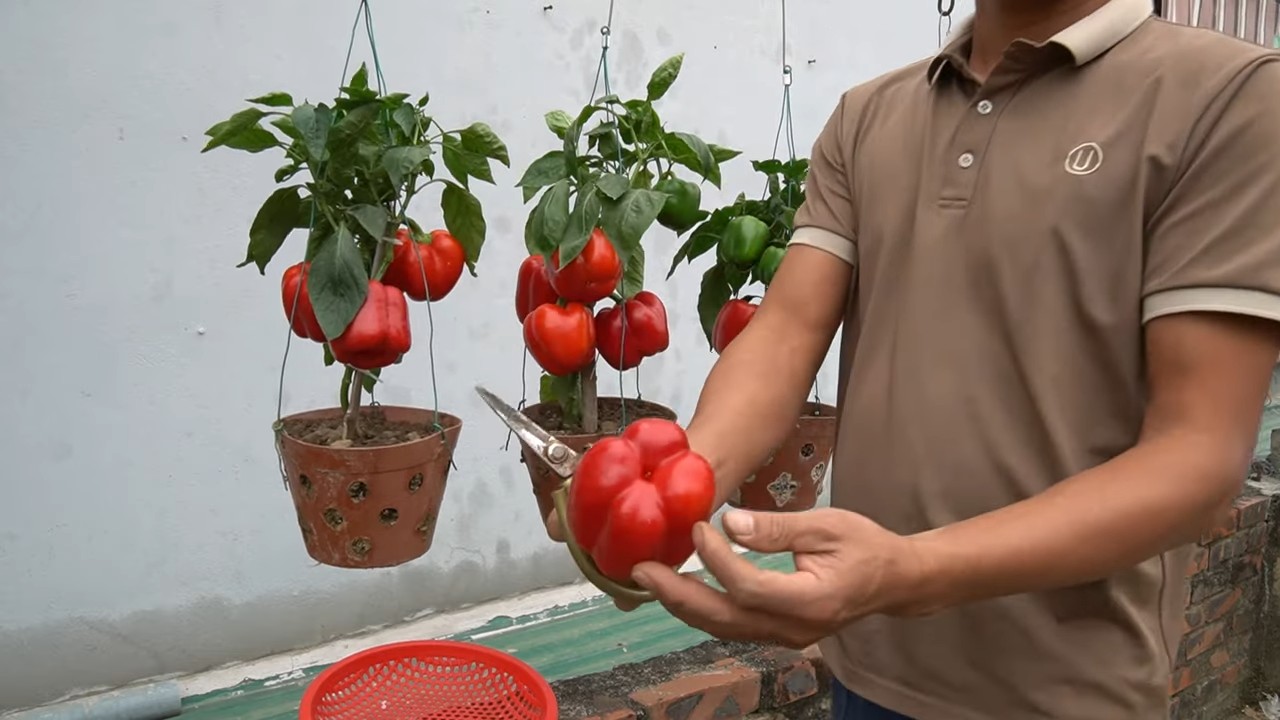
1. Erntezeitpunkt:
* Paprika sind reif, wenn sie ihre typische Farbe erreicht haben und sich leicht vom Stiel lösen lassen.
* Du kannst Paprika auch unreif ernten, sie sind dann meist grün und haben einen etwas herberen Geschmack.
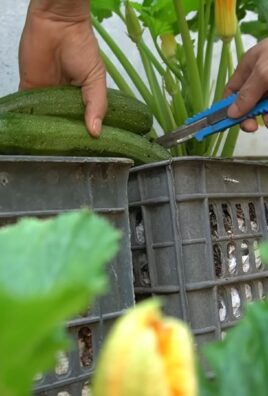
2. Ernten:
* Schneide die Paprika mit einer Gartenschere ab.
* Achte darauf, den Stiel nicht zu beschädigen.
* Ernte regelmäßig, um die Bildung neuer Früchte anzuregen.
Zusätzliche Tipps für deinen Balkon-Paprika-Garten
* Wähle den richtigen Standort: Paprika lieben die Sonne! Stelle deine Töpfe an einen sonnigen Platz auf deinem Balkon.
* Achte auf eine gute Belüftung: Sorge dafür, dass die Pflanzen ausreichend Luft bekommen, um Pilzkrankheiten vorzubeugen.
* Verwende hochwertige Erde: Eine gute Erde ist die Grundlage für eine erfolgreiche Ernte.
* Gieße und dünge regelmäßig: Paprika brauchen ausreichend Wasser und Nährstoffe, um gut zu wachsen.
* Sei geduldig: Paprika brauchen Zeit, um zu reifen. Hab Geduld und lass dich nicht entmutigen, wenn es nicht sofort klappt.
* Experimentiere mit verschiedenen Sorten: Probiere verschiedene Paprika-Sorten aus, um herauszufinden, welche dir am besten schmecken und auf deinem Balkon am besten gedeihen.
* Beobachte deine Pflanzen genau: Achte auf Veränderungen im Aussehen der Pflanzen und reagiere rechtzeitig, wenn du Probleme feststellst.
* Hab Spaß! Das Gärtnern soll Freude machen. Genieße die Zeit, die du mit deinen Paprika verbringst, und freue dich auf die reiche Ernte.
Mit diesen Tipps und Tricks steht deiner eigenen Paprika-Ernte auf dem Balkon nichts mehr im Wege. Viel Spaß beim Gärtnern und guten Appetit!
Conclusion
So, there you have it! Transforming your balcony into a thriving pepper paradise is not only achievable but incredibly rewarding. We’ve explored the ins and outs of balcony pepper growing, from selecting the right varieties and containers to mastering watering and fertilization techniques. But why is this DIY approach a must-try?
Firstly, growing your own peppers offers unparalleled freshness and flavor. Imagine plucking a sun-ripened jalapeno straight from the plant to spice up your salsa, or adding a vibrant bell pepper to your stir-fry, knowing exactly where it came from and how it was grown. The taste difference compared to store-bought peppers is simply remarkable.
Secondly, balcony pepper growing is a fantastic way to connect with nature, even in the heart of the city. Tending to your plants, observing their growth, and harvesting your own produce can be incredibly therapeutic and fulfilling. It’s a chance to slow down, appreciate the simple things, and experience the satisfaction of nurturing something from seed to harvest.
Thirdly, it’s a sustainable and cost-effective way to enjoy fresh peppers. By growing your own, you reduce your reliance on commercially grown produce, which often involves long-distance transportation and potentially harmful pesticides. Plus, once you’ve invested in the initial setup, the ongoing costs are minimal, and you’ll be reaping the rewards of fresh peppers for months to come.
But the best part about balcony pepper growing is the endless possibilities for customization and experimentation. Feel free to explore different pepper varieties, from mild bell peppers to fiery habaneros, to find your favorites. Try different container sizes and materials to see what works best for your space and climate. Experiment with different fertilizers and soil amendments to optimize your plants’ growth and yield.
Here are a few suggestions to get you started:
* Vertical Gardening: Maximize your balcony space by using vertical planters or hanging baskets. This is a great way to grow more peppers in a limited area.
* Companion Planting: Plant basil, marigolds, or other beneficial herbs alongside your peppers to deter pests and attract pollinators.
* DIY Watering System: Create a simple self-watering system using recycled plastic bottles or buckets to ensure your peppers stay hydrated, especially during hot weather.
* Pepper Powders and Sauces: Once you have a bountiful harvest, consider drying your peppers and grinding them into homemade pepper powder, or fermenting them into delicious hot sauces.
We wholeheartedly encourage you to give balcony pepper growing a try. It’s a fun, rewarding, and sustainable way to enjoy fresh, flavorful peppers right at your doorstep. Don’t be afraid to experiment, learn from your mistakes, and most importantly, have fun!
And now, we want to hear from you! Share your experiences, tips, and photos of your balcony pepper gardens in the comments below. What varieties are you growing? What challenges have you faced? What successes have you celebrated? Let’s create a community of balcony pepper growers and learn from each other. Happy growing!
Frequently Asked Questions (FAQ)
What are the best pepper varieties to grow on a balcony?
The best pepper varieties for balcony growing are generally compact and productive. Some excellent choices include:
* Bell Peppers: These are relatively easy to grow and come in a variety of colors (red, yellow, orange, green). Look for bushier varieties that are well-suited for containers.
* Jalapenos: A popular choice for their moderate heat and versatility. They are relatively compact and produce a good yield.
* Serrano Peppers: Similar to jalapenos but with a bit more heat. They are also well-suited for container growing.
* Cayenne Peppers: These long, slender peppers are great for drying and making pepper flakes or powder. They are relatively easy to grow in containers.
* Thai Peppers: Small but mighty, these peppers pack a punch of heat. They are well-suited for smaller balconies and containers.
* Patio Peppers: As the name suggests, these peppers are specifically bred for container growing. They are compact, productive, and come in a variety of colors and heat levels.
When choosing pepper varieties, consider your taste preferences, the size of your balcony, and the amount of sunlight it receives.
What size container do I need for growing peppers on a balcony?
The ideal container size for growing peppers on a balcony depends on the variety of pepper you’re growing. In general, a container that is at least 5 gallons in size is recommended. However, larger containers (10-15 gallons) are preferable, especially for larger pepper varieties like bell peppers.
Here’s a general guideline:
* Smaller Peppers (e.g., Thai peppers, some ornamental peppers): 5-gallon container
* Medium Peppers (e.g., Jalapenos, Serranos, Cayennes): 7-10 gallon container
* Larger Peppers (e.g., Bell peppers, Poblano peppers): 10-15 gallon container
Make sure the container has drainage holes to prevent waterlogging. You can also use self-watering containers to help maintain consistent moisture levels.
How much sunlight do peppers need to grow on a balcony?
Peppers need at least 6-8 hours of direct sunlight per day to thrive. If your balcony doesn’t receive enough sunlight, you may need to supplement with grow lights.
Here are some tips for maximizing sunlight exposure on your balcony:
* Choose a sunny location: Place your pepper plants in the sunniest spot on your balcony.
* Rotate your plants: Rotate your plants regularly to ensure that all sides receive equal sunlight exposure.
* Use reflective surfaces: Place reflective surfaces, such as mirrors or white walls, near your plants to bounce sunlight back onto them.
* Consider grow lights: If your balcony doesn’t receive enough sunlight, consider using grow lights to supplement. LED grow lights are energy-efficient and can provide the necessary light spectrum for pepper growth.
How often should I water my pepper plants on a balcony?
The frequency of watering depends on several factors, including the weather, the size of the container, and the type of soil you’re using. In general, you should water your pepper plants when the top inch of soil feels dry to the touch.
During hot, dry weather, you may need to water your plants daily. During cooler, wetter weather, you may only need to water them every few days.
Here are some tips for watering your pepper plants:
* Water deeply: When you water, water deeply enough so that the water drains out of the drainage holes.
* Water in the morning: Water in the morning to allow the foliage to dry before nightfall, which can help prevent fungal diseases.
* Avoid overwatering: Overwatering can lead to root rot, so be sure to let the soil dry out slightly between waterings.
* Use a moisture meter: A moisture meter can help you determine when your plants need watering.
What kind of fertilizer should I use for growing peppers on a balcony?
Peppers are heavy feeders and require regular fertilization to produce a good yield. Use a balanced fertilizer with an NPK ratio of 5-10-10 or 10-10-10. You can also use a fertilizer specifically formulated for tomatoes and peppers.
Here are some tips for fertilizing your pepper plants:
* Start fertilizing when the plants start to flower: Begin fertilizing your pepper plants when they start to flower.
* Fertilize every 2-3 weeks: Fertilize your plants every 2-3 weeks during the growing season.
* Follow the instructions on the fertilizer label: Be sure to follow the instructions on the fertilizer label to avoid over-fertilizing.
* Use organic fertilizers: Organic fertilizers, such as compost tea or fish emulsion, are a great way to provide your plants with nutrients while also improving the soil.
How do I deal with pests and diseases on my balcony pepper plants?
Pests and diseases can be a challenge when growing peppers on a balcony. However, there are several things you can do to prevent and control them.
Here are some common pests and diseases that affect pepper plants:
* Aphids: These small, sap-sucking insects can cause stunted growth and distorted leaves.
* Spider mites: These tiny mites can cause yellowing and stippling of the leaves.
* Whiteflies: These small, white insects can cause yellowing and wilting of the leaves.
* Fungal diseases: These diseases can cause spots, lesions, and rot on the leaves, stems, and fruits.
Here are some tips for preventing and controlling pests and diseases:
* Inspect your plants regularly: Inspect your plants regularly for signs of pests and diseases.
* Use organic pest control methods: Use organic pest control methods, such as insecticidal soap or neem oil, to control pests.
* Provide good air circulation: Provide good air circulation around your plants to help prevent fungal diseases.
* Remove infected leaves: Remove any infected leaves or stems to prevent the spread of disease.
* Use disease-resistant varieties:
Leave a Comment