
Plastic Bottle Spinach Growing: Unlock a world of fresh, homegrown goodness right at your doorstep! Have you ever dreamed of harvesting your own vibrant, vitamin-packed spinach, but thought you lacked the space or green thumb? Well, dream no more! This DIY guide is your key to transforming ordinary plastic bottles into miniature spinach farms, bringing the joy of gardening to even the smallest of spaces.
For centuries, cultivating your own food has been a cornerstone of self-sufficiency and a connection to nature. From ancient Roman rooftop gardens to the modern-day victory gardens of World War II, growing your own produce has always been a way to nourish ourselves and our communities. Now, with increasing concerns about food security and the desire for healthier, locally sourced options, the call to grow our own is stronger than ever. And what better way to answer that call than with a sustainable and space-saving method like plastic bottle spinach growing?
Let’s face it, not everyone has a sprawling backyard or the time for extensive gardening. That’s where this ingenious DIY trick comes in. It’s perfect for apartment dwellers, busy professionals, or anyone looking for a simple and rewarding way to add fresh, organic spinach to their diet. Plus, you’ll be giving those plastic bottles a new lease on life, reducing waste and contributing to a more sustainable lifestyle. So, grab your scissors, gather your bottles, and let’s embark on this exciting journey of plastic bottle spinach growing together! I’m excited to show you how easy and rewarding it can be!
Spinat Anbauen in Plastikflaschen: Ein DIY-Gartenprojekt für Jedermann
Hallo Gartenfreunde! Habt ihr Lust, frischen Spinat direkt vor eurer Haustür zu ernten, auch wenn ihr keinen großen Garten habt? Dann seid ihr hier genau richtig! Ich zeige euch, wie ihr aus einfachen Plastikflaschen einen kleinen, aber feinen Spinatgarten zaubern könnt. Das ist nicht nur super nachhaltig, weil wir Plastikmüll wiederverwerten, sondern auch kinderleicht und macht richtig Spaß!
Was ihr braucht:
* Plastikflaschen: Am besten eignen sich große PET-Flaschen (z.B. von Wasser oder Saft). Je mehr, desto mehr Spinat!
* Erde: Gute, nährstoffreiche Blumenerde ist ideal.
* Spinatsamen: Achtet auf eine Sorte, die für den Anbau im Topf geeignet ist.
* Messer oder Schere: Zum Zuschneiden der Flaschen.
* Bohrer oder Nagel: Für die Entwässerungslöcher.
* Gießkanne oder Sprühflasche: Zum Bewässern.
* Optional: Kieselsteine oder Tonscherben für die Drainage.
* Optional: Etiketten und Stift zum Beschriften.
Die Vorbereitung: Die Flaschen werden zu Spinatbeeten
1. Flaschen reinigen: Zuerst müsst ihr die Plastikflaschen gründlich reinigen. Entfernt alle Etiketten und spült sie mit warmem Wasser und Spülmittel aus. Achtet darauf, dass keine Spülmittelreste zurückbleiben.
2. Flaschen zuschneiden: Jetzt kommt der spannende Teil! Es gibt verschiedene Möglichkeiten, die Flaschen zuzuschneiden, je nachdem, wie ihr euren Spinatgarten gestalten wollt. Hier sind ein paar Ideen:
* Horizontale Pflanzgefäße: Schneidet die Flasche horizontal in der Mitte durch. Ihr erhaltet zwei Hälften, die ihr als Pflanzgefäße verwenden könnt. Achtet darauf, dass die Schnittkanten nicht zu scharf sind. Ihr könnt sie eventuell mit Klebeband abkleben.
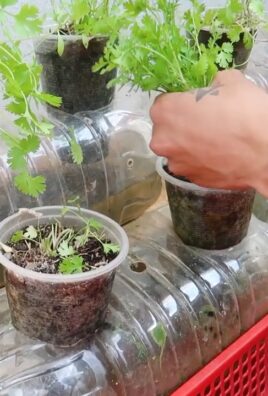
* Vertikale Pflanzgefäße: Schneidet ein großes Rechteck in die Seite der Flasche. Lasst den Boden und den oberen Teil der Flasche intakt. So entsteht eine Art “Balkon” für den Spinat.
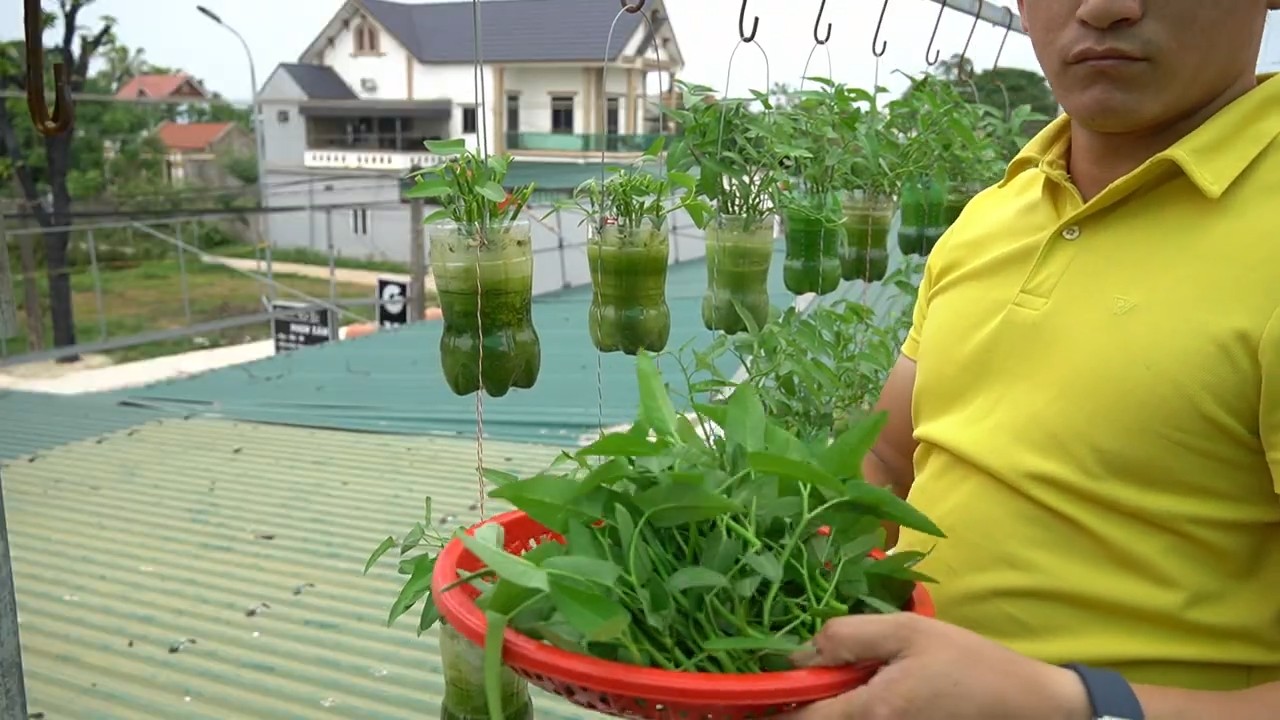
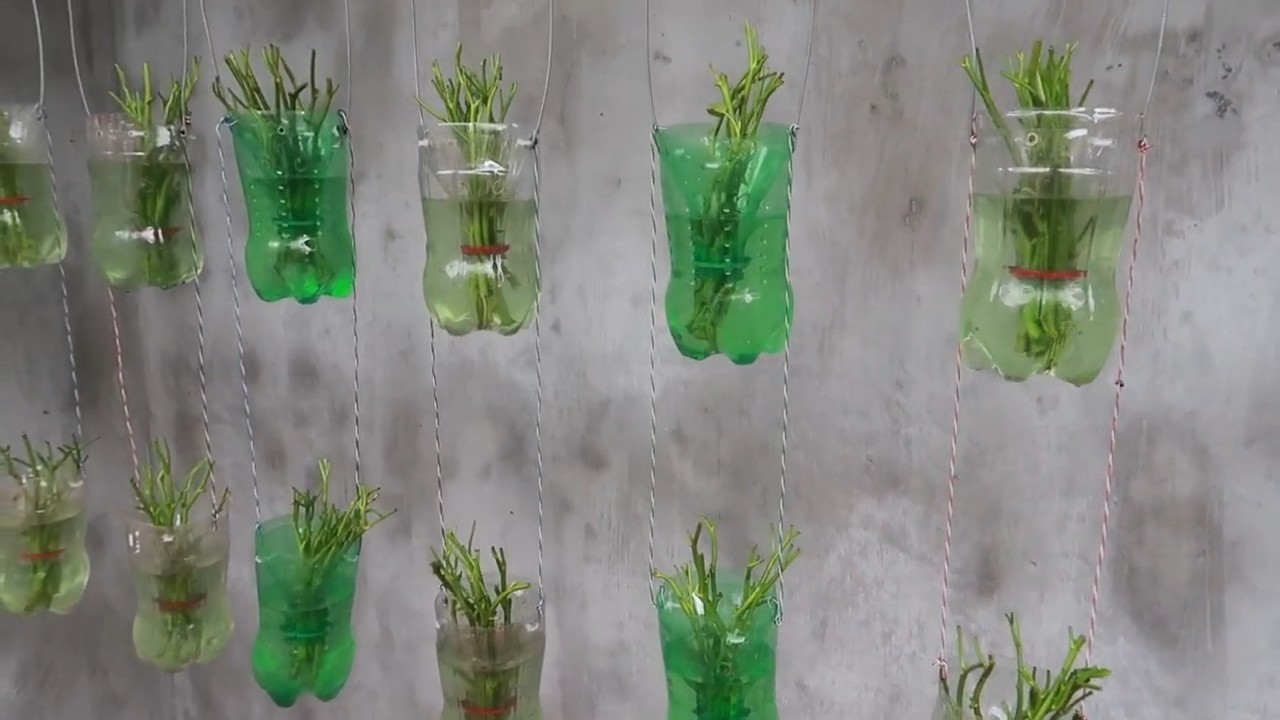
* Hängende Pflanzgefäße: Schneidet die Flasche horizontal durch, aber nicht ganz. Lasst ein kleines Stück verbunden, sodass ihr die Flasche aufklappen könnt. Bohrt Löcher in den oberen Teil der Flasche, um sie aufzuhängen.
3. Entwässerungslöcher bohren: Das ist super wichtig! Spinat mag keine Staunässe. Bohrt oder stecht mit einem Nagel mehrere Löcher in den Boden jeder Flasche. So kann überschüssiges Wasser ablaufen.
4. Drainage vorbereiten (optional): Um die Drainage noch weiter zu verbessern, könnt ihr eine Schicht Kieselsteine oder Tonscherben auf den Boden der Flaschen legen, bevor ihr die Erde einfüllt. Das verhindert, dass die Erde die Entwässerungslöcher verstopft.
Das Pflanzen: Spinat säen und pflegen
1. Erde einfüllen: Füllt die vorbereiteten Flaschen mit Erde. Lasst etwa 2-3 cm Platz bis zum Rand. Drückt die Erde leicht an.
2. Spinatsamen säen: Verteilt die Spinatsamen gleichmäßig auf der Erde. Achtet darauf, dass sie nicht zu dicht liegen. Eine Faustregel ist, etwa 1-2 cm Abstand zwischen den Samen zu lassen.
3. Samen bedecken: Bedeckt die Samen mit einer dünnen Schicht Erde (ca. 0,5 cm).
4. Angießen: Gießt die Erde vorsichtig an. Am besten verwendet ihr eine Sprühflasche, damit die Samen nicht weggespült werden. Die Erde sollte feucht, aber nicht nass sein.
5. Standort wählen: Spinat mag einen sonnigen bis halbschattigen Standort. Stellt die bepflanzten Flaschen an einen Ort, an dem sie mindestens 4-6 Stunden Sonne am Tag bekommen.
6. Bewässerung: Haltet die Erde feucht, aber nicht nass. Gießt regelmäßig, besonders an warmen Tagen. Vermeidet Staunässe.
7. Düngen (optional): Wenn ihr möchtet, könnt ihr den Spinat während des Wachstums düngen. Verwendet einen organischen Flüssigdünger und haltet euch an die Anweisungen auf der Packung.
8. Schutz vor Schädlingen: Achtet auf Schädlinge wie Blattläuse oder Schnecken. Bei Bedarf könnt ihr natürliche Schädlingsbekämpfungsmittel verwenden.
Die Ernte: Frischer Spinat aus eigener Zucht
1. Erntezeitpunkt: Der Spinat ist erntereif, wenn die Blätter etwa 10-15 cm groß sind.
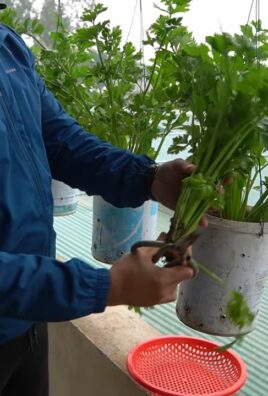
2. Ernten: Schneidet die äußeren Blätter mit einem Messer oder einer Schere ab. Lasst die inneren Blätter stehen, damit der Spinat weiterwachsen kann.
3. Genießen: Wascht den geernteten Spinat gründlich und genießt ihn frisch im Salat, als Beilage oder in Smoothies.
Zusätzliche Tipps und Tricks:
* Sortenwahl: Es gibt viele verschiedene Spinatsorten. Informiert euch, welche Sorte für den Anbau im Topf und für eure Region am besten geeignet ist.
* Aussaatzeitpunkt: Spinat kann im Frühjahr und im Herbst ausgesät werden. Achtet auf die Temperaturen. Spinat mag es nicht zu heiß.
* Beschriftung: Beschriftet die Flaschen mit dem Namen der Spinatsorte und dem Aussaatdatum. So behaltet ihr den Überblick.
* Upcycling: Verwendet alte Joghurtbecher oder andere Behälter, um die Spinatsamen vorzuziehen.
* Kreativität: Seid kreativ bei der Gestaltung eures Spinatgartens! Bemalt die Flaschen, hängt sie auf oder stellt sie in Regale.
* Vertikaler Garten: Wenn ihr wenig Platz habt, könnt ihr einen vertikalen Garten anlegen, indem ihr die Flaschen an einer Wand oder einem Zaun befestigt.
* Nachhaltigkeit: Verwendet Regenwasser zum Gießen und kompostiert eure Küchenabfälle, um die Erde anzureichern.
Häufige Probleme und Lösungen:
* Gelbe Blätter: Gelbe Blätter können ein Zeichen für Nährstoffmangel sein. Düngt den Spinat mit einem organischen Flüssigdünger.
* Schädlinge: Blattläuse oder Schnecken können den Spinat befallen. Verwendet natürliche Schädlingsbekämpfungsmittel wie Neemöl oder Knoblauchwasser.
* Staunässe: Staunässe kann zu Wurzelfäule führen. Achtet darauf, dass die Entwässerungslöcher nicht verstopft sind und gießt nicht zu viel.
* Samen keimen nicht: Die Samen keimen möglicherweise nicht, wenn die Erde zu trocken oder zu kalt ist. Haltet die Erde feucht und sorgt für eine Temperatur von mindestens 10 Grad Celsius.
Warum Spinat anbauen in Plastikflaschen eine tolle Idee ist:
* Nachhaltigkeit: Wir recyceln Plastikmüll und schonen die Umwelt.
* Platzsparend: Auch auf kleinen Balkonen oder Terrassen ist Platz für einen Spinatgarten.
* Frischer Spinat: Wir haben immer frischen Spinat zur Hand.
* Gesund: Spinat ist reich an Vitaminen und Mineralstoffen.
* Spaß: Es macht Spaß, den Spinat wachsen zu sehen und ihn selbst zu ernten.
* Lehrreich: Besonders für Kinder ist es eine tolle Erfahrung, zu sehen, wie Pflanzen wachsen.
Ich hoffe, diese Anleitung hat euch inspiriert, euren eigenen Spinatgarten in Plastikflaschen anzulegen. Es ist wirklich einfacher als man denkt und das Ergebnis ist einfach fantastisch! Viel Spaß beim Gärtnern!
Conclusion
So, there you have it! Transforming a simple plastic bottle into a thriving spinach garden is not just a fun project; it’s a sustainable, space-saving, and incredibly rewarding way to enjoy fresh, homegrown greens. We’ve walked you through the process, highlighting the ease and accessibility of this DIY method. But why is this plastic bottle spinach growing trick a must-try?
Firstly, it’s about reclaiming and repurposing. In a world grappling with plastic waste, finding creative ways to reuse these materials is crucial. This method gives plastic bottles a new lease on life, diverting them from landfills and turning them into miniature ecosystems.
Secondly, it’s about accessibility. Whether you live in a sprawling suburban home or a compact city apartment, space is often a constraint. This vertical gardening solution allows you to cultivate fresh spinach even in the smallest of spaces, bringing the joy of gardening to everyone. Imagine having fresh, organic spinach readily available just steps from your kitchen!
Thirdly, it’s about control. When you grow your own spinach, you have complete control over what goes into it. No harmful pesticides, no questionable fertilizers – just pure, natural goodness. You can tailor the soil composition and watering schedule to ensure your spinach thrives, resulting in a healthier and more flavorful harvest.
But the beauty of this DIY project lies in its adaptability. Feel free to experiment with different types of plastic bottles. Larger bottles can accommodate more spinach plants, while smaller bottles can be grouped together to create a visually appealing vertical garden.
Consider adding companion plants to your plastic bottle spinach garden. Herbs like basil or chives can deter pests and enhance the flavor of your spinach. You can also experiment with different varieties of spinach, from the classic smooth-leafed spinach to the more textured savoy spinach.
For those living in colder climates, you can bring your plastic bottle spinach garden indoors during the winter months. Place it near a sunny window or supplement with grow lights to ensure your spinach continues to thrive.
We encourage you to embrace this simple yet effective DIY trick and embark on your own plastic bottle spinach growing adventure. It’s a fantastic way to connect with nature, reduce your environmental footprint, and enjoy the delicious taste of homegrown spinach.
Don’t be afraid to get creative and personalize your plastic bottle garden. Paint the bottles, add decorative elements, or even create a tiered system for a more visually stunning display.
Most importantly, we want to hear about your experiences! Share your photos, tips, and challenges in the comments section below. Let’s build a community of plastic bottle spinach growers and inspire others to embrace sustainable gardening practices. Together, we can transform waste into wonder and cultivate a greener, healthier future, one plastic bottle at a time. So, grab a bottle, some soil, and spinach seeds, and let the growing begin! We are excited to see what you create.
Frequently Asked Questions (FAQ)
What type of plastic bottle is best for growing spinach?
Ideally, you should use food-grade plastic bottles, such as those that previously contained water, juice, or soda. Avoid using bottles that held harsh chemicals, as these may leach into the soil and contaminate your spinach. PET (Polyethylene Terephthalate) bottles, commonly used for water and soda, are generally considered safe. Make sure to thoroughly clean the bottles with soap and water before using them. Also, consider the size of the bottle. Larger bottles will accommodate more spinach plants and provide more room for root growth.
How often should I water my plastic bottle spinach garden?
The frequency of watering depends on several factors, including the climate, the type of soil you’re using, and the size of the plastic bottle. Generally, you should water your spinach when the top inch of soil feels dry to the touch. Avoid overwatering, as this can lead to root rot. Ensure that your plastic bottle has adequate drainage holes to prevent water from accumulating at the bottom. In hotter weather, you may need to water your spinach daily, while in cooler weather, you may only need to water it every few days. A good way to check is to stick your finger into the soil to feel for moisture.
What type of soil is best for growing spinach in plastic bottles?
Spinach thrives in well-draining, nutrient-rich soil. A good potting mix specifically designed for vegetables is ideal. You can also create your own soil mix by combining equal parts of compost, perlite, and peat moss. Compost provides essential nutrients, perlite improves drainage, and peat moss helps retain moisture. Avoid using garden soil, as it can be too heavy and may contain pests or diseases. Before planting, consider adding a slow-release fertilizer to the soil to provide your spinach with a steady supply of nutrients.
How much sunlight does spinach need when grown in a plastic bottle?
Spinach prefers partial shade, especially in warmer climates. Aim for at least 4-6 hours of sunlight per day. If you live in a hot climate, provide some afternoon shade to prevent the leaves from scorching. If you’re growing your spinach indoors, place it near a sunny window or supplement with grow lights. Rotate the plastic bottle regularly to ensure that all sides of the spinach plants receive adequate sunlight.
How do I prevent pests from attacking my plastic bottle spinach garden?
Several natural methods can help prevent pests from attacking your spinach. Companion planting with herbs like basil or chives can deter pests. Regularly inspect your spinach plants for signs of pests, such as aphids or caterpillars. If you find any pests, you can remove them by hand or spray your plants with a solution of soapy water. Neem oil is also an effective organic pesticide. Ensure good air circulation around your spinach plants to prevent fungal diseases.
How long does it take for spinach to grow in a plastic bottle?
Spinach typically takes about 4-6 weeks to mature from seed to harvest. You can start harvesting the outer leaves when they are about 4-6 inches long. Continue harvesting the outer leaves as needed, allowing the inner leaves to continue growing. This cut-and-come-again method will provide you with a continuous supply of fresh spinach.
Can I grow other vegetables in plastic bottles using this method?
Yes, you can grow a variety of other vegetables in plastic bottles using this method. Lettuce, herbs, strawberries, and even some smaller varieties of tomatoes and peppers can thrive in plastic bottle gardens. Consider the size of the bottle and the space requirements of the plant when choosing what to grow. Ensure that the plant receives adequate sunlight, water, and nutrients.
How do I deal with drainage issues in my plastic bottle spinach garden?
Proper drainage is crucial for preventing root rot. Ensure that your plastic bottle has adequate drainage holes at the bottom. You can also add a layer of gravel or pebbles to the bottom of the bottle to improve drainage. If you notice that the soil is consistently waterlogged, consider adding more perlite to the soil mix to improve drainage. Avoid placing your plastic bottle garden in a location where it will be exposed to excessive rainfall.
How do I fertilize my plastic bottle spinach garden?
Spinach benefits from regular fertilization. You can use a liquid fertilizer diluted to half strength every 2-3 weeks. Alternatively, you can add a slow-release fertilizer to the soil at the time of planting. Choose a fertilizer that is specifically formulated for vegetables. Avoid over-fertilizing, as this can lead to nutrient burn.
What do I do with the plastic bottles after I’m done growing spinach?
Once you’re done growing spinach, you can reuse the plastic bottles for another planting season. Simply clean them thoroughly and replenish the soil. If the bottles are damaged or no longer suitable for growing, you can recycle them. Alternatively, you can repurpose them for other gardening projects, such as seed starting or creating plant markers.
Leave a Comment