
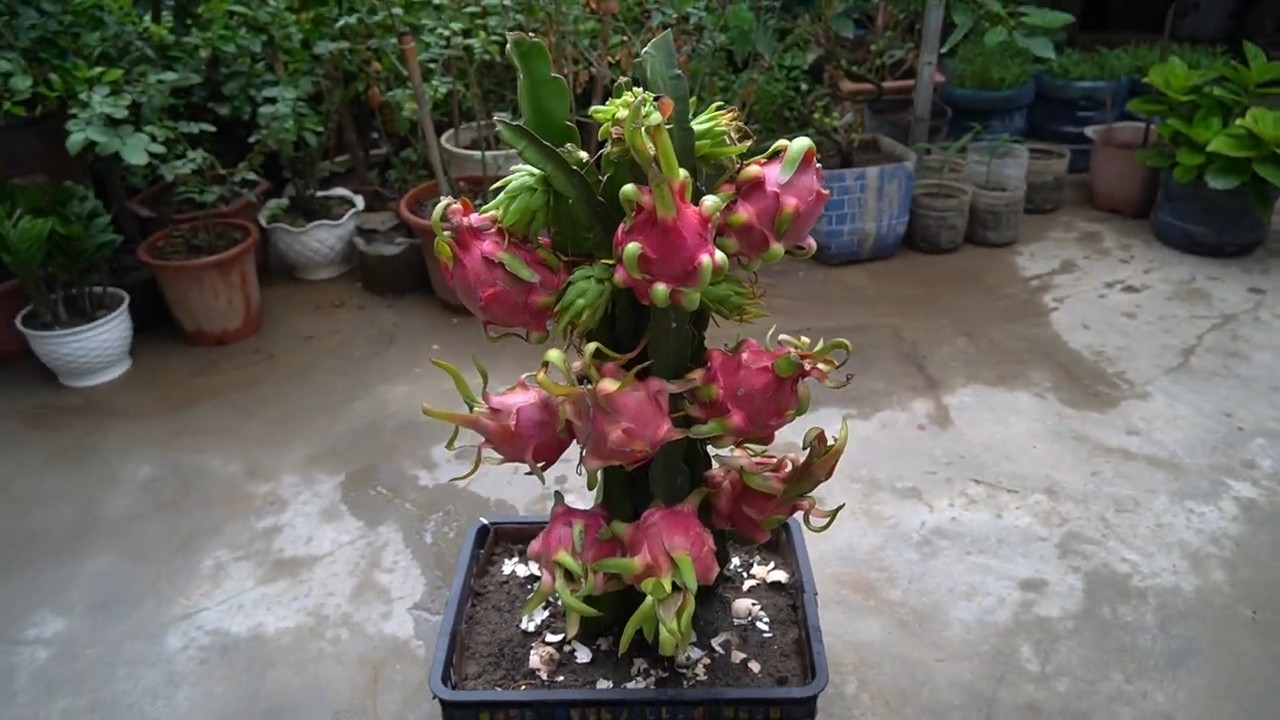
Growing Dragon Fruit Branches might seem like an exotic endeavor reserved for seasoned horticulturalists, but trust me, with a few clever DIY tricks, you can cultivate these vibrant, fruit-bearing beauties right in your own backyard! Forget those expensive grocery store prices; imagine plucking your own sweet, slightly tangy dragon fruit straight from the vine.
The dragon fruit, also known as pitaya, boasts a fascinating history, originating in Central America and spreading throughout Southeast Asia, where it’s deeply ingrained in local cultures and often associated with good fortune. For centuries, people have admired its striking appearance and delicious flavor. But you don’t need to travel to the tropics to enjoy this amazing fruit.
Why should you learn these DIY tricks for growing dragon fruit branches? Well, for starters, it’s incredibly rewarding to nurture a plant from a simple cutting to a thriving vine. Plus, dragon fruit plants are surprisingly low-maintenance once established, making them perfect for busy gardeners. More importantly, in a world where fresh produce can be costly and its origin uncertain, having your own supply of dragon fruit offers a sustainable and healthy alternative. I’m excited to share some simple, effective methods that will have you harvesting your own dragon fruit in no time!
Drachenfrucht-Äste vermehren: Dein DIY-Leitfaden für üppige Ernten
Hey Pflanzenfreunde! Hast du eine Drachenfruchtpflanze, die du liebst, oder vielleicht einen Freund, der eine hat und du möchtest auch eine? Dann bist du hier genau richtig! Ich zeige dir, wie du ganz einfach Drachenfrucht-Äste vermehren kannst, um deine eigene kleine Drachenfrucht-Farm zu starten. Es ist einfacher als du denkst und macht super viel Spaß!
Was du brauchst:
* Gesunde Drachenfrucht-Äste: Wähle Äste, die mindestens 30 cm lang sind und keine Anzeichen von Krankheiten oder Schädlingen aufweisen. Am besten sind Äste, die bereits kleine Luftwurzeln haben.
* Scharfes, sauberes Messer oder Gartenschere: Hygiene ist wichtig, um Infektionen zu vermeiden.
* Bewurzelungshormon (optional): Beschleunigt den Bewurzelungsprozess, ist aber nicht unbedingt notwendig.
* Töpfe: Wähle Töpfe mit guter Drainage.
* Kakteenerde oder gut durchlässige Blumenerde: Drachenfrüchte mögen keine Staunässe.
* Wasser: Zum Befeuchten der Erde.
* Geduld: Die Bewurzelung kann einige Wochen dauern.
* Handschuhe (optional): Drachenfrucht-Äste können kleine Stacheln haben.
Die Vorbereitung: Der Schlüssel zum Erfolg
Bevor wir loslegen, ist es wichtig, alles vorzubereiten. Das spart Zeit und sorgt dafür, dass der Vermehrungsprozess reibungslos verläuft.
1. Äste auswählen und schneiden: Suche dir an deiner Drachenfruchtpflanze gesunde, kräftige Äste aus. Achte darauf, dass sie keine Beschädigungen oder Anzeichen von Krankheiten aufweisen. Mit einem scharfen, sauberen Messer oder einer Gartenschere schneidest du die Äste ab. Der Schnitt sollte sauber und glatt sein, um die Bildung von Wurzeln zu fördern. Die Äste sollten mindestens 30 cm lang sein, idealerweise sogar etwas länger.
2. Schnittstellen behandeln: Lasse die geschnittenen Äste für 2-3 Tage an einem trockenen, schattigen Ort liegen. Dadurch können die Schnittstellen verheilen und das Risiko von Fäulnis wird reduziert. Du kannst die Schnittstellen auch mit Holzkohlepulver bestreuen, um sie zusätzlich zu schützen.
3. Töpfe vorbereiten: Fülle die Töpfe mit Kakteenerde oder einer gut durchlässigen Blumenerde. Drachenfrüchte mögen keine Staunässe, daher ist eine gute Drainage entscheidend. Du kannst auch etwas Sand oder Perlit in die Erde mischen, um die Drainage zu verbessern.
Die Vermehrung: Schritt für Schritt zur neuen Pflanze
Jetzt kommt der spannende Teil: Die eigentliche Vermehrung! Keine Sorge, es ist wirklich nicht schwer.
1. Bewurzelungshormon auftragen (optional): Wenn du Bewurzelungshormon verwendest, tauche die untere Schnittfläche des Astes in das Pulver oder die Flüssigkeit. Schüttle überschüssiges Hormon ab. Das Hormon fördert die Bildung von Wurzeln und beschleunigt den Prozess.
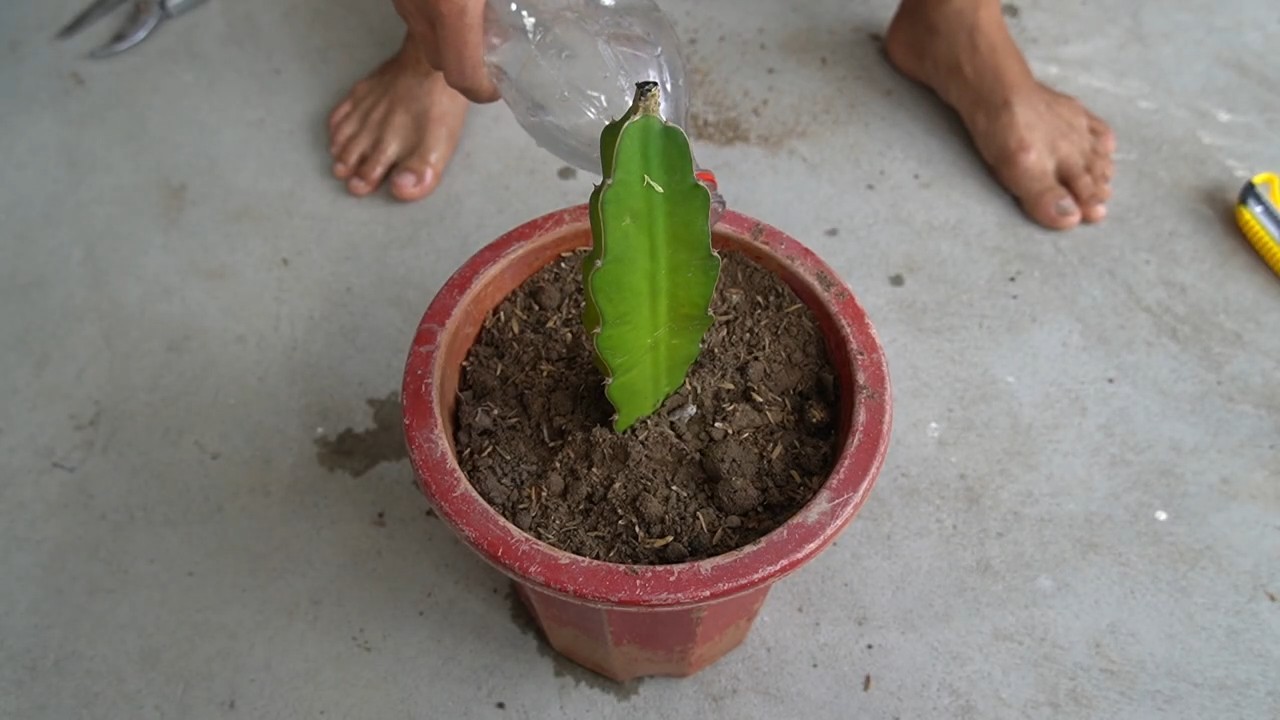
2. Äste einpflanzen: Stecke die Äste etwa 5-10 cm tief in die vorbereitete Erde. Achte darauf, dass die Äste stabil stehen und nicht umfallen. Du kannst sie bei Bedarf mit kleinen Stäben oder Steinen stützen.
3. Angießen: Gieße die eingepflanzten Äste vorsichtig an. Die Erde sollte feucht, aber nicht nass sein. Vermeide Staunässe, da dies zu Fäulnis führen kann.
4. Standort wählen: Stelle die Töpfe an einen hellen, warmen Ort, aber vermeide direkte Sonneneinstrahlung. Ein Ost- oder Westfenster ist ideal. Drachenfrüchte mögen Temperaturen zwischen 20 und 30 Grad Celsius.
5. Geduld haben: Die Bewurzelung kann einige Wochen dauern. Halte die Erde feucht, aber nicht nass, und vermeide es, die Äste zu oft zu bewegen. Du kannst die Äste vorsichtig anziehen, um zu prüfen, ob sie Wurzeln gebildet haben. Wenn du Widerstand spürst, haben sie Wurzeln geschlagen.
Die Pflege: Damit deine Drachenfrucht prächtig gedeiht
Nachdem die Äste Wurzeln geschlagen haben, ist es wichtig, sie richtig zu pflegen, damit sie zu gesunden, kräftigen Pflanzen heranwachsen.
1. Gießen: Gieße die Drachenfruchtpflanzen regelmäßig, aber lasse die Erde zwischen den Wassergaben abtrocknen. Im Winter benötigen sie weniger Wasser als im Sommer. Achte darauf, dass das Wasser gut abfließen kann, um Staunässe zu vermeiden.
2. Düngen: Dünge die Drachenfruchtpflanzen während der Wachstumsperiode (Frühling und Sommer) alle zwei bis vier Wochen mit einem Kakteendünger oder einem ausgewogenen Flüssigdünger. Im Winter benötigen sie keinen Dünger.
3. Umtopfen: Topfe die Drachenfruchtpflanzen regelmäßig um, wenn sie zu groß für ihre Töpfe werden. Wähle einen Topf, der etwas größer ist als der vorherige.
4. Beschneiden: Beschneide die Drachenfruchtpflanzen regelmäßig, um ihre Form zu erhalten und die Fruchtbildung zu fördern. Entferne abgestorbene oder beschädigte Äste.
5. Unterstützung: Drachenfrüchte sind Kletterpflanzen und benötigen eine Unterstützung, an der sie hochklettern können. Du kannst ihnen einen Pfahl, ein Spalier oder ein Rankgitter zur Verfügung stellen.
6. Überwinterung: Drachenfrüchte sind nicht winterhart und müssen im Winter an einem frostfreien Ort überwintert werden. Stelle sie an einen hellen, kühlen Ort und gieße sie nur sparsam.
Häufige Probleme und Lösungen:
* Fäulnis: Fäulnis ist ein häufiges Problem bei der Vermehrung von Drachenfrucht-Ästen. Sie wird durch Staunässe oder zu hohe Luftfeuchtigkeit verursacht. Um Fäulnis zu vermeiden, achte auf eine gute Drainage und vermeide es, die Äste zu überwässern. Wenn du Fäulnis entdeckst, schneide die betroffenen Stellen ab und behandle die Schnittflächen mit Holzkohlepulver.
* Schädlinge: Drachenfrüchte können von verschiedenen Schädlingen befallen werden, wie z.B. Wollläusen, Schildläusen oder Spinnmilben. Kontrolliere die Pflanzen regelmäßig auf Schädlinge und bekämpfe sie bei Bedarf mit einem geeigneten Insektizid oder mit natürlichen Mitteln wie Neemöl.
* Gelbe Blätter: Gelbe Blätter können ein Zeichen für Überwässerung, Nährstoffmangel oder zu wenig Licht sein. Überprüfe die Bewässerung, dünge die Pflanzen bei Bedarf und stelle sie an einen helleren Standort.
Extra-Tipps für den Erfolg:
* Verwende Regenwasser: Drachenfrüchte bevorzugen weiches Wasser. Regenwasser ist ideal.
* Sprühe die Äste regelmäßig mit Wasser ein: Das erhöht die Luftfeuchtigkeit und fördert die Bewurzelung.
* Sei geduldig: Die Vermehrung von Drachenfrucht-Ästen kann einige Zeit dauern. Gib nicht auf, wenn es nicht sofort klappt.
Mit diesen Tipps und Tricks wirst du bald deine eigenen Drachenfruchtpflanzen haben und vielleicht sogar bald deine ersten Früchte ernten können! Viel Erfolg und viel Spaß beim Gärtnern!
Conclusion
So, there you have it! Transforming dragon fruit branches into thriving new plants is not only surprisingly simple, but also incredibly rewarding. Forget expensive nursery trips and embrace the satisfaction of propagating your own dragon fruit, expanding your garden, and enjoying an abundance of this exotic fruit. This DIY propagation method is a must-try for any gardening enthusiast, regardless of experience level. It’s a cost-effective, sustainable, and deeply fulfilling way to cultivate your own dragon fruit paradise.
The beauty of this technique lies in its adaptability. Feel free to experiment with different rooting mediums. While we’ve highlighted the success of well-draining potting mix, some gardeners swear by perlite or vermiculite. You can also explore different sizes of containers, depending on the size of your dragon fruit cuttings. Remember to always prioritize drainage to prevent root rot.
Consider the climate you live in. If you experience harsh winters, you might want to keep your newly propagated dragon fruit plants indoors during the colder months. This will protect them from frost and ensure their survival. Alternatively, if you live in a warmer climate, you can gradually acclimate them to full sun exposure.
Don’t be afraid to get creative with your dragon fruit propagation. You can even try grafting different varieties onto a single plant, creating a unique and visually stunning specimen. Imagine a dragon fruit plant that produces both red and white-fleshed fruit! The possibilities are endless.
The key to success is patience and observation. Keep a close eye on your cuttings, monitor their moisture levels, and adjust your care accordingly. Remember that each cutting is unique and may require slightly different treatment.
We are confident that you’ll find this DIY dragon fruit propagation trick to be a game-changer. It’s a fantastic way to expand your garden, share your love of dragon fruit with friends and family, and enjoy the fruits (literally!) of your labor.
Now, it’s your turn! We encourage you to give this DIY trick a try and share your experience with us. Let us know what worked for you, what challenges you encountered, and any tips or tricks you discovered along the way. Your feedback will help other gardeners succeed and contribute to a thriving community of dragon fruit enthusiasts. Share your photos and stories on social media using #DragonFruitDIY and let’s grow together!
Frequently Asked Questions (FAQ)
1. What is the best time of year to propagate dragon fruit branches?
The ideal time to propagate dragon fruit branches is during the warmer months, typically spring or early summer. This is when the plant is actively growing and has the best chance of developing roots quickly. The warmer temperatures and longer daylight hours provide the optimal conditions for successful propagation. However, if you live in a climate with consistently warm temperatures year-round, you can propagate dragon fruit branches at any time. Just be sure to provide adequate warmth and light to your cuttings.
2. How long does it take for dragon fruit cuttings to root?
The time it takes for dragon fruit cuttings to root can vary depending on several factors, including the size of the cutting, the temperature, and the humidity. Generally, you can expect to see roots developing within 2-4 weeks. However, it may take longer in cooler conditions or if the cutting is particularly large. Be patient and continue to provide consistent moisture and warmth. You can gently tug on the cutting after a few weeks to check for resistance, which indicates root development.
3. What kind of soil is best for rooting dragon fruit cuttings?
Dragon fruit cuttings thrive in well-draining soil. A mix of potting soil, perlite, and coarse sand is ideal. This combination provides good drainage, aeration, and moisture retention. Avoid using heavy clay soils, as they can become waterlogged and lead to root rot. You can also use a cactus or succulent potting mix, as these are specifically formulated for plants that prefer well-draining conditions. Ensure the container you use has drainage holes to prevent water from accumulating at the bottom.
4. How often should I water dragon fruit cuttings?
Water your dragon fruit cuttings regularly, but avoid overwatering. The soil should be consistently moist, but not soggy. Check the moisture level of the soil by sticking your finger into the top inch. If it feels dry, it’s time to water. Water thoroughly until the water drains out of the bottom of the container. During warmer months, you may need to water more frequently. In cooler months, reduce watering to prevent root rot.
5. How much sunlight do dragon fruit cuttings need?
Dragon fruit cuttings need bright, indirect sunlight. Avoid placing them in direct sunlight, as this can scorch the leaves. A location near a window that receives morning sun or filtered afternoon sun is ideal. If you don’t have access to natural light, you can use a grow light to provide supplemental lighting. Ensure the grow light is positioned at the appropriate distance from the cuttings to prevent them from overheating.
6. Can I use rooting hormone to propagate dragon fruit branches?
Yes, using rooting hormone can significantly increase the success rate of dragon fruit propagation. Rooting hormone contains auxins, which are plant hormones that stimulate root development. Simply dip the cut end of the dragon fruit branch into the rooting hormone powder or liquid before planting it in the rooting medium. This will encourage faster and more robust root growth. Follow the instructions on the rooting hormone packaging for best results.
7. What are some common problems I might encounter when propagating dragon fruit branches?
Some common problems you might encounter when propagating dragon fruit branches include root rot, fungal infections, and pest infestations. Root rot is caused by overwatering and poor drainage. To prevent root rot, use well-draining soil and avoid overwatering. Fungal infections can occur in humid conditions. To prevent fungal infections, ensure good air circulation around the cuttings and avoid overcrowding. Pest infestations, such as mealybugs or aphids, can damage the cuttings. Inspect your cuttings regularly for pests and treat them with an appropriate insecticide if necessary.
8. How do I know when my dragon fruit cutting is ready to be transplanted?
You’ll know your dragon fruit cutting is ready to be transplanted when it has developed a strong root system. This typically takes several weeks. You should see roots emerging from the drainage holes of the container. Gently tug on the cutting to check for resistance. If it feels firmly rooted, it’s ready to be transplanted into a larger pot or directly into the ground.
9. What size pot should I use when transplanting my dragon fruit cutting?
When transplanting your dragon fruit cutting, choose a pot that is slightly larger than the current container. A pot that is too large can lead to overwatering and root rot. A pot that is too small will restrict root growth. A pot that is 6-8 inches in diameter is a good starting point. As the plant grows, you can gradually transplant it into larger pots.
10. Can I grow dragon fruit from seed?
While it is possible to grow dragon fruit from seed, it is a much slower and less reliable method than propagating from cuttings. Dragon fruit seeds can take several weeks to germinate, and the resulting plants may not be true to type, meaning they may not produce fruit that is identical to the parent plant. Propagating from cuttings ensures that you are getting a plant that is genetically identical to the parent plant and will produce the same type of fruit.
Leave a Comment