
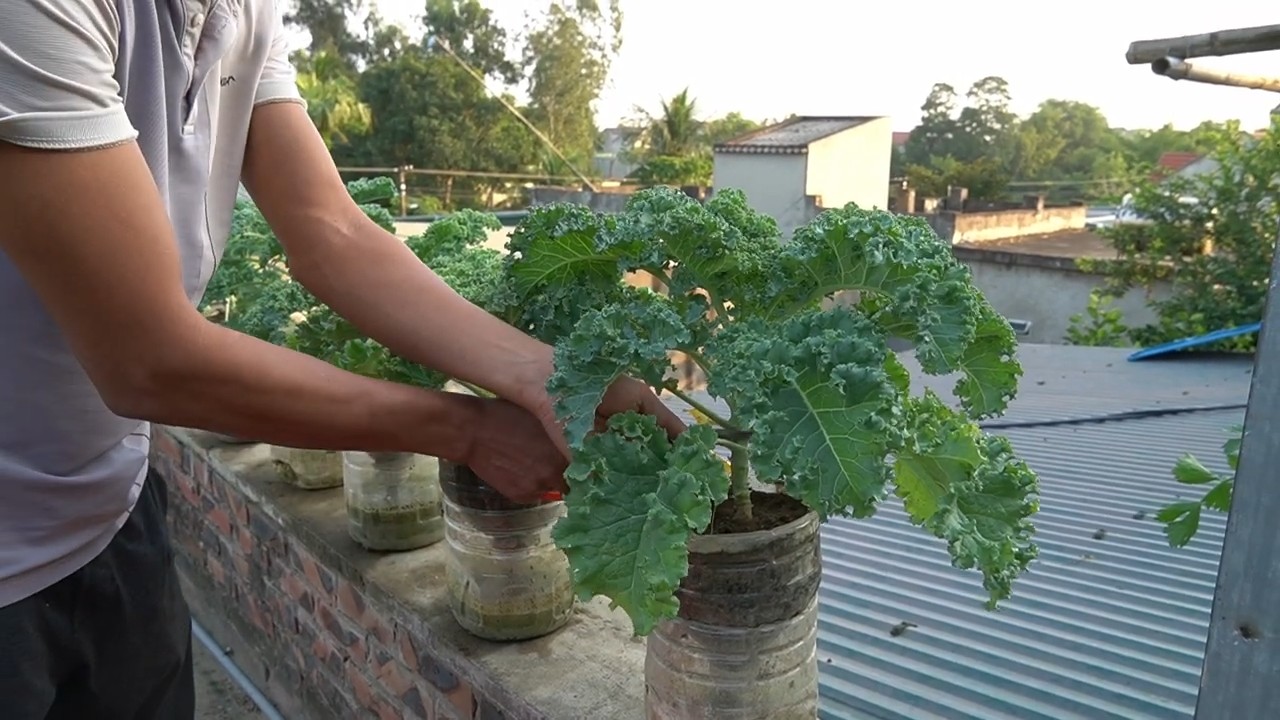
Growing Kale in Bottles: Sounds a little unconventional, right? But trust me, this DIY gardening trick is about to revolutionize your small-space gardening game! Forget sprawling gardens and endless rows; we’re taking kale cultivation vertical and compact.
Humans have been finding creative ways to cultivate food for centuries. From the hanging gardens of Babylon to the ingenious terrace farming of the Incas, resourcefulness has always been key. While I can’t claim this bottle-growing method is quite as historically significant, it definitely taps into that same spirit of innovation and making the most of what you have.
So, why should you bother growing kale in bottles? Well, think about it: limited space, limited resources, and a craving for fresh, healthy greens. Whether you live in an apartment with a tiny balcony, want to add a unique touch to your patio, or simply want to experiment with a fun and sustainable gardening project, this DIY hack is for you. Plus, it’s a fantastic way to recycle those plastic bottles that might otherwise end up in a landfill. I’m excited to show you how easy and rewarding it can be to have a thriving kale garden, even in the most unexpected of containers!
Kohl in Flaschen ziehen: Ein DIY-Gartenprojekt für kleine Räume
Hallo Gartenfreunde! Habt ihr auch nur einen kleinen Balkon oder gar keinen Garten, wollt aber trotzdem frischen Kohl ernten? Dann habe ich hier genau das Richtige für euch: Kohl in Flaschen ziehen! Klingt verrückt? Ist es vielleicht ein bisschen, aber es funktioniert super und ist ein echter Hingucker. Ich zeige euch, wie ihr aus alten Plastikflaschen kleine Kohl-Oasen zaubern könnt. Los geht’s!
Was ihr braucht:
* Plastikflaschen: Am besten eignen sich große PET-Flaschen (1,5 Liter oder größer). Achtet darauf, dass sie sauber und unbeschädigt sind.
* Kohlsetzlinge: Ihr könnt entweder fertige Setzlinge im Gartencenter kaufen oder Kohl selbst aus Samen ziehen. Ich empfehle Grünkohl, Palmkohl oder Rosenkohl, da diese Sorten gut in Flaschen wachsen.
* Erde: Verwendet am besten hochwertige Gemüseerde oder eine Mischung aus Blumenerde und Kompost.
* Schere oder Messer: Zum Zuschneiden der Flaschen.
* Bohrmaschine oder Nagel: Zum Anbringen von Drainagelöchern.
* Gießkanne oder Sprühflasche: Zum Bewässern der Pflanzen.
* Optional: Kordel oder Draht zum Aufhängen der Flaschen.
* Optional: Dünger (organisch oder mineralisch) für die Nährstoffversorgung.
* Optional: Handschuhe, um eure Hände sauber zu halten.
Vorbereitung der Flaschen:
1. Reinigung: Zuerst müsst ihr die Plastikflaschen gründlich reinigen. Entfernt alle Etiketten und spült die Flaschen mit warmem Wasser und Spülmittel aus. Achtet darauf, dass keine Spülmittelreste zurückbleiben.
2. Zuschneiden: Jetzt kommt der spaßige Teil! Mit einer Schere oder einem Messer schneidet ihr die Flaschen auf. Es gibt verschiedene Möglichkeiten, wie ihr das machen könnt:
* Variante 1: Schneidet die Flasche horizontal in der Mitte durch. Der obere Teil wird später umgedreht und in den unteren Teil gesteckt, sodass ein Mini-Gewächshaus entsteht.
* Variante 2: Schneidet ein großes Loch in die Seite der Flasche. Die Größe des Lochs sollte ausreichend sein, damit die Kohlpflanze genügend Platz zum Wachsen hat.
* Variante 3: Schneidet den Flaschenhals ab und hängt die Flasche kopfüber auf. Diese Variante eignet sich besonders gut für kleine Balkone, da sie platzsparend ist.
Ich persönlich bevorzuge Variante 2, da sie am einfachsten umzusetzen ist und den Pflanzen viel Platz bietet. Achtet beim Schneiden darauf, dass die Kanten nicht zu scharf sind, damit ihr euch nicht verletzt.
3. Drainagelöcher: Damit das Wasser gut ablaufen kann und keine Staunässe entsteht, müsst ihr Drainagelöcher in den Boden der Flaschen bohren. Verwendet dafür eine Bohrmaschine oder einen Nagel. Macht etwa 3-4 Löcher pro Flasche.
4. Optional: Aufhängung: Wenn ihr die Flaschen aufhängen möchtet, bohrt ihr jetzt noch Löcher für die Aufhängung. Macht zwei Löcher gegenüberliegend am oberen Rand der Flasche und zieht eine Kordel oder einen Draht hindurch.
Einpflanzen der Kohlsetzlinge:
1. Erde einfüllen: Füllt die vorbereiteten Flaschen mit Erde. Lasst etwa 2-3 cm Platz bis zum Rand. Drückt die Erde leicht an.
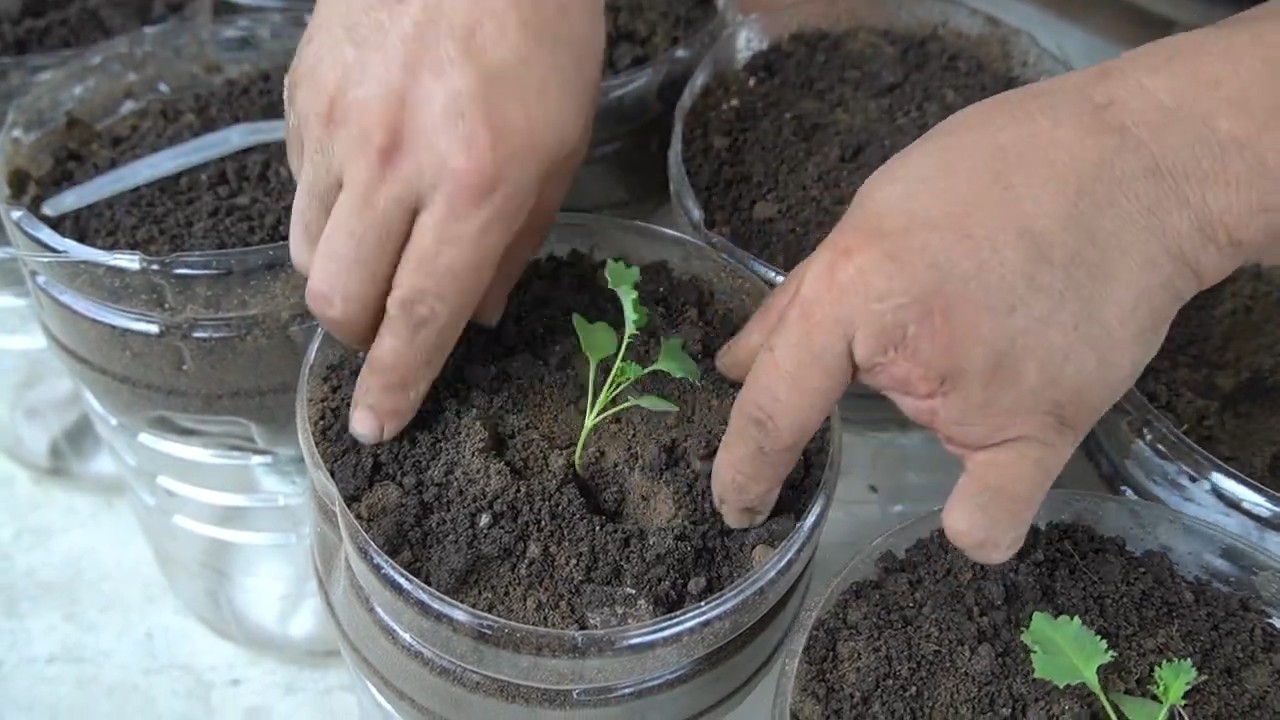
2. Pflanzlöcher vorbereiten: Macht mit den Fingern kleine Löcher in die Erde, die groß genug sind, um die Kohlsetzlinge aufzunehmen.
3. Setzlinge einsetzen: Nehmt die Kohlsetzlinge vorsichtig aus ihren Töpfen und setzt sie in die Pflanzlöcher. Achtet darauf, dass die Wurzeln nicht beschädigt werden. Füllt die Löcher mit Erde auf und drückt sie leicht an.
4. Angießen: Gießt die Kohlsetzlinge nach dem Einpflanzen gründlich an. Verwendet dafür eine Gießkanne oder eine Sprühflasche. Achtet darauf, dass die Erde gut durchfeuchtet ist.
Pflege der Kohlpflanzen:
1. Standort: Kohl braucht viel Sonne, um gut zu wachsen. Stellt die Flaschen an einen sonnigen Standort, z.B. auf einen Balkon, eine Terrasse oder an ein Fensterbrett.
2. Bewässerung: Gießt die Kohlpflanzen regelmäßig, besonders an heißen Tagen. Die Erde sollte immer leicht feucht sein, aber nicht nass. Vermeidet Staunässe.
3. Düngung: Kohl ist ein Starkzehrer und braucht viele Nährstoffe. Düngt die Pflanzen regelmäßig mit einem organischen oder mineralischen Dünger. Ich verwende am liebsten organischen Gemüsedünger, da er die Pflanzen schonend mit Nährstoffen versorgt.
4. Schutz vor Schädlingen: Kohl kann von verschiedenen Schädlingen befallen werden, z.B. von Kohlweißlingen, Blattläusen oder Erdflöhen. Kontrolliert die Pflanzen regelmäßig auf Schädlinge und bekämpft sie gegebenenfalls mit natürlichen Mitteln, z.B. mit Brennnesseljauche oder Neemöl.
5. Ausgeizen: Bei einigen Kohlsorten, wie z.B. Rosenkohl, ist es wichtig, die Seitentriebe (Geiztriebe) regelmäßig auszugeizen. Dadurch wird die Bildung von Rosenkohl gefördert.
Ernte:
Je nach Kohlsorte könnt ihr nach etwa 2-3 Monaten mit der Ernte beginnen. Grünkohl und Palmkohl können laufend geerntet werden, indem man die äußeren Blätter abzupft. Rosenkohl ist erntereif, wenn die Röschen fest und geschlossen sind.
Zusätzliche Tipps:
* Sortenwahl: Wählt Kohlsorten, die für den Anbau in Töpfen geeignet sind. Grünkohl, Palmkohl, Rosenkohl und Zwergkohl sind gute Optionen.
* Frühzeitige Aussaat: Wenn ihr Kohl selbst aus Samen ziehen möchtet, solltet ihr frühzeitig im Frühjahr mit der Aussaat beginnen.
* Umpflanzen: Wenn die Setzlinge zu groß für ihre Anzuchttöpfe geworden sind, müsst ihr sie in größere Töpfe oder direkt in die Flaschen umpflanzen.
* Mulchen: Mulcht die Erde um die Kohlpflanzen mit Stroh oder Rasenschnitt. Das hält die Erde feucht und unterdrückt Unkraut.
* Kombination mit anderen Pflanzen: Kohl verträgt sich gut mit anderen Pflanzen, z.B. mit Ringelblumen, Kapuzinerkresse oder Salbei. Diese Pflanzen können Schädlinge abwehren und das Wachstum des Kohls fördern.
* Winterharte Sorten: Einige Kohlsorten, wie z.B. Grünkohl, sind winterhart und können auch im Winter im Freien bleiben.
Fazit:
Kohl in Flaschen ziehen ist ein einfaches und lohnendes DIY-Projekt, das auch auf kleinstem Raum möglich ist. Mit ein wenig Geduld und Pflege könnt ihr schon bald frischen Kohl aus eigener Ernte genießen. Probiert es aus und lasst euch von dem Ergebnis überraschen! Ich wünsche euch viel Erfolg beim Gärtnern!
Conclusion
So, there you have it! Growing kale in bottles isn’t just a quirky gardening experiment; it’s a genuinely effective and rewarding way to cultivate fresh, nutritious greens, even if you’re short on space or dealing with less-than-ideal soil conditions. This method transforms discarded plastic into a thriving mini-garden, reducing waste and providing you with a constant supply of delicious, homegrown kale.
The beauty of this DIY trick lies in its simplicity and adaptability. You don’t need to be a seasoned gardener to succeed. The controlled environment within the bottle helps protect your kale from pests and harsh weather, giving it a significant advantage over traditional garden planting. Plus, the vertical nature of bottle gardening maximizes sunlight exposure, leading to healthier and more productive plants.
But the benefits extend beyond mere practicality. Growing kale in bottles is also incredibly satisfying. Watching your tiny seedlings sprout and flourish within their recycled containers is a testament to your resourcefulness and gardening skills. It’s a fantastic project for families, teaching children about sustainability, plant life cycles, and the importance of healthy eating.
Don’t be afraid to experiment with different varieties of kale. Curly kale, Lacinato kale (also known as dinosaur kale), and Red Russian kale all thrive in bottle gardens. You can also try adding companion plants like marigolds or basil to your bottles to deter pests and enhance the flavor of your kale. Consider using different colored bottles for a visually appealing display. A splash of paint can also transform your bottle garden into a work of art.
Ready to give it a try? We wholeheartedly encourage you to embark on this exciting gardening adventure. Gather your bottles, prepare your soil, and sow your kale seeds. You’ll be amazed at how easy and rewarding it is to grow your own fresh greens.
And most importantly, we want to hear about your experience! Share your photos, tips, and challenges in the comments below. Let’s create a community of bottle-gardening enthusiasts and inspire others to embrace this sustainable and delicious way to grow kale. Your insights could help someone else discover the joy of homegrown produce and the satisfaction of transforming waste into something beautiful and useful. Let’s all work together to make growing kale in bottles a common practice.
Frequently Asked Questions (FAQs)
What type of bottles are best for growing kale?
Ideally, you should use clear or translucent plastic bottles that are at least 2 liters in size. Larger bottles provide more room for the kale roots to grow. Avoid using bottles that have contained harmful chemicals or pesticides. Thoroughly clean the bottles with soap and water before using them. Darker bottles can also be used, but they may absorb more heat, so monitor the soil temperature closely, especially in warmer climates. Consider painting the outside of darker bottles white to reflect sunlight.
What kind of soil should I use for growing kale in bottles?
A well-draining potting mix is essential. You can purchase a pre-made potting mix or create your own by combining equal parts of compost, perlite, and peat moss (or coconut coir). The compost provides nutrients, the perlite improves drainage, and the peat moss (or coconut coir) helps retain moisture. Avoid using garden soil, as it can be too heavy and may contain pests or diseases.
How often should I water my kale plants in bottles?
Water your kale plants when the top inch of soil feels dry to the touch. The frequency of watering will depend on the weather conditions and the size of the bottle. In hot, sunny weather, you may need to water daily. In cooler, cloudy weather, you may only need to water every few days. Be careful not to overwater, as this can lead to root rot. Ensure the bottles have adequate drainage holes to prevent water from accumulating at the bottom.
How much sunlight does kale need when grown in bottles?
Kale needs at least 6 hours of sunlight per day to thrive. Place your bottle garden in a sunny location, such as a south-facing window or balcony. If you don’t have access to enough natural sunlight, you can supplement with grow lights. Rotate the bottles regularly to ensure that all sides of the plants receive adequate sunlight.
How do I fertilize my kale plants in bottles?
Kale is a heavy feeder, so it’s important to fertilize regularly. You can use a liquid fertilizer diluted to half strength every two weeks. Alternatively, you can add slow-release fertilizer granules to the soil when you plant your kale seedlings. Look for a fertilizer that is high in nitrogen, which promotes leafy growth. Organic options like compost tea or fish emulsion are also excellent choices.
How do I protect my kale plants from pests and diseases in bottles?
The enclosed environment of a bottle garden can help protect your kale from some pests, but it’s still important to be vigilant. Check your plants regularly for signs of aphids, cabbage worms, or other pests. You can remove pests by hand or spray your plants with insecticidal soap or neem oil. To prevent fungal diseases, ensure good air circulation around your plants and avoid overwatering.
When is the best time to harvest kale from my bottle garden?
You can start harvesting kale leaves when they are about 4-6 inches long. Harvest the outer leaves first, leaving the inner leaves to continue growing. This will encourage the plant to produce more leaves. Avoid harvesting more than one-third of the plant at a time.
Can I grow kale in bottles indoors during the winter?
Yes, you can grow kale in bottles indoors during the winter, provided you have enough light. Place your bottle garden near a sunny window or use grow lights to supplement natural light. Maintain a consistent temperature and humidity level.
How long will my kale plants last in bottles?
With proper care, your kale plants can last for several months in bottles. However, they may eventually become root-bound or exhaust the nutrients in the soil. When this happens, you can transplant them to a larger container or replace them with new seedlings.
Can I reuse the bottles for growing kale again?
Yes, you can reuse the bottles for growing kale again. Thoroughly clean the bottles with soap and water before reusing them. You may also want to sterilize them with a diluted bleach solution to prevent the spread of diseases. Replace the soil with fresh potting mix each time you replant.
Leave a Comment