
Waterless lettuce hanging garden – sounds like something out of a sci-fi movie, right? But trust me, it’s a totally achievable and incredibly rewarding DIY project that even the most novice gardener can tackle! Forget lugging around watering cans and battling soggy soil; we’re about to revolutionize your lettuce-growing game.
Hanging gardens, in general, have a rich history, evoking images of the legendary Hanging Gardens of Babylon, one of the Seven Wonders of the Ancient World. While our waterless lettuce version might not be quite as grand, it taps into that same spirit of ingenuity and resourcefulness. For centuries, people have sought creative ways to cultivate plants in limited spaces, and this modern twist is perfect for urban dwellers, apartment residents, or anyone looking to maximize their gardening potential.
Why do you need this DIY trick? Well, let’s face it: traditional gardening can be time-consuming and messy. Plus, overwatering is a common mistake that leads to root rot and unhappy plants. A waterless lettuce hanging garden eliminates these problems by utilizing moisture-retentive materials and a self-regulating system. Imagine fresh, crisp lettuce readily available just outside your door, without the daily watering chore. It’s a game-changer for busy individuals and a fantastic way to reduce water waste. So, let’s dive in and create your own little slice of edible paradise!
DIY Hängender Salatgarten ohne Gießen: So geht’s!
Hallo ihr Lieben! Habt ihr auch so wenig Platz im Garten oder Balkon, aber trotzdem Lust auf frischen Salat? Dann habe ich die perfekte Lösung für euch: einen hängenden Salatgarten, der fast ohne Gießen auskommt! Klingt verrückt? Ist es aber nicht! Ich zeige euch, wie ihr das ganz einfach selber bauen könnt. Das ist nicht nur platzsparend, sondern sieht auch noch super aus und ist ein echter Hingucker. Los geht’s!
Was ihr für euren hängenden Salatgarten braucht:
* Hängeampeln: Am besten eignen sich Ampeln aus Plastik oder Metall mit einem Durchmesser von mindestens 25 cm. Je größer, desto besser! Ich habe 3 Stück verwendet, aber ihr könnt natürlich so viele nehmen, wie ihr Platz habt.
* Kokosfaser-Einsätze: Diese Einsätze passen in die Hängeampeln und speichern das Wasser. Sie sind super wichtig, damit der Salat nicht so schnell austrocknet.
* Blumenerde: Gute, nährstoffreiche Blumenerde ist das A und O für einen gesunden Salat.
* Tongranulat oder Blähton: Das kommt unten in die Ampel und sorgt für eine gute Drainage. So vermeidet ihr Staunässe.
* Salatpflanzen: Hier könnt ihr euch austoben! Ich habe Pflücksalat, Romanasalat und Feldsalat verwendet. Aber auch andere Salatsorten wie Eisbergsalat oder Bataviasalat funktionieren super.
* Schere oder Messer: Zum Zuschneiden der Kokosfaser-Einsätze.
* Gießkanne: Zum Angießen der Pflanzen.
* Handschuhe: Damit eure Hände sauber bleiben.
* Optional: Eine Sprühflasche mit Wasser, um die Salatblätter ab und zu zu befeuchten.
Schritt-für-Schritt-Anleitung:
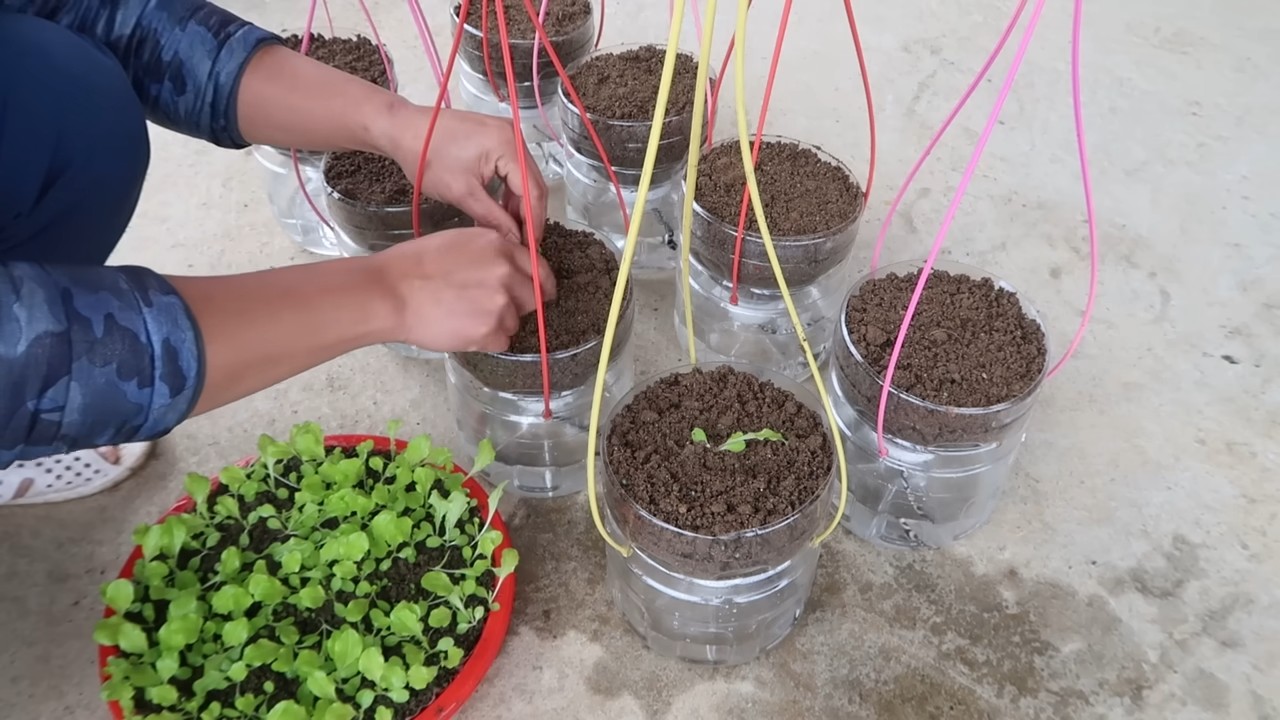
1. Vorbereitung der Hängeampeln:
* Nehmt eure Hängeampeln und schaut, ob die Kokosfaser-Einsätze gut passen. Manchmal sind sie etwas zu groß und müssen mit einer Schere oder einem Messer angepasst werden. Schneidet sie so zu, dass sie bündig mit dem Rand der Ampel abschließen.
* Legt eine Schicht Tongranulat oder Blähton auf den Boden der Ampel. Das sorgt für eine gute Drainage und verhindert, dass die Wurzeln im Wasser stehen. Ich habe etwa 5 cm hoch Tongranulat eingefüllt.
2. Befüllen mit Erde:
* Füllt die Ampel mit Blumenerde. Lasst oben etwa 5 cm Platz, damit ihr die Salatpflanzen gut einsetzen könnt. Drückt die Erde leicht an.
* Achtet darauf, dass die Erde locker und luftig ist. Wenn sie zu fest ist, können die Wurzeln nicht gut wachsen.
3. Einsetzen der Salatpflanzen:
* Nehmt eure Salatpflanzen aus den Töpfen und lockert die Wurzeln etwas auf. Das hilft den Pflanzen, sich besser in der neuen Erde zu verwurzeln.
* Macht kleine Löcher in die Erde und setzt die Salatpflanzen hinein. Achtet darauf, dass die Pflanzen nicht zu tief sitzen. Die Oberkante des Wurzelballens sollte mit der Erdoberfläche abschließen.
* Pflanzt die Salatpflanzen nicht zu dicht nebeneinander. Sie brauchen Platz zum Wachsen. Ich habe in jede Ampel etwa 3-4 Salatpflanzen gesetzt.
4. Angießen:
* Gießt die Salatpflanzen vorsichtig an. Verwendet dafür am besten eine Gießkanne mit einem feinen Brausekopf, damit die Erde nicht weggespült wird.
* Gießt so lange, bis die Erde gut durchfeuchtet ist. Aber Achtung: Vermeidet Staunässe!
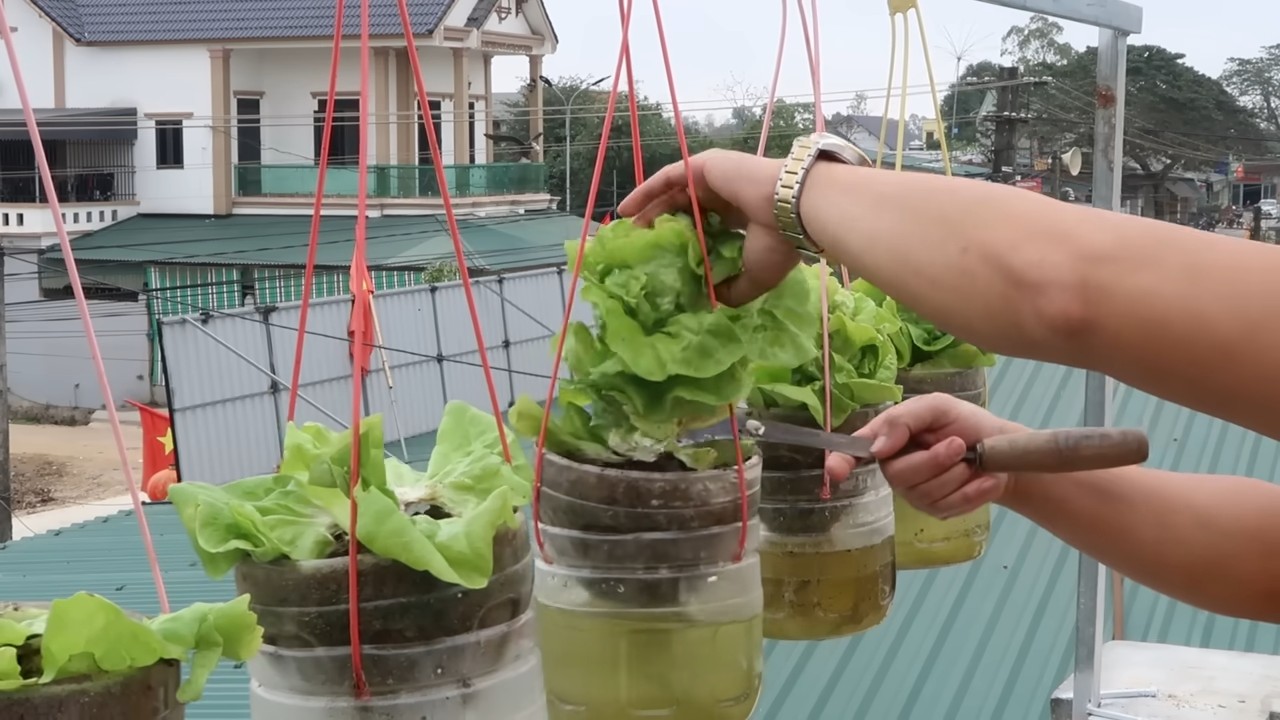
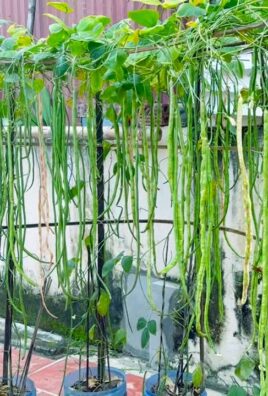
5. Aufhängen der Hängeampeln:
* Sucht euch einen sonnigen Platz für euren hängenden Salatgarten. Der Salat braucht mindestens 6 Stunden Sonne am Tag.
* Hängt die Ampeln an einem stabilen Haken oder einer Stange auf. Achtet darauf, dass die Ampeln nicht zu dicht nebeneinander hängen, damit die Pflanzen genügend Licht bekommen.
* Ich habe meine Ampeln an einem alten Ast aufgehängt, den ich im Wald gefunden habe. Das sieht super natürlich aus!
Pflege eures hängenden Salatgartens:
* Gießen: Da wir Kokosfaser-Einsätze verwenden, müsst ihr nicht so oft gießen. Die Kokosfaser speichert das Wasser und gibt es langsam an die Pflanzen ab. Fühlt einfach regelmäßig, ob die Erde noch feucht ist. Wenn sie sich trocken anfühlt, gießt ihr nach.
* Düngen: Salat ist ein Starkzehrer und braucht regelmäßig Nährstoffe. Düngt euren Salatgarten alle 2-3 Wochen mit einem organischen Flüssigdünger. Ich verwende am liebsten Brennnesseljauche, die ich selber herstelle.
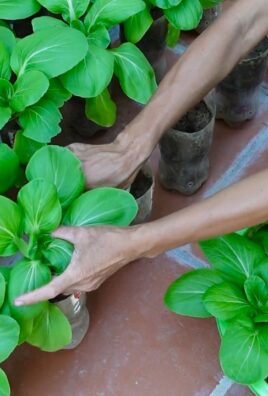
* Ernten: Pflücksalat könnt ihr schon nach wenigen Wochen ernten. Schneidet einfach die äußeren Blätter ab. Die inneren Blätter wachsen dann nach. Bei anderen Salatsorten müsst ihr warten, bis sie ausgewachsen sind.
* Schädlinge: Achtet auf Schädlinge wie Schnecken oder Blattläuse. Bei einem Befall könnt ihr die Schädlinge absammeln oder mit einem biologischen Schädlingsbekämpfungsmittel behandeln.
* Sonnenschutz: An sehr heißen Tagen kann es sinnvoll sein, den Salatgarten etwas zu beschatten, damit die Blätter nicht verbrennen.
Zusätzliche Tipps und Tricks:
* Verschiedene Salatsorten: Mischt verschiedene Salatsorten in euren Hängeampeln. Das sieht nicht nur schön aus, sondern sorgt auch für eine abwechslungsreiche Ernte.
* Kräuter: Ihr könnt auch Kräuter wie Petersilie, Schnittlauch oder Basilikum in euren Salatgarten pflanzen. Das passt super zum Salat und sorgt für noch mehr Geschmack.
* Mulchen: Mulcht die Erde mit Stroh oder Rasenschnitt. Das hält die Feuchtigkeit im Boden und verhindert, dass Unkraut wächst.
* Regelmäßiges Ausputzen: Entfernt regelmäßig welke oder gelbe Blätter. Das fördert das Wachstum der Pflanzen und verhindert Krankheiten.
* Bewässerungssystem: Wenn ihr noch weniger gießen wollt, könnt ihr ein automatisches Bewässerungssystem installieren. Es gibt spezielle Bewässerungssysteme für Hängeampeln, die sehr einfach zu installieren sind.
Warum ein hängender Salatgarten ohne Gießen so toll ist:
* Platzsparend: Ideal für kleine Balkone oder Gärten.
* Weniger Gießen: Die Kokosfaser-Einsätze speichern das Wasser und geben es langsam an die Pflanzen ab.
* Schädlingsschutz: Durch das Aufhängen sind die Pflanzen weniger anfällig für Schnecken und andere Schädlinge.
* Dekorativ: Ein hängender Salatgarten ist ein echter Hingucker und verschönert jeden Balkon oder Garten.
* Frischer Salat: Ihr habt immer frischen Salat zur Hand, ohne ihn im Supermarkt kaufen zu müssen.
* Nachhaltig: Ihr spart Verpackungsmüll und unterstützt den Anbau von regionalen Lebensmitteln.
Ich hoffe, diese Anleitung hat euch gefallen und ihr habt Lust bekommen, euren eigenen hängenden Salatgarten zu bauen. Es ist wirklich kinderleicht und macht super viel Spaß! Wenn ihr Fragen habt, könnt ihr mir gerne einen Kommentar hinterlassen. Viel Erfolg und guten Appetit!
Conclusion
So, there you have it! Creating your own waterless lettuce hanging garden is not just a fun project; it’s a game-changer for anyone looking to enjoy fresh, homegrown lettuce without the hassle of traditional gardening. We’ve walked you through the simple steps, highlighting how easy it is to repurpose materials and create a thriving green space, even in the smallest of apartments or balconies.
But why is this DIY trick a must-try? Let’s recap. First and foremost, it’s incredibly space-efficient. Forget sprawling garden beds; this vertical system allows you to maximize your yield in a minimal footprint. Second, it’s water-wise. By eliminating the need for constant watering, you’re conserving precious resources and reducing your environmental impact. Third, it’s cost-effective. The materials are readily available and often free, making this a budget-friendly way to grow your own food. Finally, and perhaps most importantly, it’s incredibly rewarding. There’s nothing quite like harvesting your own fresh lettuce and knowing that you grew it yourself.
Now, let’s talk variations. Feel free to experiment with different types of containers. Plastic bottles, old buckets, even repurposed fabric planters can all work beautifully. Consider adding other leafy greens to your hanging garden, such as spinach, kale, or arugula. You can also adjust the spacing between plants to optimize growth and airflow. For those living in colder climates, consider bringing your hanging garden indoors during the winter months and supplementing with grow lights. You can also add a small amount of slow-release fertilizer to the soil mix to provide your lettuce with the nutrients it needs to thrive.
Don’t be afraid to get creative and personalize your waterless lettuce hanging garden to suit your own needs and preferences. The possibilities are endless!
We truly believe that this DIY project is accessible to everyone, regardless of their gardening experience. It’s a simple, sustainable, and satisfying way to enjoy fresh, homegrown lettuce all year round.
So, what are you waiting for? Gather your materials, follow our instructions, and get ready to create your own thriving waterless lettuce hanging garden. We’re confident that you’ll be amazed by the results.
And most importantly, we want to hear about your experience! Share your photos, tips, and tricks with us in the comments below. Let us know what worked for you, what challenges you faced, and any creative variations you came up with. Together, we can inspire others to embrace sustainable gardening and enjoy the delicious rewards of growing their own food. Let’s cultivate a community of thriving waterless lettuce hanging gardens!
Frequently Asked Questions (FAQ)
What exactly does “waterless” mean in this context? Does it mean I never water the lettuce?
No, “waterless” doesn’t mean you never water the lettuce. It refers to the system’s design, which minimizes water loss and reduces the frequency of watering compared to traditional gardening. The soil mix retains moisture effectively, and the hanging structure allows for good drainage, preventing waterlogging. You will still need to water your lettuce, but less frequently. Check the soil moisture regularly by sticking your finger about an inch into the soil. If it feels dry, it’s time to water.
What type of soil mix is best for a waterless lettuce hanging garden?
A well-draining soil mix is crucial. We recommend a combination of potting soil, perlite, and vermiculite. The potting soil provides nutrients, while the perlite and vermiculite improve drainage and aeration. A good ratio is 2 parts potting soil, 1 part perlite, and 1 part vermiculite. You can also add a small amount of compost to enrich the soil further. Avoid using heavy garden soil, as it can compact and impede drainage.
How often do I need to water my waterless lettuce hanging garden?
The frequency of watering depends on several factors, including the climate, the type of container you’re using, and the size of your lettuce plants. As a general rule, check the soil moisture every few days. If the top inch of soil feels dry, it’s time to water. Water thoroughly until water drains out of the bottom of the container. Avoid overwatering, as this can lead to root rot. During hot, dry weather, you may need to water more frequently.
What kind of lettuce varieties are best suited for a hanging garden?
Loose-leaf lettuce varieties, such as Romaine, Butterhead, and Oakleaf, are generally well-suited for hanging gardens. They tend to be more compact and easier to harvest than head lettuce varieties. You can also try growing mesclun mixes, which offer a variety of flavors and textures. Experiment with different varieties to see what grows best in your specific environment.
How much sunlight does my waterless lettuce hanging garden need?
Lettuce needs at least 4-6 hours of sunlight per day. If you’re growing your hanging garden outdoors, choose a location that receives ample sunlight. If you’re growing it indoors, you may need to supplement with grow lights. Position the grow lights about 12-18 inches above the plants and keep them on for 12-14 hours per day.
How do I prevent pests and diseases in my waterless lettuce hanging garden?
Prevention is key when it comes to pests and diseases. Start by using healthy, disease-free seedlings. Inspect your plants regularly for signs of pests or diseases. If you spot any problems, address them promptly. You can use organic pest control methods, such as insecticidal soap or neem oil. Ensure good airflow around your plants to prevent fungal diseases. Avoid overwatering, as this can create a favorable environment for disease.
Can I grow other vegetables besides lettuce in my hanging garden?
Yes, you can grow other vegetables in your hanging garden, but choose varieties that are relatively compact and don’t require a lot of space. Good options include spinach, kale, arugula, herbs (such as basil, parsley, and mint), and even strawberries. Be mindful of the specific needs of each plant, such as sunlight and watering requirements.
How do I harvest lettuce from my hanging garden?
Harvest lettuce by cutting the outer leaves as needed, leaving the inner leaves to continue growing. This allows you to enjoy a continuous harvest over several weeks. Avoid harvesting more than one-third of the plant at a time. You can also harvest the entire plant at once if you prefer.
How long will my waterless lettuce hanging garden last?
With proper care, your waterless lettuce hanging garden can last for several months. Lettuce is a cool-season crop, so it will thrive in spring and fall. During hot summer months, you may need to provide some shade to prevent the plants from bolting (going to seed). You can also start new seedlings every few weeks to ensure a continuous supply of fresh lettuce.
What if I don’t have a balcony or outdoor space? Can I still create a waterless lettuce hanging garden?
Absolutely! You can create a waterless lettuce hanging garden indoors. Hang your containers near a sunny window or use grow lights to provide adequate light. Make sure to choose a location that is well-ventilated and protected from drafts. With a little creativity, you can enjoy fresh, homegrown lettuce even in the smallest of apartments.
Leave a Comment