
Grow Peanuts in Foam Box: Ever dreamt of harvesting your own crunchy, delicious peanuts right from your backyard, or even your balcony? I know I have! Forget those sprawling peanut farms you see in movies; you can cultivate these tasty legumes in a surprisingly simple and space-saving way – using a foam box! This DIY project is not only incredibly rewarding, but it also offers a fantastic solution for urban gardeners or anyone with limited space.
Peanuts, originally from South America, have a rich history as a staple food and a symbol of prosperity in many cultures. For centuries, they’ve been cultivated for their nutritional value and unique flavor. Now, you can participate in this agricultural tradition, even without acres of land.
Why should you try growing peanuts in a foam box? Well, for starters, it’s a fantastic way to control the growing environment, ensuring optimal conditions for your peanut plants. Foam boxes provide excellent insulation, protecting the roots from extreme temperatures. Plus, it’s a budget-friendly and eco-conscious way to repurpose materials. Imagine the satisfaction of snacking on peanuts you nurtured from seed to harvest! This guide will walk you through every step, making it easy to grow peanuts in a foam box and enjoy the fruits (or rather, the nuts!) of your labor. Let’s get started!
Erdnüsse im Styroporbehälter anbauen: Dein DIY-Leitfaden für eine erfolgreiche Ernte
Hey Gartenfreunde! Habt ihr schon mal darüber nachgedacht, eure eigenen Erdnüsse anzubauen? Es ist einfacher als ihr denkt und macht unglaublich viel Spaß, besonders wenn ihr wenig Platz habt. In diesem Artikel zeige ich euch, wie ihr Erdnüsse in einem Styroporbehälter (auch bekannt als Schaumstoffbox) anbauen könnt. Das ist eine super Methode, um auch auf dem Balkon, der Terrasse oder in einem kleinen Garten eine reiche Ernte zu erzielen. Los geht’s!
Warum ein Styroporbehälter?
Bevor wir loslegen, kurz ein paar Worte, warum ich Styroporbehälter so mag:
* Isolierung: Styropor isoliert hervorragend. Das ist besonders wichtig für Erdnüsse, die eine konstante Bodentemperatur lieben.
* Leichtgewicht: Auch wenn der Behälter voll mit Erde ist, lässt er sich immer noch relativ leicht bewegen.
* Drainage: Mit ein paar Löchern im Boden sorgt ihr für eine gute Drainage, was Staunässe verhindert.
* Wiederverwendung: Styroporbehälter sind oft kostenlos (fragt mal in Supermärkten oder Fischgeschäften nach) und leisten einen Beitrag zur Wiederverwertung.
Was du brauchst: Die Materialliste
Hier ist eine Liste aller Materialien, die du für dein Erdnussprojekt benötigst:
* Styroporbehälter: Am besten einen großen Behälter (mindestens 40x60x30 cm), damit die Erdnusspflanzen genug Platz haben.
* Erdnüsse: Rohe, ungesalzene Erdnüsse (am besten aus dem Bioladen oder Gartencenter). Geröstete Erdnüsse keimen nicht!
* Erde: Hochwertige Blumenerde oder eine Mischung aus Gartenerde, Kompost und Sand.
* Sand: Für eine bessere Drainage und Belüftung des Bodens.
* Kompost: Für eine gute Nährstoffversorgung.
* Bohrmaschine oder Schraubenzieher: Zum Bohren von Drainagelöchern.
* Gießkanne: Zum Bewässern der Pflanzen.
* Pflanzschilder: Zum Beschriften der Pflanzen (optional).
* Gartenschere: Zum Entfernen von abgestorbenen Blättern (optional).
* Handschuhe: Zum Schutz deiner Hände (optional).
Schritt-für-Schritt-Anleitung: So baust du Erdnüsse im Styroporbehälter an
Hier kommt die detaillierte Anleitung, damit bei deinem Erdnussprojekt nichts schiefgeht:
1. Drainagelöcher bohren:
* Nimm deine Bohrmaschine oder den Schraubenzieher und bohre mehrere Löcher in den Boden des Styroporbehälters. Die Löcher sollten etwa 1-2 cm groß sein und in einem Abstand von etwa 10-15 cm zueinander liegen. Das ist super wichtig, damit überschüssiges Wasser ablaufen kann und die Wurzeln nicht faulen.
2. Den Behälter vorbereiten:
* Fülle den Boden des Behälters mit einer Schicht Sand (ca. 5-10 cm). Das verbessert die Drainage zusätzlich.
* Mische dann die Erde mit Kompost (Verhältnis etwa 2:1). Das sorgt für eine gute Nährstoffversorgung der Erdnusspflanzen.
* Fülle den Behälter mit der Erdmischung, lasse aber etwa 5-10 cm Platz bis zum Rand.
3. Erdnüsse vorbereiten:
* Weiche die rohen Erdnüsse für etwa 24 Stunden in lauwarmem Wasser ein. Das hilft, die Keimung zu beschleunigen.
* Du kannst die Erdnüsse auch vorsichtig schälen, aber das ist nicht unbedingt notwendig. Wenn du sie schälst, achte darauf, die dünne Haut um die Erdnuss herum nicht zu beschädigen.
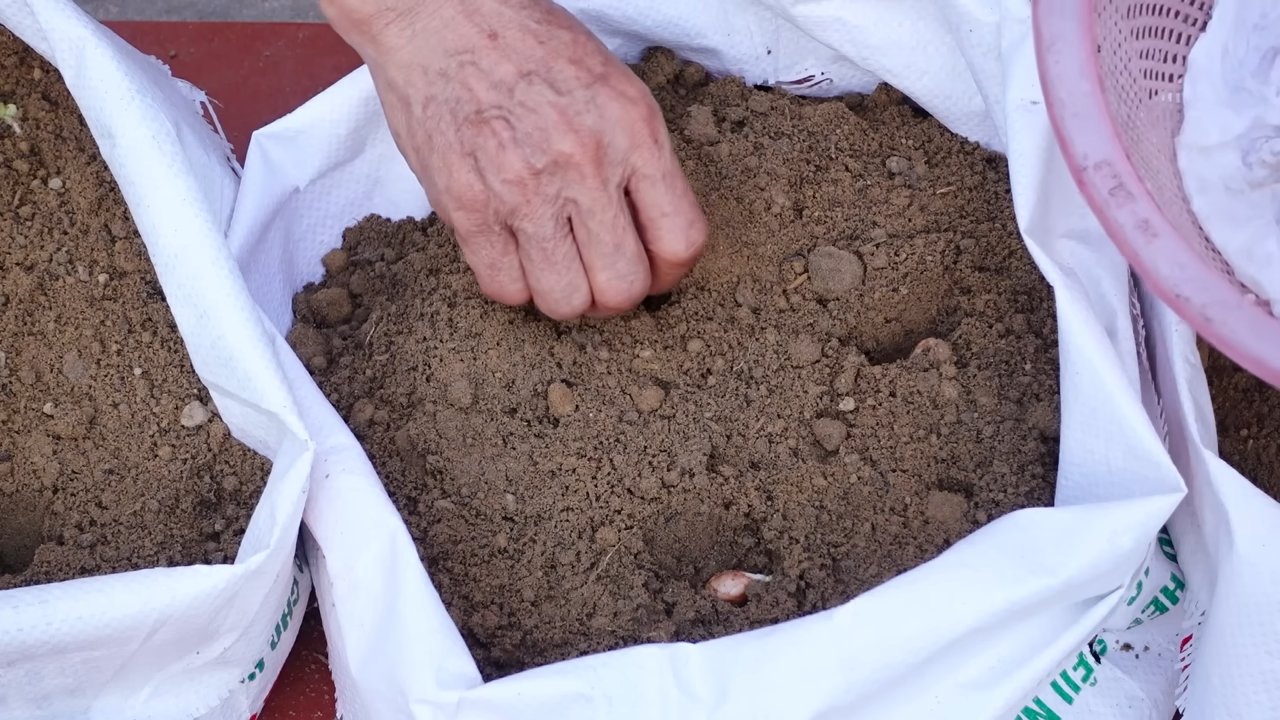
4. Erdnüsse pflanzen:
* Mache mit dem Finger oder einem kleinen Werkzeug kleine Löcher in die Erde (etwa 2-3 cm tief).
* Lege in jedes Loch eine Erdnuss.
* Bedecke die Erdnüsse mit Erde und drücke sie leicht an.
* Achte darauf, dass die Erdnüsse nicht zu dicht beieinander liegen. Ein Abstand von etwa 15-20 cm zwischen den Pflanzen ist ideal.
5. Bewässern:
* Gieße die Erde vorsichtig an, bis sie gut durchfeuchtet ist. Vermeide Staunässe!
6. Standort wählen:
* Stelle den Styroporbehälter an einen sonnigen und warmen Ort. Erdnüsse lieben die Sonne! Ein Standort mit mindestens 6-8 Stunden direkter Sonneneinstrahlung pro Tag ist ideal.
7. Pflege:
* Bewässerung: Halte die Erde feucht, aber nicht nass. Gieße regelmäßig, besonders an heißen Tagen.
* Düngung: Dünge die Erdnusspflanzen etwa alle 2-3 Wochen mit einem organischen Dünger.
* Unkraut entfernen: Entferne regelmäßig Unkraut, das im Behälter wächst.
* Häufeln: Wenn die Erdnusspflanzen etwa 15-20 cm hoch sind, häufle Erde um die Basis der Pflanzen an. Das fördert die Bildung von Erdnüssen.
8. Blütezeit:
* Nach etwa 4-6 Wochen beginnen die Erdnusspflanzen zu blühen. Die Blüten sind klein und gelb.
* Nach der Befruchtung biegen sich die Blütenstiele nach unten und bohren sich in die
Hey Gartenfreunde! Habt ihr schon mal darüber nachgedacht, eure eigenen Erdnüsse anzubauen? Es ist einfacher als ihr denkt und macht unglaublich viel Spaß, besonders wenn ihr wenig Platz habt. In diesem Artikel zeige ich euch, wie ihr Erdnüsse in einem Styroporbehälter (auch bekannt als Schaumstoffbox) anbauen könnt. Das ist eine super Methode, um auch auf dem Balkon, der Terrasse oder in einem kleinen Garten eine reiche Ernte zu erzielen. Los geht’s!
Warum ein Styroporbehälter?
Bevor wir loslegen, kurz ein paar Worte, warum ich Styroporbehälter so mag:
* Isolierung: Styropor isoliert hervorragend. Das ist besonders wichtig für Erdnüsse, die eine konstante Bodentemperatur lieben.
* Leichtgewicht: Auch wenn der Behälter voll mit Erde ist, lässt er sich immer noch relativ leicht bewegen.
* Drainage: Mit ein paar Löchern im Boden sorgt ihr für eine gute Drainage, was Staunässe verhindert.
* Wiederverwendung: Styroporbehälter sind oft kostenlos (fragt mal in Supermärkten oder Fischgeschäften nach) und leisten einen Beitrag zur Wiederverwertung.
Was du brauchst: Die Materialliste
Hier ist eine Liste aller Materialien, die du für dein Erdnussprojekt benötigst:
* Styroporbehälter: Am besten einen großen Behälter (mindestens 40x60x30 cm), damit die Erdnusspflanzen genug Platz haben.
* Erdnüsse: Rohe, ungesalzene Erdnüsse (am besten aus dem Bioladen oder Gartencenter). Geröstete Erdnüsse keimen nicht!
* Erde: Hochwertige Blumenerde oder eine Mischung aus Gartenerde, Kompost und Sand.
* Sand: Für eine bessere Drainage und Belüftung des Bodens.
* Kompost: Für eine gute Nährstoffversorgung.
* Bohrmaschine oder Schraubenzieher: Zum Bohren von Drainagelöchern.
* Gießkanne: Zum Bewässern der Pflanzen.
* Pflanzschilder: Zum Beschriften der Pflanzen (optional).
* Gartenschere: Zum Entfernen von abgestorbenen Blättern (optional).
* Handschuhe: Zum Schutz deiner Hände (optional).
Schritt-für-Schritt-Anleitung: So baust du Erdnüsse im Styroporbehälter an
Hier kommt die detaillierte Anleitung, damit bei deinem Erdnussprojekt nichts schiefgeht:
1. Drainagelöcher bohren:
* Nimm deine Bohrmaschine oder den Schraubenzieher und bohre mehrere Löcher in den Boden des Styroporbehälters. Die Löcher sollten etwa 1-2 cm groß sein und in einem Abstand von etwa 10-15 cm zueinander liegen. Das ist super wichtig, damit überschüssiges Wasser ablaufen kann und die Wurzeln nicht faulen.
2. Den Behälter vorbereiten:
* Fülle den Boden des Behälters mit einer Schicht Sand (ca. 5-10 cm). Das verbessert die Drainage zusätzlich.
* Mische dann die Erde mit Kompost (Verhältnis etwa 2:1). Das sorgt für eine gute Nährstoffversorgung der Erdnusspflanzen.
* Fülle den Behälter mit der Erdmischung, lasse aber etwa 5-10 cm Platz bis zum Rand.
3. Erdnüsse vorbereiten:
* Weiche die rohen Erdnüsse für etwa 24 Stunden in lauwarmem Wasser ein. Das hilft, die Keimung zu beschleunigen.
* Du kannst die Erdnüsse auch vorsichtig schälen, aber das ist nicht unbedingt notwendig. Wenn du sie schälst, achte darauf, die dünne Haut um die Erdnuss herum nicht zu beschädigen.
4. Erdnüsse pflanzen:
* Mache mit dem Finger oder einem kleinen Werkzeug kleine Löcher in die Erde (etwa 2-3 cm tief).
* Lege in jedes Loch eine Erdnuss.
* Bedecke die Erdnüsse mit Erde und drücke sie leicht an.
* Achte darauf, dass die Erdnüsse nicht zu dicht beieinander liegen. Ein Abstand von etwa 15-20 cm zwischen den Pflanzen ist ideal.
5. Bewässern:
* Gieße die Erde vorsichtig an, bis sie gut durchfeuchtet ist. Vermeide Staunässe!
6. Standort wählen:
* Stelle den Styroporbehälter an einen sonnigen und warmen Ort. Erdnüsse lieben die Sonne! Ein Standort mit mindestens 6-8 Stunden direkter Sonneneinstrahlung pro Tag ist ideal.
7. Pflege:
* Bewässerung: Halte die Erde feucht, aber nicht nass. Gieße regelmäßig, besonders an heißen Tagen.
* Düngung: Dünge die Erdnusspflanzen etwa alle 2-3 Wochen mit einem organischen Dünger.
* Unkraut entfernen: Entferne regelmäßig Unkraut, das im Behälter wächst.
* Häufeln: Wenn die Erdnusspflanzen etwa 15-20 cm hoch sind, häufle Erde um die Basis der Pflanzen an. Das fördert die Bildung von Erdnüssen.
8. Blütezeit:
* Nach etwa 4-6 Wochen beginnen die Erdnusspflanzen zu blühen. Die Blüten sind klein und gelb.
* Nach der Befruchtung biegen sich die Blütenstiele nach unten und bohren sich in die Erde. Dort entwickeln sich dann die Erdnüsse.
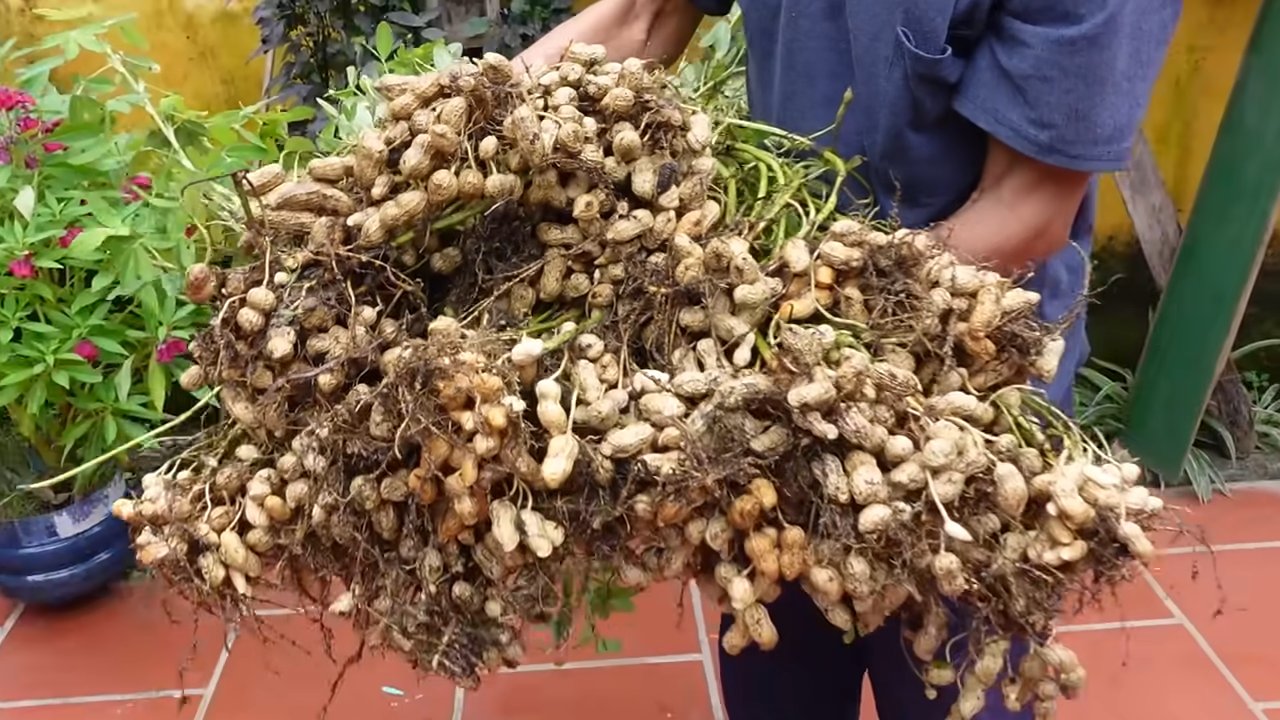
9. Erntezeit:
* Die Erntezeit ist etwa 4-5 Monate nach der Aussaat. Du erkennst, dass die Erdnüsse reif sind, wenn die Blätter der Pflanzen gelb werden und absterben.
* Grabe die Erdnusspflanzen vorsichtig aus.
* Schüttle die Erde von den Erdnüssen ab.
* Lasse die Erdnüsse an einem trockenen und luftigen Ort trocknen (am besten im Schatten). Das kann 1-2 Wochen dauern.
* Nach dem Trocknen kannst du die Erdnüsse lagern oder direkt genießen!
Zusätzliche Tipps für eine erfolgreiche Ernte
Hier sind noch ein paar zusätzliche Tipps, die dir helfen können, eine reiche Ernte zu erzielen:
* Sortenwahl: Es gibt verschiedene Erdnusssorten. Informiere dich, welche Sorte für dein Klima am besten geeignet ist.
* Schädlinge und Krankheiten: Achte auf Schädlinge und Krankheiten. Bei Bedarf kannst du biologische Schädlingsbekämpfungsmittel einsetzen.
* Bodenprobe: Wenn du unsicher bist, ob dein Boden die richtigen Nährstoffe enthält, kannst du eine Bodenprobe nehmen und analysieren lassen.
* Mulchen: Eine Mulchschicht (z.B. aus Stroh oder Rasenschnitt) hilft, die Feuchtigkeit im Boden zu halten und Unkraut zu unterdrücken.
* Geduld: Erdnüsse brauchen Zeit, um zu wachsen. Sei geduldig und gib nicht auf!
Häufige Probleme und Lösungen
Auch beim Anbau von Erdnüssen können Probleme auftreten. Hier sind einige häufige Probleme und Lösungen:
* Keine Keimung: Wenn die Erdnüsse nicht keimen, kann das verschiedene Ursachen haben. Möglicherweise waren die Erdnüsse nicht frisch genug, die Temperatur war zu niedrig oder die Erde war zu trocken. Versuche es mit frischen Erdnüssen und achte auf die richtige Temperatur und Feuchtigkeit.
* Gelbe Blätter: Gelbe Blätter können ein Zeichen für Nährstoffmangel sein. Dünge die Pflanzen mit einem organischen Dünger.
* Schädlinge: Blattläuse und andere Schädlinge können die Erdnusspflanzen befallen. Spritze die Pflanzen mit einem biologischen Schädlingsbekämpfungsmittel ab.
* Pilzkrankheiten: Pilzkrankheiten können auftreten, wenn die Luftfeuchtigkeit zu hoch ist. Sorge für eine gute Belüftung und vermeide Staunässe.
Fazit
Erdnüsse im Sty
Conclusion
Growing peanuts in a foam box might sound unconventional, but as you’ve seen, it’s a surprisingly effective and rewarding method, especially for those with limited space or challenging soil conditions. This DIY trick offers a controlled environment, protecting your precious peanut plants from pests, diseases, and harsh weather fluctuations. The foam box acts as an insulator, maintaining a more consistent temperature for optimal peanut development. Plus, the portability of the box allows you to chase the sun or shelter your plants during unexpected cold snaps.
But the benefits extend beyond mere convenience. By using a foam box, you’re essentially creating a mini-ecosystem tailored to the specific needs of peanut plants. You have complete control over the soil composition, drainage, and nutrient levels, leading to healthier plants and a more abundant harvest. Imagine the satisfaction of harvesting your own homegrown peanuts, knowing that you nurtured them from seed to shell in your very own foam box garden!
This method isn’t just about practicality; it’s about experimentation and connection with nature. Feel free to adapt the technique to suit your specific needs and preferences. For instance, try different soil mixtures to see which yields the best results in your climate. Consider adding companion plants like marigolds or basil to deter pests naturally. You could even experiment with different varieties of peanuts to discover your favorite flavor profile.
Don’t be afraid to get creative! The beauty of this DIY project lies in its adaptability. You can customize the size of the foam box, the type of soil, and even the watering schedule to perfectly match your local conditions and personal preferences.
We highly encourage you to give this DIY peanut growing trick a try. It’s a fun, educational, and ultimately delicious way to connect with nature and enjoy the fruits (or rather, nuts) of your labor. And once you’ve harvested your first batch of homegrown peanuts, be sure to share your experience with us! We’d love to hear about your successes, challenges, and any variations you’ve tried. Post photos of your foam box garden, share your favorite peanut recipes, and inspire others to embark on their own peanut-growing adventure. Let’s build a community of foam box peanut enthusiasts!
So, grab a foam box, some peanut seeds, and get ready to experience the joy of growing your own delicious and nutritious peanuts. You might be surprised at just how easy and rewarding it can be. Happy growing!
Frequently Asked Questions (FAQ)
1. What type of foam box is best for growing peanuts?
The ideal foam box is one that’s sturdy, clean, and large enough to accommodate the root systems of your peanut plants. A box that’s at least 12 inches deep and 24 inches wide is a good starting point for a few plants. Make sure the box is food-grade or hasn’t been used to store harmful chemicals. You can often find suitable foam boxes at grocery stores, fish markets, or recycling centers. Consider the thickness of the foam; thicker foam provides better insulation. Also, ensure the box has drainage holes to prevent waterlogging. If it doesn’t, you’ll need to drill some yourself.
2. What kind of soil should I use in my foam box peanut garden?
Peanuts thrive in well-draining, sandy loam soil. Avoid heavy clay soils, as they can impede root development and pod formation. A good mix would be equal parts of garden soil, compost, and sand. The compost provides essential nutrients, while the sand improves drainage. You can also add a small amount of perlite or vermiculite to further enhance drainage and aeration. Before planting, test the soil pH. Peanuts prefer a slightly acidic to neutral pH of around 6.0 to 7.0. You can amend the soil with lime if it’s too acidic.
3. How often should I water my peanut plants in a foam box?
Watering frequency depends on the weather, soil type, and the size of your plants. Generally, you should water deeply whenever the top inch of soil feels dry to the touch. Avoid overwatering, as this can lead to root rot. During hot, dry periods, you may need to water daily. In cooler, wetter weather, you can reduce the frequency. Ensure the foam box has adequate drainage to prevent water from pooling at the bottom. A good rule of thumb is to water thoroughly until you see water draining from the bottom of the box.
4. Do I need to fertilize my peanut plants in a foam box?
Yes, peanuts benefit from regular fertilization, especially during the flowering and pod-filling stages. Use a balanced fertilizer with a ratio of 5-10-5 (nitrogen-phosphorus-potassium) or a fertilizer specifically formulated for legumes. Avoid fertilizers that are too high in nitrogen, as this can promote excessive foliage growth at the expense of pod production. Apply the fertilizer according to the manufacturer’s instructions, usually every 2-3 weeks. You can also supplement with organic fertilizers like compost tea or fish emulsion.
5. How do I protect my peanut plants from pests and diseases in a foam box?
The controlled environment of a foam box can help minimize pest and disease problems. However, it’s still important to be vigilant. Regularly inspect your plants for signs of pests like aphids, spider mites, or caterpillars. If you spot any, treat them with insecticidal soap or neem oil. To prevent fungal diseases, ensure good air circulation around your plants and avoid overwatering. You can also apply a fungicide if necessary. Consider using companion plants like marigolds or basil to deter pests naturally.
6. When and how do I harvest my peanuts from the foam box?
Peanuts are typically ready to harvest about 120-150 days after planting. The leaves will start to yellow and the plants will begin to wilt. To check if the peanuts are ready, dig up a plant and examine the pods. The pods should be plump and the kernels should be fully developed and have a reddish-brown skin. To harvest, carefully dig up the entire plant, being careful not to damage the pods. Shake off any excess soil and hang the plants upside down in a warm, dry place for several weeks to cure. Once the peanuts are cured, you can remove them from the plants and store them in a cool, dry place.
7. Can I reuse the soil in my foam box for future peanut crops?
While you can reuse the soil, it’s best to amend it with fresh compost and other organic matter to replenish nutrients. Peanuts are heavy feeders and can deplete the soil over time. You should also consider rotating crops to prevent the buildup of soilborne diseases. If you’ve had any pest or disease problems, it’s best to sterilize the soil before reusing it. You can do this by baking it in the oven or solarizing it in the sun.
8. What are some variations I can try with this foam box peanut growing method?
There are many ways to customize this method to suit your needs and preferences. You can experiment with different varieties of peanuts, such as Virginia, Spanish, or Runner. You can also try growing other legumes in a foam box, such as beans or peas. Consider adding a trellis to support the plants if they become too tall. You can also use a self-watering system to automate the watering process. Get creative and have fun experimenting!
9. Is growing peanuts in a foam box organic?
Growing peanuts in a foam box can be organic if you use organic soil, fertilizers, and pest control methods. Avoid using synthetic fertilizers, pesticides, and herbicides. Choose organic soil amendments like compost, manure, and bone meal. Use natural pest control methods like insecticidal soap, neem oil, and companion planting. By following these guidelines, you can grow healthy and delicious organic peanuts in your foam box garden.
10. What if I live in a colder climate? Can I still grow peanuts in a foam box?
Yes, you can still grow peanuts in a foam box even if you live in a colder climate. The foam box provides insulation, which can help protect the plants from frost and cold temperatures. You can also start the seeds indoors several weeks before the last expected frost and then transplant them into the foam box once the weather warms up. Consider using a greenhouse or cold frame to provide additional protection. You may need to choose a shorter-season variety of peanuts to ensure they have enough time to mature before the first frost.
Leave a Comment