
Grow Lettuce Indoors Beginner? Absolutely! Imagine fresh, crisp lettuce gracing your salads, sandwiches, and wraps, all year round, regardless of the weather outside. No more sad, wilted greens from the grocery store! This isn’t just a dream; it’s a deliciously achievable reality with a few simple tricks and a dash of DIY spirit.
For centuries, humans have cultivated leafy greens, adapting their methods to suit various climates and spaces. From ancient Roman gardens to modern-day urban farms, the desire for fresh produce has driven innovation. Now, you too can participate in this rich history by bringing the garden indoors!
Why should you learn to grow lettuce indoors beginner? Well, think about it: controlling the environment means controlling the pests, the weather, and ultimately, the quality of your harvest. Plus, it’s incredibly rewarding to nurture something from seed to salad. This DIY guide will walk you through every step, from choosing the right container and soil to providing the perfect lighting and watering schedule. Say goodbye to expensive, pre-packaged lettuce and hello to a thriving indoor garden that will nourish your body and soul. Let’s get growing!
Anfängerleitfaden: Salat drinnen anbauen – So geht’s!
Ich liebe frischen Salat, besonders im Winter, wenn der Garten leer ist. Deshalb habe ich mich damit beschäftigt, Salat drinnen anzubauen, und ich möchte meine Erfahrungen mit dir teilen. Es ist einfacher, als du denkst, und du wirst bald deinen eigenen frischen Salat ernten können!
Was du brauchst:
* Salatsamen: Wähle Sorten, die sich gut für den Anbau in Töpfen eignen, z.B. Pflücksalat, Romana oder Mini-Kopfsalat.
* Anzuchterde: Eine leichte, gut durchlässige Erde ist ideal.
* Töpfe oder Behälter: Wähle Töpfe mit Drainagelöchern. Die Größe hängt von der Salatsorte ab, aber ein Durchmesser von 15-20 cm ist ein guter Anfang.
* Pflanzschalen oder Untersetzer: Um überschüssiges Wasser aufzufangen.
* Wachstumslampen (optional, aber empfohlen): Besonders in den dunkleren Monaten.
* Sprühflasche: Zum Befeuchten der Erde.
* Dünger (optional): Ein flüssiger, organischer Dünger für Blattgemüse.
Die Vorbereitung:
* Samen auswählen: Ich empfehle, mit Pflücksalat zu beginnen, da er schnell wächst und du ihn mehrmals ernten kannst.
* Töpfe vorbereiten: Fülle die Töpfe mit Anzuchterde, lass aber etwa 2-3 cm Platz bis zum Rand.
* Standort wählen: Ein heller Standort am Fenster ist gut, aber Wachstumslampen sind besser, besonders wenn du nicht viel natürliches Licht hast.
Aussaat und Keimung:
1. Samen aussäen: Streue die Salatsamen gleichmäßig über die Erde. Sie sind sehr klein, also sei vorsichtig, dass du sie nicht zu dicht säst.
2. Leicht bedecken: Bedecke die Samen mit einer dünnen Schicht Erde (ca. 0,5 cm).
3. Befeuchten: Besprühe die Erde vorsichtig mit Wasser, bis sie feucht, aber nicht durchnässt ist.
4. Abdecken (optional): Du kannst die Töpfe mit Frischhaltefolie oder einer Plastiktüte abdecken, um die Luftfeuchtigkeit zu erhöhen. Vergiss nicht, Löcher in die Folie zu stechen, damit die Luft zirkulieren kann.
5. Warm halten: Stelle die Töpfe an einen warmen Ort (ca. 18-24°C).
6. Geduld haben: Die Keimung dauert in der Regel 5-10 Tage. Halte die Erde während dieser Zeit feucht.
Pflege der Salatpflanzen:
1. Licht: Sobald die Samen gekeimt sind, brauchen die Salatpflanzen viel Licht. Wenn du kein helles Fenster hast, verwende Wachstumslampen. Ich lasse meine Lampen etwa 14-16 Stunden am Tag brennen.
2. Bewässerung: Gieße die Salatpflanzen regelmäßig, aber vermeide Staunässe. Die Erde sollte immer leicht feucht sein. Ich prüfe die Erde jeden Tag und gieße, wenn sich die oberste Schicht trocken anfühlt.
3. Temperatur: Salat mag es kühl. Eine Temperatur zwischen 15-20°C ist ideal. Vermeide es, die Pflanzen in der Nähe von Heizkörpern oder anderen Wärmequellen aufzustellen.
4. Düngen (optional): Wenn du möchtest, kannst du die Salatpflanzen alle zwei Wochen mit einem flüssigen, organischen Dünger für Blattgemüse düngen. Achte darauf, die Anweisungen auf der Verpackung zu befolgen.
5. Ausdünnen: Wenn die Salatpflanzen zu dicht stehen, musst du sie ausdünnen. Entferne die schwächsten Pflanzen, damit die stärkeren genug Platz zum Wachsen haben.
6. Drehen: Drehe die Töpfe regelmäßig, damit die Pflanzen gleichmäßig Licht bekommen und nicht schief wachsen.
Ernte:
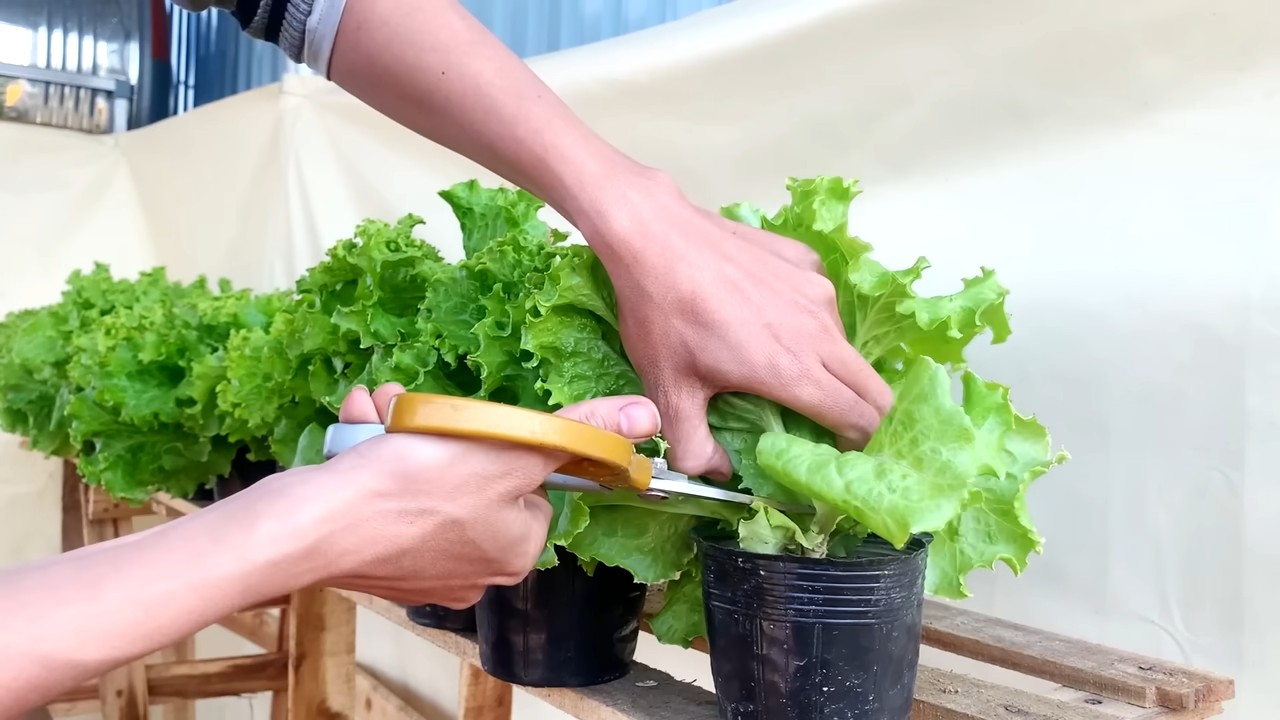
* Pflücksalat: Du kannst Pflücksalat ernten, sobald die Blätter groß genug sind. Schneide die äußeren Blätter ab und lass die inneren Blätter weiterwachsen. So kannst du über mehrere Wochen ernten.
* Kopfsalat: Kopfsalat erntest du, wenn er einen festen Kopf gebildet hat. Schneide den Kopf am Stiel ab.
* Romana: Romana erntest du, wenn die Blätter groß und knackig sind. Schneide die Blätter am Stiel ab.
Häufige Probleme und Lösungen:
* Gelbe Blätter: Gelbe Blätter können ein Zeichen für Überwässerung, Nährstoffmangel oder zu wenig Licht sein. Überprüfe deine Bewässerungsgewohnheiten, dünge die Pflanzen und stelle sicher, dass sie genug Licht bekommen.
* Schädlinge: Blattläuse und andere Schädlinge können Salat befallen. Kontrolliere die Pflanzen regelmäßig und entferne Schädlinge mit der Hand oder verwende ein biologisches Schädlingsbekämpfungsmittel.
* Pilzkrankheiten: Pilzkrankheiten können auftreten, wenn die Luftfeuchtigkeit zu hoch ist. Sorge für eine gute Belüftung und vermeide es, die Blätter beim Gießen zu benetzen.
Zusätzliche Tipps:
* Verschiedene Sorten anbauen: Probiere verschiedene Salatsorten aus, um herauszufinden, welche dir am besten schmecken und am besten in deiner Wohnung wachsen.
* Regelmäßig säen: Säe alle paar Wochen neue Samen aus, um eine kontinuierliche Ernte zu gewährleisten.
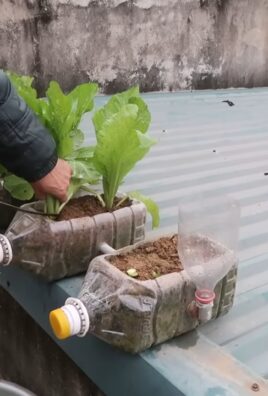
* Upcycling: Verwende alte Joghurtbecher oder andere Behälter als Anzuchttöpfe.
* Kinder einbeziehen: Der Anbau von Salat ist eine tolle Aktivität für Kinder. Sie können beim Säen, Gießen und Ernten helfen.
Detaillierte Anleitung in Phasen:
Phase 1: Aussaat und Keimung (ca. 1-2 Wochen)
1. Vorbereitung der Töpfe:
* Wähle die richtigen Töpfe. Ich bevorzuge Töpfe aus Kunststoff, da sie leicht sind und sich gut reinigen lassen. Achte darauf, dass sie Drainagelöcher haben, damit überschüssiges Wasser ablaufen kann.
* Fülle die Töpfe mit Anzuchterde. Drücke die Erde leicht an, aber nicht zu fest. Lass etwa 2-3 cm Platz bis zum Rand.
* Befeuchte die Erde vor dem Aussäen leicht mit einer Sprühflasche.
2. Aussaat der Samen:
* Nimm eine kleine Menge Salatsamen in deine Hand.
* Streue die Samen gleichmäßig über die Erde. Achte darauf, dass sie nicht zu dicht liegen.
* Bedecke die Samen mit einer dünnen Schicht Erde (ca. 0,5 cm).
* Besprühe die Erde vorsichtig mit Wasser, bis sie feucht, aber nicht durchnässt ist.
3. Keimung fördern:
* Decke die Töpfe mit Frischhaltefolie oder einer Plastiktüte ab, um die Luftfeuchtigkeit zu erhöhen. Steche Löcher in die Folie, damit die Luft zirkulieren kann.
* Stelle die Töpfe an einen warmen Ort (ca. 18-24°C). Ein Fensterbrett über einer Heizung kann ideal sein, aber achte darauf, dass die Erde nicht austrocknet.
* Kontrolliere die Erde täglich und besprühe sie bei Bedarf mit Wasser.
4. Geduld haben:
* Die Keimung dauert in der Regel 5-10 Tage. Hab Geduld und lass die Natur ihren Lauf nehmen.
* Sobald die ersten Keimlinge erscheinen, entferne die Folie oder Plastiktüte.
Phase 2: Wachstum und Pflege (ca. 4-6 Wochen)
1. Lichtversorgung:
* Stelle die Töpfe an einen hellen Standort am Fenster. Ein Südfenster ist ideal, aber auch Ost- oder Westfenster können funktionieren.
* Wenn du nicht genug natürliches Licht hast, verwende Wachstumslampen. Ich verwende LED-Wachstumslampen, da sie energieeffizient sind und ein gutes Lichtspe

Conclusion
So, there you have it! Growing lettuce indoors, even for a complete beginner, is not only achievable but also incredibly rewarding. Forget those sad, wilted bags of store-bought lettuce. Imagine crisp, vibrant, and flavorful greens readily available right in your own home, whenever you need them. This DIY trick transforms your kitchen into a miniature garden, providing a constant supply of fresh ingredients for salads, sandwiches, and more.
Why is this a must-try? Because it empowers you to take control of your food source. You know exactly where your lettuce comes from, what it’s been exposed to (or not exposed to!), and you can harvest it at its peak of freshness. Plus, it’s a fantastic way to reduce your environmental impact by cutting down on transportation and packaging waste. Think about the satisfaction of serving a salad made entirely from lettuce you nurtured yourself!
But the benefits don’t stop there. Growing lettuce indoors is also a surprisingly therapeutic activity. The simple act of tending to your plants, watching them grow, and harvesting your bounty can be incredibly calming and stress-relieving. It’s a little slice of nature right in your home, offering a welcome respite from the hustle and bustle of daily life.
Ready to take your indoor lettuce growing to the next level? Consider experimenting with different varieties of lettuce. Romaine, butterhead, loose-leaf – each offers a unique flavor and texture. You can also try succession planting, sowing new seeds every few weeks to ensure a continuous harvest. And don’t be afraid to get creative with your growing setup. Repurpose old containers, build a vertical garden, or even invest in a dedicated hydroponic system. The possibilities are endless!
We wholeheartedly encourage you to give this DIY trick a try. It’s easier than you think, and the rewards are well worth the effort. Start small, be patient, and don’t be afraid to experiment. And most importantly, share your experience with us! We’d love to hear about your successes, your challenges, and any tips you’ve discovered along the way. Post photos of your indoor lettuce garden, share your favorite recipes, and let’s create a community of indoor gardening enthusiasts. Let’s all enjoy the benefits of fresh, homegrown lettuce, year-round. Embrace the joy of **growing lettuce indoors** and discover the delicious difference it makes!
Frequently Asked Questions (FAQ)
What kind of lettuce grows best indoors?
Loose-leaf varieties like Black Seeded Simpson, Salad Bowl, and Red Sails are generally the easiest to grow indoors. They mature quickly and can be harvested a few leaves at a time, allowing for a continuous supply. Butterhead varieties like Buttercrunch and Romaine also do well, but may take a bit longer to mature. Avoid head lettuce varieties like iceberg, as they require more space and are more challenging to grow indoors. Experiment to see what thrives best in your specific indoor environment.
How much light does indoor lettuce need?
Lettuce needs at least 6 hours of direct sunlight per day. If you don’t have a sunny window, you’ll need to supplement with artificial light. Fluorescent grow lights or LED grow lights are excellent options. Place the lights a few inches above the plants and keep them on for 12-14 hours per day. Insufficient light will result in leggy, pale lettuce that is less flavorful.
What kind of soil should I use for growing lettuce indoors?
Use a well-draining potting mix specifically formulated for vegetables. Avoid using garden soil, as it can be too heavy and may contain pests or diseases. A good potting mix will provide the necessary nutrients and drainage for healthy lettuce growth. You can also add compost to the potting mix to further enrich the soil.
How often should I water my indoor lettuce?
Keep the soil consistently moist, but not soggy. Water when the top inch of soil feels dry to the touch. Overwatering can lead to root rot, so be careful not to overdo it. Use a watering can or spray bottle to water gently, avoiding getting water on the leaves, which can promote fungal growth.
What temperature is ideal for growing lettuce indoors?
Lettuce prefers cooler temperatures, ideally between 60-70°F (15-21°C). Avoid placing your lettuce near heat sources, such as radiators or vents. If your home is too warm, you can try placing the lettuce in a cooler room or using a fan to circulate the air.
How do I harvest my indoor lettuce?
You can start harvesting lettuce leaves when they are about 4-6 inches long. For loose-leaf varieties, simply snip off the outer leaves with scissors, leaving the inner leaves to continue growing. This cut-and-come-again method allows you to harvest lettuce continuously for several weeks. For butterhead and romaine varieties, you can harvest the entire head when it is mature.
What are some common problems when growing lettuce indoors?
Common problems include aphids, spider mites, and fungal diseases. Inspect your plants regularly for signs of pests or diseases. If you find any, treat them promptly with an appropriate insecticide or fungicide. Good air circulation and proper watering can help prevent many of these problems.
Can I grow lettuce indoors year-round?
Yes, you can grow lettuce indoors year-round, as long as you provide adequate light, water, and temperature. Indoor growing allows you to control the environment and avoid the seasonal limitations of outdoor gardening.
How do I fertilize my indoor lettuce?
Lettuce is a light feeder, so you don’t need to fertilize it heavily. Use a balanced liquid fertilizer diluted to half strength every 2-3 weeks. Avoid over-fertilizing, as this can lead to leggy growth and bitter-tasting leaves.
My lettuce is bolting (going to seed). What can I do?
Bolting is a common problem when lettuce is exposed to high temperatures or long days. Once lettuce bolts, the leaves become bitter and unpalatable. To prevent bolting, keep your lettuce in a cool location and provide adequate shade during the hottest part of the day. If your lettuce does bolt, it’s best to harvest the remaining leaves and start a new batch.

Leave a Comment