
Growing Leeks at Home can seem daunting, but trust me, it’s easier than you think! Imagine stepping outside your back door to harvest fresh, flavorful leeks for your favorite soup or stew. No more trips to the grocery store for limp, overpriced produce. This DIY guide will unlock the secrets to cultivating these culinary gems right in your own backyard, even if you’re a complete beginner.
Leeks have a rich history, dating back to ancient Egypt, where they were revered and even depicted in hieroglyphics. The Romans, known for their sophisticated cuisine, also embraced leeks, spreading their cultivation throughout Europe. Today, they remain a staple in many cuisines, adding a delicate oniony flavor to dishes worldwide.
But why bother with the effort of growing your own? Well, for starters, homegrown leeks taste infinitely better than store-bought ones. Plus, you have complete control over the growing process, ensuring they’re free from harmful pesticides and herbicides. More importantly, growing leeks at home is incredibly rewarding. There’s nothing quite like the satisfaction of nurturing a plant from seed to harvest, knowing you’ve created something delicious and healthy for yourself and your family. This DIY guide will provide you with simple, effective tricks and hacks to make the process a breeze, regardless of your gardening experience. Let’s get started!
Leckeren Lauch selbst anbauen: Ein umfassender DIY-Leitfaden
Hallo Gartenfreunde! Ich liebe es, frisches Gemüse direkt aus meinem Garten zu ernten, und Lauch ist da keine Ausnahme. Er ist vielseitig, lecker und überraschend einfach anzubauen. In diesem Artikel zeige ich euch Schritt für Schritt, wie ihr euren eigenen Lauch zu Hause ziehen könnt, egal ob ihr einen großen Garten oder nur einen kleinen Balkon habt. Los geht’s!
Warum Lauch selbst anbauen?
Bevor wir ins Detail gehen, lasst mich euch kurz erzählen, warum ich so begeistert vom Lauch-Anbau bin:
* Frische und Geschmack: Selbst angebauter Lauch schmeckt einfach besser! Er ist aromatischer und frischer als das, was man im Supermarkt bekommt.
* Nachhaltigkeit: Ihr wisst genau, was in eurem Lauch steckt – keine Pestizide, keine langen Transportwege.
* Kosteneffizienz: Einmal angepflanzt, liefert Lauch über einen langen Zeitraum Ernte.
* Gartenfreude: Es macht einfach Spaß, zu sehen, wie die kleinen Pflänzchen wachsen und gedeihen!
Die richtige Vorbereitung: Was ihr braucht
Bevor wir loslegen, solltet ihr sicherstellen, dass ihr alles Notwendige zur Hand habt. Hier ist eine Liste der Dinge, die ihr benötigt:
* Lauchsaatgut: Wählt eine Sorte, die zu eurem Klima passt. Es gibt frühe, mittlere und späte Sorten.
* Anzuchterde: Diese ist feiner und nährstoffärmer als normale Blumenerde und ideal für die Anzucht von Sämlingen.
* Anzuchtschalen oder -töpfe: Kleine Behälter für die Aussaat.
* Gießkanne mit feinem Brausekopf: Für eine schonende Bewässerung.
* Pikierstab oder Bleistift: Zum Vereinzeln der Sämlinge.
* Gemüseerde: Für das Auspflanzen in den Garten oder größere Töpfe.
* Kompost oder organischer Dünger: Zur Nährstoffversorgung.
* Gartenwerkzeug: Spaten, Hacke, Pflanzkelle.
* Etiketten und Stift: Zum Beschriften der Saatschalen.
Aussaat: Der Start in ein leckeres Lauchleben
Die Aussaat ist der erste wichtige Schritt. Ich empfehle, Lauch im Haus vorzuziehen, um ihm einen Vorsprung zu verschaffen.
1. Aussaatzeitpunkt bestimmen: Die beste Zeit für die Aussaat ist in der Regel von Februar bis April. Beachtet die Angaben auf der Saatgutpackung.
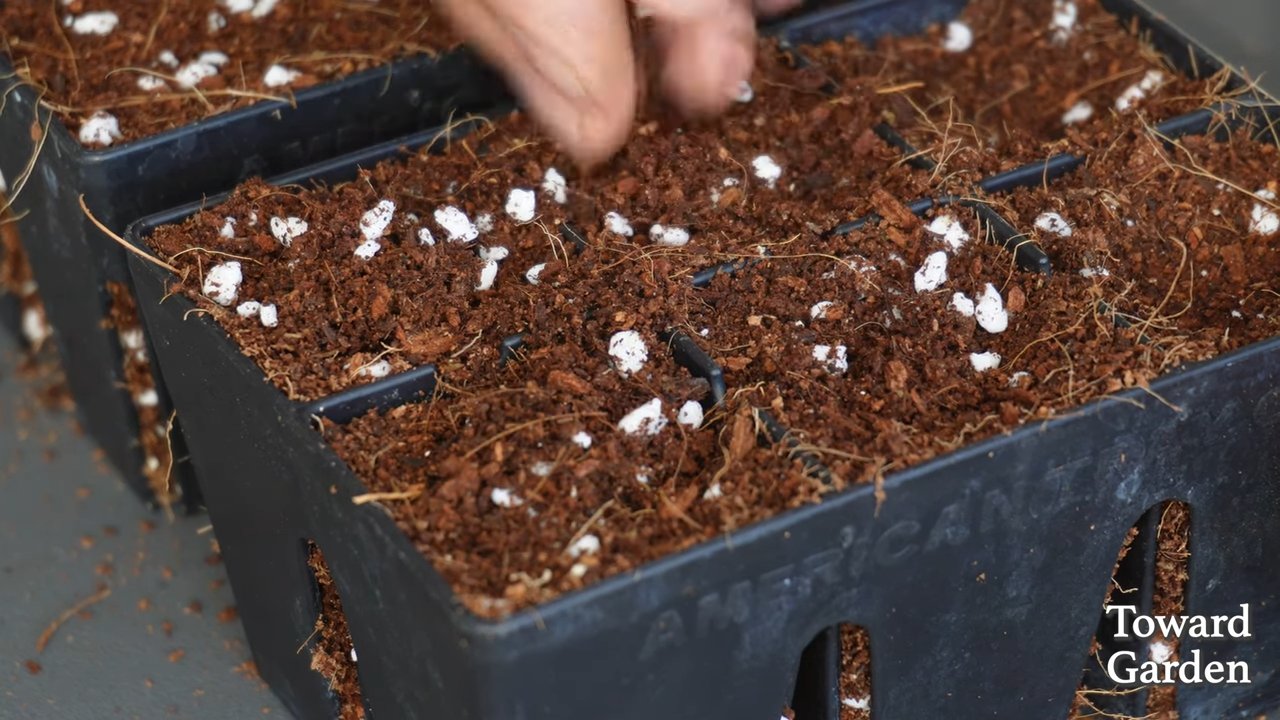
2. Anzuchtschalen vorbereiten: Füllt die Anzuchtschalen mit Anzuchterde und drückt sie leicht an.
3. Aussaat: Verteilt die Lauchsaat gleichmäßig auf der Erde. Sie sind sehr klein, also seid vorsichtig. Bedeckt die Samen dann mit einer dünnen Schicht Erde (ca. 0,5 cm).
4. Bewässerung: Befeuchtet die Erde vorsichtig mit einer Gießkanne mit feinem Brausekopf. Die Erde sollte feucht, aber nicht nass sein.
5. Standort: Stellt die Anzuchtschalen an einen hellen und warmen Ort (ca. 18-20°C). Ein Fensterbrett ist ideal.
6. Feuchtigkeit halten: Um die Luftfeuchtigkeit zu erhöhen, könnt ihr die Anzuchtschalen mit einer durchsichtigen Folie oder einem Deckel abdecken. Lüftet regelmäßig, um Schimmelbildung zu vermeiden.
7. Geduld haben: Die Keimung dauert in der Regel 10-14 Tage.
Pikieren: Den kleinen Lauchpflanzen mehr Raum geben
Sobald die Lauchpflänzchen ihre ersten richtigen Blätter (neben den Keimblättern) entwickelt haben, ist es Zeit zum Pikieren. Das bedeutet, dass ihr die kleinen Pflanzen vereinzeln und in größere Töpfe umsetzen.
1. Vorbereitung: Füllt kleine Töpfe (ca. 5-7 cm Durchmesser) mit Anzuchterde.
2. Vereinzeln: Löst die Lauchpflänzchen vorsichtig mit einem Pikierstab oder Bleistift aus der Anzuchtschale. Achtet darauf, die Wurzeln nicht zu beschädigen.
3. Einsetzen: Setzt jeweils ein Lauchpflänzchen in einen Topf. Die Pflanze sollte bis zu den Keimblättern in der Erde sitzen.
4. Bewässerung: Gießt die pikierten Pflanzen vorsichtig an.
5. Standort: Stellt die Töpfe an einen hellen, aber nicht zu sonnigen Ort.
6. Pflege: Haltet die Erde feucht und düngt die Pflanzen regelmäßig mit einem organischen Dünger.
Auspflanzen: Ab ins Freie!
Nachdem die Lauchpflanzen kräftig genug sind (ca. 15-20 cm hoch), können sie ins Freie gepflanzt werden. Das ist in der Regel ab Mai der Fall, wenn keine Frostgefahr mehr besteht.
1. Vorbereitung des Beetes: Wählt einen sonnigen Standort mit lockerem, humosem Boden. Bereitet das Beet vor, indem ihr es umgrabt und mit Kompost oder organischem Dünger anreichert.
2. Pflanzlöcher graben: Grabt Pflanzlöcher im Abstand von ca. 15-20 cm. Die Löcher sollten tief genug sein, damit die Lauchpflanzen bis zu den unteren Blättern in der Erde sitzen.
3. Pflanzen: Setzt die Lauchpflanzen vorsichtig in die Pflanzlöcher und füllt diese mit Erde auf. Drückt die Erde leicht an.
4. Bewässerung: Gießt die Pflanzen gründlich an.
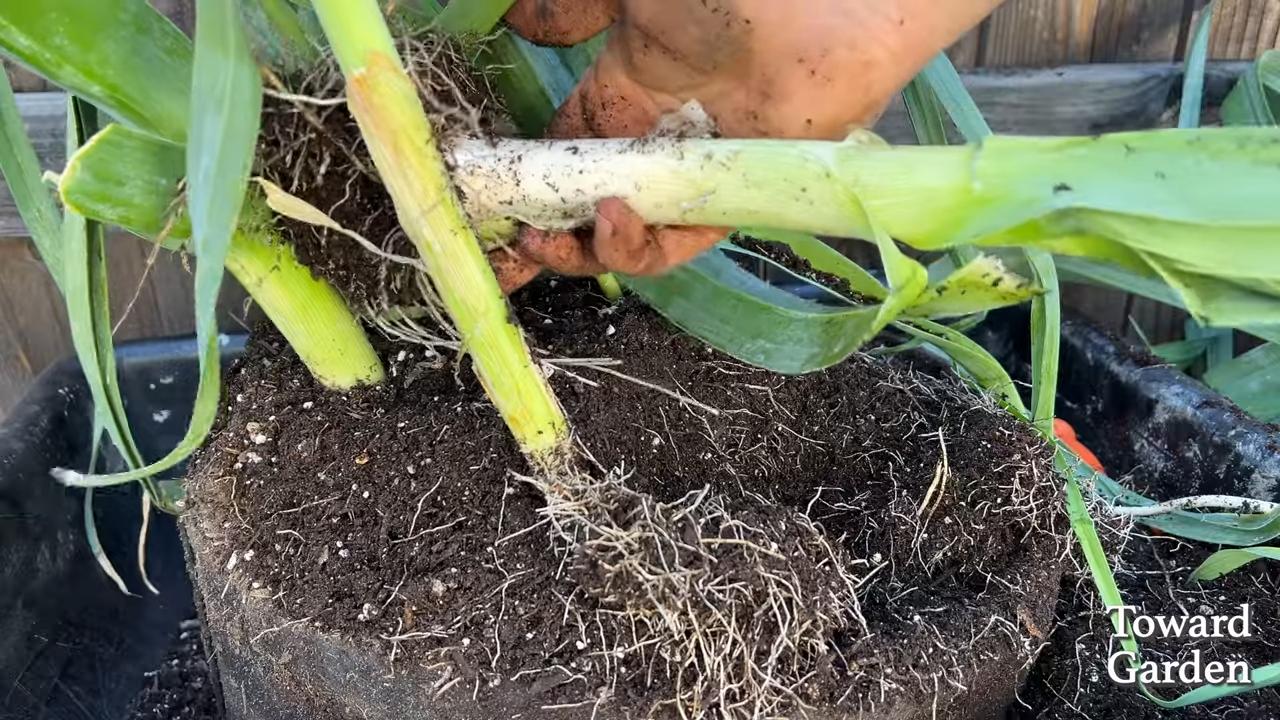
5. Anhügeln: Um den weißen Schaft des Lauchs zu verlängern, könnt ihr die Pflanzen regelmäßig anhäufeln. Das bedeutet, dass ihr Erde um die Stängel herum auftragt.
6. Schutz vor Schädlingen: Lauch kann von Lauchmotten befallen werden. Um dies zu verhindern, könnt ihr ein Kulturschutznetz über die Pflanzen spannen.
Pflege: Damit der Lauch prächtig gedeiht
Die richtige Pflege ist entscheidend für eine reiche Lauchernte.
* Bewässerung: Lauch benötigt regelmäßig Wasser, besonders in trockenen Perioden. Achtet darauf, dass die Erde immer feucht ist.
* Düngung: Düngt die Pflanzen regelmäßig mit einem organischen Dünger oder Kompost.
* Unkrautbekämpfung: Haltet das Beet unkrautfrei, damit der Lauch genügend Nährstoffe und Licht bekommt.
* Bodenlockerung: Lockert den Boden regelmäßig auf, um die Belüftung zu verbessern.
* Schutz vor Krankheiten und Schädlingen: Achtet auf Anzeichen von Krankheiten oder Schädlingsbefall und handelt entsprechend.
Ernte: Der Lohn der Mühe
Die Lauchernte kann je nach Sorte und Aussaatzeitpunkt ab August beginnen und bis in den Winter hinein andauern.
1. Erntezeitpunkt: Erntet den Lauch, wenn er die gewünschte Größe erreicht hat.
2. Erntemethode: Zieht den Lauch vorsichtig aus der Erde. Ihr könnt ihn auch mit einem Spaten ausstechen.
3. Reinigung: Entfernt die äußeren Blätter und reinigt den Lauch gründlich.
4. Lagerung: Lauch kann im Kühlschrank einige Tage gelagert werden. Er lässt sich auch gut einfrieren.
Häufige Probleme und Lösungen
Auch beim Lauch-Anbau können Probleme auftreten. Hier sind einige häufige Probleme und wie ihr sie lösen könnt:
* Lauchmotte: Ein Kulturschutznetz ist die beste Vorbeugung. Bei Befall können Nützlinge wie Schlupfwespen eingesetzt werden.
* Rostpilz: Sorgt für eine gute Belüftung und vermeidet Staunässe. Befallene Blätter sollten entfernt werden.
* Zwiebelfliege: Auch hier hilft ein Kulturschutznetz.
Zusätzliche Tipps für eine erfolgreiche Lauchernte
* Fruchtfolge beachten: Baut Lauch nicht jedes
Conclusion
So, there you have it! Growing leeks at home isn’t just a gardening project; it’s an investment in flavor, freshness, and a more sustainable lifestyle. We’ve walked you through the process, from seed to harvest, and hopefully, demystified any concerns you might have had. The beauty of this DIY endeavor lies not only in the delicious leeks you’ll enjoy but also in the satisfaction of nurturing something from the very beginning.
Why is this a must-try? Because store-bought leeks simply can’t compare to the vibrant taste and texture of homegrown ones. You control the entire process, ensuring they’re free from unwanted pesticides and harvested at their peak of perfection. Plus, growing your own leeks significantly reduces your carbon footprint by eliminating transportation and packaging. It’s a win-win for your taste buds and the planet!
But the fun doesn’t stop there! Feel free to experiment with different varieties of leeks. Some are milder, while others offer a more pungent flavor. Consider trying ‘Giant Musselburgh’ for its impressive size or ‘American Flag’ for its cold hardiness. You can also play around with companion planting. Carrots and onions are excellent companions for leeks, as they help deter pests. And don’t forget to utilize every part of the leek! The dark green tops, often discarded, are fantastic for making flavorful stocks and broths.
Don’t be intimidated if you’re a beginner gardener. Leeks are surprisingly resilient and forgiving. Start small, follow our guide, and you’ll be amazed at how rewarding it is to cultivate your own supply of these versatile vegetables.
We wholeheartedly encourage you to give growing leeks at home a try. It’s a simple, cost-effective, and incredibly satisfying way to enhance your culinary creations and connect with nature. Once you’ve tasted the difference between homegrown and store-bought, you’ll never go back!
And most importantly, we want to hear about your experiences! Share your tips, tricks, and triumphs in the comments below. Did you encounter any challenges? What varieties did you grow? What are your favorite ways to use your homegrown leeks? Your insights will not only inspire other readers but also help us refine this guide for future gardeners. Let’s build a community of leek-loving enthusiasts! So, grab your seeds, get your hands dirty, and embark on this exciting gardening adventure. Happy growing!
Frequently Asked Questions (FAQ)
Q: How long does it take to grow leeks from seed?
A: Growing leeks from seed typically takes around 120 to 150 days from sowing to harvest. This timeframe can vary slightly depending on the variety of leek, the climate, and the growing conditions. You’ll generally start seeds indoors about 8-10 weeks before the last expected frost. After the seedlings have developed a few true leaves and the weather has warmed up, you can transplant them outdoors.
Q: What is the best time of year to plant leeks?
A: The best time to plant leeks depends on your climate. In colder regions with harsh winters, start seeds indoors in late winter or early spring (February-March). Transplant the seedlings outdoors in late spring or early summer (May-June) after the risk of frost has passed. In milder climates with warmer winters, you can sow seeds directly into the ground in late summer or early fall (August-September) for a winter or early spring harvest.
Q: What kind of soil do leeks need?
A: Leeks thrive in well-drained, fertile soil that is rich in organic matter. They prefer a slightly acidic to neutral soil pH, ideally between 6.0 and 7.0. Before planting, amend the soil with compost or well-rotted manure to improve drainage, fertility, and water retention. Avoid heavy clay soils, as they can become waterlogged and hinder leek growth. If you have clay soil, consider growing leeks in raised beds or containers.
Q: How much sunlight do leeks need?
A: Leeks require at least 6 hours of direct sunlight per day to grow properly. Choose a planting location that receives full sun for optimal growth and bulb development. If you live in a particularly hot climate, some afternoon shade can be beneficial to prevent the leeks from scorching.
Q: How often should I water leeks?
A: Leeks need consistent moisture, especially during hot and dry periods. Water deeply and regularly, ensuring the soil remains consistently moist but not waterlogged. Check the soil moisture regularly by sticking your finger about an inch into the soil. If it feels dry, it’s time to water. Mulching around the leeks can help retain moisture and suppress weeds.
Q: What are some common pests and diseases that affect leeks?
A: Some common pests that can affect leeks include onion flies, thrips, and leek moths. Diseases that can affect leeks include rust, white rot, and downy mildew. To prevent pest and disease problems, practice crop rotation, maintain good soil drainage, and remove any infected plants promptly. You can also use organic pest control methods, such as insecticidal soap or neem oil, to control pests.
Q: How do I blanch leeks to get a longer white stem?
A: Blanching leeks involves excluding light from the lower portion of the stem to produce a longer, whiter, and milder-tasting section. There are several ways to blanch leeks:
* **Hilling:** As the leeks grow, gradually mound soil around the stems, burying them deeper and deeper.
* **Trenching:** Plant the leeks in a trench and gradually fill it in with soil as they grow.
* **Using Collars:** Place cardboard or plastic collars around the base of the leeks to block out the light.
Start blanching when the leeks are about 6-8 inches tall and continue until harvest.
Q: Can I grow leeks in containers?
A: Yes, you can successfully grow leeks in containers, especially if you have limited garden space. Choose a large container that is at least 12 inches deep and wide to accommodate the leek’s root system. Use a well-draining potting mix and ensure the container has drainage holes. Water regularly and fertilize every few weeks with a balanced fertilizer.
Q: How do I harvest leeks?
A: Leeks are ready to harvest when they reach the desired size, typically when the stems are about 1-2 inches in diameter. To harvest, loosen the soil around the base of the leek with a garden fork or trowel and gently pull it out of the ground. You can harvest leeks as needed throughout the growing season.
Q: How do I store leeks after harvesting?
A: After harvesting, remove any excess soil from the leeks and trim the roots. You can store leeks in the refrigerator for up to 1-2 weeks. Wrap them loosely in plastic wrap or place them in a plastic bag to prevent them from drying out. You can also freeze leeks for longer storage. To freeze, blanch them for 2-3 minutes, then cool them in ice water before packaging them in freezer bags.
Q: Can I regrow leeks from the root end?
A: Yes, you can regrow leeks from the root end. After using the leek, place the root end (about 2 inches) in a glass of water, ensuring the bottom is submerged. Place the glass in a sunny location and change the water every day or two. After a few days, you should see new green shoots emerging from the top. Once the roots have developed, you can transplant the root end into a pot or directly into the garden. This method won’t produce a full-sized leek, but it will give you a continuous supply of fresh greens for salads and garnishes.

Leave a Comment