
Growing Carrots in your Kitchen Garden might seem daunting, but trust me, it’s easier than you think! Have you ever dreamt of plucking vibrant, sweet carrots straight from your own backyard, knowing exactly where they came from and how they were grown? Imagine the satisfaction of serving a dish featuring carrots you nurtured from tiny seeds to crunchy perfection. This isn’t just a pipe dream; it’s an achievable reality with a few simple tricks and DIY hacks.
The history of carrot cultivation stretches back centuries, with early varieties differing significantly from the orange beauties we know today. From their origins in Persia and Afghanistan, carrots have journeyed across the globe, adapting to diverse climates and cultures. For generations, home gardens have been a source of sustenance and connection to nature, and growing your own carrots is a wonderful way to participate in this tradition.
In today’s world, where concerns about food security and the quality of produce are ever-present, knowing how to grow your own food is more important than ever. Plus, store-bought carrots often lack the fresh, vibrant flavor of homegrown ones. This DIY guide will equip you with the knowledge and skills to successfully cultivate delicious carrots in your very own kitchen garden, regardless of your experience level. I’m excited to share these simple yet effective techniques that will transform your gardening experience and bring the joy of fresh, homegrown carrots to your table!
Karotten im eigenen Küchengarten ziehen: So geht’s!
Ich liebe es, frische Karotten direkt aus dem Garten zu ernten! Der Geschmack ist einfach unvergleichlich mit denen aus dem Supermarkt. Und das Beste daran: Es ist gar nicht so schwer, sie selbst anzubauen. In diesem Artikel zeige ich dir Schritt für Schritt, wie du deine eigenen Karotten im Küchengarten ziehen kannst – egal ob du einen großen Garten oder nur einen kleinen Balkon hast.
Was du für den Karottenanbau brauchst
Bevor wir loslegen, lass uns sicherstellen, dass du alles Nötige zur Hand hast. Hier ist eine Liste der wichtigsten Dinge:
* Karottensamen: Wähle am besten eine Sorte, die für deine Region und deinen Boden geeignet ist. Es gibt verschiedene Sorten, die sich in Größe, Form und Reifezeit unterscheiden.
* Gartenwerkzeug: Eine Schaufel, eine Harke, eine Gießkanne oder ein Gartenschlauch sind unerlässlich.
* Bodenverbesserungsmittel: Kompost oder gut verrotteter Mist sind ideal, um den Boden vorzubereiten und mit Nährstoffen anzureichern.
* Sand (optional): Wenn dein Boden sehr lehmig ist, kann Sand helfen, ihn aufzulockern.
* Pflanzgefäße (optional): Für den Anbau auf dem Balkon benötigst du ausreichend große Pflanzgefäße.
* Markierungshilfen: Kleine Schilder oder Stäbe helfen dir, die Reihen zu markieren und den Überblick zu behalten.
* Geduld: Karotten brauchen Zeit zum Wachsen!
Die Vorbereitung ist das A und O
Der Erfolg beim Karottenanbau hängt stark von der richtigen Vorbereitung ab. Karotten mögen es locker und luftig, daher ist ein gut vorbereiteter Boden entscheidend.
Bodenbearbeitung
1. Boden lockern: Beginne damit, den Boden gründlich aufzulockern. Entferne Steine, Wurzeln und andere Hindernisse. Karottenwurzeln stoßen schnell an Hindernisse und können sich dann verformen.
2. Boden verbessern: Arbeite Kompost oder gut verrotteten Mist in den Boden ein. Das verbessert die Bodenstruktur und versorgt die Karotten mit wichtigen Nährstoffen. Wenn dein Boden sehr lehmig ist, mische etwas Sand unter, um ihn aufzulockern.
3. Boden ebnen: Harke den Boden glatt, um eine ebene Oberfläche zu schaffen. Das erleichtert die Aussaat.
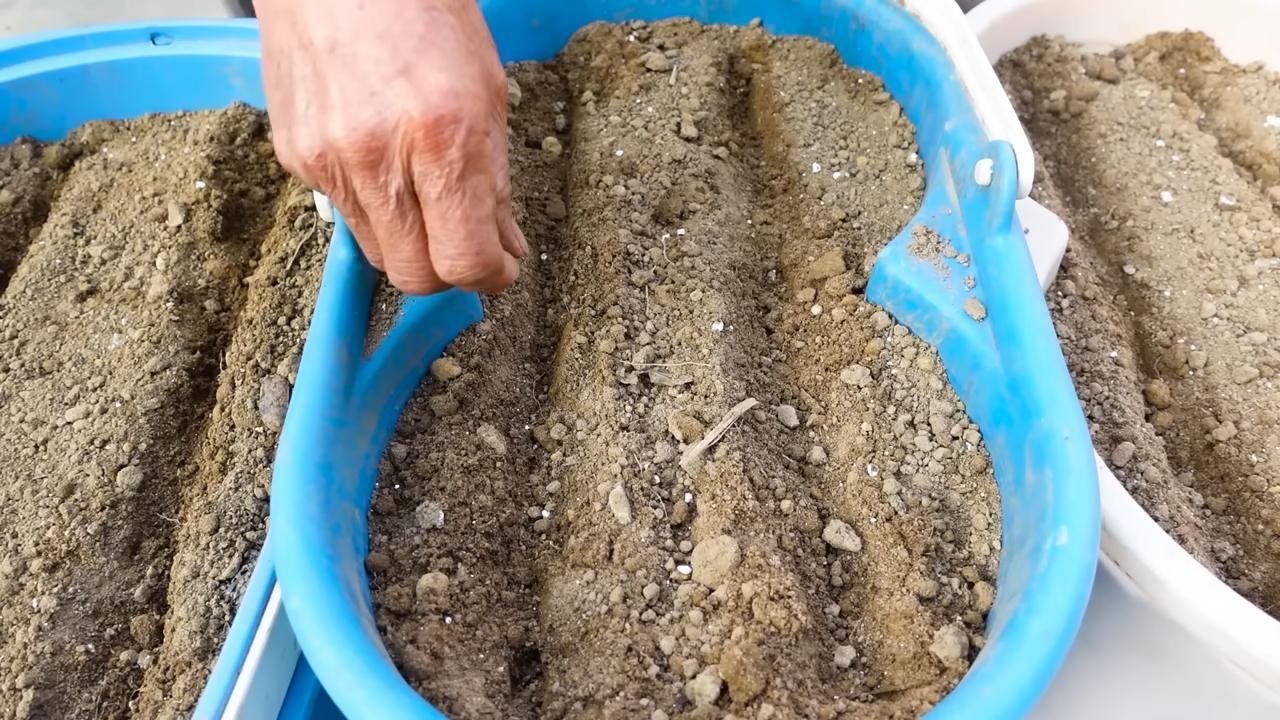
Aussaat im Beet
1. Reihen ziehen: Ziehe mit einer Harke oder einem Stock flache Reihen in den Boden. Die Reihen sollten etwa 15-20 cm auseinander liegen.
2. Samen säen: Säe die Karottensamen dünn in die Reihen. Karottensamen sind sehr klein, daher ist es wichtig, nicht zu viele Samen auf einmal zu säen. Du kannst die Samen auch mit etwas Sand vermischen, um sie besser verteilen zu können.
3. Samen bedecken: Bedecke die Samen mit einer dünnen Schicht Erde (ca. 0,5-1 cm).
4. Angießen: Gieße die Reihen vorsichtig an, damit die Samen nicht weggespült werden.
Aussaat im Pflanzgefäß
1. Gefäß vorbereiten: Fülle das Pflanzgefäß mit hochwertiger Pflanzerde. Achte darauf, dass das Gefäß ausreichend groß ist (mindestens 20 cm tief), damit die Karottenwurzeln genügend Platz haben.
2. Samen säen: Säe die Karottensamen dünn auf die Erde.
3. Samen bedecken: Bedecke die Samen mit einer dünnen Schicht Erde (ca. 0,5-1 cm).
4. Angießen: Gieße die Erde vorsichtig an.
Die Pflege: Gießen, Vereinzeln und Unkraut jäten
Nach der Aussaat ist die richtige Pflege entscheidend für eine reiche Ernte.
Gießen
* Regelmäßig gießen: Halte den Boden gleichmäßig feucht, besonders während der Keimung und des Wachstums. Vermeide Staunässe, da dies zu Wurzelfäule führen kann.
* Morgens gießen: Gieße am besten morgens, damit die Blätter über den Tag abtrocknen können. Das reduziert das Risiko von Pilzkrankheiten.
Vereinzeln
* Wenn die Keimlinge groß genug sind: Sobald die Keimlinge etwa 2-3 cm groß sind, musst du sie vereinzeln. Das bedeutet, dass du die schwächsten Pflanzen entfernst, damit die verbleibenden Pflanzen genügend Platz zum Wachsen haben.
* Abstand halten: Der Abstand zwischen den Pflanzen sollte etwa 3-5 cm betragen.
Unkraut jäten
* Regelmäßig jäten: Unkraut konkurriert mit den Karotten um Nährstoffe und Wasser. Jäte daher regelmäßig Unkraut, um sicherzustellen, dass die Karotten optimal wachsen können.
* Vorsichtig jäten: Sei beim Jäten vorsichtig, um die Karottenwurzeln nicht zu beschädigen.
Schutz vor Schädlingen
Karotten können von verschiedenen Schädlingen befallen werden, wie z.B. der Karottenfliege.
* Karottenfliege: Die Karottenfliege legt ihre Eier in der Nähe der Karotten ab. Die Larven fressen sich dann in die Karottenwurzeln.
* Vorbeugung: Um einem Befall vorzubeugen, kannst du ein Kulturschutznetz über die Karotten legen. Das Netz verhindert, dass die Karottenfliege ihre Eier ablegen kann.
* Bekämpfung: Wenn deine Karotten bereits von der Karottenfliege befallen sind, kannst du Nützlinge wie Nematoden einsetzen, um die Larven zu bekämpfen.
* Schnecken: Schnecken können ebenfalls an den Karottenblättern fressen.
* Vorbeugung: Um Schnecken fernzuhalten, kannst du Schneckenzäune aufstellen oder Schneckenkorn streuen.
* Bekämpfung: Sammle Schnecken ab oder setze Nützlinge wie Laufkäfer ein.
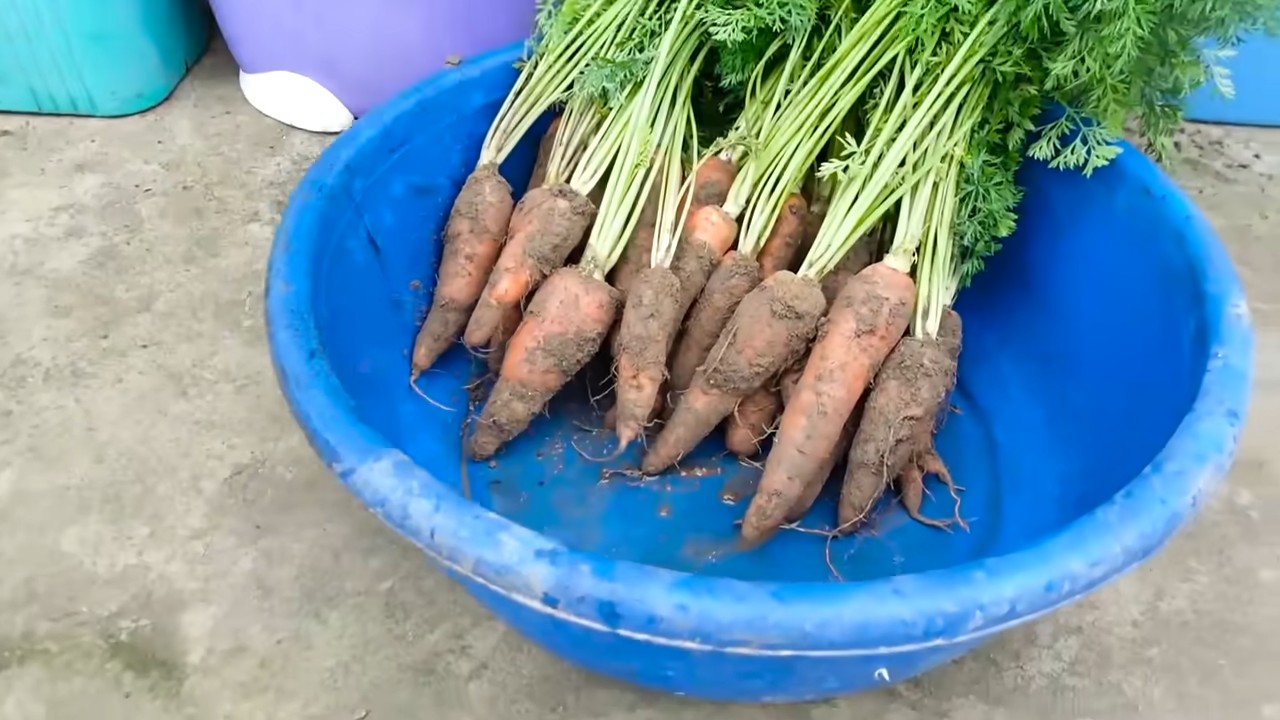
Die Ernte: Wann sind die Karotten reif?
Die Erntezeit hängt von der Karottensorte ab. In der Regel sind Karotten nach etwa 2-3 Monaten reif.
* Größe und Farbe: Achte auf die Größe und Farbe der Karotten. Sie sollten die gewünschte Größe erreicht haben und eine kräftige Farbe haben.
* Test: Ziehe eine Karotte vorsichtig aus dem Boden, um zu überprüfen, ob sie reif ist. Wenn sie sich leicht ziehen lässt und die gewünschte Größe hat, kannst du die restlichen Karotten ernten.
* Erntezeitpunkt: Ernte die Karotten am besten an einem trockenen Tag. Ziehe sie vorsichtig aus dem Boden, um die Wurzeln nicht zu beschädigen.
Tipps und Tricks für eine erfolgreiche Karottenernte
* Fruchtfolge beachten: Baue Karotten nicht jedes Jahr am selben Standort an. Wechsle die Kulturen, um Krankheiten und Schädlingen vorzubeugen.
* Mischkultur: Pflanze Karotten in Mischkultur mit anderen Pflanzen, wie z.B. Zwiebeln oder Knoblauch. Diese Pflanzen können Schädlinge abwehren.
* Bodenprobe: Lass regelmäßig eine Bodenprobe durchführen, um den Nährstoffgehalt des Bodens zu überprüfen und gegebenenfalls Dünger zuzuführen.
* Lagerung: Karotten können im Kühlschrank oder im Keller gelagert werden. Entferne das Grün und lagere die Karotten in feuchtem Sand oder in einem Plastikbeutel.
Ich hoffe, diese Anleitung hilft dir dabei, deine eigenen Karotten im Küchengarten zu ziehen. Es ist wirklich ein tolles Gefühl, die eigenen, frisch geernteten Karotten zu genießen! Viel Erfolg!
Conclusion
So, there you have it! Mastering the art of growing carrots in your kitchen garden is not only achievable but also incredibly rewarding. We’ve walked you through the essential steps, from selecting the right carrot varieties and preparing the soil to understanding watering needs and tackling common pests. But why is this DIY approach a must-try?
Firstly, the taste. Commercially grown carrots, while convenient, often lack the intense sweetness and nuanced flavor of homegrown varieties. When you nurture your own carrots, you control every aspect of their growth, ensuring they receive the optimal conditions for developing that signature carrot sweetness. Imagine biting into a crisp, juicy carrot, pulled straight from your garden, bursting with flavor that store-bought carrots simply can’t match. That alone is worth the effort.
Secondly, consider the environmental impact. By growing your own carrots, you’re reducing your reliance on industrial agriculture, which often involves heavy pesticide use and long-distance transportation. You’re contributing to a more sustainable food system and minimizing your carbon footprint. Plus, you know exactly what’s going into your food – no hidden chemicals or preservatives.
Thirdly, the satisfaction. There’s an undeniable sense of accomplishment that comes from nurturing a plant from seed to harvest. Watching those tiny carrot seedlings emerge from the soil and gradually develop into vibrant, orange roots is a truly fulfilling experience. It’s a connection to nature that’s often missing in our modern lives.
But the journey doesn’t end here! Feel free to experiment with different carrot varieties. Consider planting Nantes carrots for their cylindrical shape and sweet flavor, or try Chantenay carrots for their shorter, sturdier roots, perfect for heavier soils. You can also explore companion planting, pairing your carrots with onions or garlic to deter pests and improve soil health. Another variation is to try succession planting, sowing seeds every few weeks to ensure a continuous harvest throughout the growing season. You can even try growing carrots in containers if you have limited space.
Don’t be afraid to get your hands dirty and embrace the learning process. Gardening is all about experimentation and adaptation. Every garden is unique, and what works for one person may not work for another. The key is to observe your plants, pay attention to their needs, and adjust your approach accordingly.
We wholeheartedly encourage you to embark on this DIY adventure and experience the joy of growing your own carrots. It’s a simple yet profound way to connect with nature, improve your health, and enhance your culinary creations. And most importantly, don’t forget to share your experiences with us! We’d love to hear about your successes, challenges, and any unique tips or tricks you discover along the way. Share your photos, stories, and questions in the comments below. Let’s build a community of passionate carrot growers and inspire others to embrace the magic of homegrown food. So, grab your seeds, prepare your soil, and get ready to enjoy the delicious rewards of your own kitchen garden. Happy growing!
Frequently Asked Questions (FAQ)
What is the best time of year to plant carrot seeds?
The ideal time to plant carrot seeds depends on your climate. In general, carrots are a cool-season crop, meaning they thrive in temperatures between 60°F and 70°F (15°C and 21°C). For most regions, this translates to planting in early spring or late summer/early fall. Spring plantings should occur as soon as the soil can be worked, typically a few weeks before the last expected frost. Fall plantings should be timed to allow the carrots to mature before the first hard frost. Check your local weather patterns and planting guides for specific recommendations for your area.
How deep should I plant carrot seeds?
Carrot seeds are quite small, so they should be planted shallowly. Aim for a depth of about ¼ to ½ inch (0.6 to 1.3 cm). Planting too deep can prevent the seeds from germinating, while planting too shallow can cause them to dry out. After sowing the seeds, gently cover them with a thin layer of soil or compost and water thoroughly.
How often should I water my carrot plants?
Carrots need consistent moisture to develop properly. Water deeply and regularly, especially during dry periods. Aim to keep the soil consistently moist but not waterlogged. Overwatering can lead to root rot, while underwatering can cause the carrots to become stunted and tough. A good rule of thumb is to water when the top inch of soil feels dry to the touch. Mulching around the plants can help retain moisture and reduce the need for frequent watering.
What kind of soil is best for growing carrots?
Carrots prefer loose, well-drained soil that is rich in organic matter. Heavy, clay-based soils can hinder root development and result in misshapen carrots. Before planting, amend the soil with compost or other organic matter to improve drainage and fertility. Remove any rocks or debris that could obstruct the growth of the roots. A slightly acidic soil pH of 6.0 to 6.8 is ideal for growing carrots.
How long does it take for carrots to mature?
The time it takes for carrots to mature depends on the variety and growing conditions. Generally, carrots take between 60 and 80 days to reach maturity. Check the seed packet for specific information on the variety you are growing. You can start harvesting carrots when they reach a usable size, even if they are not fully mature.
What are some common pests and diseases that affect carrots?
Some common pests that affect carrots include carrot rust flies, aphids, and nematodes. Carrot rust flies lay their eggs near the base of the plants, and the larvae burrow into the roots, causing damage. Aphids can suck the sap from the leaves, weakening the plants. Nematodes are microscopic worms that can damage the roots. To prevent pest problems, practice crop rotation, use row covers, and encourage beneficial insects. Common diseases that affect carrots include leaf blight and root rot. To prevent diseases, ensure good air circulation, avoid overwatering, and use disease-resistant varieties.
How do I prevent my carrots from splitting?
Carrot splitting is often caused by inconsistent watering. When the soil dries out and then is suddenly saturated, the carrots can absorb water too quickly, causing them to split. To prevent splitting, water your carrots regularly and consistently, especially during dry periods. Mulching around the plants can also help retain moisture and prevent the soil from drying out too quickly.
Can I grow carrots in containers?
Yes, you can grow carrots in containers, but you need to choose a container that is deep enough to accommodate the roots. A container that is at least 12 inches (30 cm) deep is recommended. Use a well-draining potting mix and water regularly. Container-grown carrots may need more frequent watering than those grown in the ground. Choose shorter carrot varieties, such as Nantes or Chantenay, for container growing.
How do I store my harvested carrots?
To store your harvested carrots, remove the tops and gently brush off any excess soil. Store the carrots in a cool, dark, and humid place, such as a refrigerator or root cellar. You can store them in a plastic bag or container to prevent them from drying out. Carrots can typically be stored for several weeks or even months under the right conditions.
What are the benefits of growing my own carrots?
Growing your own carrots offers numerous benefits, including fresher, more flavorful produce, reduced reliance on industrial agriculture, and a connection to nature. Homegrown carrots often have a sweeter and more intense flavor than store-bought carrots. You also have control over the growing process, ensuring that your carrots are free from harmful pesticides and chemicals. Gardening is a great way to relieve stress, get exercise, and connect with the natural world. Plus, there’s nothing quite like the satisfaction of harvesting your own food.


Leave a Comment