
Growing Strawberries Indoors might seem like a whimsical dream, especially if you’re staring out at a snow-covered landscape! But trust me, it’s totally achievable, and I’m here to show you how. Imagine plucking juicy, sun-ripened (well, grow-light-ripened!) strawberries right from your kitchen counter in the dead of winter. Sounds amazing, right?
The history of cultivating strawberries dates back to ancient Rome, but the idea of bringing that cultivation inside is a relatively modern innovation. For centuries, strawberries were a seasonal treat, a fleeting taste of summer. Now, thanks to advancements in grow lights and hydroponics, we can enjoy these delicious berries year-round, regardless of the weather outside.
So, why would you want to embark on this indoor strawberry adventure? Well, for starters, it’s incredibly rewarding! There’s something deeply satisfying about nurturing a plant from seedling to fruit, especially when that fruit is as delicious as a strawberry. Plus, growing strawberries indoors allows you to control the environment, minimizing pests and diseases that can plague outdoor gardens. And let’s be honest, who wouldn’t want a constant supply of fresh, organic strawberries at their fingertips? This DIY guide will walk you through everything you need to know, from choosing the right variety to troubleshooting common problems. Get ready to unleash your inner indoor gardener!
Growing Strawberries Indoors: Your DIY Guide for a Sweet Harvest
Hey Strawberry Lovers! Have you ever dreamed of harvesting fresh, juicy strawberries right in your home, no matter the season? Me too! And guess what? It’s easier than you think! In this article, I’ll show you how to grow your own strawberries indoors with a few simple steps and a little patience. Let’s get started!
What You Need: Your Shopping List
Before we start growing, we need to make sure we have everything necessary on hand. Here is a list of the things you’ll need:
- Strawberry plants: Everbearing varieties are best, as they produce fruit over a longer period. Popular varieties for indoor growing include ‘Albion’, ‘Seascape’, or ‘Eversweet’. You can buy young plants at a nursery or online.
- Pots/Containers: Choose pots with good drainage. They should be at least 15 cm (6 inches) in diameter, or even a bit larger, so the roots have enough space.
- High-quality potting soil: Use a well-draining potting soil that is rich in organic matter. A mix of peat moss, perlite, and vermiculite is ideal.
- Grow lights: Strawberries need a lot of light, especially when you grow them indoors. An LED grow light is energy-efficient and provides the necessary spectrum.
- Fertilizer: A water-soluble fertilizer specifically for strawberries is important to supply the plants with the necessary nutrients.
- Spray bottle: For moistening the leaves and increasing humidity.
- Watering can: For watering the plants.
- Scissors or garden shears: For removing dead leaves and runners.
- Optional: Mulch (e.g., straw or coco coir) for moisture retention and weed suppression.
Step-by-Step Guide: Planting and Caring for Strawberries
Now that we have everything, we can begin the actual growing process. Follow these steps to successfully grow your strawberry plants indoors:
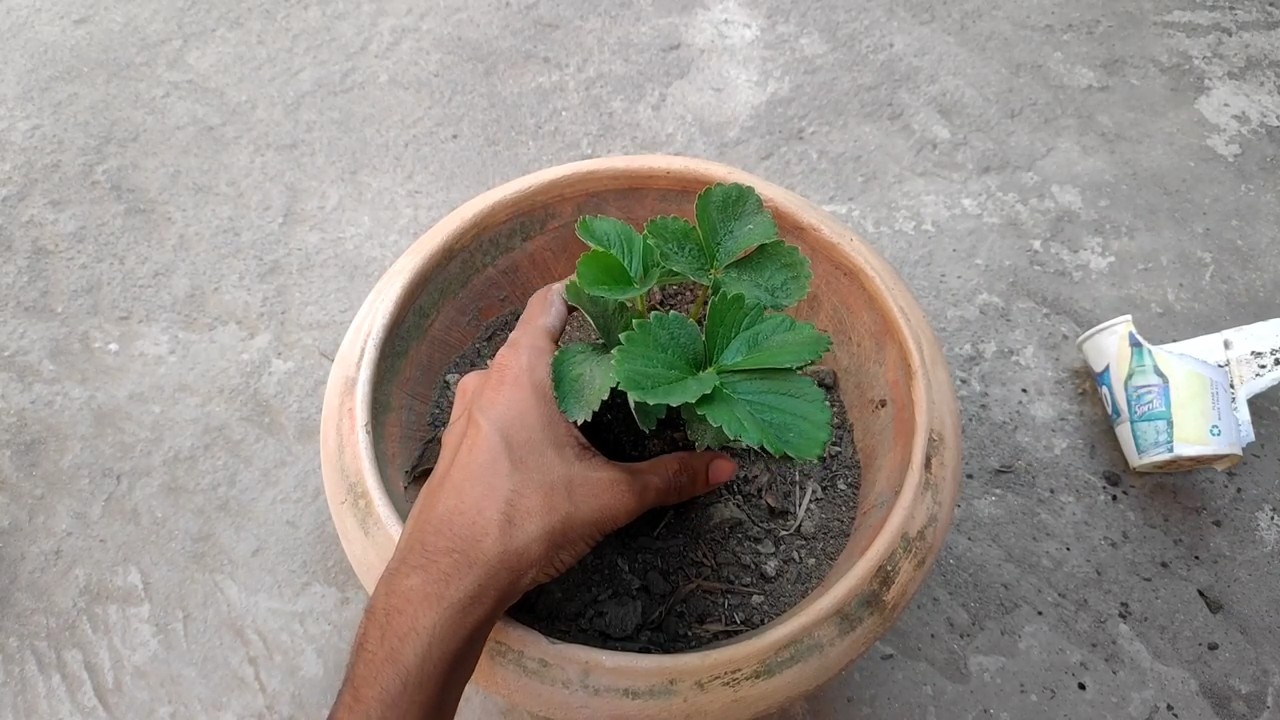
- Prepare the plants: When you receive your strawberry plants, carefully remove them from their containers. Gently loosen the roots a bit so they can spread out better in the new pot.
- Prepare the pots: Fill the pots with potting soil, but leave about 2-3 cm (1 inch) of space at the top. This makes watering easier.
- Plant the strawberries: Place the strawberry plants in the pots. Make sure that the crown (the transition between the roots and the stem) is just above the soil level. Fill the pots with more soil and press it down lightly.
- Water: Water the plants thoroughly until water runs out of the drainage holes. This helps settle the soil and moisten the roots.
- Choose the right location: Place the pots in a bright spot. If you don’t have sufficient natural light, use a grow light. The plants should receive at least 6-8 hours of light per day.
- Install the grow light: Hang the grow light about 30-60 cm (12-24 inches) above the plants. Make sure the plants are evenly illuminated.
- Water regularly: Strawberries like to be moist, but not wet. Water the plants when the top layer of soil feels dry. Avoid waterlogging, as this can lead to root rot.
- Fertilize: Begin fertilizing about two weeks after planting. Use a water-soluble fertilizer specifically for strawberries and follow the instructions on the packaging. Fertilize the plants every 2-3 weeks.
- Increase humidity: Strawberries prefer higher humidity. You can increase the humidity by regularly spraying the leaves with water or by placing a humidifier near the plants.
- Remove runners: Strawberry plants produce runners, which are long stems where new plants form. Remove these runners so the mother plant can put its energy into fruit production.
- Pollination: Outdoors, strawberries are pollinated by bees and other insects. Indoors, you’ll have to handle the pollination yourself. you can do this by gently going from flower to flower with a small paintbrush and distributing the pollen. Alternatively, you can also gently shake the plants to release the pollen.
- Control pests and diseases: Watch for signs of pests like aphids or spider mites. If you discover pests, you can treat them with an organic insecticide or a mixture of water and dish soap. Also, look for signs of diseases like powdery mildew. Remove affected leaves immediately.
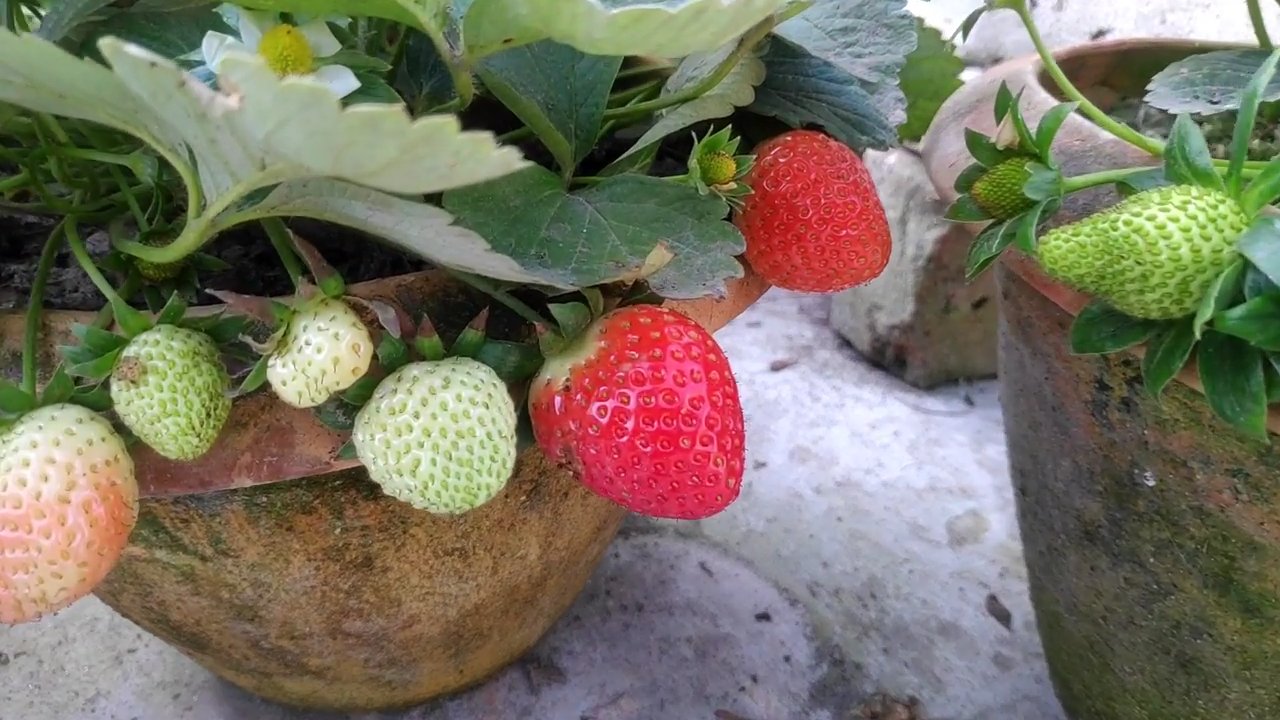
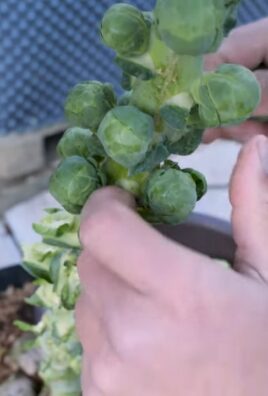
- Harvesting: The strawberries are ripe when they have a deep red color and detach easily from the stem. Gently pick the ripe strawberries to avoid damaging the plants.
Additional Tips for a Successful Indoor Strawberry Harvest
Here are a few more tips that can help you optimize your indoor strawberry harvest:
- Choose the right variety: As mentioned, everbearing varieties are best suited for indoor cultivation. Research different varieties before buying and choose the one that best fits your conditions.
- Repot regularly: Strawberry plants grow quickly and can rapidly fill their pots. Repot the plants into larger pots every 1-2 years to give them enough space to grow.
- Rotate the plants: Rotate the plants regularly so they receive light evenly from all sides.
- Be patient: It can take several weeks for strawberry plants to bear fruit. Be patient and don’t give up!
Common Problems and Solutions
Problems can also arise when growing strawberries indoors. Here are some common issues and how to solve them:
- Yellow leaves: Yellow leaves can be a sign of overwatering, nutrient deficiency, or lack of light. Check your watering habits, fertilize the plants, and ensure they are getting enough light.
- No fruit: If your strawberry plants are not producing fruit, it could be due to a lack of pollination, too little light, or a nutrient deficiency. Manually pollinate the flowers, ensure the plants get enough light, and fertilize them regularly.
- Pests: Pests like aphids or spider mites can infest your strawberry plants. Combat the pests with an organic insecticide or a mixture of water and dish soap.
- Root rot: Root rot is caused by waterlogging. Make sure the pots have good drainage and do not overwater the plants.
Conclusion: Your Own Strawberry Oasis at Home
With a little patience and care, you can grow your own strawberries indoors and enjoy fresh, juicy fruit all year round. It’s a rewarding project that not only provides delicious strawberries but also creates a green oasis in your home. So, what are you waiting for? Get started and begin your own strawberry adventure! I wish you the best of luck and a bountiful harvest
Conclusion
So, there you have it! Growing strawberries indoors isn’t just a whimsical dream; it’s a tangible reality, and with these simple DIY tricks, it’s more accessible than ever. We’ve walked you through the essential steps, from selecting the right variety and preparing the perfect potting mix to ensuring adequate lighting and mastering the art of pollination. But why should you embark on this berry-filled adventure?
Firstly, imagine the sheer delight of plucking fresh, juicy strawberries from your own indoor garden, even in the dead of winter. No more relying on store-bought berries that lack the vibrant flavor and sweetness of homegrown produce. You’ll have complete control over the growing process, ensuring your strawberries are free from harmful pesticides and bursting with natural goodness.
Secondly, growing strawberries indoors is a fantastic way to connect with nature, even when you’re confined to your home. It’s a therapeutic activity that can reduce stress, boost your mood, and provide a sense of accomplishment as you watch your plants thrive. Plus, it’s a wonderful educational opportunity for children, teaching them about plant life cycles and the importance of sustainable food practices.
Thirdly, think about the cost savings! While there’s an initial investment in supplies, you’ll quickly recoup your expenses as you harvest your own strawberries. Over time, you’ll save money on groceries and reduce your reliance on commercially grown produce.
But the benefits don’t stop there. Growing strawberries indoors allows you to experiment with different varieties and techniques. Why not try growing alpine strawberries for their intense flavor and compact size? Or perhaps you’d like to experiment with hydroponics for a soilless growing experience? The possibilities are endless!
Consider these variations to personalize your indoor strawberry garden:
* Vertical Gardening: Maximize your space by using vertical planters or hanging baskets. This is especially useful if you have limited floor space.
* Companion Planting: Plant basil or marigolds alongside your strawberries to deter pests and attract pollinators.
* Strawberry Towers: Create a stunning visual display with a strawberry tower, which allows you to grow multiple plants in a small footprint.
* Different Containers: Experiment with different container materials, such as terracotta pots, plastic containers, or even repurposed items like old buckets or tires.
We’ve provided you with the knowledge and inspiration to get started, but the real magic happens when you put these tips into practice. Don’t be afraid to experiment, learn from your mistakes, and adapt the techniques to suit your specific environment and preferences. Remember, growing strawberries indoors is a journey, not a destination. Enjoy the process, celebrate your successes, and learn from your challenges.
So, what are you waiting for? Grab your supplies, roll up your sleeves, and embark on your indoor strawberry-growing adventure today! We’re confident that you’ll be amazed by the results. And most importantly, we want to hear about your experience! Share your photos, tips, and stories with us in the comments below. Let’s create a community of indoor strawberry enthusiasts and inspire others to discover the joy of growing their own fresh, delicious berries. Let us know what DIY tricks worked best for you when growing strawberries indoors.
Frequently Asked Questions (FAQ)
1. What are the best strawberry varieties to grow indoors?
The best strawberry varieties for indoor growing are typically day-neutral or everbearing varieties. These types of strawberries produce fruit throughout the growing season, rather than just during a specific period. Some popular choices include:
* Albion: Known for its large, flavorful berries and disease resistance.
* Seascape: A reliable everbearing variety that produces consistently high yields.
* Tristar: A compact, day-neutral variety that’s well-suited for small spaces.
* Ozark Beauty: While technically a June-bearing variety, it can still produce a decent crop indoors with proper care.
* Alpine Strawberries: These small, intensely flavored strawberries are a great option for indoor growing, especially if you’re looking for something unique. They don’t require pollination.
Consider the size of your growing space and your personal taste preferences when selecting a variety. Research the specific needs of each variety to ensure you can provide the optimal growing conditions.
2. How much light do indoor strawberries need?
Strawberries require a significant amount of light to thrive and produce fruit. Ideally, they need at least 6-8 hours of direct sunlight per day. However, if you don’t have access to enough natural light, you can supplement with artificial grow lights.
Full-spectrum LED grow lights are an excellent choice for indoor strawberry growing. They provide the necessary wavelengths of light for photosynthesis and can be adjusted to suit the specific needs of your plants. Position the grow lights about 6-12 inches above the plants and monitor their growth to ensure they’re receiving adequate light.
If you’re using fluorescent grow lights, you’ll need to use both cool white and warm white bulbs to provide a balanced spectrum of light. Replace the bulbs regularly, as their intensity decreases over time.
3. How often should I water my indoor strawberry plants?
The watering frequency for indoor strawberry plants depends on several factors, including the size of the container, the type of potting mix, and the ambient temperature and humidity. As a general rule, you should water your plants when the top inch of soil feels dry to the touch.
Avoid overwatering, as this can lead to root rot. Ensure that your containers have adequate drainage holes to prevent water from accumulating at the bottom. Water deeply, allowing the water to drain out of the bottom of the container.
During the flowering and fruiting stages, strawberries require more water than during the vegetative stage. Monitor your plants closely and adjust your watering schedule accordingly.
4. How do I pollinate my indoor strawberry plants?
Since there are no bees or other pollinators indoors, you’ll need to manually pollinate your strawberry plants. This is a simple process that can be done with a small paintbrush or cotton swab.
Gently brush the pollen from the stamen (the male part of the flower) onto the pistil (the female part of the flower). Repeat this process for each flower on your plants. You can also use a small fan to gently blow air over the plants, which can help to distribute the pollen.
Pollinate your plants every day or two during the flowering stage to ensure optimal fruit set. You’ll know that pollination has been successful when the base of the flower begins to swell and develop into a strawberry.
5. What kind of fertilizer should I use for indoor strawberries?
Strawberries are heavy feeders and require regular fertilization to produce abundant fruit. Use a balanced fertilizer that’s specifically formulated for strawberries or other fruiting plants. A fertilizer with an NPK ratio of 10-10-10 or 14-14-14 is a good choice.
Fertilize your plants every 2-4 weeks during the growing season, following the instructions on the fertilizer label. Avoid over-fertilizing, as this can burn the roots and damage the plants.
You can also supplement with organic fertilizers, such as compost tea or fish emulsion. These provide essential nutrients and beneficial microbes that can improve soil health and plant growth.
6. How do I deal with pests and diseases on my indoor strawberry plants?
Indoor strawberry plants are less susceptible to pests and diseases than outdoor plants, but they can still be affected. Common pests include aphids, spider mites, and whiteflies. Common diseases include powdery mildew and gray mold.
To prevent pests and diseases, keep your growing area clean and well-ventilated. Inspect your plants regularly for signs of infestation or infection. If you spot any pests, you can try washing them off with a strong stream of water or using insecticidal soap or neem oil.
For diseases, remove any infected leaves or fruit and treat the plants with a fungicide. Ensure that your plants have adequate air circulation to prevent the spread of disease.
7. How long does it take for indoor strawberries to produce fruit?
The time it takes for indoor strawberries to produce fruit depends on the variety, the growing conditions, and the age of the plants. Generally, you can expect to harvest your first strawberries within 2-3 months of planting.
Day-neutral and everbearing varieties will produce fruit continuously throughout the growing season, while June-bearing varieties will produce a single large crop.
Be patient and provide your plants with the optimal growing conditions to ensure a bountiful harvest.
8. Can I grow strawberries indoors from seed?
Yes, you can grow strawberries indoors from seed, but it’s a more challenging and time-consuming process than starting with established plants. Strawberry seeds require a period of cold stratification before they will germinate. This means that they need to be exposed to cold temperatures for several weeks.
To stratify strawberry seeds, place them in a damp paper towel inside a plastic bag and store them in the refrigerator for 4-6 weeks. After stratification, sow the seeds in a seed-starting mix and keep them moist and warm.
It can take several weeks for strawberry seeds to germinate, and the seedlings are very delicate. Be patient and provide them with the proper care to ensure their survival.
9. How do I overwinter my indoor strawberry plants?
Even though you’re growing indoors, your strawberry plants may benefit from a period of dormancy during the winter months. This
Leave a Comment