
Grow Summer Squash like a pro, even if you think you have a black thumb! Have you ever dreamed of harvesting baskets overflowing with vibrant zucchini, crookneck, or pattypan squash, all grown right in your own backyard? I know I have! For centuries, squash has been a staple crop in many cultures, dating back thousands of years in the Americas. It’s not just a delicious and versatile vegetable; it’s a symbol of abundance and self-sufficiency.
But let’s be honest, sometimes gardening can feel overwhelming. Pests, diseases, and unpredictable weather can quickly turn your gardening dreams into a frustrating reality. That’s where these simple, yet effective, DIY tricks and hacks come in. I’m going to share my favorite secrets to help you grow summer squash successfully, even if you’re short on space, time, or experience.
Imagine the satisfaction of serving a meal made with ingredients you nurtured from seed to table. These DIY solutions will not only save you money but also empower you to create a thriving garden that provides fresh, healthy food for you and your family. So, grab your gardening gloves, and let’s get started on this exciting journey to a bountiful summer squash harvest!
Growing Summer Squash: A Beginner’s Guide to a Bountiful Harvest
Hey there, fellow gardening enthusiasts! I’m so excited to share my tips and tricks for growing summer squash. It’s one of the most rewarding vegetables to cultivate – fast-growing, prolific, and incredibly versatile in the kitchen. Plus, there’s nothing quite like the taste of a freshly picked zucchini or yellow squash straight from your own garden. Let’s dive in!
Choosing Your Squash Variety
Before we get our hands dirty, let’s talk about variety. Summer squash comes in all shapes, sizes, and colors. Here are a few popular options:
* Zucchini: The classic! Dark green, cylindrical, and incredibly productive. Black Beauty and Costata Romanesco are two of my favorites.
* Yellow Squash (Straightneck & Crookneck): These offer a milder flavor than zucchini. Early Crookneck and Yellow Straightneck are reliable choices.
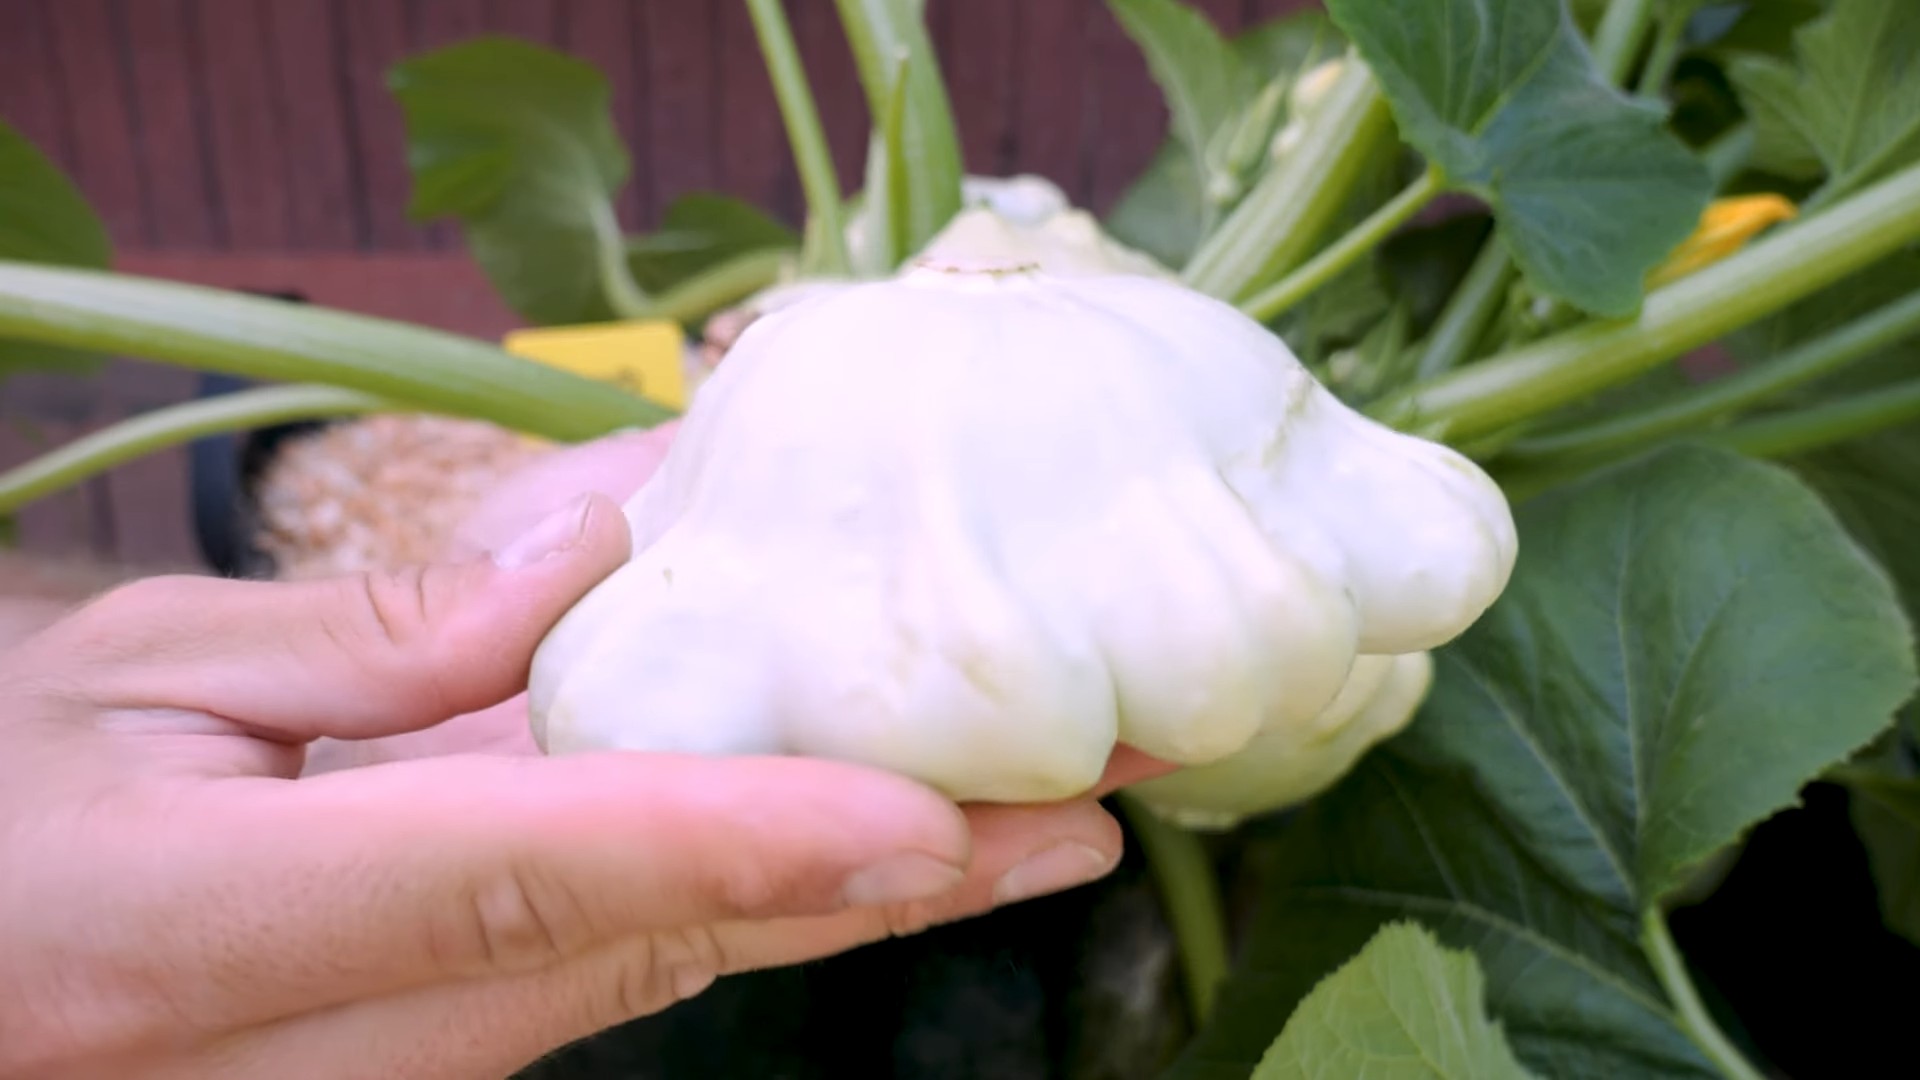
* Pattypan Squash: These adorable, saucer-shaped squash come in various colors, including yellow, green, and white. They have a slightly nutty flavor.
* Round Zucchini (Eight Ball): These are fun to grow and perfect for stuffing.
Consider your space and culinary preferences when making your selection. I usually grow a mix of zucchini and yellow squash for variety.
Preparing Your Garden Bed
Squash plants are heavy feeders, so preparing your garden bed properly is crucial for a successful harvest. Here’s what I do:
* Sunlight: Summer squash needs at least 6-8 hours of direct sunlight per day. Choose a sunny spot in your garden.
* Soil: Well-drained soil is essential. Squash doesn’t like to sit in soggy conditions. Amend your soil with plenty of compost or well-rotted manure. This will improve drainage and provide essential nutrients.
* Soil pH: Aim for a soil pH between 6.0 and 6.8. You can test your soil with a home testing kit or send a sample to your local agricultural extension office.
* Spacing: Give your squash plants plenty of room to grow. Zucchini and yellow squash need about 2-3 feet of space between plants, while larger varieties may need even more. Pattypan squash can be planted closer together, about 18 inches apart.
Planting Your Squash Seeds or Seedlings
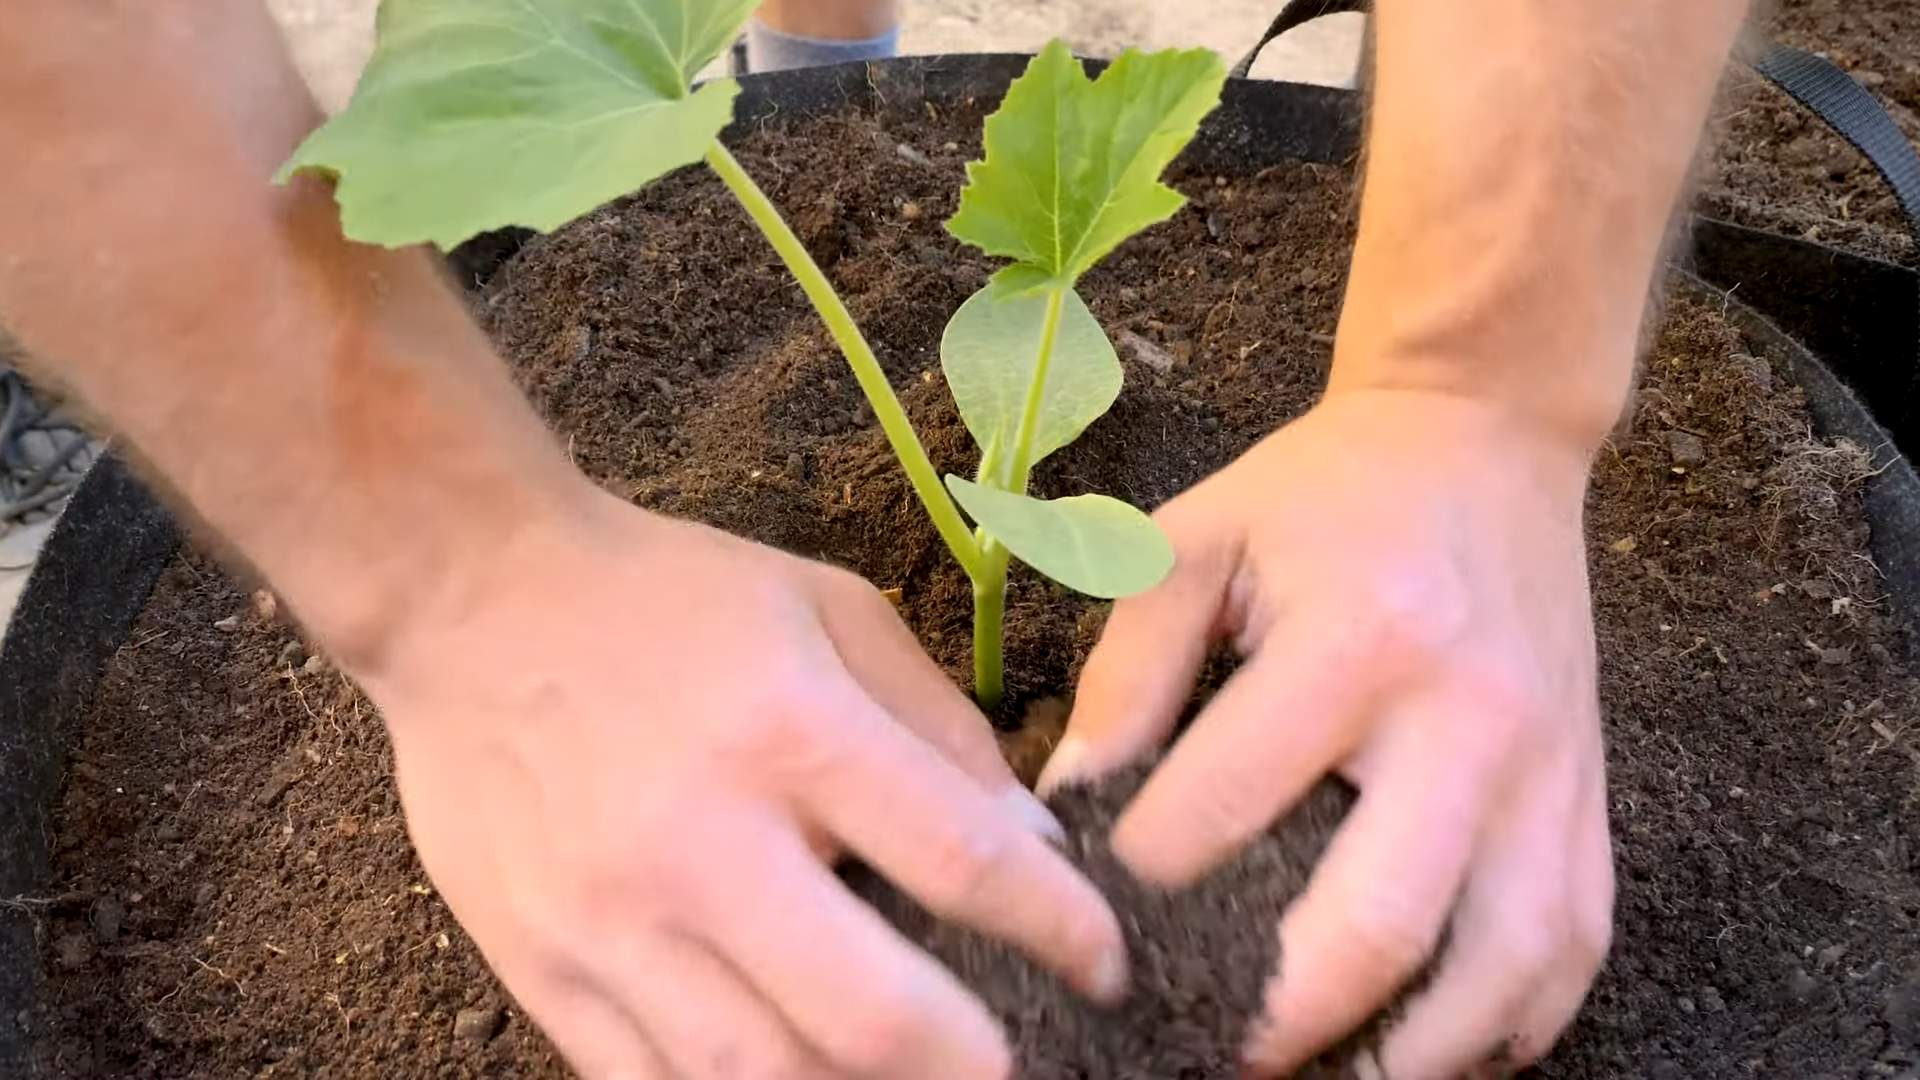
You can start squash seeds indoors or direct sow them in your garden. I usually direct sow because it’s easier and squash seedlings don’t always transplant well.
Direct Sowing:
1. Wait for Warm Weather: Squash is a warm-weather crop. Wait until the soil temperature is consistently above 60°F (15°C) before planting. This is usually a couple of weeks after the last frost.
2. Prepare the Planting Holes: Dig small holes about 1 inch deep and space them according to the variety you’re growing.
3. Sow the Seeds: Place 2-3 seeds in each hole. This ensures that at least one seed will germinate.
4. Cover and Water: Gently cover the seeds with soil and water thoroughly.
5. Thin Seedlings: Once the seedlings emerge and have a few true leaves, thin them to one plant per hole. Choose the strongest, healthiest-looking seedling.
Starting Seeds Indoors (Optional):
1. Start Early: Start seeds indoors about 3-4 weeks before the last expected frost.
2. Use Seed Starting Mix: Use a good quality seed starting mix in small pots or trays.
3. Sow Seeds: Sow 1-2 seeds per pot, about 1 inch deep.
4. Keep Warm and Moist: Keep the soil consistently moist and provide warmth. A heat mat can help speed up germination.
5. Harden Off Seedlings: Before transplanting seedlings outdoors, harden them off by gradually exposing them to outdoor conditions for a week or two.
6. Transplant Carefully: Transplant seedlings into your prepared garden bed, spacing them according to the variety. Be very gentle when transplanting, as squash roots are delicate.
Caring for Your Squash Plants
Once your squash plants are established, it’s time to provide them with the care they need to thrive.
* Watering: Squash plants need consistent moisture, especially during hot weather. Water deeply at the base of the plants, avoiding getting the leaves wet. Soaker hoses or drip irrigation are ideal. I usually water deeply 2-3 times a week, depending on the weather.
* Fertilizing: As heavy feeders, squash plants benefit from regular fertilization. Use a balanced fertilizer or side-dress with compost every few weeks. I like to use a liquid seaweed fertilizer for an extra boost.
* Weeding: Keep the area around your squash plants free of weeds. Weeds compete for nutrients and water. Mulching with straw or wood chips can help suppress weeds and retain moisture.
* Pest Control: Squash plants are susceptible to several pests, including squash bugs, squash vine borers, and aphids. Inspect your plants regularly for signs of infestation.
* Squash Bugs: These sap-sucking insects can weaken and kill your plants. Handpick them off the plants or use insecticidal soap.
* Squash Vine Borers: These pests bore into the stems of squash plants, causing them to wilt and die. Wrap the base of the stems with aluminum foil or row covers to prevent borers from entering. You can also inject Bacillus thuringiensis (Bt) into the stems to kill the borers.
* Aphids: These tiny insects suck sap from the leaves, causing them to curl and distort. Spray aphids with insecticidal soap or blast them off with a strong stream of water.
* Pollination: Squash plants have separate male and female flowers. Pollination is necessary for fruit to develop. Bees and other pollinators usually do the job, but sometimes hand-pollination is necessary, especially if you have a lot of cloudy weather.
* Hand-Pollination: To hand-pollinate, use a small paintbrush to transfer pollen from the male flower (which has a long, thin stem) to the female flower (which has a small fruit at the base). Do this in the morning, when the flowers are open.
Harvesting Your Summer Squash
Harvesting summer squash at the right time is crucial for optimal flavor and texture.
* Timing: Harvest summer squash when it’s young and tender. Zucchini and yellow squash are usually ready to harvest when they are 6-8 inches long. Pattypan squash can be harvested when they are about 3-4 inches in diameter.
* Technique: Use a sharp knife or pruners to cut the squash from the plant. Be careful not to damage the plant.
* Frequency: Harvest frequently to encourage continued production. The more you harvest, the more squash your plants will produce.
* Storage: Summer squash is best used fresh. Store it in the refrigerator for up to a week.
Dealing with Common Problems
Even with the best care, you may encounter some problems when growing summer squash. Here are a few common issues and how to address them:
* Powdery Mildew: This fungal disease causes a white, powdery coating on the leaves. Improve air circulation by spacing plants properly and pruning away crowded leaves. You can also spray with a fungicide.
* Blossom End Rot: This condition causes the blossom end of the squash to rot. It’s usually caused by calcium deficiency or inconsistent watering. Ensure your soil has adequate calcium and water regularly.
* Lack of Pollination: If your squash plants are producing flowers but no fruit, it could be due to lack of pollination. Hand-pollinate the flowers or attract more pollinators to your garden by planting flowers that attract bees and other beneficial insects.
Enjoying Your Harvest
Now for the best part – enjoying the fruits (or vegetables!) of your labor. Summer squash is incredibly versatile in the kitchen. Here are a few of my favorite ways to use it:
* Grilled: Slice zucchini or yellow squash lengthwise and grill it with a little olive oil, salt, and pepper.
* Sautéed: Sauté diced squash with onions, garlic, and other vegetables.
* Roasted: Roast squash with other vegetables like bell peppers, onions, and tomatoes.
* Zucchini Bread: Grate zucchini and use it to make delicious zucchini bread or muffins.
* Stuffed Squash: Hollow out pattypan squash or round zucchini and stuff them with a mixture of rice, vegetables, and meat or cheese.
* Zoodles: Use a spiralizer to turn zucchini into noodles and serve them with your favorite sauce.
Saving Seeds (Optional)
If you want to save seeds from your summer squash for next year, choose the healthiest, most vigorous plants. Allow a few squash to mature fully on the vine. Once they are fully ripe, harvest them and scoop out the seeds. Rinse the seeds and spread them out on a
Conclusion
So, there you have it! Growing summer squash at home, while it might seem daunting at first, is incredibly rewarding and, with these simple tricks, surprisingly achievable. We’ve walked you through the essential steps, from seed to harvest, highlighting the key factors that contribute to a bountiful yield. But why should you bother? Why dedicate your precious time and garden space to this endeavor?
The answer is simple: flavor, freshness, and control. Store-bought summer squash, while convenient, often lacks the vibrant taste and crisp texture of homegrown varieties. When you grow your own, you’re in charge of everything – from the soil quality to the watering schedule, ensuring that your squash is bursting with flavor and free from unwanted chemicals. Plus, there’s an undeniable satisfaction in harvesting something you’ve nurtured from a tiny seed.
This DIY approach to growing summer squash isn’t just about saving money; it’s about connecting with nature, learning new skills, and enjoying the fruits (or rather, vegetables!) of your labor. Imagine the delicious meals you can create with your homegrown zucchini, yellow squash, and pattypan squash. Think of the summer salads, grilled vegetable platters, and comforting casseroles you can whip up with ingredients straight from your backyard.
But the benefits don’t stop there. Growing your own summer squash also allows you to experiment with different varieties. Why stick to the standard zucchini when you can try growing heirloom varieties like Costata Romanesco or Tromboncino? Each variety offers a unique flavor and texture profile, adding excitement and diversity to your culinary creations.
And speaking of variations, don’t be afraid to get creative with your growing methods. If you’re short on space, consider growing your summer squash in containers. Just make sure to choose a large container with good drainage and provide adequate support for the vines. You can also try companion planting to deter pests and attract beneficial insects. Marigolds, nasturtiums, and basil are all excellent companions for summer squash.
Another variation to consider is succession planting. By planting new seeds every few weeks, you can extend your harvest season and enjoy a continuous supply of fresh summer squash throughout the summer. This is especially useful if you have a large family or enjoy sharing your harvest with friends and neighbors.
Ultimately, growing summer squash is a journey of discovery. There will be challenges along the way, but the rewards are well worth the effort. So, grab your seeds, prepare your soil, and get ready to experience the joy of homegrown summer squash. We encourage you to try this DIY trick and witness the magic for yourself.
Don’t forget to share your experiences with us! We’d love to hear about your successes, your challenges, and any tips or tricks you’ve discovered along the way. Share your photos and stories on social media using #HomegrownSummerSquash. Let’s build a community of passionate gardeners and celebrate the bounty of the summer harvest together!
Frequently Asked Questions (FAQ)
What is the best time to plant summer squash?
The ideal time to plant summer squash is after the last frost when the soil has warmed to at least 60°F (15°C). Summer squash is very sensitive to frost, so planting too early can damage or kill the seedlings. In most regions, this is typically in late spring or early summer. You can start seeds indoors 2-3 weeks before the last expected frost to get a head start, but be sure to harden them off before transplanting them outdoors. Check your local weather forecasts and planting calendars for the most accurate timing for your specific area.
How much sun does summer squash need?
Summer squash thrives in full sun, requiring at least 6-8 hours of direct sunlight per day. Insufficient sunlight can lead to weak plants, reduced yields, and increased susceptibility to pests and diseases. Choose a planting location that receives ample sunlight throughout the day. If you’re growing in containers, make sure to position them in a sunny spot. If you live in a particularly hot climate, some afternoon shade may be beneficial to prevent the plants from overheating.
What kind of soil is best for growing summer squash?
Summer squash prefers well-drained, fertile soil that is rich in organic matter. Amend your soil with compost, aged manure, or other organic materials before planting to improve its fertility and drainage. The ideal soil pH for summer squash is between 6.0 and 7.5. You can test your soil pH using a soil testing kit and adjust it accordingly. Avoid planting in heavy clay soil, as this can lead to root rot. If you have clay soil, amend it with plenty of organic matter to improve its drainage.
How often should I water summer squash?
Summer squash needs consistent moisture, especially during hot, dry weather. Water deeply and regularly, aiming to keep the soil consistently moist but not waterlogged. Water at the base of the plants to avoid wetting the foliage, which can increase the risk of fungal diseases. A good rule of thumb is to water when the top inch of soil feels dry to the touch. Mulching around the plants can help to retain moisture and suppress weeds.
What are some common pests and diseases that affect summer squash?
Summer squash is susceptible to a variety of pests and diseases, including squash bugs, squash vine borers, aphids, powdery mildew, and squash mosaic virus. Regularly inspect your plants for signs of pests or diseases and take action promptly to prevent them from spreading. Use organic pest control methods whenever possible, such as hand-picking pests, using insecticidal soap, or introducing beneficial insects. To prevent diseases, ensure good air circulation around the plants, avoid overhead watering, and practice crop rotation.
How do I harvest summer squash?
Summer squash is typically harvested when it is young and tender, before the skin becomes tough. The size of the squash at harvest will depend on the variety, but generally, it should be about 6-8 inches long. Use a sharp knife or pruners to cut the squash from the vine, leaving a short stem attached. Harvest regularly to encourage continued production. Overripe squash will become seedy and less flavorful.
Can I grow summer squash in containers?
Yes, summer squash can be successfully grown in containers, but you’ll need to choose a large container with good drainage. A 5-gallon container is the minimum size recommended, but larger is better. Use a high-quality potting mix and provide adequate support for the vines. Water regularly and fertilize every few weeks with a balanced fertilizer. Choose bush varieties of summer squash, as they are more compact and better suited for container growing.
How can I prevent squash vine borers from attacking my plants?
Squash vine borers are a common pest that can devastate summer squash plants. To prevent them, wrap the base of the stems with aluminum foil or nylon stockings to prevent the borers from laying their eggs. You can also monitor your plants for signs of borer activity, such as small holes in the stems or wilting leaves. If you find borers, you can try to remove them manually by slitting the stem and extracting the larvae. Another preventative measure is to introduce beneficial nematodes to the soil, which will attack the borer larvae.
What are some good companion plants for summer squash?
Companion planting can help to deter pests, attract beneficial insects, and improve the overall health of your summer squash plants. Some good companion plants for summer squash include marigolds, nasturtiums, basil, oregano, and dill. Marigolds and nasturtiums repel squash bugs and other pests, while basil and oregano attract beneficial insects like pollinators and predatory wasps. Dill attracts ladybugs, which prey on aphids.
How do I store summer squash?
Summer squash is best stored in the refrigerator. Wrap it loosely in a plastic bag or store it in a perforated container to prevent it from drying out. Summer squash will typically last for about a week in the refrigerator. You can also freeze summer squash for longer storage. To freeze it, blanch it in boiling water for a few minutes, then cool it in ice water. Drain well and store in freezer bags or containers.


Leave a Comment