
Grow Bell Peppers in Pots? Absolutely! Imagine plucking fresh, vibrant bell peppers right from your patio, ready to add a burst of flavor to your next meal. It’s easier than you think, and this DIY guide will show you exactly how to make it happen, even if you’re short on space.
For centuries, container gardening has allowed people to cultivate food and beauty in even the most urban environments. From the hanging gardens of Babylon to the humble window boxes of today, the desire to nurture plants close to home is deeply ingrained in us. But let’s face it, not everyone has a sprawling backyard for a traditional garden. That’s where the magic of growing bell peppers in pots comes in!
I know what you’re thinking: “Can I really grow bell peppers in a pot?” The answer is a resounding YES! This DIY project is perfect for apartment dwellers, balcony gardeners, or anyone who wants to add a touch of homegrown goodness to their lives. We’ll cover everything from choosing the right pot and soil to providing the perfect amount of sunlight and water. Plus, I’ll share some insider tips and tricks to ensure your bell pepper plants thrive and produce a bountiful harvest. Get ready to ditch the grocery store peppers and enjoy the satisfaction of growing your own delicious, colorful bell peppers!
Growing Bell Peppers in Pots: A Comprehensive DIY Guide
Hey there, fellow gardening enthusiasts! I’m so excited to share my tried-and-true method for growing vibrant, delicious bell peppers right in pots. Whether you have a sprawling backyard or just a sunny balcony, this guide will walk you through every step, ensuring a bountiful harvest. Let’s get our hands dirty!
Choosing the Right Pot and Soil
Before we even think about seeds, let’s talk about the foundation of our pepper-growing success: the pot and the soil.
* Pot Size Matters: Bell peppers need room to stretch their roots. I recommend a pot that’s at least 12 inches in diameter and 12 inches deep. A 5-gallon pot is a good starting point, but bigger is always better! Larger pots retain moisture better and give the roots more space to grow, leading to healthier, more productive plants.
* Drainage is Key: Make sure your pot has drainage holes! Peppers hate sitting in soggy soil. If your pot doesn’t have enough holes, you can drill a few more. Trust me, it’s worth the effort to prevent root rot.
* Choosing the Right Soil: Don’t even think about using garden soil straight from the ground. It’s often too dense and doesn’t drain well in containers. Instead, opt for a high-quality potting mix. I prefer a mix that’s specifically formulated for vegetables, as it usually contains added nutrients. You can also amend a general-purpose potting mix with compost or other organic matter.
* My Secret Soil Recipe: I like to create my own super-charged potting mix. I combine equal parts of:
* High-quality potting mix
* Compost (for nutrients and water retention)
* Perlite (for drainage and aeration)
* A handful of slow-release fertilizer (for sustained feeding)
Starting Your Bell Pepper Seeds (or Buying Seedlings)
You have two options here: start your own seeds or buy seedlings from a nursery. Starting from seed is more rewarding (and often cheaper!), but it requires a bit more patience.
* Starting from Seed:
* Timing is Everything: Bell peppers need a long growing season, so start your seeds indoors 6-8 weeks before the last expected frost.
* Seed Starting Mix: Use a seed starting mix, which is finer and more sterile than potting mix.
* Planting the Seeds: Sow the seeds about ¼ inch deep in small pots or seed trays.
* Warmth is Crucial: Bell pepper seeds need warmth to germinate. Aim for a soil temperature of 75-85°F (24-29°C). You can use a heat mat to help maintain the temperature.
* Keep it Moist: Keep the soil consistently moist, but not soggy.
* Light it Up: Once the seedlings emerge, they need plenty of light. Place them under grow lights or in a very sunny window.
* Thinning the Seedlings: If you planted multiple seeds in one pot, thin them out to one strong seedling per pot.
* Buying Seedlings:
* Choose Wisely: Select healthy-looking seedlings with sturdy stems and vibrant green leaves. Avoid plants that are leggy, yellowing, or have signs of pests or diseases.
* Check the Roots: Gently remove the seedling from its pot and inspect the roots. They should be white and healthy, not brown and root-bound.
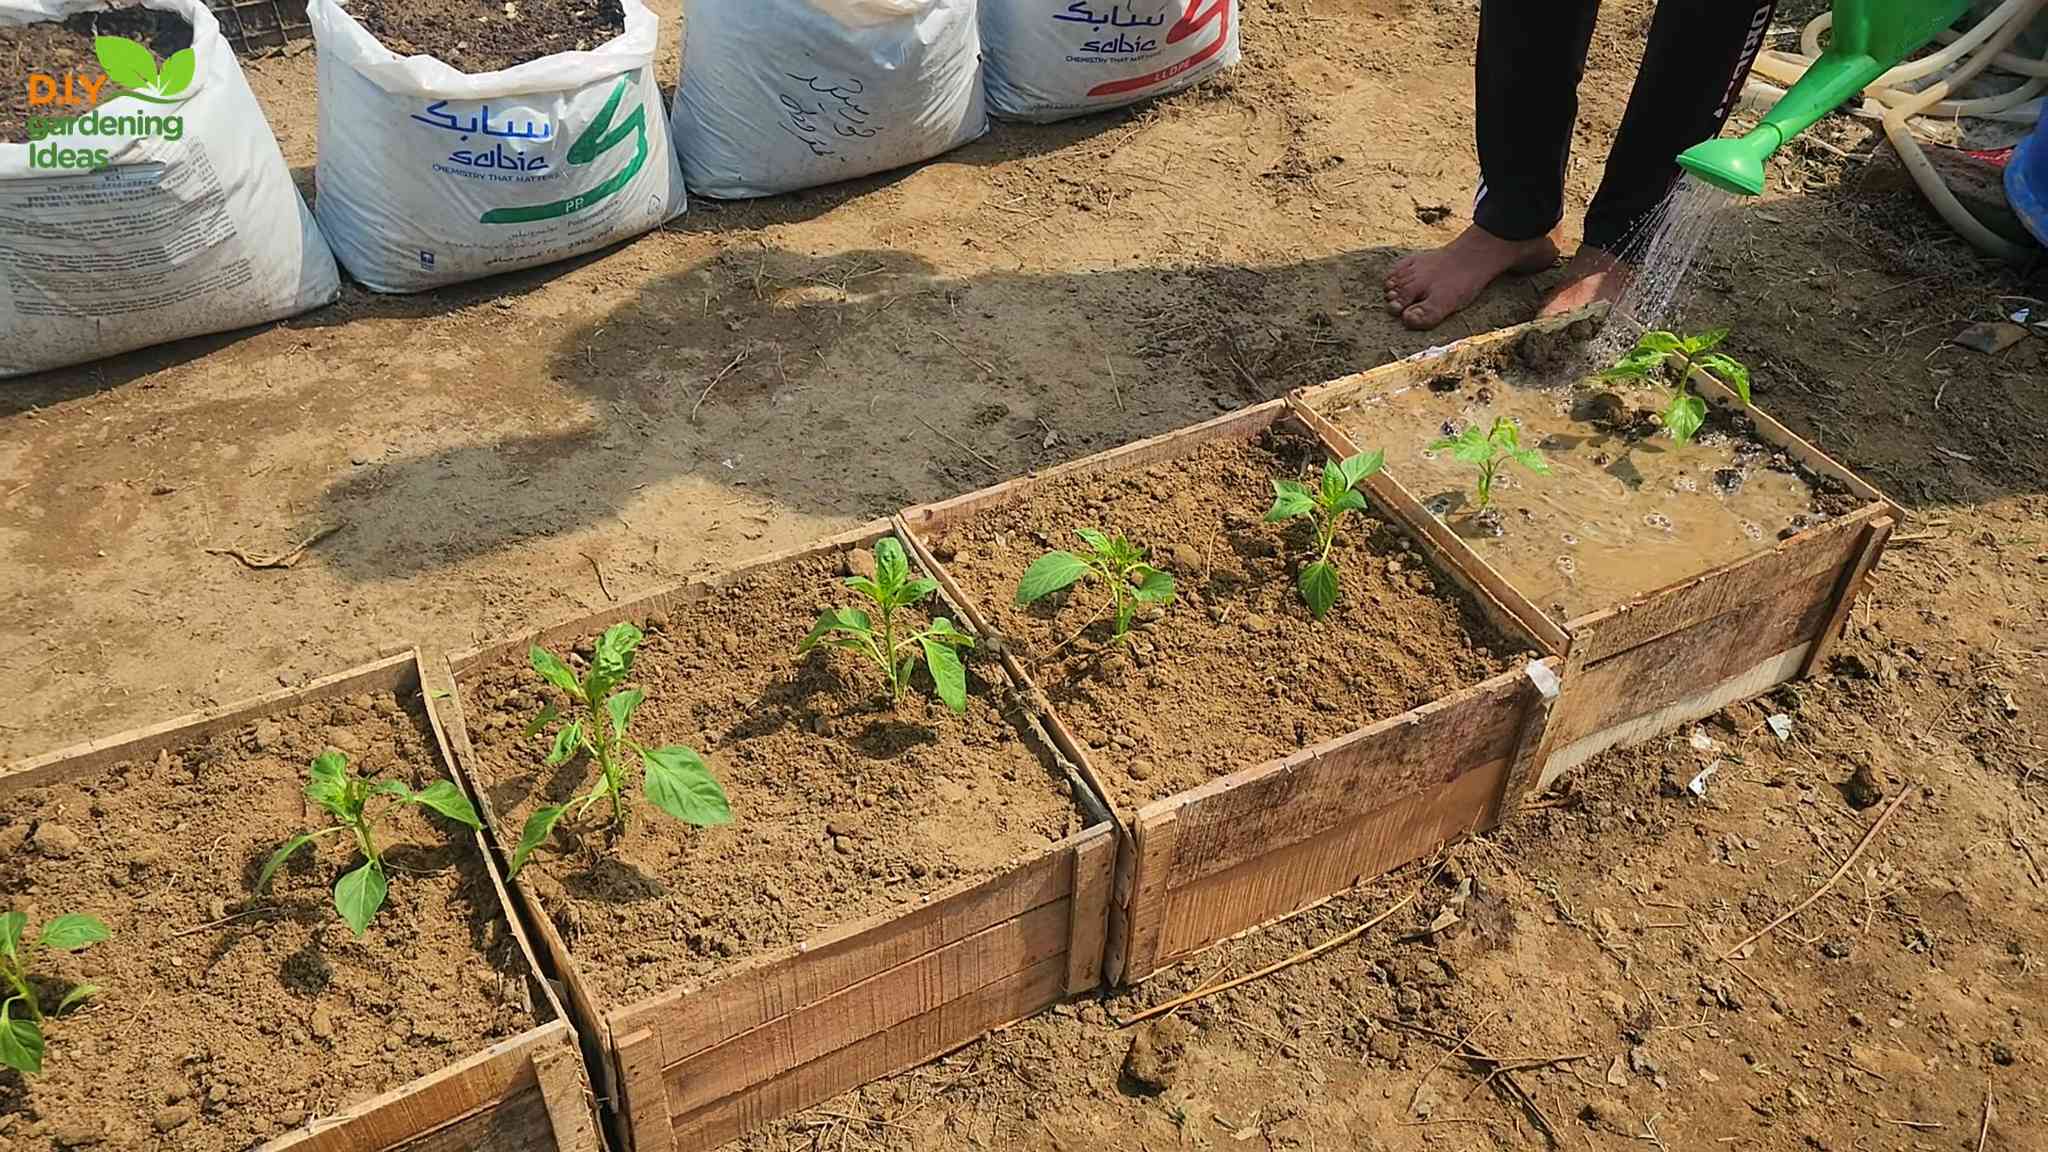
Transplanting Your Seedlings
Whether you started your own seeds or bought seedlings, it’s time to transplant them into their final pots.
1. Harden Off Your Seedlings: Before transplanting, you need to “harden off” your seedlings. This means gradually exposing them to outdoor conditions over a period of 7-10 days. Start by placing them in a sheltered spot for an hour or two each day, gradually increasing the amount of time they spend outdoors. This will help them acclimate to the sun, wind, and temperature changes.
2. Prepare the Pot: Fill your chosen pot with your prepared potting mix, leaving a few inches of space at the top.
3. Gently Remove the Seedling: Carefully remove the seedling from its pot, being careful not to damage the roots. If the roots are tightly bound, gently loosen them with your fingers.
4. Plant the Seedling: Dig a hole in the potting mix that’s large enough to accommodate the root ball. Place the seedling in the hole and backfill with potting mix, gently firming the soil around the base of the plant.
5. Water Thoroughly: Water the newly transplanted seedling thoroughly.
6. Add Support (Optional): Bell pepper plants can get quite heavy with fruit, so you may want to add a stake or tomato cage for support. Insert the stake or cage into the pot before the plant gets too big.
Caring for Your Bell Pepper Plants
Now comes the fun part: nurturing your plants and watching them grow!
* Sunlight: Bell peppers need at least 6-8 hours of sunlight per day. Place your pots in the sunniest spot you can find.
* Watering: Water your bell pepper plants regularly, especially during hot, dry weather. The soil should be consistently moist, but not soggy. Check the soil moisture by sticking your finger into the soil. If the top inch feels dry, it’s time to water.
* Fertilizing: Bell peppers are heavy feeders, so they need regular fertilization. Use a balanced fertilizer (e.g., 10-10-10) every 2-3 weeks. You can also use a liquid fertilizer diluted to half strength. I like to use a fertilizer that’s specifically formulated for tomatoes and peppers.
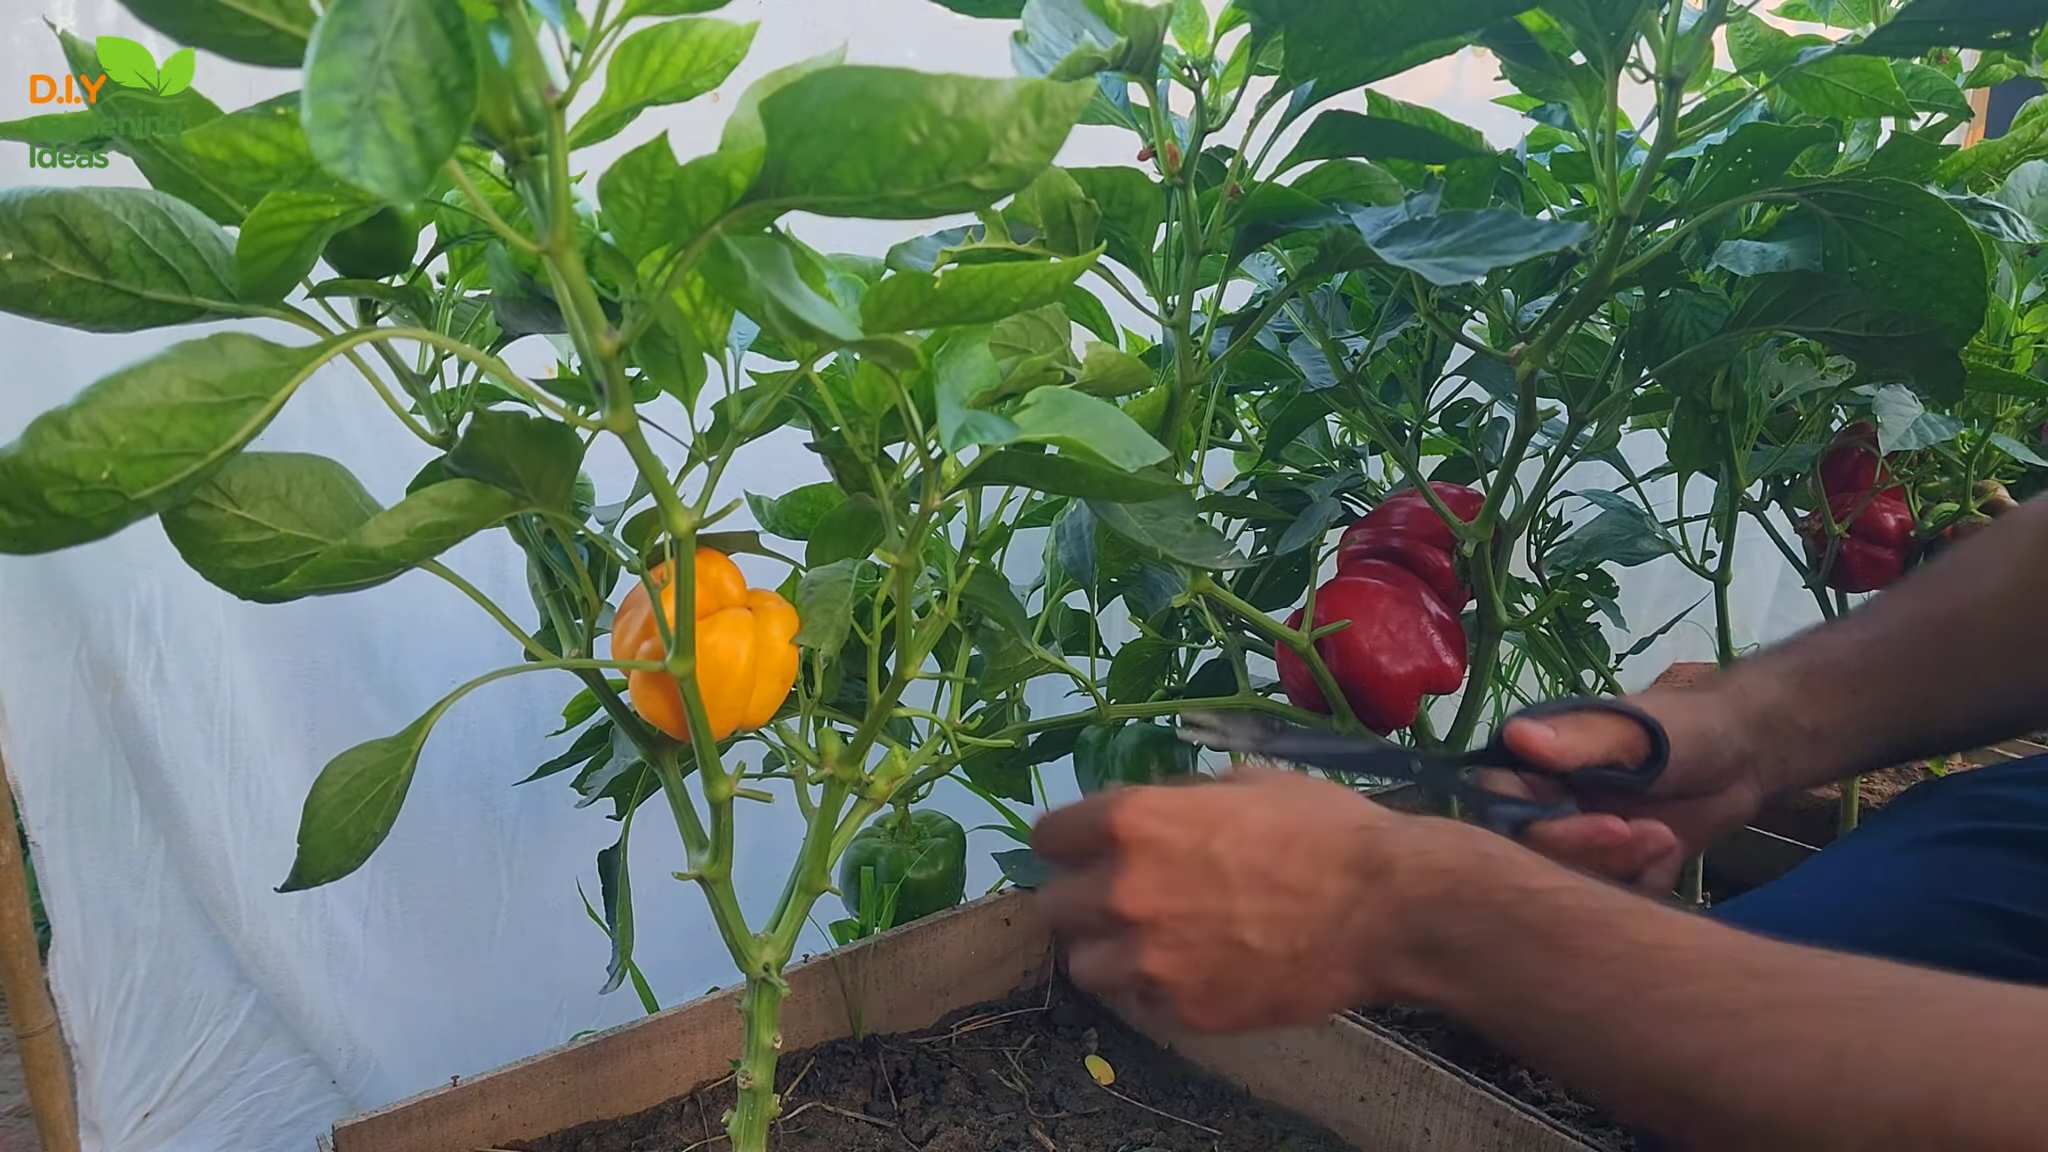
* Pruning: Pruning can help improve air circulation and encourage fruit production. Remove any suckers (small shoots that grow from the base of the plant) and any yellowing or diseased leaves.
* Pest and Disease Control: Keep an eye out for pests and diseases. Common pests include aphids, spider mites, and whiteflies. You can control these pests with insecticidal soap or neem oil. Common diseases include blossom end rot and fungal infections. Blossom end rot is caused by a calcium deficiency, so you can prevent it by adding calcium to the soil or using a calcium-rich fertilizer. Fungal infections can be prevented by ensuring good air circulation and avoiding overwatering.
Pollination
Bell peppers are self-pollinating, meaning they don’t need bees or other insects to pollinate them. However, sometimes the pollen can get stuck inside the flower.
* Give Them a Shake: To help with pollination, gently shake the plants every few days, especially when they’re flowering. This will help release the pollen.
* Use a Fan: You can also use a fan to circulate the air around the plants, which will also help with pollination.
Harvesting Your Bell Peppers
The moment we’ve all been waiting for!
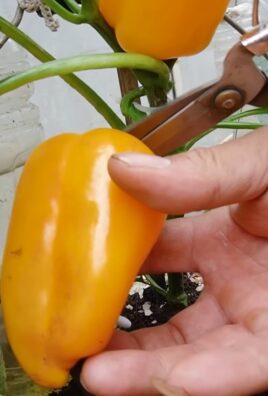
* Timing is Key: Bell peppers can be harvested at any stage of maturity, but they’re usually harvested when they’re fully colored and firm. Green bell peppers are simply unripe red, yellow, or orange peppers.
* How to Harvest: Use a sharp knife or pruning shears to cut the peppers from the plant. Cut the stem about an inch above the pepper.
* Enjoy Your Harvest: Now it’s time to enjoy the fruits (or vegetables!) of your labor. Bell peppers can be eaten raw, cooked, or preserved.
Troubleshooting
Even with the best care, you might encounter some problems along the way. Here are a few common issues and how to fix them:
* Blossom End Rot: This is a common problem that causes the bottom of the pepper to rot. It’s caused by a calcium deficiency. To prevent it, add calcium to the soil or use a calcium-rich fertilizer.
* Yellowing Leaves: Yellowing leaves can be caused by a variety of factors, including nutrient deficiencies, overwatering, and pests. Check the soil moisture and fertilize the plant if necessary. Inspect the leaves for pests.
* Lack of Fruit: If your bell pepper plant isn’t producing fruit, it could be due to a lack of sunlight, poor pollination, or nutrient deficiencies. Make sure the plant is getting enough sunlight, gently shake the plant to help with pollination, and fertilize the plant regularly.
* Pests: Aphids, spider mites, and whiteflies are common pests that can attack bell pepper plants. Control these pests with insecticidal soap or neem oil.
Choosing Bell Pepper Varieties for Pots
Not all bell pepper varieties are created equal when it comes to container gardening. Some are more compact and better suited for pots than others. Here are a few of my favorites:
* ‘Yolo Wonder’: A classic green bell pepper that’s reliable and productive.
* ‘California Wonder’: Another popular green
Conclusion
So, there you have it! Growing bell peppers in pots is not only achievable, but it’s also a rewarding and surprisingly simple process. We’ve walked you through everything from selecting the right pot size and soil mix to providing the necessary sunlight and nutrients. But why should you bother with this DIY project?
The answer is multifaceted. First and foremost, growing your own bell peppers gives you complete control over the quality and freshness of your produce. No more wondering about pesticides or long transportation times. You’ll be harvesting vibrant, flavorful bell peppers right from your own patio or balcony. Imagine the satisfaction of adding a freshly picked bell pepper to your salad or stir-fry!
Secondly, container gardening offers unparalleled flexibility. Whether you have a sprawling backyard or a tiny apartment balcony, you can enjoy the benefits of homegrown vegetables. Pots are easily moved to chase the sun or shelter from harsh weather, giving you a significant advantage over traditional in-ground gardening. This is especially beneficial if you live in an area with unpredictable weather patterns or limited sunlight.
Thirdly, growing bell peppers in pots is a fantastic way to learn about gardening and connect with nature. It’s a hands-on experience that can be incredibly therapeutic and educational, especially for children. Watching your bell pepper plants grow from tiny seedlings to mature, fruit-bearing plants is a truly magical experience.
But the benefits don’t stop there. By growing your own bell peppers, you’re also contributing to a more sustainable lifestyle. You’re reducing your reliance on commercially grown produce, which often involves long-distance transportation and environmentally harmful practices. You’re also minimizing food waste by harvesting only what you need.
Now, let’s talk about variations. While we’ve focused on the basics, there are plenty of ways to customize your bell pepper growing experience. Consider experimenting with different varieties of bell peppers, such as sweet bell peppers, spicy bell peppers, or even ornamental bell peppers. You can also try companion planting, such as planting basil or marigolds alongside your bell peppers to deter pests and attract pollinators. Another variation is to use self-watering pots, which can be particularly helpful if you tend to forget to water your plants regularly. You could also explore different soil amendments, such as adding compost or worm castings to boost the nutrient content of your soil.
Don’t be afraid to experiment and find what works best for you and your growing environment. The key is to be patient, observant, and willing to learn from your mistakes.
We truly believe that anyone can successfully grow bell peppers in pots with a little bit of knowledge and effort. So, what are you waiting for? Grab a pot, some soil, and a bell pepper seedling, and get started today!
We’re confident that you’ll be amazed by the results. And once you’ve harvested your first batch of homegrown bell peppers, we’d love to hear about your experience. Share your photos, tips, and stories with us in the comments below. Let’s create a community of bell pepper enthusiasts and inspire others to embrace the joys of container gardening! Happy growing!
Frequently Asked Questions (FAQ)
1. What is the best size pot for growing bell peppers?
The ideal pot size for growing bell peppers is at least 12 inches in diameter and 12 inches deep, but larger is generally better. A 5-gallon pot is a good starting point, but a 7-gallon or even 10-gallon pot will provide more room for the roots to grow and allow the plant to produce more peppers. The larger the pot, the less frequently you’ll need to water and fertilize. Smaller pots can work, but they require more frequent attention and may limit the plant’s growth potential.
2. What type of soil should I use for growing bell peppers in pots?
Bell peppers need well-draining soil that is rich in organic matter. A good potting mix will typically contain a blend of peat moss, perlite, and vermiculite. You can also amend your potting mix with compost, aged manure, or other organic materials to improve its fertility and drainage. Avoid using garden soil in pots, as it tends to compact and doesn’t drain well, which can lead to root rot. Look for a potting mix specifically formulated for vegetables or one that is labeled as “all-purpose.”
3. How much sunlight do bell peppers need?
Bell peppers need at least 6-8 hours of direct sunlight per day to thrive. Choose a location for your potted bell peppers that receives plenty of sunlight throughout the day. If you live in a particularly hot climate, you may need to provide some afternoon shade to prevent the plants from getting scorched. If you don’t have enough natural sunlight, you can supplement with grow lights.
4. How often should I water my bell pepper plants in pots?
Water your bell pepper plants regularly, especially during hot, dry weather. The soil should be kept consistently moist, but not soggy. Check the soil moisture by sticking your finger about an inch into the soil. If it feels dry, it’s time to water. Water deeply, until water drains out of the bottom of the pot. Avoid overhead watering, as this can promote fungal diseases.
5. What kind of fertilizer should I use for bell peppers?
Bell peppers are heavy feeders and need regular fertilization to produce a good crop. Use a balanced fertilizer with an NPK ratio of 5-10-10 or 10-10-10. You can also use a fertilizer specifically formulated for vegetables. Fertilize your bell pepper plants every 2-3 weeks during the growing season. Follow the instructions on the fertilizer label for proper application rates. You can also supplement with organic fertilizers, such as compost tea or fish emulsion.
6. How do I prevent pests and diseases on my bell pepper plants?
Regularly inspect your bell pepper plants for signs of pests or diseases. Common pests include aphids, spider mites, and whiteflies. You can control these pests with insecticidal soap, neem oil, or by handpicking them off the plants. Common diseases include blossom end rot, fungal leaf spots, and viruses. Prevent blossom end rot by providing consistent watering and calcium to the soil. Improve air circulation around the plants to prevent fungal diseases. Remove any infected leaves or plants to prevent the spread of disease.
7. When can I harvest my bell peppers?
Bell peppers are typically ready to harvest 60-90 days after transplanting, depending on the variety. The peppers should be firm, glossy, and fully colored. You can harvest green bell peppers when they are still immature, but they will be sweeter and more flavorful if you allow them to ripen to their mature color (red, yellow, orange, or purple). Use a sharp knife or pruning shears to cut the peppers from the plant, leaving a short stem attached.
8. Can I overwinter my bell pepper plants?
In some climates, you can overwinter your bell pepper plants indoors. Before the first frost, prune the plants back to about 6 inches tall and move them to a cool, bright location indoors. Water sparingly during the winter months. In the spring, gradually acclimate the plants to outdoor conditions before transplanting them back into pots. Overwintering bell pepper plants can be a bit tricky, but it’s a great way to extend the growing season and get a head start on next year’s crop.
9. Why are my bell pepper flowers falling off?
Bell pepper flower drop can be caused by several factors, including temperature stress (too hot or too cold), inconsistent watering, lack of pollination, or nutrient deficiencies. Ensure that your plants are receiving adequate sunlight, water, and fertilizer. If temperatures are consistently above 90°F or below 60°F, try to provide some protection from the extreme temperatures. You can also try hand-pollinating the flowers by gently shaking the plants or using a small paintbrush to transfer pollen from one flower to another.
10. My bell peppers are small and not growing very big. What can I do?
Small bell peppers can be caused by a number of factors, including insufficient sunlight, inadequate watering, nutrient deficiencies, or overcrowding. Make sure your plants are getting at least 6-8 hours of direct sunlight per day and that you are watering them regularly. Fertilize your plants with a balanced fertilizer to provide them with the nutrients they need. If you have multiple plants in the same pot, consider thinning them out to give each plant more room to grow. Also, make sure the pot is large enough for the plant’s root system.

Leave a Comment