
Growing Onions at Home can seem daunting, but trust me, it’s more rewarding than you might think! Imagine plucking fresh, flavorful onions straight from your backyard, ready to elevate your culinary creations. No more bland, store-bought onions – just vibrant, homegrown goodness.
Onions have a rich history, dating back thousands of years. Ancient Egyptians revered them, even using them in burial rituals, believing their concentric layers symbolized eternal life. From humble peasant fare to gourmet dishes, onions have been a staple in cultures worldwide, adding depth and complexity to countless recipes.
But why bother growing your own? Well, for starters, the taste is simply unmatched. Homegrown onions boast a freshness and intensity that you just can’t find in the supermarket. Plus, you have complete control over the growing process, ensuring they’re free from harmful pesticides and chemicals. In this article, I’ll share some simple yet effective DIY tricks and hacks that will make growing onions at home a breeze, even if you’re a complete beginner. Get ready to transform your garden and your kitchen with the magic of homegrown onions!
Growing Onions at Home: A Beginner’s Guide to a Bountiful Harvest
Hey there, fellow gardening enthusiasts! I’m so excited to share my experience and guide you through the surprisingly simple process of growing your own onions at home. Forget those bland, store-bought onions – nothing beats the flavor of freshly harvested, homegrown goodness. This guide will walk you through every step, from choosing the right variety to harvesting your prize-winning bulbs. Let’s get started!
Choosing Your Onion Type
Before we even think about planting, we need to decide what kind of onions we want to grow. There are three main types, categorized by day length:
* Long-day onions: These are best suited for northern climates (above 35° latitude) because they need 14-16 hours of daylight to form bulbs. Popular varieties include Walla Walla Sweet, Yellow Spanish, and Red Wethersfield.
* Short-day onions: These thrive in southern climates (below 35° latitude) and require only 10-12 hours of daylight. Think Texas Sweet White, Crystal White Wax, and Red Creole.
* Intermediate-day onions: These are more adaptable and can grow in a wider range of latitudes (32° to 42°). Good choices include Candy Onion and Superstar.
Important Tip: Choosing the right type for your region is crucial for successful bulb formation. If you’re unsure, check with your local garden center or agricultural extension office.
Starting from Seeds, Sets, or Transplants
You have three options for starting your onion journey: seeds, sets, or transplants. Each has its pros and cons:
* Seeds: This is the most economical option, but it requires the most time and effort. You’ll need to start seeds indoors 8-10 weeks before the last expected frost.
* Sets: These are small, immature bulbs that are easy to plant and get a head start. They’re a good option for beginners.
* Transplants: These are young onion plants that are already established. They offer a good balance of convenience and cost.
I personally prefer starting from sets because they’re easy to handle and give me a good head start. But feel free to choose whichever method suits you best!
Preparing the Soil
Onions are heavy feeders, meaning they need nutrient-rich soil to thrive. Here’s how to prepare your garden bed:
* Choose a sunny spot: Onions need at least 6-8 hours of sunlight per day.
* Amend the soil: Onions prefer well-drained, fertile soil with a pH of 6.0-7.0. Amend your soil with plenty of compost or well-rotted manure. This will improve drainage, add nutrients, and help retain moisture.
* Loosen the soil: Use a garden fork or tiller to loosen the soil to a depth of at least 12 inches. This will allow the onion roots to penetrate easily.
* Remove rocks and debris: Onions don’t like competition, so remove any rocks, weeds, or other debris from the planting area.
My Secret Weapon: I always add a slow-release fertilizer specifically formulated for vegetables to my soil before planting. This gives my onions a steady supply of nutrients throughout the growing season.
Planting Your Onions
Now for the fun part – planting! Here’s how to do it, depending on whether you’re using sets or transplants:
Planting Onion Sets
1. Prepare the planting bed: Make sure the soil is loose and well-amended.
2. Create furrows: Dig shallow furrows about 1 inch deep and 4-6 inches apart.
3. Plant the sets: Place the sets in the furrows, about 2-3 inches apart. Make sure the pointed end is facing up.
4. Cover the sets: Gently cover the sets with soil, leaving the very tip of the bulb exposed.
5. Water thoroughly: Water the planting bed thoroughly to settle the soil around the sets.
Planting Onion Transplants
1. Prepare the planting bed: Same as for sets – loose, well-amended soil is key.
2. Dig holes: Dig small holes about 1 inch deep and 4-6 inches apart.
3. Plant the transplants: Gently remove the transplants from their containers and place them in the holes.
4. Backfill with soil: Fill the holes with soil, gently firming around the base of the plants.
5. Water thoroughly: Water the planting bed thoroughly to help the transplants establish.
Spacing is Key: Proper spacing is essential for good bulb development. If you plant your onions too close together, they’ll compete for resources and won’t grow as large.
Caring for Your Onions
Once your onions are planted, it’s important to provide them with the care they need to thrive. Here’s what you need to do:
* Watering: Onions need consistent moisture, especially during bulb formation. Water deeply whenever the top inch of soil feels dry. Avoid overwatering, which can lead to rot.
* Weeding: Keep the planting bed free of weeds, which can compete with your onions for nutrients and water. Hand-pull weeds carefully to avoid disturbing the onion roots.
* Fertilizing: Onions are heavy feeders, so fertilize them regularly with a balanced fertilizer. I like to use a liquid fertilizer every 2-3 weeks.
* Mulching: Apply a layer of mulch around your onions to help retain moisture, suppress weeds, and regulate soil temperature. Straw, shredded leaves, or grass clippings work well.
* Pest and Disease Control: Keep an eye out for common onion pests and diseases, such as onion maggots, thrips, and downy mildew. Treat any problems promptly with appropriate organic or chemical controls.
Watering Wisdom: I always water my onions in the morning so the foliage has time to dry before nightfall. This helps prevent fungal diseases.
Harvesting Your Onions
The moment we’ve all been waiting for – harvest time! Here’s how to know when your onions are ready:
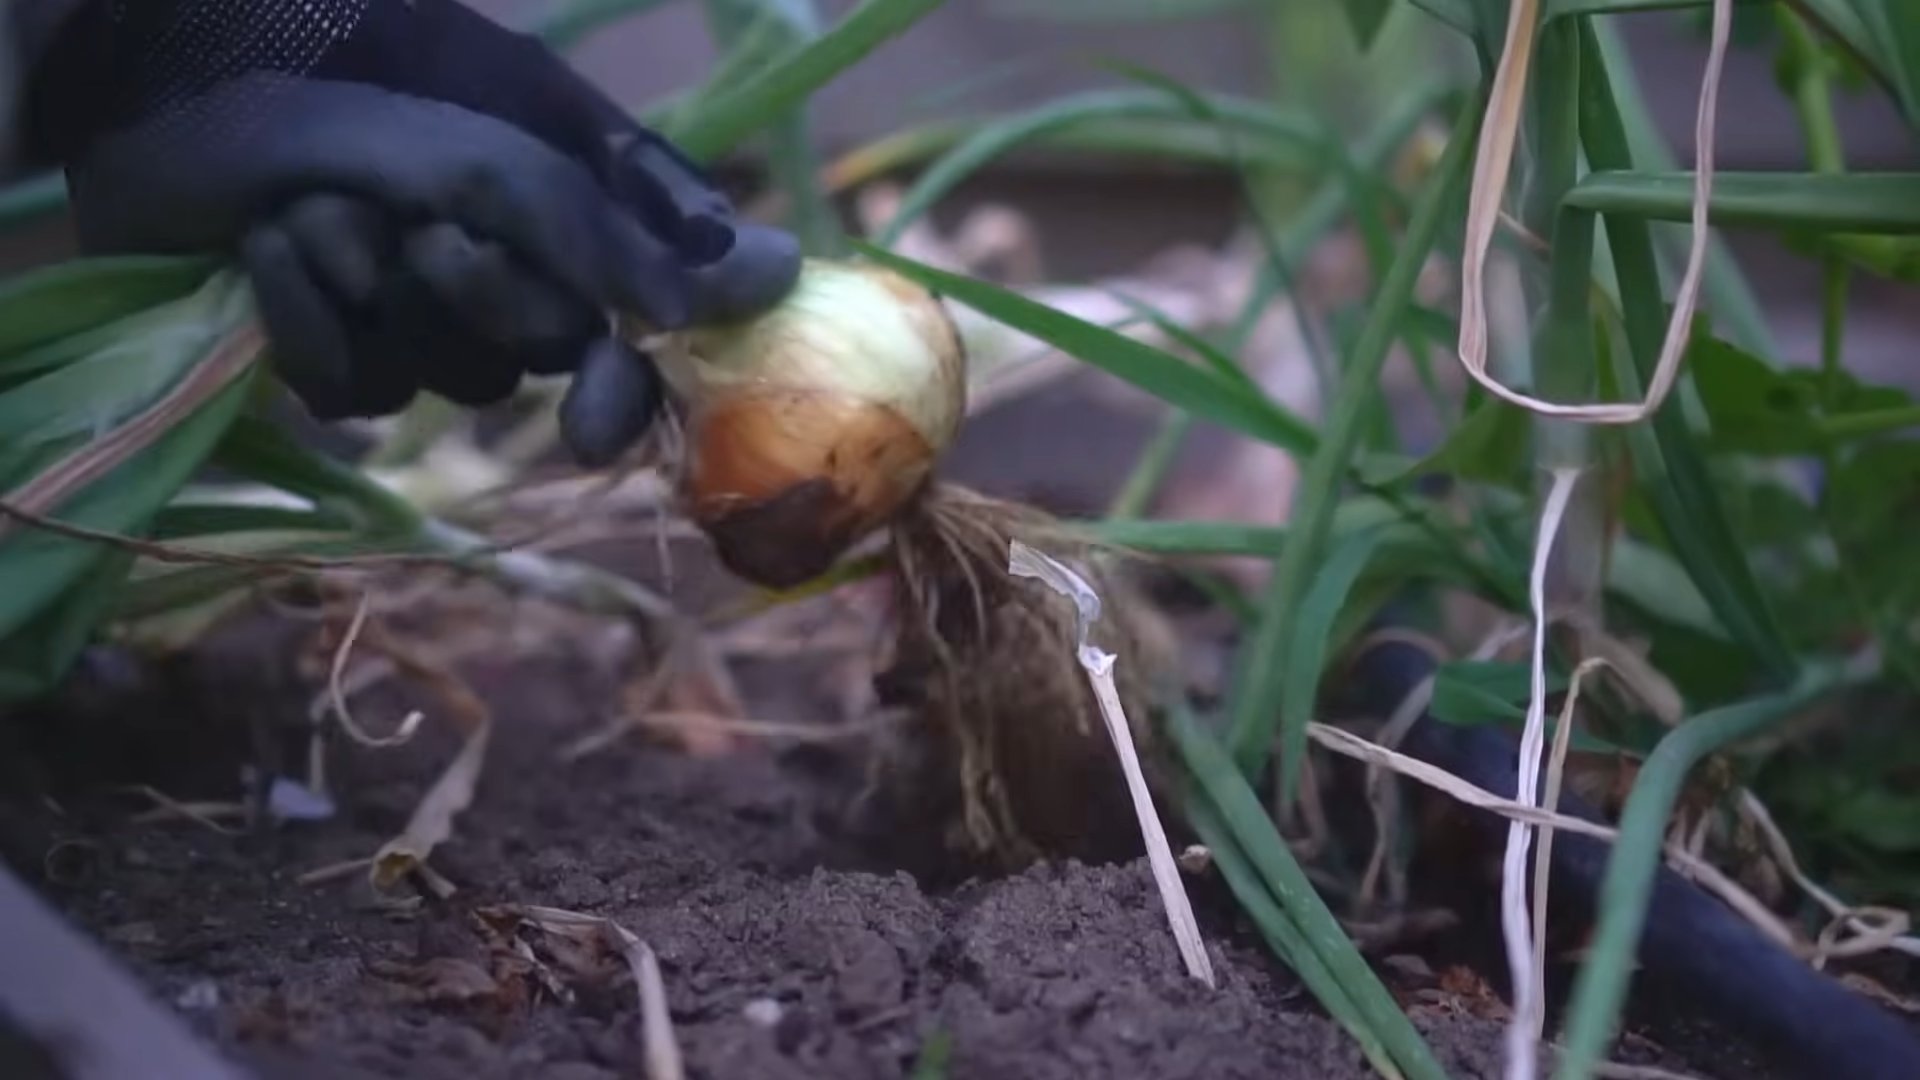
* Check the foliage: When the tops of the onions start to turn yellow and fall over, it’s a sign that they’re ready to harvest.
* Gently lift the bulbs: Use a garden fork to gently lift the bulbs from the soil.
* Cure the onions: After harvesting, cure the onions in a warm, dry, well-ventilated place for 2-3 weeks. This will help them develop a papery outer skin and improve their storage life.
* Store the onions: Once the onions are cured, store them in a cool, dry, dark place. Braiding the tops together and hanging them is a traditional and attractive way to store onions.
Harvesting Hint: Don’t wait too long to harvest your onions. If you leave them in the ground too long, they can start to rot.
Troubleshooting Common Onion Problems
Even with the best care, you might encounter some problems along the way. Here are a few common issues and how to address them:
* Small bulbs: This could be due to insufficient sunlight, poor soil, or overcrowding. Make sure your onions are getting enough sun, amend the soil with compost, and thin out the plants if necessary.
* Bolting (premature flowering): This can happen if onions are exposed to cold temperatures early in the season. Remove the flower stalk to encourage bulb development.
* Pest infestations: Onion maggots and thrips are common pests that can damage onion plants. Use appropriate organic or chemical controls to manage infestations.
* Fungal diseases: Downy mildew and other fungal diseases can cause yellowing and spotting on the foliage. Improve air circulation, avoid overwatering, and treat with a fungicide if necessary.
Don’t Give Up! Gardening is a learning process. Don’t be discouraged if you encounter problems. Just keep learning and experimenting, and you’ll eventually master the art of growing onions.
Enjoying Your Homegrown Onions
Congratulations! You’ve successfully grown your own onions. Now it’s time to enjoy the fruits (or rather, vegetables) of your labor. Use your homegrown onions in all your favorite recipes, from soups and stews to stir-fries and salads. You’ll be amazed at the difference in flavor compared to store-bought onions.
My Favorite Way to Use Homegrown Onions: I love caramelizing them and adding them to grilled cheese sandwiches. The sweetness of the caramelized onions perfectly complements the savory cheese.
Growing onions at home is a rewarding experience that anyone can enjoy. With a little planning, preparation, and care, you can have a bountiful harvest of delicious, homegrown onions. So get out there and start planting! Happy gardening!
Conclusion
So, there you have it! Growing onions at home, from humble scraps no less, is not just a fun gardening experiment; it’s a genuinely rewarding way to reduce food waste, save money, and enjoy the unparalleled flavor of freshly grown produce. This DIY trick transforms kitchen scraps into a sustainable source of delicious onions, right at your fingertips. Forget those bland, store-bought onions that have traveled miles – imagine the satisfaction of cooking with onions you nurtured from discarded roots!
The beauty of this method lies in its simplicity and adaptability. While we’ve focused on green onions, don’t be afraid to experiment! You can try this technique with other members of the allium family, such as leeks or shallots, to see what results you achieve. Remember, gardening is all about learning and adapting.
Consider these variations to personalize your onion-growing journey:
* **Container Gardening:** If you lack a traditional garden, don’t despair! Onions thrive in containers, making this DIY trick perfect for apartment dwellers or those with limited space. Choose a pot that’s at least 6 inches deep and wide to allow for root development.
* **Soil Amendments:** While onions aren’t particularly fussy, adding compost or well-rotted manure to your soil can significantly boost their growth and flavor. These amendments provide essential nutrients and improve drainage.
* **Succession Planting:** To ensure a continuous supply of fresh onions, stagger your planting. Start new scraps every few weeks to have a steady harvest throughout the growing season.
* **Different Onion Varieties:** While regrowing from scraps typically yields green onions, you can also plant onion sets (small, immature onions) to grow larger bulb onions. Experiment with different varieties like yellow, red, or white onions to find your favorites.
This DIY trick for growing onions at home is a game-changer for any home cook or gardening enthusiast. It’s a sustainable, cost-effective, and incredibly satisfying way to add fresh flavor to your meals.
We wholeheartedly encourage you to give this DIY trick a try. It’s easier than you think, and the results are well worth the effort. Once you’ve experienced the joy of harvesting your own homegrown onions, you’ll never look at onion scraps the same way again.
But don’t just take our word for it! We want to hear about your experiences. Share your photos, tips, and stories in the comments below. Let’s build a community of home gardeners who are passionate about sustainable living and delicious food. What challenges did you face? What successes did you celebrate? What unique variations did you discover? Your insights can help others learn and grow, literally! So, grab those onion scraps, get your hands dirty, and embark on this exciting gardening adventure. Happy growing!
Frequently Asked Questions (FAQ)
How long does it take to regrow onions from scraps?
The time it takes to regrow onions from scraps can vary depending on several factors, including the variety of onion, the growing conditions (sunlight, water, soil), and the climate. Generally, you can expect to see new green shoots emerging within a few days to a week. Within two to three weeks, you should have a noticeable amount of new growth that you can start harvesting. However, if you’re aiming for larger bulb onions, it will take significantly longer, potentially several months, and may require starting from onion sets rather than just scraps. Remember that regrowing from scraps is primarily for the greens, not necessarily for developing a large bulb.
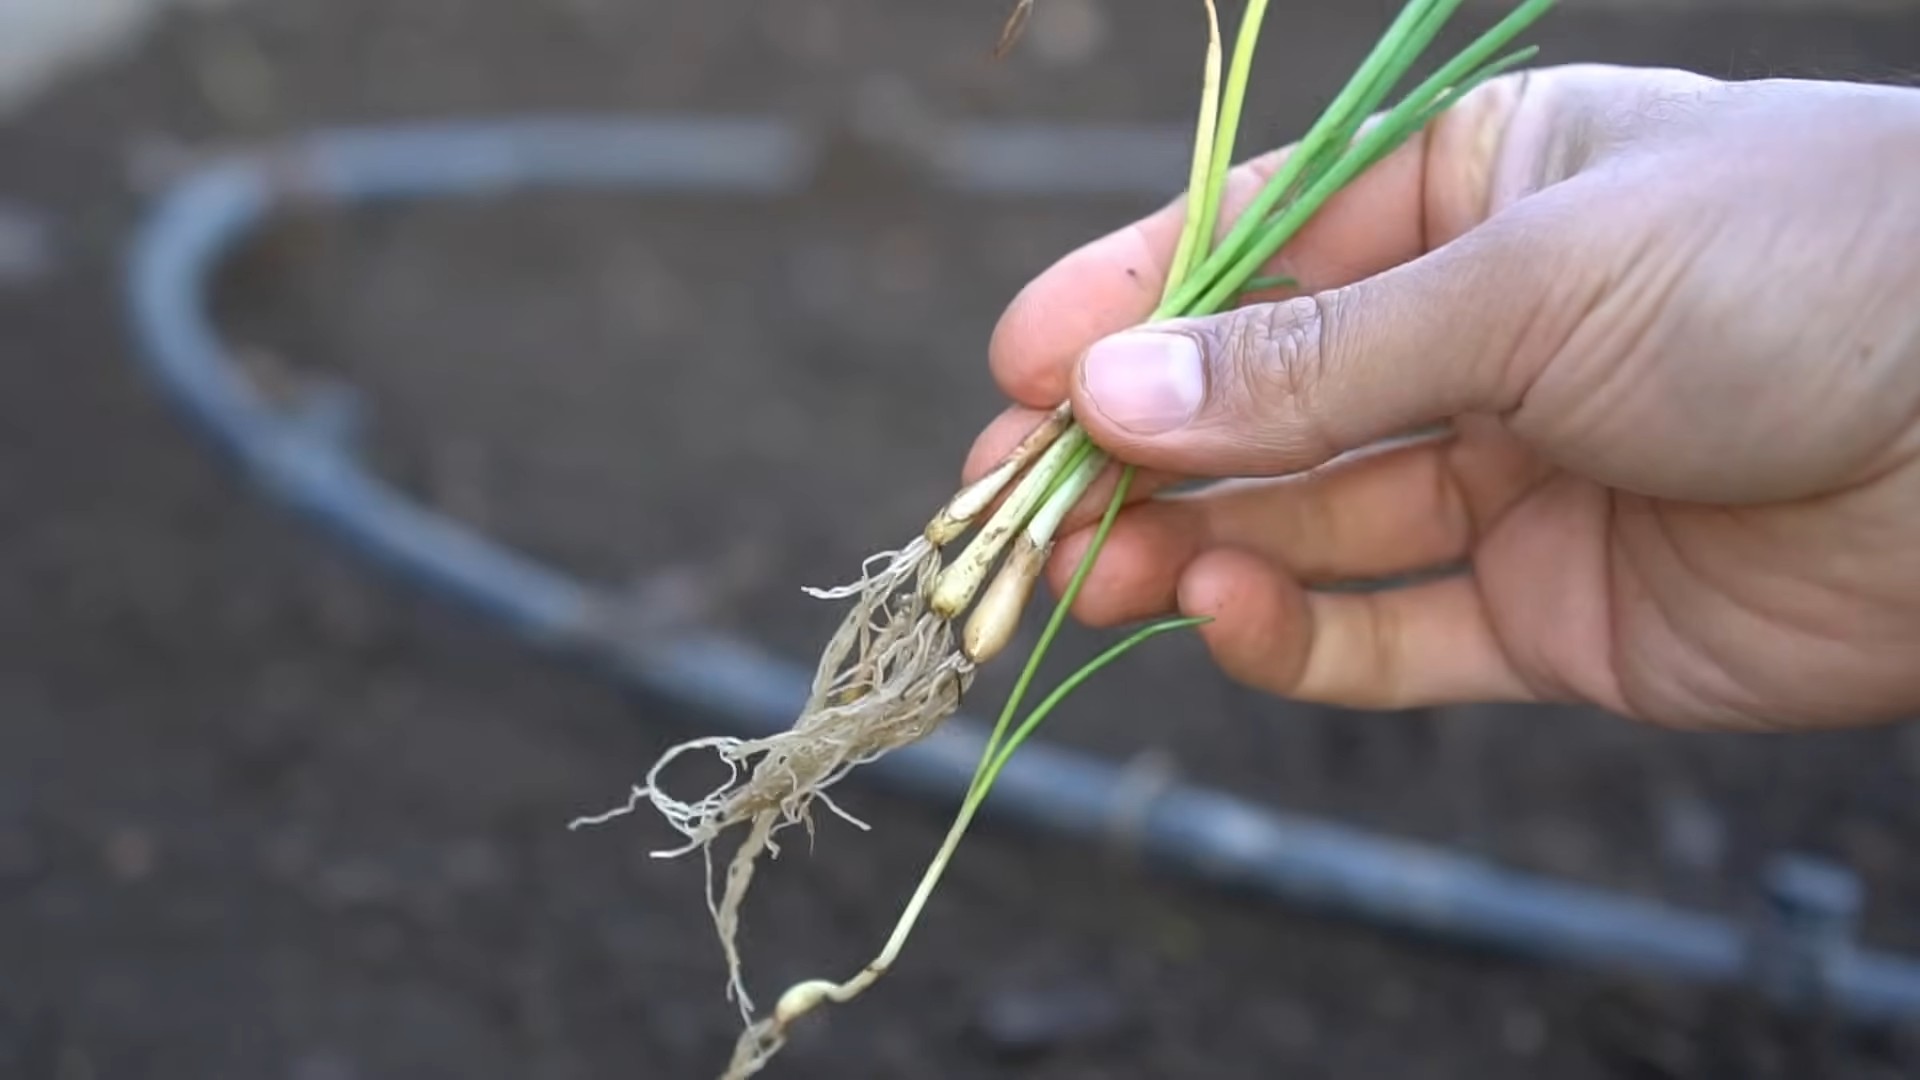
What part of the onion do I need to regrow it?
You need the root end of the onion, typically the bottom 1-2 inches that you would normally discard after using the rest of the onion in your cooking. This section should include the roots (or the remnants of roots) and a small portion of the bulb. Make sure the root end is firm and healthy-looking, without any signs of rot or mold. This is crucial for successful regrowth.
Can I regrow any type of onion from scraps?
While the general principle applies to most types of onions, green onions (scallions) are the easiest and most reliable to regrow from scraps. Other types of onions, such as yellow, red, or white onions, can be regrown, but they may be less successful in producing a full-sized bulb. The focus when regrowing these types of onions from scraps is usually on harvesting the green shoots for use as a garnish or flavoring. For growing full-sized bulb onions, it’s generally recommended to start with onion sets or seeds.
How often should I water my regrowing onions?
Water your regrowing onions regularly, keeping the soil consistently moist but not waterlogged. The frequency of watering will depend on the climate, the type of soil, and the size of the container. In general, water when the top inch of soil feels dry to the touch. Avoid overwatering, as this can lead to root rot. If you’re growing your onions in a container, make sure it has drainage holes to allow excess water to escape.
What kind of soil is best for regrowing onions?
Onions prefer well-draining soil that is rich in organic matter. A good potting mix or garden soil amended with compost or well-rotted manure is ideal. The soil should be loose and friable to allow for good root development. Avoid heavy clay soils, as they can retain too much moisture and lead to root rot. A slightly acidic to neutral pH (around 6.0 to 7.0) is also beneficial.
How much sunlight do regrowing onions need?
Onions need plenty of sunlight to thrive. Aim for at least 6-8 hours of direct sunlight per day. If you’re growing your onions indoors, place them near a sunny window or use a grow light to supplement natural light. Insufficient sunlight can result in weak, leggy growth and reduced yields.
Can I grow onions from scraps in water only?
Yes, you can initially start regrowing onions from scraps in water. Place the root end of the onion in a glass or jar with enough water to cover the roots, but not the entire bulb. Change the water every day or two to prevent bacterial growth. Once you see new green shoots emerging and the roots have grown longer, you can transplant the onion into soil for continued growth. Growing in water alone is a good way to initiate growth, but soil provides the necessary nutrients for long-term development.
How do I harvest my regrown onions?
For green onions, you can harvest the green shoots as needed by snipping them off with scissors or a knife. Leave about an inch or two of the green shoots intact to allow them to continue growing. For bulb onions, you’ll need to wait until the tops start to turn yellow and fall over. This indicates that the bulb is mature and ready to harvest. Gently dig up the bulb, being careful not to damage it.
What are some common problems when regrowing onions and how do I fix them?
Some common problems include:
* **Root Rot:** Caused by overwatering or poorly draining soil. Ensure proper drainage and avoid overwatering.
* **Pests:** Onions can be susceptible to pests like onion maggots or thrips. Use organic pest control methods like neem oil or insecticidal soap.
* **Yellowing Leaves:** Can be caused by nutrient deficiencies, lack of sunlight, or overwatering. Ensure proper fertilization, adequate sunlight, and well-draining soil.
* **Slow Growth:** Can be caused by insufficient sunlight, poor soil, or lack of water. Provide adequate sunlight, improve soil quality, and water regularly.
Can I fertilize my regrowing onions?
Yes, fertilizing your regrowing onions can help promote healthy growth and increase yields. Use a balanced fertilizer or one that is specifically formulated for vegetables. Follow the instructions on the fertilizer label for application rates and frequency. You can also use organic fertilizers like compost tea or fish emulsion. Avoid over-fertilizing, as this can burn the roots.

Leave a Comment