
Growing Celery at Home might seem like a challenge reserved for seasoned gardeners, but I’m here to tell you it’s totally achievable, even if you’re a beginner! Forget those limp, expensive stalks from the grocery store. Imagine crisp, flavorful celery, fresh from your own backyard, ready to add a delightful crunch to your salads, soups, and snacks.
Celery has a rich history, dating back to ancient times where it was used medicinally before becoming a culinary staple. From the Mediterranean region, it slowly made its way into our modern diets, but the convenience of grocery stores often overshadows the joy of cultivating our own food. But why settle for store-bought when you can experience the satisfaction of nurturing your own celery patch?
This DIY guide is your secret weapon to successful growing celery at home. We’ll break down the process into easy-to-follow steps, covering everything from seed starting to harvesting. Many people struggle with getting celery to thrive, often facing issues like bolting (premature flowering) or pest infestations. But with the right knowledge and a few simple tricks, you can overcome these hurdles and enjoy a bountiful harvest. I’m excited to share these tips and hacks with you, so let’s get started and transform your garden into a celery-growing haven!
Sellerie zu Hause anbauen: Ein umfassender DIY-Leitfaden
Hallo zusammen! Ich liebe es, frische Zutaten direkt aus meinem Garten zu verwenden, und Sellerie ist da keine Ausnahme. Es mag anfangs etwas einschüchternd wirken, aber glaubt mir, mit ein wenig Geduld und den richtigen Schritten könnt ihr ganz einfach euren eigenen Sellerie zu Hause anbauen. Dieser Leitfaden führt euch durch den gesamten Prozess, von der Auswahl des richtigen Selleries bis zur Ernte eurer eigenen knackigen Stangen. Los geht’s!
Was ihr braucht
Bevor wir loslegen, hier eine Liste der Dinge, die ihr benötigt:
* Selleriestrunk: Am besten einen frischen, festen Strunk aus dem Supermarkt oder vom Bauernmarkt. Achtet darauf, dass die Basis (der untere Teil, wo die Wurzeln waren) intakt und nicht beschädigt ist.
* Ein Glas oder eine Schale: Groß genug, um die Selleriebasis aufzunehmen.
* Wasser: Leitungswasser ist in Ordnung.
* Blumenerde: Eine hochwertige Blumenerde ist wichtig für das Wachstum.
* Ein Topf: Mit Drainagelöchern, groß genug für den Sellerie.
* Ein sonniger Standort: Sellerie braucht viel Sonnenlicht.
* Geduld: Sellerie braucht Zeit, um zu wachsen.
Sellerie aus einem Strunk ziehen: Schritt-für-Schritt-Anleitung
1. Den Selleriestrunk vorbereiten:
* Schneidet den Selleriestrunk etwa 5-7 cm vom unteren Ende ab. Achtet darauf, dass ihr den Teil mit der Wurzelbasis behaltet.
* Entfernt die äußeren, welken oder beschädigten Stangen. Die inneren, frischen Stangen könnt ihr für Suppen oder Salate verwenden.
2. Die Selleriebasis einweichen:
* Füllt das Glas oder die Schale mit etwa 2-3 cm Wasser.
* Stellt die Selleriebasis mit der Schnittfläche nach unten in das Wasser. Achtet darauf, dass nur die Basis im Wasser steht und nicht die gesamten Stangen.
3. An einem sonnigen Ort platzieren:
* Stellt das Glas mit der Selleriebasis an einen hellen, sonnigen Ort. Ein Fensterbrett ist ideal.
* Wechselt das Wasser alle 1-2 Tage, um es frisch und sauber zu halten.
4. Wurzelbildung beobachten:
* Nach etwa 5-7 Tagen solltet ihr kleine Wurzeln an der Unterseite der Selleriebasis sehen.
* Auch neue, grüne Blätter sollten in der Mitte des Strunks zu wachsen beginnen.
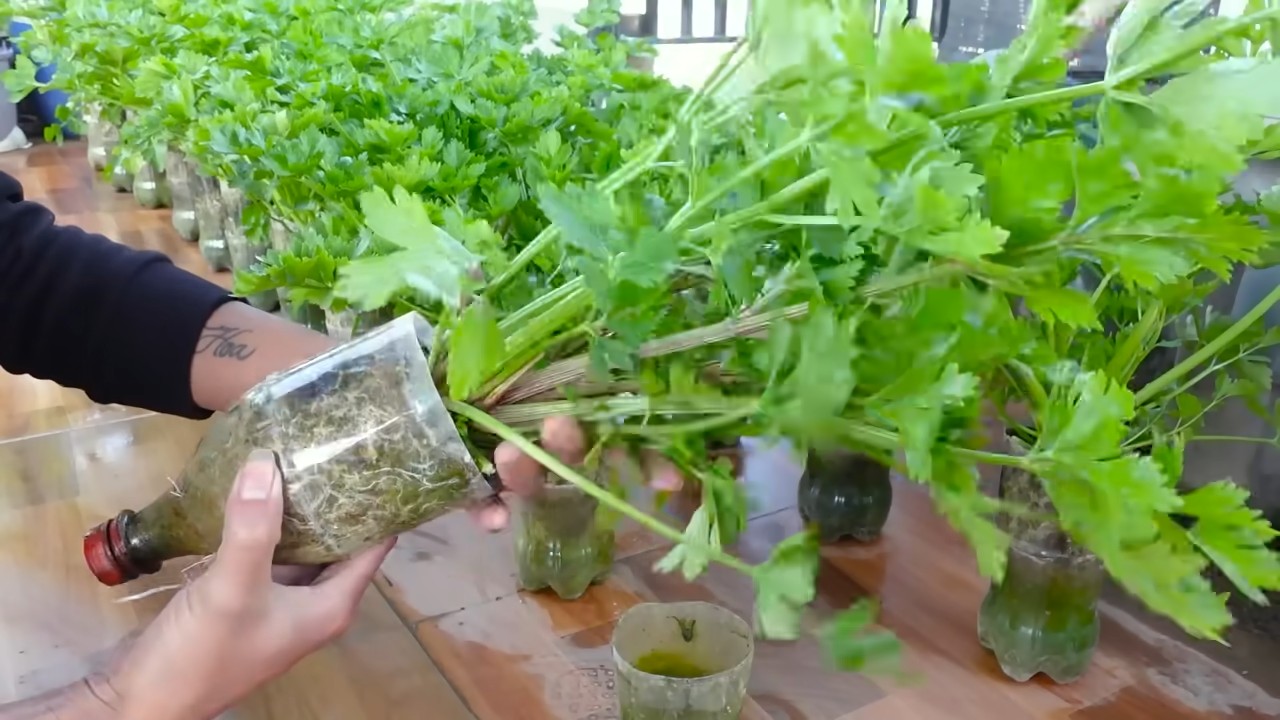
5. Den Sellerie umtopfen:
* Sobald die Wurzeln etwa 5 cm lang sind, ist es Zeit, den Sellerie in einen Topf mit Erde zu pflanzen.
* Füllt den Topf mit Blumenerde.
* Macht ein Loch in die Mitte der Erde, das groß genug ist, um die Selleriebasis aufzunehmen.
* Setzt die Selleriebasis vorsichtig in das Loch und bedeckt sie mit Erde. Lasst die neuen Blätter frei.
* Gießt den Sellerie gründlich.
6. Pflege des Selleries:
* Stellt den Topf an einen sonnigen Ort.
* Gießt den Sellerie regelmäßig, so dass die Erde feucht, aber nicht nass ist.
* Düngt den Sellerie alle 2-3 Wochen mit einem organischen Dünger.
7. Geduld haben:
* Sellerie braucht Zeit, um zu wachsen. Es kann mehrere Monate dauern, bis ihr einen erntereifen Sellerie habt.
* Habt Geduld und pflegt euren Sellerie gut.
Tipps für ein erfolgreiches Selleriewachstum
* Der richtige Standort: Sellerie braucht mindestens 6 Stunden Sonnenlicht pro Tag. Wählt einen sonnigen Standort in eurem Garten oder auf eurem Balkon.
* Die richtige Erde: Verwendet eine hochwertige Blumenerde, die gut drainiert und reich an Nährstoffen ist. Ihr könnt auch Kompost oder andere organische Materialien hinzufügen, um die Erde zu verbessern.
* Die richtige Bewässerung: Sellerie braucht viel Wasser. Gießt ihn regelmäßig, so dass die Erde feucht, aber nicht nass ist. Vermeidet Staunässe, da dies zu Wurzelfäule führen kann.
* Die richtige Düngung: Sellerie ist ein Starkzehrer. Düngt ihn alle 2-3 Wochen mit einem organischen Dünger.
* Schutz vor Schädlingen: Sellerie kann von verschiedenen Schädlingen befallen werden, wie z.B. Blattläusen oder Schnecken. Kontrolliert eure Pflanzen regelmäßig und bekämpft Schädlinge bei Bedarf mit natürlichen Mitteln.
* Bleichen des Selleries (optional): Um hellere und mildere Selleriestangen zu erhalten, könnt ihr den Sellerie bleichen. Dies geschieht, indem man die Stangen etwa 2-3 Wochen vor der Ernte mit Erde oder Pappe abdeckt, so dass nur die Blätter Licht bekommen.
Ernte eures selbstgezogenen Selleries
* Wann ernten: Sellerie ist erntereif, wenn die Stangen eine ausreichende Größe erreicht haben und fest sind. Dies ist in der Regel nach etwa 3-4 Monaten der Fall.
* Wie ernten: Schneidet die Stangen mit einem scharfen Messer oder einer Gartenschere am Boden ab. Ihr könnt entweder den gesamten Sellerie auf einmal ernten oder nur einzelne Stangen nach Bedarf.
* Lagerung: Sellerie kann im Kühlschrank in einem Plastikbeutel oder in einem Behälter mit Wasser aufbewahrt werden. So bleibt er mehrere Wochen frisch.
Mögliche Probleme und Lösungen
* Gelbe Blätter: Gelbe Blätter können ein Zeichen für zu wenig Wasser, Nährstoffmangel oder Schädlingsbefall sein. Überprüft die Bewässerung, düngt den Sellerie und kontrolliert ihn auf Schädlinge.
* Schlaffe Stangen: Schlaffe Stangen sind oft ein Zeichen für zu wenig Wasser. Gießt den Sellerie gründlich.
* Wurzelfäule: Wurzelfäule wird durch Staunässe verursacht. Achtet darauf, dass der Topf gute Drainagelöcher hat und gießt den Sellerie nicht zu viel.
* Schädlinge: Kontrolliert eure Pflanzen regelmäßig auf Schädlinge und bekämpft sie bei Bedarf mit natürlichen Mitteln.
Sellerie aus Samen ziehen (Alternative)
Obwohl dieser Artikel sich auf das Ziehen von Sellerie aus einem Strunk konzentriert, möchte ich kurz erwähnen, dass ihr Sellerie auch aus Samen ziehen könnt. Dies ist etwas zeitaufwendiger, aber es ermöglicht euch, verschiedene Selleriesorten anzubauen.
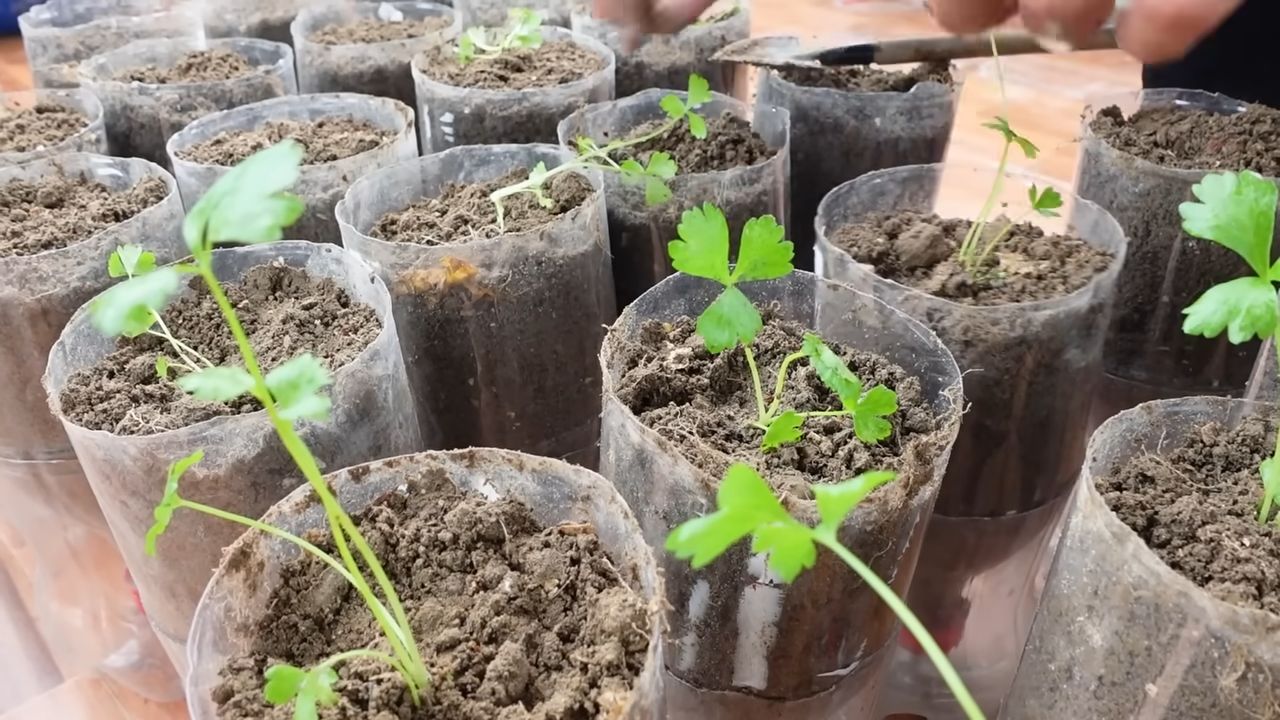
1. Aussaat: Säät Selleriesamen im Frühjahr in Anzuchtschalen oder Töpfen aus.
2. Keimung: Selleriesamen brauchen Licht zum Keimen. Drückt die Samen leicht in die Erde und besprüht sie mit Wasser. Haltet die Erde feucht.
3. Pikieren: Sobald die Sämlinge groß genug sind, pikiert ihr sie in separate Töpfe.
4. Auspflanzen: Pflanzt die Selleriesämlinge nach den letzten Frösten ins Freie.
Warum Sellerie selbst anbauen?
Es gibt viele Gründe, warum ich es liebe, meinen eigenen Sellerie anzubauen:
* Frische: Selbstgezogener Sellerie ist viel frischer und aromatischer als Sellerie aus dem Supermarkt.
* Nachhaltigkeit: Ihr reduziert euren ökologischen Fußabdruck, indem ihr keine langen Transportwege benötigt.
* Kontrolle: Ihr wisst genau, was in eurem Sellerie steckt, da ihr ihn selbst angebaut habt.
* Befriedigung: Es ist einfach ein tolles Gefühl, etwas selbst anzubauen und zu ernten.
Ich hoffe, dieser Leitfaden hat euch geholfen und inspiriert, euren eigenen Sellerie zu Hause anzubauen. Es ist ein lohnendes Projekt, das euch mit frischen, gesunden Zutaten belohnt. Viel Erfolg und viel Spaß beim Gärtnern!
Conclusion
So, there you have it! Growing celery at home, while it might seem daunting at first, is a surprisingly rewarding experience. It’s not just about saving money on groceries; it’s about connecting with your food, understanding the process from seed to stalk, and enjoying the unparalleled freshness of homegrown produce. Think about it: no more limp, store-bought celery that’s been sitting on a shelf for days. Instead, you’ll have crisp, vibrant stalks ready to be harvested whenever you need them.
But the benefits extend beyond just taste and freshness. By growing your own celery, you’re reducing your carbon footprint by minimizing transportation and packaging. You’re also ensuring that your celery is free from harmful pesticides and herbicides, giving you complete control over what goes into your body. Plus, let’s be honest, there’s a certain satisfaction that comes from nurturing a plant from a tiny seed into a thriving vegetable. It’s a tangible accomplishment that you can be proud of.
This DIY trick of regrowing celery from the base is a fantastic starting point. It’s simple, requires minimal effort, and provides a quick and easy way to get your celery-growing journey underway. However, don’t stop there! Once you’ve mastered the art of regrowing from the base, consider experimenting with different celery varieties. There’s the classic Pascal celery, known for its crispness and mild flavor, or the Golden Self-Blanching celery, which is sweeter and more tender. You can even try growing celeriac, the root vegetable related to celery, for a unique and flavorful addition to your soups and stews.
Furthermore, explore different growing methods. While regrowing from the base is great for a quick start, consider starting celery from seed for a more complete growing experience. This will allow you to select specific varieties and control every aspect of the growing process. You can also experiment with different soil types and fertilizers to see what works best for your celery.
Don’t be afraid to get your hands dirty and experiment! Gardening is all about learning and adapting. There will be successes and failures along the way, but each experience will teach you something new.
We truly believe that growing celery at home is a must-try for any home gardener, regardless of experience level. It’s a fun, rewarding, and sustainable way to enjoy fresh, healthy produce. So, grab a celery base, follow our simple steps, and get ready to experience the joy of homegrown celery.
We’re confident that you’ll be amazed at how easy and rewarding it is. And once you’ve harvested your first crop, we encourage you to share your experience with us! Post photos of your homegrown celery on social media using [Your Hashtag Here] and tell us about your successes and challenges. We’d love to hear your tips and tricks for growing the best celery possible. Let’s create a community of home celery growers and inspire others to join in the fun! So, what are you waiting for? Get growing!
Frequently Asked Questions (FAQ)
Why should I bother growing celery at home when I can just buy it at the store?
That’s a valid question! While store-bought celery is convenient, homegrown celery offers several advantages. First and foremost, the taste and freshness are unparalleled. Homegrown celery is noticeably crisper, more flavorful, and lacks the bitterness that can sometimes be present in store-bought varieties. Secondly, you have complete control over the growing process, ensuring that your celery is free from harmful pesticides and herbicides. This is especially important if you’re concerned about the chemicals used in conventional agriculture. Thirdly, growing your own celery is a sustainable practice that reduces your carbon footprint by minimizing transportation and packaging. Finally, it’s a rewarding and educational experience that connects you with your food and the natural world. Plus, the satisfaction of harvesting your own celery is hard to beat!
Is it really that easy to regrow celery from the base?
Yes, it is! Regrowing celery from the base is one of the easiest and most beginner-friendly gardening projects you can undertake. It requires minimal effort and resources, and the results are often surprisingly quick. Simply place the celery base in a shallow dish of water, provide it with sunlight, and watch it sprout new growth. Within a week or two, you’ll have a small celery plant ready to be transplanted into soil. While it may not produce full-sized stalks right away, it’s a great way to get started and learn the basics of celery cultivation.
What kind of soil is best for growing celery?
Celery thrives in rich, well-drained soil that is high in organic matter. A good soil mix should retain moisture but also allow for adequate drainage to prevent root rot. Amend your garden soil with compost, aged manure, or other organic materials to improve its fertility and drainage. A slightly acidic to neutral soil pH (around 6.0 to 7.0) is ideal. You can test your soil pH using a home testing kit or by sending a sample to a local agricultural extension office.
How much sunlight does celery need?
Celery needs at least six hours of sunlight per day to thrive. Choose a location in your garden that receives full sun, especially during the morning hours. If you live in a hot climate, providing some afternoon shade can help prevent the celery from bolting (going to seed prematurely). When growing celery indoors, place it near a sunny window or supplement with artificial grow lights.
How often should I water my celery?
Celery is a water-loving plant and requires consistent moisture to grow properly. Water your celery regularly, especially during hot and dry weather. Aim to keep the soil consistently moist but not waterlogged. Check the soil moisture level regularly by sticking your finger into the soil. If the top inch feels dry, it’s time to water. Mulching around the base of the celery plant can help retain moisture and suppress weeds.
What are some common pests and diseases that affect celery?
Celery can be susceptible to several pests and diseases, including aphids, celery leaf tiers, and fungal diseases like early blight and late blight. Regularly inspect your celery plants for signs of infestation or disease. If you spot any problems, take action promptly to prevent them from spreading. Organic pest control methods, such as insecticidal soap or neem oil, can be effective against aphids and other pests. For fungal diseases, ensure good air circulation around the plants and avoid overhead watering. You can also use organic fungicides if necessary.
Can I grow celery in containers?
Yes, you can definitely grow celery in containers! Choose a large container (at least 12 inches in diameter) with drainage holes. Fill the container with a high-quality potting mix that is rich in organic matter. Water regularly and fertilize every few weeks with a balanced fertilizer. Container-grown celery may require more frequent watering than celery grown in the ground, especially during hot weather.
How long does it take to grow celery from seed?
Growing celery from seed takes longer than regrowing from the base. It typically takes around 120 to 150 days from seed to harvest. Start the seeds indoors 8 to 10 weeks before the last expected frost. Transplant the seedlings outdoors after the danger of frost has passed.
When is celery ready to harvest?
Celery is ready to harvest when the stalks are at least 6-8 inches long and have reached the desired thickness. You can harvest individual stalks as needed or harvest the entire plant at once. To harvest, simply cut the stalks at the base of the plant with a sharp knife.
Can I freeze celery?
Yes, you can freeze celery for later use. Wash and chop the celery into small pieces. Blanch the celery in boiling water for 2-3 minutes, then immediately transfer it to an ice bath to stop the cooking process. Drain the celery well and pack it into freezer bags or containers. Frozen celery is best used in soups, stews, and other cooked dishes.

Leave a Comment