
Grow Roma Tomatoes Home and unlock a world of delicious, homegrown goodness right in your backyard! Imagine biting into a juicy, sun-ripened Roma tomato, bursting with flavor – a flavor far superior to anything you can find in a grocery store. That’s the magic we’re about to explore together. For generations, cultivating tomatoes has been a cherished tradition, connecting us to the earth and providing sustenance. From the sun-drenched fields of Italy, where Roma tomatoes are a culinary staple, to humble backyard gardens around the globe, these versatile fruits have nourished families and inspired countless recipes.
But let’s be honest, getting those perfect Roma tomatoes can sometimes feel like a challenge. Pests, diseases, and unpredictable weather can all throw a wrench in your gardening plans. That’s where our DIY tricks and hacks come in! I’m going to share some simple, yet effective, techniques that will help you grow Roma Tomatoes Home like a pro, even if you’re a complete beginner. We’ll cover everything from choosing the right soil and providing adequate support to warding off common tomato ailments and maximizing your yield. So, grab your gardening gloves, and let’s get started on this exciting journey to a bountiful harvest of delicious Roma tomatoes!
Growing Roma Tomatoes Yourself: Your Comprehensive DIY Guide
Hello dear garden friends! I love harvesting fresh, aromatic Roma tomatoes directly from my own garden. They are perfect for sauces, soups, salads, and simply for snacking. And the best part? It’s not that hard to grow them yourself! In this article, I’ll show you step by step how you can successfully plant and care for your own Roma tomatoes. Let’s get started!
What You Need: The Right Equipment and Materials
Before we begin, make sure you have everything on hand. Here is a list of the most important things:
- Roma tomato seeds or young plants: You can either buy seeds and start the plants yourself or get young plants directly from a garden center. I personally prefer to start with seeds, as it gives me more control over the entire process.
- Seed starting mix: Regular garden soil is not suitable for starting seeds as it is too heavy and the young roots cannot penetrate it well. Seed starting mix is loose, low in nutrients, and provides good aeration.
- Seedling pots or trays: You will need small pots or trays to start the seeds. There are also special seed starting kits with small cells.
- Larger pots or a garden bed: When the young plants are larger, they will need more space. you can either transplant them into larger pots or directly into the garden bed.
- Garden soil: For the garden bed or the larger pots, you will need good garden soil. You can enrich it with compost or other organic material.
- Plant stakes or tomato cages: Roma tomato plants grow quite large and need support so they don’t fall over.
- Watering can or garden hose: For regularly watering the plants.
- Fertilizer: Tomatoes are heavy feeders and need regular applications of fertilizer to grow well and produce lots of fruit. I recommend a special tomato fertilizer.
- Pruning shears: For pruning the side shoots (suckers).
- Gloves: To protect your hands.
- Spade or shovel: For turning over the soil and planting the tomatoes.
Phase 1: Starting from Seed (Optional, but Recommended)
If you have decided to start from seed, now is the right time to get going. Starting seeds ideally begins about 6-8 weeks before the last expected frost.
- Prepare the seedling pots: Fill the seedling pots or trays with seed starting mix. Press the soil down lightly.
- Sow the seeds: Place 2-3 seeds in each pot. Cover the seeds with a thin layer of seed starting mix (approx. 0.5 cm).
- Water: Moisten the soil carefully with a spray bottle or watering can. Make sure the soil does not get too wet.
- Location: Place the seedling pots in a warm, bright place. A south-facing windowsill is ideal. You can also use a special plant lamp.
- Germination: The seeds usually germinate within 7-14 days. Keep the soil moist during this time.
- Pricking out: As soon as the seedlings have developed their first true leaves (besides the seed leaves), you can prick them out. This means you remove the weaker plants and transplant the strongest ones into separate pots. Be very careful not to damage the roots.
Phase 2: Preparing the Garden Bed or Pots
Whether you want to grow your Roma tomatoes in a garden bed or in pots, proper preparation is crucial.
- Choose a location: Roma tomatoes need a lot of sun, at least 6-8 hours per day. Choose a sunny location with well-draining soil.
- Soil improvement: If you have a garden bed, turn over the soil and remove weeds and stones. Enrich the soil with compost or other organic material. This improves the soil structure and provides the plants with nutrients.
- Pot preparation: If you are using pots, choose large pots with a diameter of at least 30 cm. Fill the pots with good garden soil. Make sure the pots have drainage holes so excess water can run off.
Phase 3: Planting Out the Young Plants
As soon as the young plants are large enough and there is no more danger of frost (usually mid-May), you can plant them out.
- Hardening off: Before you plant out the young plants, you should harden them off for a few days. This means you place them outdoors for a few hours during the day so they can get used to the sun and wind.
- Planting holes: Dig planting holes that are slightly larger than the root balls of the young plants.
- Planting: Place the young plants in the planting holes. Make sure the root ball is completely covered with soil.
- Watering: Water the plants thoroughly after planting.
- Planting distance: Maintain a planting distance of about 50-60 cm between the plants.
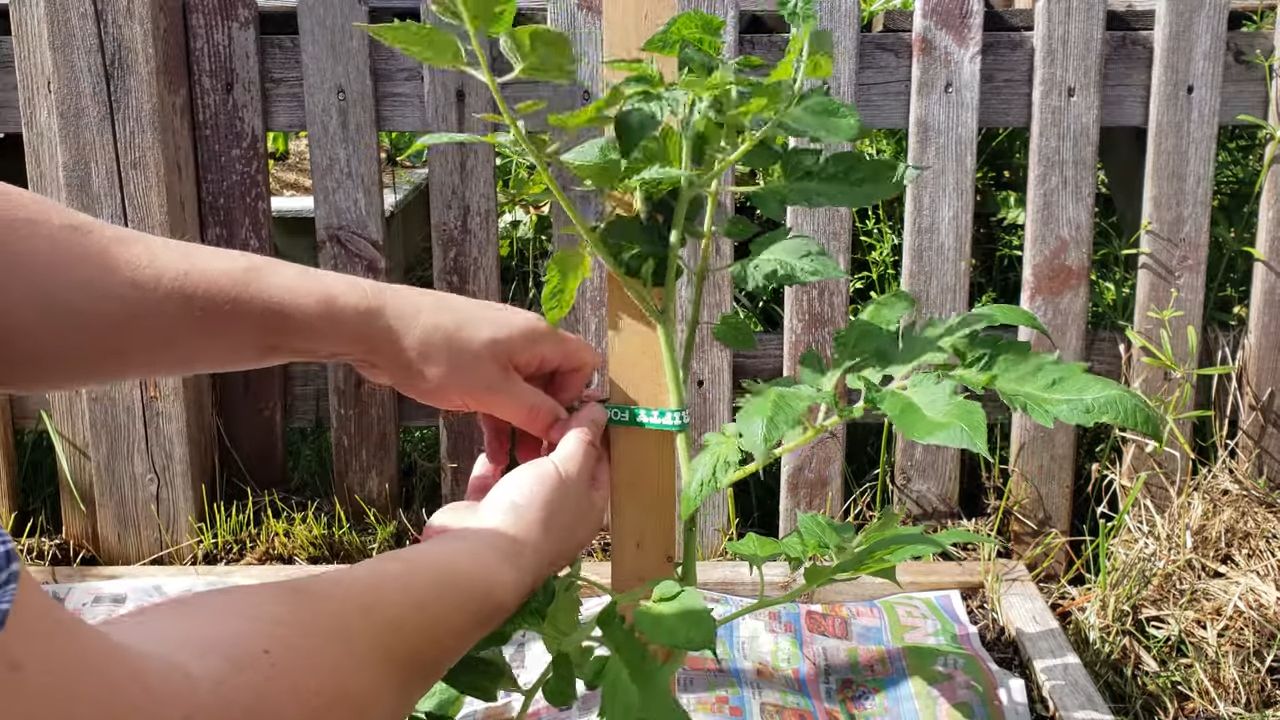
- Staking: Immediately after planting, place plant stakes or tomato cages next to the plants. Carefully tie the plants to the stakes to give them support.
Phase 4: Caring for the Roma Tomato Plants
The care of Roma tomato plants is crucial for a bountiful harvest.
- Watering: Water the plants regularly, especially during dry periods. Make sure the soil does not dry out, but avoid waterlogging. It’s best to water in the morning so the leaves can dry off during the day.
- Fertilizing: Fertilize the plants regularly with a special tomato fertilizer. Start about 2-3 weeks after planting out and repeat the fertilization every 2-3 weeks.
- Pruning suckers: Roma tomatoes produce “suckers,” which are side shoots that grow from the leaf axils. These side shoots take unnecessary energy from the plant and should be regularly pruned. Simply break off the side shoots with your fingers while they are still small.
- Mulching: Mulch the soil around the plants with straw or grass clippings. This keeps the soil moist, suppresses weeds, and protects the fruit from dirt.
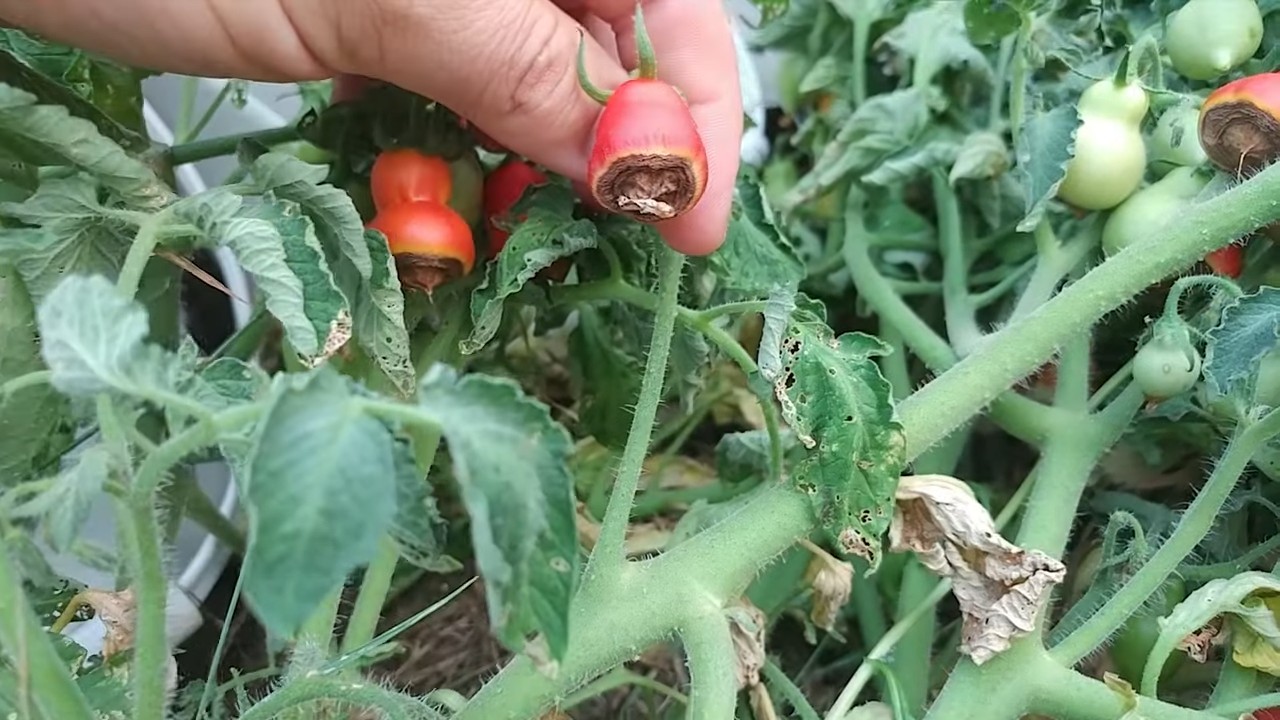
- Disease and pest control: Watch for signs of diseases or pests. Tomatoes are susceptible to various diseases like late and early blight. If infested, you should act quickly and use a suitable plant protection product if necessary.
Phase 5: The Harvest
The harvest of Roma tomatoes usually begins in July or August, depending on the sowing time and weather conditions.
- Recognizing ripeness: Roma tomatoes are ripe when they have a deep red color and detach easily from the stem.
- Harvesting: Harvest the tomatoes carefully to avoid damaging the plants.
- Storage: Ripe Roma tomatoes can be stored at room temperature for a few days. They last a bit longer in the refrigerator but will lose some of their flavor.
Additional Tips for Successful Roma Tomato Cultivation
Choose the right variety: There are different Roma tomato…
Conclusion
So, there you have it! Growing Roma tomatoes at home isn’t just a gardening project; it’s an investment in flavor, freshness, and a deeper connection to your food. We’ve walked through the essential steps, from selecting the perfect seeds or seedlings to nurturing your plants and harvesting those beautiful, sun-ripened fruits.
Why is this DIY trick a must-try? Because it empowers you to control the entire process, ensuring you get the most delicious and healthy Roma tomatoes possible. Store-bought tomatoes, even the best ones, often lack the intense flavor and vibrant color of homegrown varieties. Plus, you’ll avoid the pesticides and other chemicals that can sometimes be used in commercial farming. Imagine the satisfaction of using your own Roma tomatoes to create a rich, flavorful pasta sauce, a vibrant salsa, or a perfectly balanced bruschetta. The possibilities are endless!
But the benefits extend beyond just taste. Gardening is a therapeutic activity that can reduce stress, improve your mood, and provide a sense of accomplishment. Watching your Roma tomato plants grow and thrive is a rewarding experience that connects you to the natural world.
Now, let’s talk about variations. While we’ve focused on the traditional method, there are plenty of ways to customize your Roma tomato growing experience. Consider these options:
* Container Gardening: If you have limited space, Roma tomatoes thrive in large containers. Choose a pot that’s at least 20 gallons in size and use a high-quality potting mix. This is a great option for balconies, patios, or small yards.
* Vertical Gardening: Maximize your space by growing Roma tomatoes vertically using trellises, cages, or even hanging baskets. This method also improves air circulation and reduces the risk of disease.
* Companion Planting: Enhance the growth and flavor of your Roma tomatoes by planting them alongside beneficial companions like basil, marigolds, or carrots. These plants can deter pests, attract pollinators, and improve soil health.
* Heirloom Varieties: Explore different heirloom Roma tomato varieties for unique flavors and colors. Some popular options include ‘San Marzano’ and ‘Amish Paste’.
* Hydroponics: For the more adventurous gardener, hydroponic systems offer a soil-free way to grow Roma tomatoes. This method can be more efficient and produce higher yields.
No matter which method you choose, remember to provide your Roma tomato plants with plenty of sunlight, water, and nutrients. Regular pruning and staking will also help them stay healthy and productive.
We wholeheartedly encourage you to try growing Roma tomatoes at home. It’s a rewarding and delicious experience that you won’t regret. Don’t be afraid to experiment and find what works best for you.
And most importantly, we want to hear about your experience! Share your tips, tricks, and photos in the comments below. Let’s create a community of Roma tomato enthusiasts and learn from each other. What challenges did you face? What successes did you celebrate? What are your favorite ways to use your homegrown Roma tomatoes? Your insights can help other gardeners achieve their own Roma tomato growing dreams. So, get your hands dirty, nurture those plants, and enjoy the fruits (or vegetables!) of your labor. Happy gardening!
Frequently Asked Questions (FAQ)
What are the best conditions for growing Roma tomatoes?
Roma tomatoes thrive in warm, sunny locations with well-drained soil. They need at least 6-8 hours of direct sunlight per day. The ideal soil temperature for germination is between 70-80°F (21-27°C). Roma tomatoes prefer slightly acidic soil with a pH of 6.0-6.8. Consistent watering is crucial, especially during fruit development. Avoid overhead watering, as it can lead to fungal diseases.
How often should I water my Roma tomato plants?
Water deeply and regularly, especially during hot, dry weather. Aim to keep the soil consistently moist but not waterlogged. A good rule of thumb is to water when the top inch of soil feels dry to the touch. Mulching around the plants can help retain moisture and suppress weeds. In general, water deeply 2-3 times per week, adjusting based on weather conditions.
What kind of fertilizer should I use for Roma tomatoes?
Roma tomatoes are heavy feeders and benefit from regular fertilization. Start with a balanced fertilizer (e.g., 10-10-10) at planting time. Once the plants start to flower, switch to a fertilizer that’s higher in phosphorus and potassium (e.g., 5-10-10) to promote fruit development. You can also supplement with compost tea or liquid seaweed extract. Avoid over-fertilizing, as it can lead to excessive foliage growth and reduced fruit production.
How do I prevent common Roma tomato diseases?
Several diseases can affect Roma tomatoes, including early blight, late blight, and blossom end rot. To prevent these problems, choose disease-resistant varieties, provide good air circulation, avoid overhead watering, and mulch around the plants. Regularly inspect your plants for signs of disease and remove any affected leaves or fruits. If necessary, use a fungicide or insecticide according to the manufacturer’s instructions. Blossom end rot is often caused by calcium deficiency, so ensure your soil has adequate calcium levels.
When is the best time to harvest Roma tomatoes?
Roma tomatoes are typically ready to harvest 70-80 days after transplanting. The fruits should be firm, plump, and uniformly red. Gently twist the tomato from the vine, leaving a small piece of stem attached. Avoid harvesting tomatoes that are still green or have blemishes. Roma tomatoes can be stored at room temperature for a few days or refrigerated for longer storage.
How do I deal with pests that attack Roma tomato plants?
Common pests that attack Roma tomatoes include aphids, tomato hornworms, and whiteflies. Regularly inspect your plants for signs of infestation and take action promptly. You can handpick pests, use insecticidal soap, or introduce beneficial insects like ladybugs. Tomato hornworms can be particularly destructive, so keep an eye out for them and remove them as soon as you spot them.
Can I grow Roma tomatoes indoors?
Yes, you can grow Roma tomatoes indoors, but it requires more effort than growing them outdoors. You’ll need a sunny location or grow lights to provide adequate light. Choose a self-pollinating variety and hand-pollinate the flowers if necessary. Use a large container with well-drained potting mix and provide regular watering and fertilization. Indoor Roma tomato plants may not produce as many fruits as outdoor plants, but you can still enjoy a decent harvest.
How do I prune Roma tomato plants?
Pruning Roma tomato plants can improve air circulation, reduce the risk of disease, and promote fruit production. Remove suckers (the small shoots that grow between the main stem and the branches) to encourage the plant to focus its energy on developing fruits. You can also remove any yellowing or diseased leaves. Avoid over-pruning, as it can reduce the plant’s ability to photosynthesize.
What are some good companion plants for Roma tomatoes?
Several plants can benefit Roma tomatoes when planted nearby. Basil repels pests and improves the flavor of the tomatoes. Marigolds deter nematodes and other soil pests. Carrots attract beneficial insects and improve soil health. Other good companion plants include onions, garlic, and parsley. Avoid planting Roma tomatoes near brassicas (e.g., cabbage, broccoli) or fennel, as they can inhibit growth.
How can I save seeds from my Roma tomatoes for next year?
Saving seeds from your Roma tomatoes is a great way to preserve your favorite varieties and save money. Choose ripe, healthy tomatoes from disease-free plants. Squeeze the seeds and pulp into a jar and add a little water. Let the mixture ferment for a few days, stirring occasionally. The good seeds will sink to the bottom, while the pulp and bad seeds will float to the top. Rinse the seeds thoroughly and spread them out on a paper towel to dry completely. Store the dried seeds in an airtight container in a cool, dark place.


Leave a Comment