
Patio Summer Squash Growing can feel like a distant dream if you’re short on space, right? I get it! You envision fresh, vibrant zucchini and yellow squash gracing your summer table, but your tiny patio seems to laugh in the face of such ambitions. But don’t despair, fellow gardening enthusiast! This isn’t just another article; it’s your personal guide to unlocking the secrets of bountiful harvests, even in the most compact of outdoor spaces.
For centuries, humans have cultivated squash, with evidence tracing back thousands of years in the Americas. From the Three Sisters planting method of indigenous cultures to the modern-day urban gardener, the desire to nurture and harvest this versatile vegetable has remained constant. But let’s face it, traditional squash growing can be a land hog! That’s where these DIY tricks come in.
Why do you need these hacks? Because everyone deserves the joy of homegrown goodness, regardless of their square footage! Imagine stepping onto your patio and picking a perfectly ripe summer squash for dinner. No more trips to the grocery store, no more questionable produce. Just fresh, flavorful, and fulfilling results. I’m going to show you how to maximize your yield, choose the right varieties, and conquer common challenges, all while keeping your patio summer squash growing experience fun and rewarding. Let’s get started!
Growing Summer Squash in Containers: A Patio Gardener’s Dream
Hey there, fellow garden enthusiasts! I’m so excited to share my experience with growing summer squash right on my patio. It’s surprisingly easy, even if you don’t have a sprawling backyard. With a little know-how, you can enjoy fresh, homegrown squash all summer long. Let’s dive in!
Choosing the Right Squash Variety
Not all summer squash varieties are created equal when it comes to container gardening. You’ll want to opt for bush varieties, which are more compact and manageable than vining types. Here are a few of my favorites:
* ‘Spacemaster’ Zucchini: This is a classic choice, known for its compact size and prolific yields. The fruits are dark green and delicious.
* ‘Bush Baby’ Butternut Squash: While technically a winter squash, ‘Bush Baby’ is a bush variety that produces smaller, sweeter butternut squash. It’s a bit more challenging than zucchini, but definitely worth a try!
* ‘Early Crookneck’: This yellow squash is a reliable producer and has a slightly curved neck. It’s a great option if you prefer yellow squash over zucchini.
* ‘Patio Star’ Zucchini: As the name suggests, this variety is specifically bred for container gardening. It’s very compact and produces dark green zucchini.
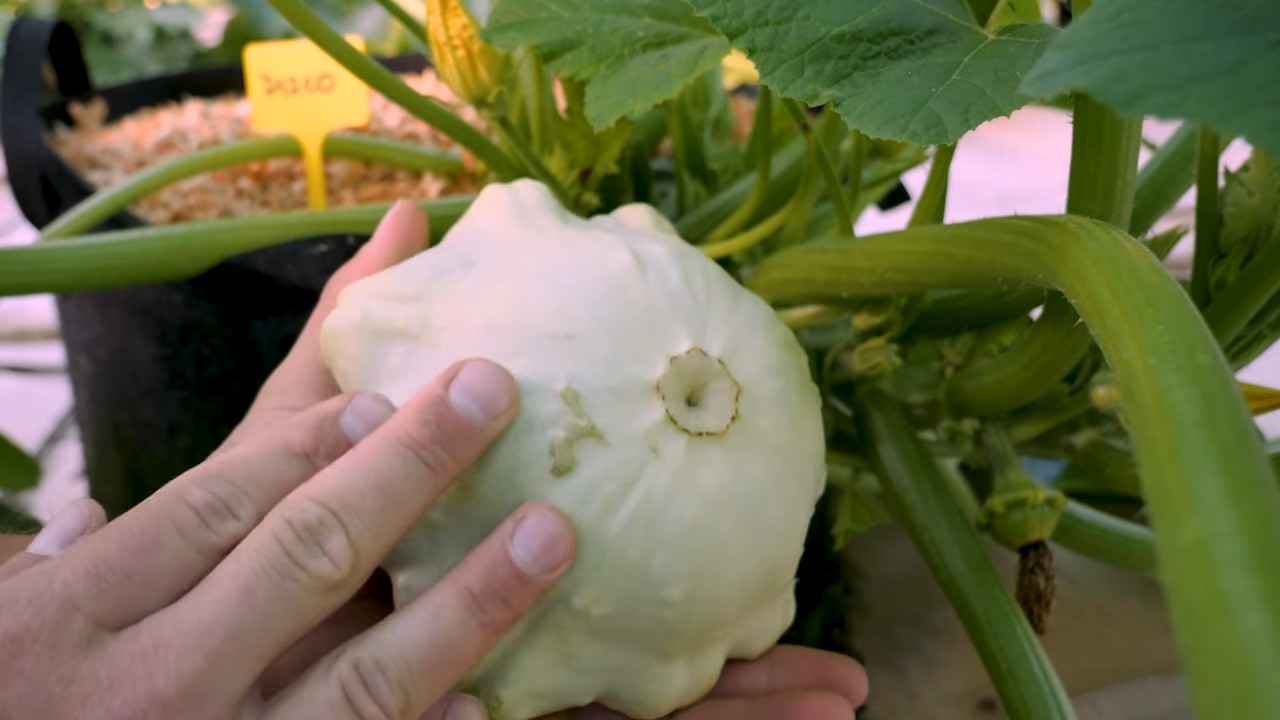
* ‘Sunburst’ Patty Pan Squash: These adorable, saucer-shaped squash come in yellow and are incredibly productive. They’re also very ornamental!
Gathering Your Supplies
Before we get started, let’s make sure you have everything you need. Here’s a checklist:
* Large Container: This is crucial! You’ll need a container that’s at least 24 inches in diameter and 12 inches deep. The bigger, the better, as squash plants have extensive root systems.
* High-Quality Potting Mix: Don’t skimp on the potting mix! Use a well-draining mix that’s rich in organic matter. Avoid using garden soil, as it can compact in containers and hinder drainage.
* Squash Seeds or Seedlings: Choose your favorite variety from the list above. You can start from seed or purchase seedlings from a local nursery.
* Slow-Release Fertilizer: Squash plants are heavy feeders, so a slow-release fertilizer will provide them with the nutrients they need throughout the growing season.
* Watering Can or Hose: You’ll need a way to water your plants regularly.
* Trowel or Shovel: For planting and transplanting.
* Mulch (Optional): Mulch helps to retain moisture and suppress weeds. Straw, wood chips, or shredded bark are all good options.
* Support Structure (Optional): While not always necessary for bush varieties, a small trellis or stake can provide extra support if your plant gets top-heavy with fruit.
Planting Your Squash
Okay, let’s get our hands dirty! Here’s how to plant your squash:
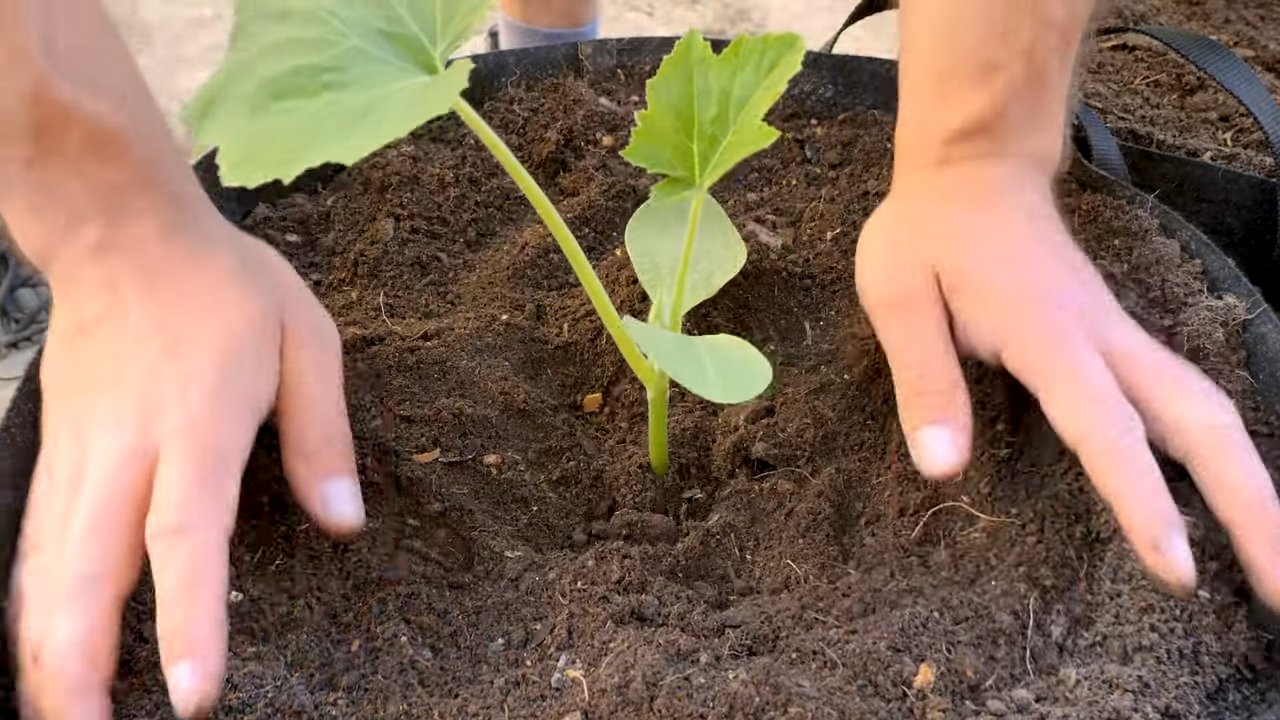
1. Prepare the Container: Fill your container with potting mix, leaving a few inches of space at the top.
2. Sow Seeds (if starting from seed): If you’re starting from seed, sow 2-3 seeds per container, about 1 inch deep. Space them a few inches apart. Once the seedlings emerge, thin them to the strongest plant.
3. Transplant Seedlings (if using seedlings): If you’re using seedlings, gently remove them from their nursery pots. Loosen the roots slightly and plant them in the center of the container, at the same depth they were growing in the nursery pot.
4. Water Thoroughly: Water the soil deeply until water drains out of the bottom of the container. This will help to settle the soil and encourage root growth.
5. Add Slow-Release Fertilizer: Sprinkle a slow-release fertilizer around the base of the plant, following the instructions on the package.
6. Mulch (Optional): Add a layer of mulch around the base of the plant to help retain moisture and suppress weeds.
Caring for Your Squash Plants
Now that your squash plants are in their new home, it’s time to provide them with the care they need to thrive.
1. Watering: Squash plants need consistent moisture, especially during hot weather. Water deeply whenever the top inch of soil feels dry to the touch. Avoid overhead watering, as this can lead to fungal diseases. Aim to water at the base of the plant.
2. Sunlight: Squash plants need at least 6-8 hours of sunlight per day. Choose a sunny spot on your patio or balcony.
3. Fertilizing: In addition to the slow-release fertilizer you added at planting time, you may need to supplement with a liquid fertilizer every few weeks. Look for a fertilizer that’s high in phosphorus and potassium, which are essential for fruit production.
4. Pollination: Squash plants have separate male and female flowers. The female flowers need to be pollinated in order to produce fruit. If you’re not seeing any fruit develop, you may need to hand-pollinate the flowers. To do this, use a small paintbrush to transfer pollen from the male flowers to the female flowers. You can identify female flowers by the small fruit that’s already forming at the base of the flower.
5. Pest and Disease Control: Keep an eye out for common squash pests, such as squash bugs, squash vine borers, and aphids. You can control these pests with insecticidal soap or neem oil. Fungal diseases, such as powdery mildew, can also be a problem. To prevent fungal diseases, avoid overhead watering and ensure good air circulation around your plants. If you do notice signs of disease, treat with a fungicide.
6. Pruning: While not always necessary, you can prune your squash plants to improve air circulation and encourage fruit production. Remove any yellowing or damaged leaves. You can also pinch off the tips of the vines to encourage branching.
Harvesting Your Squash
The best part of growing your own squash is, of course, the harvest! Here’s how to know when your squash is ready to pick:
1. Zucchini: Harvest zucchini when they are 6-8 inches long. They should be firm and have a glossy skin.
2. Yellow Squash: Harvest yellow squash when they are 6-8 inches long. They should be firm and have a smooth skin.
3. Patty Pan Squash: Harvest patty pan squash when they are 3-4 inches in diameter. They should be tender and have a slightly scalloped edge.
4. Butternut Squash: Harvest butternut squash when they are fully mature and have a hard rind. The skin should be a deep tan color.
To harvest your squash, use a sharp knife or pruners to cut the stem close to the fruit. Be careful not to damage the plant.
Troubleshooting
Even with the best care, you may encounter some challenges when growing squash in containers. Here are a few common problems and how to solve them:
* Yellowing Leaves: This can be caused by a number of factors, including overwatering, underwatering, nutrient deficiencies, or pests. Check the soil moisture and adjust your watering accordingly. Fertilize your plants regularly. Inspect the leaves for pests.
* Lack of Fruit Production: This is often due to poor pollination. Hand-pollinate the flowers if you’re not seeing any fruit develop.
* Powdery Mildew: This fungal disease can cause a white, powdery coating on the leaves. Improve air circulation around your plants and treat with a fungicide.
* Squash Bugs: These pests can suck the sap from your plants, causing them to wilt and die. Handpick the bugs off your plants or spray with insecticidal soap.
* Squash Vine Borers: These pests can tunnel into the stems of your plants, causing them to collapse. Wrap the base of the stems with aluminum foil to prevent the borers from entering. If you see signs of borers, you can try to remove them by slitting the stem open and extracting the larvae.
Enjoying Your Harvest
Now that you’ve harvested your delicious homegrown squash, it’s time to enjoy it! Summer squash is incredibly versatile and can be used in a variety of dishes. Here are a few of my favorite ways to use it:
* Grilled Squash: Slice the squash lengthwise and grill it until tender. Drizzle with olive oil and balsamic vinegar.
* Sautéed Squash: Dice the squash and sauté it with onions, garlic, and other vegetables.
* Squash Bread: Grate the squash and add it to your favorite bread recipe.
* Squash Soup: Puree the squash and add it to soup.
* Zucchini Noodles: Use a spiralizer to create zucchini noodles and serve them with your favorite sauce.
Growing summer squash in containers is a rewarding experience that allows you to enjoy fresh, homegrown produce even if you don’t have
Conclusion
So, there you have it! Growing summer squash in containers on your patio isn’t just a possibility; it’s a rewarding and surprisingly simple way to bring fresh, homegrown goodness right to your doorstep. We’ve walked through the essentials, from selecting the right varieties and containers to mastering the art of watering, fertilizing, and pest control. But why is this DIY trick a must-try?
Firstly, it’s about accessibility. Not everyone has a sprawling garden, but a sunny patio or balcony can become a thriving mini-farm. Imagine stepping outside and harvesting your own zucchini or yellow squash for dinner – the taste is unparalleled, and the satisfaction is immense. Secondly, it’s about control. Container gardening allows you to tailor the soil, water, and nutrient levels precisely to your plants’ needs, leading to healthier, more productive squash. Finally, it’s about the sheer joy of nurturing life. Watching those tiny seedlings sprout and grow into bountiful plants is a deeply fulfilling experience.
But don’t stop there! This is just the beginning of your patio squash adventure.
Variations and Suggestions:
* Companion Planting: Enhance your squash’s growth and deter pests by planting companion herbs like basil, mint, or marigolds in the same container or nearby. The aromatic herbs can confuse pests and attract beneficial insects.
* Vertical Gardening: If space is truly limited, consider training your squash to grow vertically on a trellis or support structure. This not only saves space but also improves air circulation and reduces the risk of fungal diseases.
* Succession Planting: Extend your harvest season by planting new squash seeds every few weeks. This ensures a continuous supply of fresh squash throughout the summer.
* Experiment with Varieties: Don’t be afraid to try different varieties of summer squash. Explore unique shapes, colors, and flavors to find your favorites. Consider trying pattypan squash for a different texture and presentation.
* Composting: Use your own homemade compost to enrich the soil in your containers. This is a sustainable and eco-friendly way to provide your squash with the nutrients they need.
Ultimately, the best way to learn is by doing. So, grab some seeds, a container, and some soil, and get started! Don’t be afraid to experiment and adapt the techniques to suit your specific environment and preferences. The key is to observe your plants closely and respond to their needs.
We are confident that with a little effort and attention, you can successfully grow delicious and abundant summer squash right on your patio. We encourage you to try this DIY trick and experience the joy of homegrown produce. And most importantly, we want to hear about your experiences! Share your photos, tips, and challenges in the comments below. Let’s create a community of patio squash growers and learn from each other. Your success story could inspire others to embark on their own gardening journey. So, get planting and let the summer squash season begin! Remember, mastering the art of **patio summer squash growing** is within your reach, and the rewards are well worth the effort.
Frequently Asked Questions (FAQ)
Q: What is the best type of container to use for growing summer squash on a patio?
A: The ideal container for summer squash should be at least 24 inches in diameter and 12 inches deep. This provides ample space for the roots to grow and develop. Choose a container made from durable materials like plastic, terracotta, or wood. Ensure the container has drainage holes to prevent waterlogging, which can lead to root rot. Fabric pots are also a great option as they allow for excellent drainage and aeration.
Q: What kind of soil should I use for my patio summer squash?
A: Summer squash thrives in well-draining, nutrient-rich soil. A good potting mix specifically formulated for vegetables is an excellent choice. You can also create your own mix by combining equal parts of compost, peat moss (or coconut coir), and perlite or vermiculite. Avoid using garden soil, as it can be too heavy and compacted for container gardening. Adding slow-release fertilizer to the soil at planting time will provide a steady supply of nutrients throughout the growing season.
Q: How often should I water my patio summer squash?
A: Summer squash needs consistent moisture, especially during hot weather. Water deeply whenever the top inch of soil feels dry to the touch. Avoid overhead watering, as this can promote fungal diseases. Instead, water at the base of the plant, using a watering can or a soaker hose. Mulching around the base of the plant with straw or wood chips can help retain moisture and suppress weeds. Check the soil moisture daily, especially during periods of drought or high temperatures.
Q: How much sunlight does patio summer squash need?
A: Summer squash requires at least 6-8 hours of direct sunlight per day to thrive. Choose a sunny location on your patio or balcony where your plants will receive ample sunlight. If you live in a particularly hot climate, some afternoon shade may be beneficial to prevent the plants from overheating. If you don’t have enough natural sunlight, you can supplement with grow lights.
Q: What are some common pests and diseases that affect patio summer squash, and how can I control them?
A: Common pests that can affect summer squash include squash bugs, squash vine borers, aphids, and cucumber beetles. Regularly inspect your plants for signs of infestation, such as chewed leaves, wilting vines, or sticky residue. Handpicking pests, using insecticidal soap, or applying neem oil can help control infestations. Common diseases include powdery mildew and squash vine borer. Ensure good air circulation around your plants and avoid overhead watering to prevent fungal diseases. If powdery mildew appears, treat it with a fungicide specifically labeled for use on vegetables. For squash vine borers, you can wrap the base of the stem with aluminum foil to prevent them from laying eggs.
Q: How do I know when my patio summer squash is ready to harvest?
A: Summer squash is typically ready to harvest when it is young and tender. The size will vary depending on the variety, but generally, zucchini should be harvested when they are 6-8 inches long, and yellow squash should be harvested when they are 4-6 inches long. The skin should be smooth and glossy, and the squash should feel firm to the touch. Use a sharp knife or pruning shears to cut the squash from the vine, leaving a short stem attached. Regular harvesting encourages the plant to produce more fruit.
Q: Can I grow different varieties of summer squash in the same container?
A: While it’s possible to grow different varieties of summer squash in the same large container, it’s generally recommended to stick to one variety per container. Different varieties may have different growth habits and nutrient requirements, which can make it challenging to provide optimal conditions for all plants. If you do choose to grow multiple varieties in the same container, make sure to select varieties that have similar growth habits and nutrient needs.
Q: How do I fertilize my patio summer squash?
A: Summer squash are heavy feeders and require regular fertilization. Start by incorporating slow-release fertilizer into the soil at planting time. Then, supplement with liquid fertilizer every 2-3 weeks throughout the growing season. Use a balanced fertilizer with an NPK ratio of 10-10-10 or 20-20-20. You can also use organic fertilizers like compost tea or fish emulsion. Avoid over-fertilizing, as this can lead to excessive foliage growth and reduced fruit production.
Q: What do I do if my patio summer squash plant is not producing fruit?
A: There are several reasons why your summer squash plant may not be producing fruit. One common reason is lack of pollination. Summer squash requires pollination to set fruit. If you are not seeing bees or other pollinators in your garden, you may need to hand-pollinate the flowers. Another reason could be insufficient sunlight, water, or nutrients. Make sure your plant is receiving at least 6-8 hours of direct sunlight per day, is being watered regularly, and is being fertilized properly. Extreme temperatures can also affect fruit production. If the weather is too hot or too cold, the plant may not be able to set fruit.

Leave a Comment