
Brussels sprouts in planters? Absolutely! I know what you might be thinking: “Brussels sprouts? In a pot? Seriously?” But trust me, this isn’t your grandma’s overcooked, sulfurous side dish we’re talking about. We’re diving into the surprisingly rewarding world of growing your own fresh, delicious Brussels sprouts, right on your patio or balcony!
For centuries, Brussels sprouts have been a staple in European cuisine, with evidence suggesting their cultivation began in Belgium (hence the name!) as far back as the 13th century. They’ve come a long way since then, and modern varieties are far more palatable than their ancestors. But even with improved taste, many people still shy away from buying them at the store. That’s where this DIY guide comes in. Imagine plucking perfectly formed, vibrant green sprouts straight from your own container, knowing exactly where they came from and how they were grown.
This DIY article is your ticket to fresh, homegrown goodness. Growing Brussels sprouts in planters is not only easier than you might think, but it also allows you to control the growing environment, ensuring a healthier, tastier harvest. Plus, it’s a fantastic way to add some vertical interest to your garden space. Ready to ditch the store-bought sprouts and embark on a rewarding gardening adventure? Let’s get started!
Growing Brussels Sprouts in Containers: A Complete DIY Guide
Hey there, fellow gardening enthusiasts! I’m so excited to share my experience with growing Brussels sprouts in containers. It’s totally doable, even if you don’t have a huge garden. I’ve found it to be a rewarding and space-saving way to enjoy these delicious little cabbages. Let’s dive in!
Choosing the Right Container and Soil
Before we even think about seeds, let’s get the foundation right. The container and soil are crucial for healthy Brussels sprouts.
* Container Size: Brussels sprouts need room to grow, both above and below ground. I recommend a container that’s at least 12 inches in diameter and 12 inches deep. A 5-gallon bucket works great, but bigger is always better! Think about a half-barrel planter if you want to grow multiple plants in one container.
* Drainage: This is non-negotiable! Make sure your container has plenty of drainage holes. Brussels sprouts hate sitting in soggy soil. If your container doesn’t have enough holes, drill a few more.
* Material: Plastic, terracotta, or even fabric pots will work. I personally prefer plastic because they retain moisture better, but terracotta looks nicer. Fabric pots are great for air pruning the roots, which encourages healthier growth.
* Soil: Forget garden soil! It’s too heavy and compacts easily in containers. You need a well-draining potting mix. I like to use a mix of:
* 1 part compost (for nutrients)
* 1 part peat moss or coco coir (for moisture retention)
* 1 part perlite or vermiculite (for drainage)
* A handful of slow-release fertilizer
Starting Your Brussels Sprouts
You have two options here: starting from seed or buying seedlings. I’ve done both, and honestly, starting from seed is more rewarding (and cheaper!).
* Starting from Seed:
* Timing: Brussels sprouts need a long growing season (around 100 days), so start your seeds indoors about 6-8 weeks before the last expected frost.
* Sowing: Fill seed trays or small pots with seed-starting mix. Sow seeds about 1/2 inch deep.
* Watering: Keep the soil consistently moist, but not soggy. I use a spray bottle to gently water the seedlings.
* Light: Seedlings need plenty of light. If you don’t have a sunny windowsill, use grow lights. I keep my grow lights on for about 14-16 hours a day.
* Temperature: Aim for a temperature of around 65-75°F (18-24°C).
* Hardening Off: Before transplanting your seedlings outdoors, you need to “harden them off.” This means gradually exposing them to outdoor conditions over a period of about a week. Start by putting them outside for an hour or two each day, gradually increasing the time.
* Buying Seedlings:
* Choosing Seedlings: Look for healthy seedlings with strong stems and green leaves. Avoid seedlings that are yellowed, leggy, or have signs of pests or diseases.
* Timing: Plant seedlings after the last expected frost.
Planting Your Brussels Sprouts
Now for the fun part! Getting those little plants into their new homes.
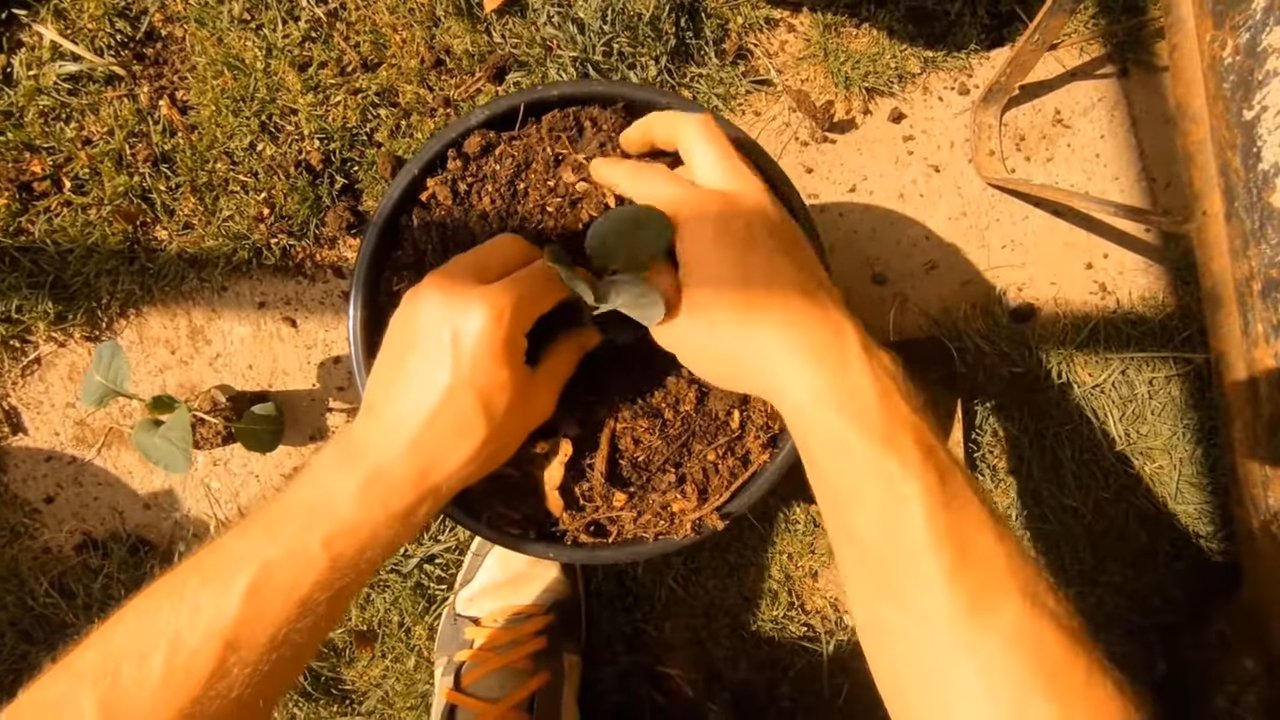
1. Prepare the Container: Fill your chosen container with the potting mix we discussed earlier, leaving a few inches of space at the top.
2. Transplant Seedlings (if applicable): Gently remove the seedlings from their trays or pots. If the roots are tightly bound, gently loosen them.
3. Planting Depth: Plant the seedlings at the same depth they were growing in their original containers.
4. Spacing: If you’re planting multiple Brussels sprouts in one container, space them at least 18 inches apart. This gives them enough room to grow without competing for resources.
5. Water Thoroughly: After planting, water the seedlings thoroughly. This helps settle the soil and encourages root growth.
6. Mulch: Add a layer of mulch around the base of the plants. Mulch helps retain moisture, suppress weeds, and regulate soil temperature. I like to use straw or shredded leaves.
Caring for Your Brussels Sprouts
This is where the real work begins, but don’t worry, it’s not too demanding.
* Watering: Brussels sprouts need consistent moisture, especially during hot weather. Water deeply whenever the top inch of soil feels dry. Avoid overhead watering, as this can lead to fungal diseases.
* Fertilizing: Brussels sprouts are heavy feeders. Fertilize them every 2-3 weeks with a balanced liquid fertilizer. You can also side-dress them with compost or aged manure.
* Sunlight: Brussels sprouts need at least 6 hours of sunlight per day. Place your containers in a sunny location.
* Pest Control: Keep an eye out for pests like aphids, cabbage worms, and flea beetles. I like to use organic pest control methods, such as insecticidal soap or neem oil. You can also handpick pests off the plants.
Hey there, fellow gardening enthusiasts! I’m so excited to share my experience with growing Brussels sprouts in containers. It’s totally doable, even if you don’t have a huge garden. I’ve found it to be a rewarding and space-saving way to enjoy these delicious little cabbages. Let’s dive in!
Choosing the Right Container and Soil
Before we even think about seeds, let’s get the foundation right. The container and soil are crucial for healthy Brussels sprouts.
* Container Size: Brussels sprouts need room to grow, both above and below ground. I recommend a container that’s at least 12 inches in diameter and 12 inches deep. A 5-gallon bucket works great, but bigger is always better! Think about a half-barrel planter if you want to grow multiple plants in one container.
* Drainage: This is non-negotiable! Make sure your container has plenty of drainage holes. Brussels sprouts hate sitting in soggy soil. If your container doesn’t have enough holes, drill a few more.
* Material: Plastic, terracotta, or even fabric pots will work. I personally prefer plastic because they retain moisture better, but terracotta looks nicer. Fabric pots are great for air pruning the roots, which encourages healthier growth.
* Soil: Forget garden soil! It’s too heavy and compacts easily in containers. You need a well-draining potting mix. I like to use a mix of:
* 1 part compost (for nutrients)
* 1 part peat moss or coco coir (for moisture retention)
* 1 part perlite or vermiculite (for drainage)
* A handful of slow-release fertilizer
Starting Your Brussels Sprouts
You have two options here: starting from seed or buying seedlings. I’ve done both, and honestly, starting from seed is more rewarding (and cheaper!).
* Starting from Seed:
* Timing: Brussels sprouts need a long growing season (around 100 days), so start your seeds indoors about 6-8 weeks before the last expected frost.
* Sowing: Fill seed trays or small pots with seed-starting mix. Sow seeds about 1/2 inch deep.
* Watering: Keep the soil consistently moist, but not soggy. I use a spray bottle to gently water the seedlings.
* Light: Seedlings need plenty of light. If you don’t have a sunny windowsill, use grow lights. I keep my grow lights on for about 14-16 hours a day.
* Temperature: Aim for a temperature of around 65-75°F (18-24°C).
* Hardening Off: Before transplanting your seedlings outdoors, you need to “harden them off.” This means gradually exposing them to outdoor conditions over a period of about a week. Start by putting them outside for an hour or two each day, gradually increasing the time.
* Buying Seedlings:
* Choosing Seedlings: Look for healthy seedlings with strong stems and green leaves. Avoid seedlings that are yellowed, leggy, or have signs of pests or diseases.
* Timing: Plant seedlings after the last expected frost.
Planting Your Brussels Sprouts
Now for the fun part! Getting those little plants into their new homes.
1. Prepare the Container: Fill your chosen container with the potting mix we discussed earlier, leaving a few inches of space at the top.
2. Transplant Seedlings (if applicable): Gently remove the seedlings from their trays or pots. If the roots are tightly bound, gently loosen them.
3. Planting Depth: Plant the seedlings at the same depth they were growing in their original containers.
4. Spacing: If you’re planting multiple Brussels sprouts in one container, space them at least 18 inches apart. This gives them enough room to grow without competing for resources.
5. Water Thoroughly: After planting, water the seedlings thoroughly. This helps settle the soil and encourages root growth.
6. Mulch: Add a layer of mulch around the base of the plants. Mulch helps retain moisture, suppress weeds, and regulate soil temperature. I like to use straw or shredded leaves.
Caring for Your Brussels Sprouts
This is where the real work begins, but don’t worry, it’s not too demanding.
* Watering: Brussels sprouts need consistent moisture, especially during hot weather. Water deeply whenever the top inch of soil feels dry. Avoid overhead watering, as this can lead to fungal diseases.
* Fertilizing: Brussels sprouts are heavy feeders. Fertilize them every 2-3 weeks with a balanced liquid fertilizer. You can also side-dress them with compost or aged manure.
* Sunlight: Brussels sprouts need at least 6 hours of sunlight per day. Place your containers in a sunny location.
* Pest Control: Keep an eye out for pests like aphids, cabbage worms, and flea beetles. I like to use organic pest control methods, such as insecticidal soap or neem oil. You can also handpick pests off the plants.
* Supporting the Plants: As your Brussels sprouts grow, they may become top-heavy. You may need to stake them to prevent them from falling over. I use bamboo stakes and garden twine.
* Removing Yellowing Leaves: As the plant grows taller, the lower leaves will naturally yellow and die off. Remove these leaves to improve air circulation and prevent disease.
Harvesting Your Brussels Sprouts
The moment we’ve all been waiting for! Harvesting those delicious little sprouts.
* Timing: Brussels sprouts are typically ready to harvest in the fall or early winter, after a few light frosts. Frost actually improves their flavor!
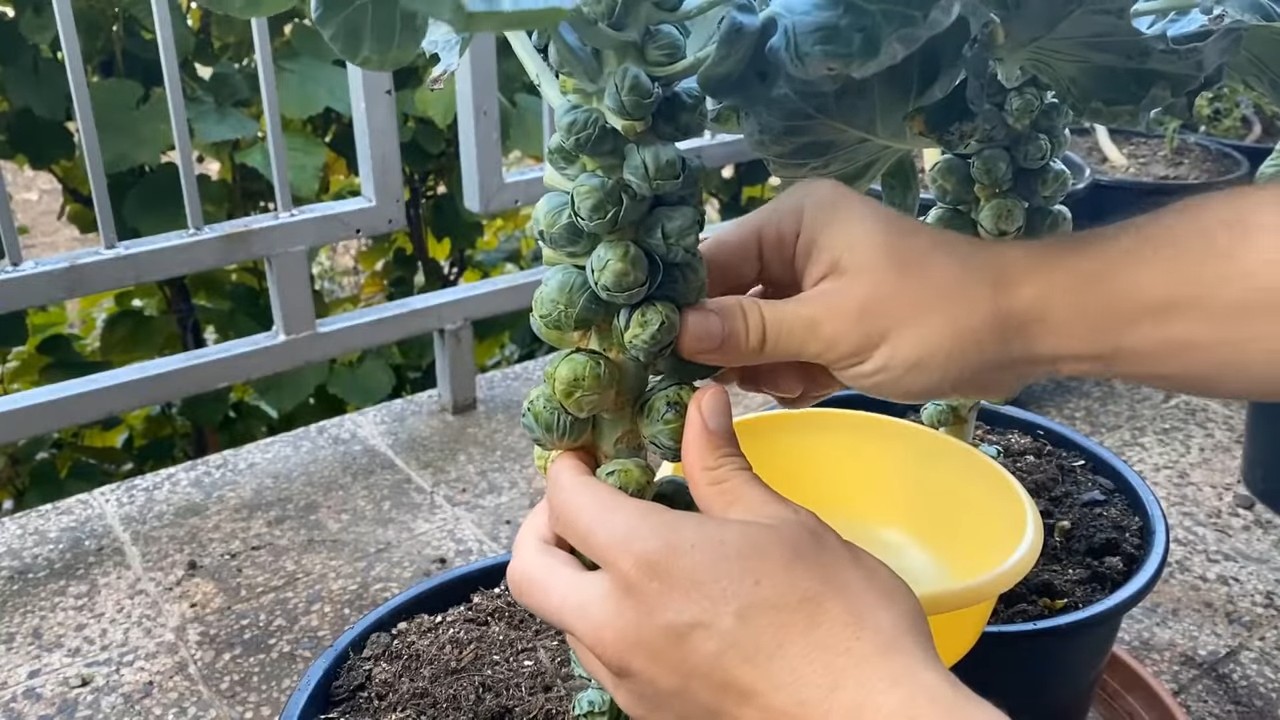
* Harvesting Technique: Start harvesting from the bottom of the plant, working your way up. The sprouts should be firm and tightly closed. Twist them off the stem.
* Continued Harvesting: You can continue harvesting Brussels sprouts for several weeks, as the sprouts mature at different rates.
* Storing: Store harvested Brussels sprouts in the refrigerator for up to a week.
Troubleshooting
Even with the best care, you might encounter some problems. Here are a few common issues and how to deal with them:
* Yellowing Leaves: This could be caused by overwatering, underwatering, nutrient deficiencies, or pests. Check the soil moisture, fertilize the plants, and inspect for pests.
* Sprouts Not Forming: This could be caused by insufficient sunlight, poor soil, or lack of fertilizer. Make sure your plants are getting enough sunlight, amend the soil with compost, and fertilize regularly.
* Pest Infestations: Use organic pest control methods to get rid of pests.
* Diseases: Prevent diseases by providing good air circulation, avoiding overhead watering, and using disease-resistant varieties.
Choosing the Right Variety
Not all Brussels sprouts are created equal! Here are a few varieties that I’ve had success with in containers:
* ‘Long Island Improved’: A classic variety that produces small, tightly packed sprouts.
* ‘Jade Cross’: A hybrid variety that is resistant to disease and produces uniform sprouts.
* ‘Redarling’: A beautiful red-purple variety that adds a pop of color to your garden.
* ‘Roodnerf’: Another red variety, known for its nutty flavor.
* ‘Divino F1’: A very early variety, great for shorter growing seasons.
Extra Tips for Success
Here are a few extra tips that I’ve learned along the way:
* Rotate Your Crops: Don’t plant Brussels sprouts in the same container year after year. This can deplete the soil and increase the risk of disease.
* Companion Planting: Plant Brussels sprouts with companion plants like marigolds, nasturtiums, or thyme to deter pests.
* Water in the Morning: Water your plants in the morning so that the foliage has time to dry before nightfall. This helps prevent fungal diseases.
* Check for Pests Regularly: The sooner you catch a pest infestation, the easier it will be to control.
* Don’t Give Up! Gardening can be challenging, but it’s also incredibly rewarding. Don’t be discouraged if you encounter problems. Just keep learning and experimenting.
Enjoying Your Homegrown Brussels Sprouts
There’s nothing quite like the taste of homegrown Brussels sprouts. They’re so much fresher and more flavorful than store-bought ones. I love to roast them with olive oil, salt, and pepper. You can also shred them and add them to salads, or sauté them with bacon and onions. The possibilities are endless!
Growing Brussels sprouts in containers is a fun and rewarding project that anyone can do. With a little bit of planning and care, you can enjoy a
Conclusion
So, there you have it! Transforming your garden (or even your balcony!) into a Brussels sprout haven with this simple DIY planter trick is not just a fun project; it’s a gateway to fresher, tastier, and more rewarding meals. We’ve walked you through the process, highlighting the ease and accessibility of growing your own Brussels sprouts in planters. Forget those bland, often bitter, store-bought sprouts. Imagine the satisfaction of harvesting your own perfectly formed, vibrant green orbs, knowing exactly where they came from and how they were grown.
This method isn’t just about convenience; it’s about control. You dictate the soil quality, the watering schedule, and the sun exposure, ensuring optimal conditions for your Brussels sprouts to thrive. Plus, growing in planters allows you to easily move your plants to chase the sun or protect them from unexpected frost. It’s a flexible and adaptable approach to gardening that’s perfect for both seasoned gardeners and complete beginners.
But the benefits don’t stop there. Growing your own Brussels sprouts in planters is also a fantastic way to reduce your carbon footprint. Think about it: no more transportation from distant farms, no more plastic packaging, and no more reliance on industrial agriculture. You’re contributing to a more sustainable food system, one delicious sprout at a time.
And let’s talk about variations! Feel free to experiment with different planter sizes and materials. Terracotta pots offer excellent drainage, while plastic containers are lightweight and durable. You can even get creative with repurposed items like old buckets or wooden crates. Consider companion planting too! Marigolds can help deter pests, while herbs like rosemary and thyme can add flavor and fragrance to your garden.
Don’t be afraid to tweak the soil mix to suit your specific needs. Adding compost or aged manure will provide extra nutrients, while perlite or vermiculite will improve drainage. And remember to monitor your plants regularly for signs of pests or diseases. Early detection is key to preventing problems and ensuring a bountiful harvest.
This DIY planter trick is more than just a gardening hack; it’s an invitation to connect with nature, to learn about the food we eat, and to experience the joy of growing our own produce. It’s a chance to slow down, to get our hands dirty, and to appreciate the simple pleasures of life.
So, what are you waiting for? Grab a planter, some soil, and some Brussels sprout seedlings, and get started today! We’re confident that you’ll be amazed by the results. And once you’ve harvested your first batch of homegrown Brussels sprouts, be sure to share your experience with us. We’d love to see your photos, hear your stories, and learn from your successes (and even your failures!). Use the hashtag #DIYBrusselsSprouts and tag us on social media. Let’s build a community of sprout-loving gardeners and inspire others to grow their own food.
Remember, the key to successful Brussels sprouts in planters is patience, observation, and a willingness to experiment. Don’t be discouraged if things don’t go perfectly at first. Gardening is a learning process, and every mistake is an opportunity to grow (pun intended!). So, embrace the challenge, have fun, and enjoy the delicious rewards of your labor. Happy planting!
Frequently Asked Questions (FAQ)
What is the ideal size planter for Brussels sprouts?
A good rule of thumb is to use a planter that is at least 12 inches in diameter and 12 inches deep per plant. Brussels sprouts need room for their roots to develop properly. Larger planters (15-18 inches) are even better, especially if you plan on growing multiple plants in the same container. The larger the planter, the more soil volume, which translates to better water retention and nutrient availability for your Brussels sprouts.
What type of soil is best for growing Brussels sprouts in planters?
Brussels sprouts thrive in well-draining, fertile soil with a slightly acidic to neutral pH (around 6.0 to 7.0). A good potting mix specifically formulated for vegetables is a great starting point. You can also amend your own mix by combining equal parts of:
* Garden soil (avoid heavy clay soils)
* Compost (for nutrients and water retention)
* Perlite or vermiculite (for drainage)
Adding a slow-release fertilizer to the soil mix at planting time will provide a steady supply of nutrients throughout the growing season.
How much sunlight do Brussels sprouts need when grown in planters?
Brussels sprouts need at least 6 hours of direct sunlight per day to produce a good harvest. Choose a location for your planters that receives plenty of sunshine. If you live in a particularly hot climate, some afternoon shade may be beneficial to prevent the plants from overheating. If you don’t have a sunny spot, consider using grow lights to supplement the natural sunlight.
How often should I water my Brussels sprouts in planters?
Water your Brussels sprouts regularly, especially during hot, dry weather. The soil should be kept consistently moist, but not waterlogged. Check the soil moisture by sticking your finger about an inch deep. If the soil feels dry, it’s time to water. Water deeply, allowing the water to drain out of the bottom of the planter. Avoid overhead watering, as this can promote fungal diseases.
How do I fertilize Brussels sprouts grown in planters?
Brussels sprouts are heavy feeders, so regular fertilization is essential. In addition to adding slow-release fertilizer at planting time, you should also fertilize your plants every 2-3 weeks with a liquid fertilizer that is high in nitrogen. Fish emulsion or compost tea are excellent organic options. Follow the instructions on the fertilizer label carefully to avoid over-fertilizing, which can burn the roots.
What are some common pests and diseases that affect Brussels sprouts in planters?
Common pests that can affect Brussels sprouts include aphids, cabbage worms, and flea beetles. Inspect your plants regularly for signs of infestation and take action promptly. You can handpick pests off the plants, use insecticidal soap, or apply Bacillus thuringiensis (Bt) for cabbage worms. Common diseases include clubroot and downy mildew. Ensure good air circulation around your plants and avoid overhead watering to prevent these diseases. If you notice signs of disease, remove the affected leaves and treat the plants with a fungicide if necessary.
When should I harvest my Brussels sprouts?
Brussels sprouts are typically ready to harvest in the fall, after they have been exposed to a few light frosts. The sprouts should be firm, green, and about 1-2 inches in diameter. Start harvesting from the bottom of the plant and work your way up. Twist the sprouts off the stem or cut them off with a knife.
Can I grow Brussels sprouts in planters indoors?
While it’s possible to grow Brussels sprouts indoors, it can be challenging. They require a lot of light, so you’ll need to provide supplemental lighting with grow lights. You’ll also need to ensure good air circulation and maintain a consistent temperature. It’s generally easier and more rewarding to grow Brussels sprouts in planters outdoors, where they can receive plenty of sunlight and fresh air.
What are some good companion plants for Brussels sprouts in planters?
Companion planting can help deter pests, attract beneficial insects, and improve the overall health of your Brussels sprouts. Some good companion plants for Brussels sprouts include:
* Marigolds (deter pests)
* Nasturtiums (attract aphids away from Brussels sprouts)
* Rosemary and thyme (deter cabbage moths)
* Dill (attract beneficial insects)
* Garlic and onions (deter pests)
How do I store harvested Brussels sprouts?
Freshly harvested Brussels sprouts can be stored in the refrigerator for up to a week. Place them in a plastic bag or container to prevent them from drying out. You can also freeze Brussels sprouts for longer storage. Blanch them in boiling water for 3-5 minutes, then plunge them into ice water to stop the cooking process. Drain them well and store them in freezer bags or containers.

Leave a Comment