
Ginger Growing Hacks: Unlock the secrets to cultivating your own spicy, aromatic ginger right in your backyard! Have you ever dreamt of snipping off a fresh piece of ginger whenever a recipe calls for it, or brewing a soothing ginger tea with ingredients you’ve nurtured yourself? Well, dream no more! This isn’t just another gardening article; it’s your personal guide to mastering the art of growing ginger at home, regardless of your experience level.
Ginger, with its fiery zest, has a rich history steeped in ancient traditions. For centuries, it’s been revered in Asian cultures not only as a culinary staple but also as a potent medicinal herb. From traditional Chinese medicine to Indian Ayurvedic practices, ginger’s healing properties have been celebrated and utilized for generations. Now, you can tap into this ancient wisdom and bring the benefits of fresh ginger directly to your doorstep.
Why should you embrace these ginger growing hacks? Because store-bought ginger, while convenient, often lacks the vibrant flavor and freshness of homegrown varieties. Plus, growing your own is incredibly rewarding! Imagine the satisfaction of nurturing a plant from rhizome to harvest, knowing exactly where your food comes from and avoiding the pesticides often used in commercial farming. I’m here to show you simple, effective techniques that will transform your garden (or even your windowsill!) into a thriving ginger patch. Let’s get started and unlock the secrets to a bountiful ginger harvest!
Grow Your Own Ginger: A Beginner’s Guide to a Bountiful Harvest
Hey there, fellow gardening enthusiasts! Ever dreamt of having fresh, flavorful ginger right at your fingertips? Well, dream no more! Growing your own ginger is surprisingly easy and incredibly rewarding. I’m going to walk you through everything you need to know, from selecting the perfect ginger root to harvesting your very own spicy treasure. Let’s get our hands dirty!
Choosing and Preparing Your Ginger Rhizome
The key to a successful ginger harvest starts with selecting the right rhizome (that’s the “root” part we eat). Here’s what to look for:
* Look for plump, healthy rhizomes: Avoid anything shriveled, dry, or moldy. You want a rhizome that looks vibrant and full of life.
* Choose rhizomes with visible “eyes”: These are the little buds that will sprout into new ginger plants. The more eyes, the better!
* Opt for organic ginger: Non-organic ginger may be treated with growth inhibitors, which can prevent sprouting. I always prefer organic for the best results.
* Soaking the Rhizome (Optional but Recommended): Soaking the rhizome in water overnight can help rehydrate it and encourage sprouting. I find this gives it a little head start.
Step-by-Step Planting Guide
Now that you have your ginger rhizome ready, let’s get it planted!
1. Prepare Your Pot: Choose a wide, shallow pot (at least 12 inches wide and 6-8 inches deep). Ginger roots grow horizontally, so width is more important than depth. Make sure your pot has drainage holes to prevent waterlogging. I like to use terracotta pots because they allow the soil to breathe.
2. Choose the Right Soil: Ginger thrives in well-draining, nutrient-rich soil. A mix of potting soil, compost, and perlite is ideal. I usually go for a ratio of 2 parts potting soil, 1 part compost, and 1 part perlite. The perlite helps with drainage, which is crucial.
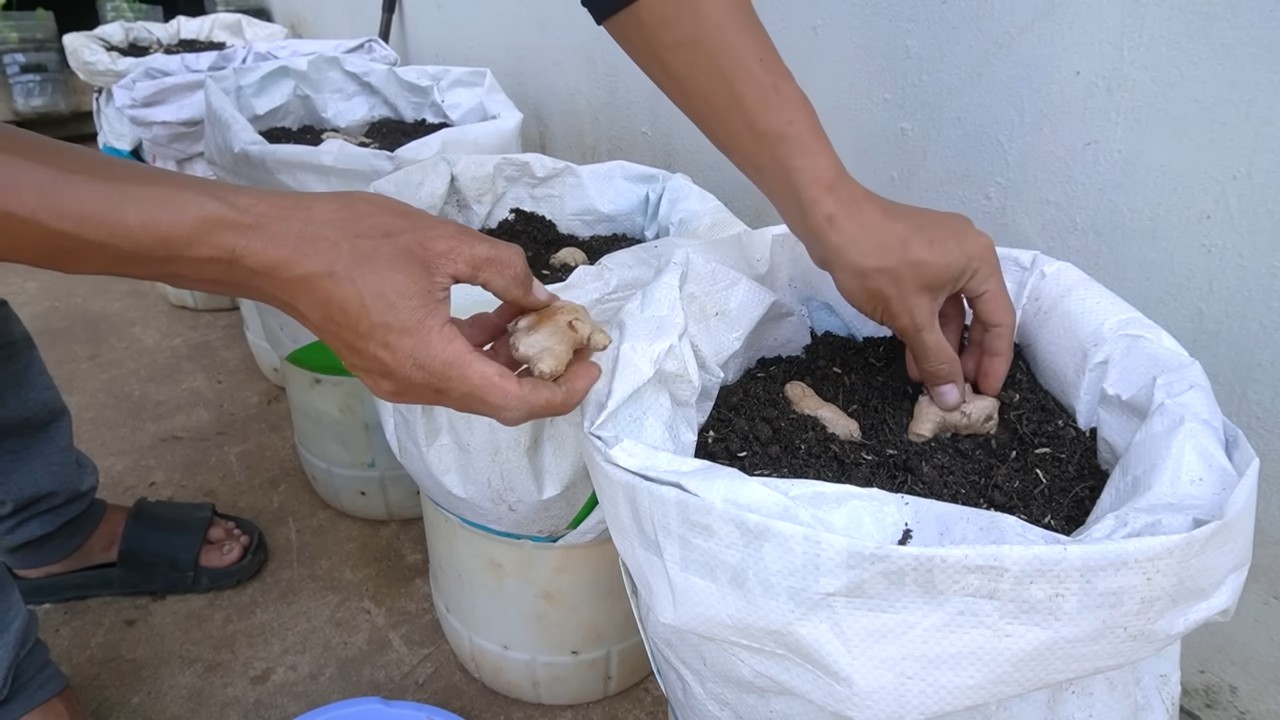
3. Planting the Rhizome: Fill your pot with the soil mixture, leaving about an inch of space at the top. Place the ginger rhizome horizontally on top of the soil, with the “eyes” facing upwards. Cover the rhizome with about 1-2 inches of soil.
4. Watering: Water the soil thoroughly after planting, making sure the water drains out of the bottom of the pot. Keep the soil consistently moist, but not soggy. I usually water every 2-3 days, depending on the weather. Stick your finger into the soil to check the moisture level – if it feels dry, it’s time to water.
5. Location, Location, Location: Ginger loves warmth and humidity. Place your pot in a warm, sunny location that receives bright, indirect sunlight. Avoid direct sunlight, which can scorch the leaves. A spot near a window that gets morning sun is perfect.
6. Patience is Key: It can take several weeks for the ginger to sprout, so don’t get discouraged if you don’t see anything happening right away. Just keep the soil moist and be patient. I know it’s hard, but trust me, it’s worth the wait!
Caring for Your Ginger Plant
Once your ginger plant starts to grow, here’s how to keep it happy and healthy:
* Watering: Continue to water regularly, keeping the soil consistently moist. Avoid overwatering, which can lead to root rot.
* Fertilizing: Ginger is a heavy feeder, so fertilize it every 2-3 weeks with a balanced liquid fertilizer. I like to use a fertilizer that’s specifically formulated for vegetables.
* Humidity: Ginger loves humidity, so if you live in a dry climate, you may need to increase the humidity around your plant. You can do this by misting the leaves regularly, placing a tray of water near the plant, or using a humidifier.
* Pest Control: Keep an eye out for pests like aphids and spider mites. If you see any pests, treat them with insecticidal soap or neem oil. I prefer neem oil because it’s a natural and effective pest control solution.
* Repotting (If Necessary): If your ginger plant outgrows its pot, you may need to repot it into a larger container. Choose a pot that’s at least 2 inches wider than the current pot.
Harvesting Your Ginger
The best part about growing your own ginger is, of course, the harvest!
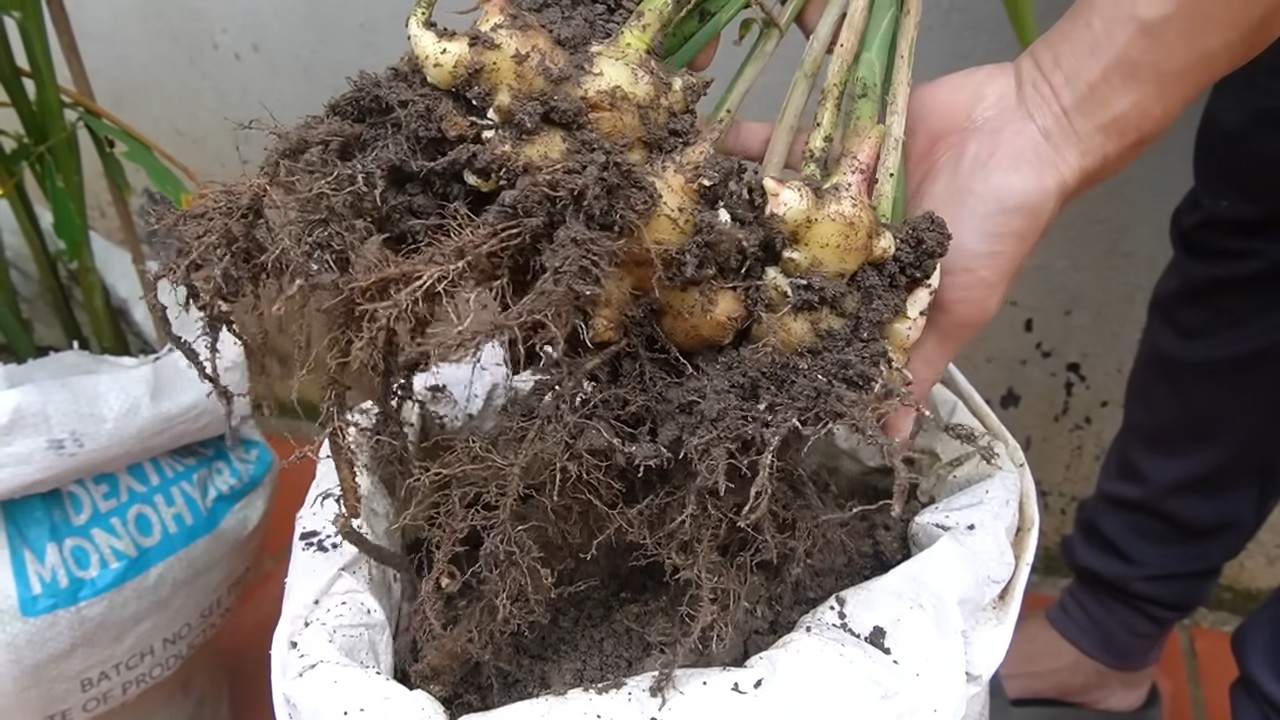
* When to Harvest: You can start harvesting ginger about 8-10 months after planting. The leaves will start to turn yellow and die back when the ginger is ready to harvest.
* How to Harvest: Gently dig around the base of the plant and lift the rhizomes out of the soil. You can harvest the entire plant at once, or you can harvest individual rhizomes as needed. I usually harvest a few rhizomes at a time, leaving the rest of the plant to continue growing.
* Storing Your Ginger: Freshly harvested ginger can be stored in the refrigerator for several weeks. Wrap it in a paper towel and place it in a plastic bag. You can also freeze ginger for longer storage. To freeze ginger, peel it and chop it into small pieces. Place the pieces in a freezer bag and freeze.
Troubleshooting Common Problems
Even with the best care, you may encounter some problems when growing ginger. Here are some common issues and how to fix them:
* Yellowing Leaves: Yellowing leaves can be caused by overwatering, underwatering, nutrient deficiencies, or pests. Check the soil moisture level and adjust your watering accordingly. Fertilize the plant if it’s lacking nutrients. Inspect the leaves for pests and treat them if necessary.
* Root Rot: Root rot is caused by overwatering and poor drainage. Make sure your pot has drainage holes and that the soil is well-draining. Avoid overwatering the plant. If you suspect root rot, repot the plant in fresh soil.
* Lack of Sprouting: If your ginger rhizome doesn’t sprout, it may be too old, treated with growth inhibitors, or not getting enough warmth and moisture. Try soaking the rhizome in water overnight before planting. Make sure the soil is consistently moist and that the plant is in a warm location.
* Pests: Pests like aphids and spider mites can damage ginger plants. Treat them with insecticidal soap or neem oil.
Tips and Tricks for a Supercharged Ginger Harvest
Want to take your ginger growing game to the next level? Here are some extra tips and tricks I’ve learned along the way:
* Start with a Large Rhizome: The bigger the rhizome you start with, the more ginger you’ll harvest.
* Use a Heat Mat: If you live in a cold climate, use a heat mat to warm the soil and encourage sprouting.
* Provide Extra Humidity: Ginger loves humidity, so consider growing it in a greenhouse or using a humidifier.
* Rotate Your Crop: Don’t plant ginger in the same spot year after year. Rotate your crops to prevent soilborne diseases.
* Experiment with Different Varieties: There are many different varieties of ginger, each with its own unique flavor and aroma. Experiment with different varieties to find your favorite.
* Ginger Tea: Don’t throw away the ginger leaves! You can use them to make a delicious and refreshing ginger tea.
Growing Ginger in Different Climates
Ginger is a tropical plant, but it can be grown in a variety of climates with a little extra care.
* Warm Climates: In warm climates, ginger can be grown outdoors year-round. Choose a location that receives bright, indirect sunlight and has well-draining soil.
* Temperate Climates: In temperate climates, ginger can be grown outdoors during the summer months and brought indoors during the winter. Plant the ginger in a pot so that it can be easily moved indoors.
* Cold Climates: In cold climates, ginger can be grown indoors year-round. Provide plenty of warmth, humidity, and light.
Ginger Varieties to Consider
While the ginger you find at the grocery store is usually just labeled “ginger,” there are actually many different varieties, each with slightly different flavors and characteristics. Here are a few to consider:
* Common Ginger (Zingiber officinale): This is the most common type of ginger, and the one you’ll typically find in grocery stores. It has a spicy, pungent flavor.
* Galangal (Alpinia galanga): Also known as Thai ginger, galangal has a citrusy, earthy flavor. It’s often used in Southeast Asian cuisine.
* Turmeric (Curcuma longa): While technically a different plant, turmeric is in the same family as ginger and has similar growing requirements. It has a warm, slightly bitter flavor and is known for its vibrant yellow color.
* Myoga Ginger (Zingiber mioga):
Conclusion
So, there you have it! Mastering these ginger growing hacks isn’t just about saving money; it’s about connecting with nature, understanding the life cycle of a plant, and enjoying the unparalleled flavor of freshly harvested ginger. Imagine the satisfaction of adding your own homegrown ginger to your favorite stir-fries, teas, or even baked goods. The vibrant, spicy kick will be noticeably fresher and more intense than anything you can buy at the store.
This isn’t a complicated process, but it does require a little patience and attention. Remember, the key to success lies in providing the right environment: warmth, moisture, and well-draining soil. Don’t be afraid to experiment with different varieties of ginger too! Some gardeners swear by growing the common ginger found in grocery stores, while others prefer to seek out specific cultivars known for their flavor profiles or growth habits.
Consider these variations to personalize your ginger growing experience:
* **Container Gardening:** If you’re short on space or live in a colder climate, growing ginger in containers is an excellent option. This allows you to easily move your plants indoors during the winter months. Choose a large pot with drainage holes and use a high-quality potting mix.
* **Hydroponics:** For the more adventurous gardener, hydroponic ginger growing is a fascinating alternative. This method involves growing ginger in nutrient-rich water without soil. It can be a bit more technical, but the results can be impressive.
* **Companion Planting:** Enhance your ginger’s growth by planting it alongside beneficial companion plants. Marigolds, for example, can help deter nematodes, while basil can repel certain pests.
* Ginger Tea Garden: Create a dedicated space for growing ginger specifically for tea. Experiment with adding other herbs like mint or lemon balm to create your own unique tea blends.
Ultimately, the best way to learn is by doing. Don’t be discouraged if your first attempt isn’t perfect. Every gardener faces challenges, and each experience is a learning opportunity. The reward of harvesting your own fresh ginger is well worth the effort.
We’re confident that these ginger growing hacks will empower you to cultivate your own thriving ginger patch, no matter your experience level. So, grab a ginger rhizome, follow our tips, and get ready to enjoy the delicious rewards of your labor.
We’d love to hear about your experiences! Share your successes, challenges, and any variations you try in the comments below. Let’s create a community of ginger-growing enthusiasts and learn from each other. Happy growing!
FAQ
Frequently Asked Questions About Growing Ginger
Q: What kind of ginger should I plant? Can I just use the ginger from the grocery store?
A: Yes, you can absolutely use ginger from the grocery store! Look for rhizomes that are plump, firm, and have visible “eyes” (small buds). Organic ginger is often recommended, as it’s less likely to have been treated with growth inhibitors. However, regular ginger can work just fine. If possible, soak the rhizome in water overnight before planting to rehydrate it. You can also source specific ginger cultivars online or from nurseries for potentially different flavors and growth characteristics.
Q: How long does it take to grow ginger?
A: Ginger typically takes around 8-10 months to mature. You can start harvesting small pieces of ginger after about 4 months, but the rhizomes will be smaller and less potent. For a full harvest, wait until the leaves start to turn yellow and die back, usually in the fall.
Q: What kind of soil is best for growing ginger?
A: Ginger thrives in well-draining, fertile soil that is rich in organic matter. A slightly acidic pH (around 6.0-6.5) is ideal. Amend your soil with compost, well-rotted manure, or other organic materials to improve drainage and fertility. Avoid heavy clay soils, as they can become waterlogged and lead to root rot.
Q: How much sunlight does ginger need?
A: Ginger prefers partial shade, especially in hot climates. Direct sunlight can scorch the leaves. Aim for about 2-5 hours of filtered sunlight per day. If you’re growing ginger indoors, place it near a bright window but shield it from intense afternoon sun.
Q: How often should I water my ginger plant?
A: Ginger needs consistent moisture, but it’s crucial to avoid overwatering. Water thoroughly when the top inch of soil feels dry to the touch. During the growing season (spring and summer), you may need to water more frequently. Reduce watering in the fall and winter when the plant is dormant. Ensure your pot has good drainage to prevent water from pooling around the roots.
Q: What are some common problems when growing ginger, and how can I prevent them?
A: The most common problems include root rot (due to overwatering), pests (like aphids and spider mites), and fungal diseases. To prevent root rot, ensure your soil is well-draining and avoid overwatering. Regularly inspect your plants for pests and treat them with insecticidal soap or neem oil if necessary. Good air circulation can help prevent fungal diseases.
Q: Can I grow ginger indoors?
A: Yes, ginger can be successfully grown indoors, especially in colder climates. Choose a large pot with drainage holes and use a well-draining potting mix. Place the pot near a bright window but shield it from direct sunlight. Maintain consistent moisture and humidity. You may need to supplement with artificial light if your indoor space is not bright enough.
Q: How do I harvest ginger?
A: To harvest ginger, gently dig around the plant and lift the rhizomes from the soil. You can harvest the entire plant at once or selectively harvest pieces as needed. If you only need a small amount of ginger, carefully cut off a piece of the rhizome and replant the remaining portion.
Q: How do I store ginger after harvesting?
A: Freshly harvested ginger can be stored in the refrigerator for several weeks. Wrap it in a paper towel and place it in a plastic bag. You can also freeze ginger for longer storage. Peel and chop the ginger into small pieces or grate it before freezing. Alternatively, you can pickle ginger in vinegar or brine.
Q: My ginger plant isn’t growing very well. What could be the problem?
A: Several factors could be contributing to poor growth. Check the following:
* **Soil:** Is it well-draining and fertile?
* **Watering:** Are you watering too much or too little?
* **Sunlight:** Is the plant getting enough light, but not too much direct sun?
* **Nutrients:** Is the plant getting enough nutrients? Consider fertilizing with a balanced organic fertilizer.
* **Pests or Diseases:** Are there any signs of pests or diseases?
Addressing these factors can often help improve your ginger plant’s growth.
Q: Can I grow ginger from old, dried-out ginger?
A: While it’s best to use fresh, plump ginger rhizomes with visible eyes, you can sometimes revive older, slightly dried-out ginger. Soak the rhizome in water for 24-48 hours to rehydrate it. If you see any signs of sprouting, plant it as usual. However, be aware that the success rate may be lower compared to using fresh ginger.
Q: Is there a specific time of year that is best to plant ginger?
A: The best time to plant ginger is in the early spring, after the last frost. This allows the plant to take advantage of the warm growing season. If you live in a colder climate, you can start ginger indoors a few weeks before the last frost and transplant it outdoors once the weather warms up.


Leave a Comment